technical SKODA ROOMSTER 2014 1.G User Guide
[x] Cancel search | Manufacturer: SKODA, Model Year: 2014, Model line: ROOMSTER, Model: SKODA ROOMSTER 2014 1.GPages: 204, PDF Size: 14.15 MB
Page 122 of 204
Assist systems
Brake assist systems
Introduction
This chapter contains information on the following subjects:
Electronic Stability Control (ESC)
119
Antilock Braking System (ABS)
120
Traction Control System (ASR)
120
Electronic Differential Lock (EDL)
120WARNING■ A lack of fuel can cause irregular engine running or cause the engine to
shut down. The brake assist systems would then fail to function – risk of
accident!■
Adjust the speed and driving style to the current visibility, weather, road
and traffic conditions. The increased safety provided by the brake assist
systems must not tempt you to take safety risks – risk of accident!
■
In the event of an ABS fault, visit a specialist garage immediately. Adjust
your style of driving according to the damage to the ABS, as you will not
know the exact extent of the damage or the extent to which this is limiting the braking efficiency.
CAUTION
■ All four wheels must be fitted with the same tyres approved by the manufac-
turer to ensure the brake assist systems operate correctly.■
Changes to the vehicle (e.g. to the engine, brakes, chassis) can influence the
functionality of the brake assist systems » page 132, Services, modifications
and technical alterations .
■
If a fault occurs in the ABS system, the ESC, TCS and EDL will also fail to
work. An ABS fault is indicated with the warning light
» page 42 .
Electronic Stability Control (ESC)
Read and observe
and on page 119 first.
The ESC system helps to maintain control of the vehicle in situations where it
is being operated at its dynamic limits, such as a sudden change in the direc-
tion of travel. Depending on the road surface conditions, the risk of skidding is
reduced, thereby improving the vehicle's driving stability .
The ESC system is automatically activated each time the ignition is switched
on.
The direction which the driver wishes to take is determined based on the
steering angle and the speed of the vehicle and is constantly compared with
the actual behaviour of the vehicle. In the event of deviations occurring, such
as the car beginning to skid, the ESC system will automatically brake the ap-
propriate wheel.
During an intervention of the system, the warning light
flashes in the instru-
ment cluster.
The following systems are integrated into the electronic stabilisation control
(ESC) :
› Antilock brake system (ABS),
› Traction control (TCS),
› Electronic Differential Lock (EDL)
› Hydraulic Brake Assist (HBA)
› Hill Hold Control (HHC).
The ESC system cannot be deactivated. The
» Fig. 117 on page 120 button
can only be used to deactivate the TCS. The warning light comes on in the
instrument cluster when the TCS is deactivated.
In the event of an ESC fault, the ESC warning light illuminates in the instru-
ment cluster
» page 42 .
Hydraulic Brake Assist (HBA)
HBA increases the braking effect and helps to shorten the braking distance.
The HBA is activated by very quick operation of the brake pedal. In order to
achieve the shortest possible braking distance, the brake pedal must be ap-
plied firmly until the vehicle has come to a standstill.
The HBA function is automatically switched off when the brake pedal is re-
leased.
The ABS is activated faster and more effectively with the intervention of the
HBA.
Hill Hold Control (HHC)
When driving on slopes, HHC allows you to move your foot from the brake ped-
al to the accelerator pedal without having to use the handbrake.
The system holds the brake pressure produced by the activation of the brake
pedal for approx. 2 seconds after the brake pedal is released. 119Assist systems
Page 132 of 204
WARNING■Never allow the ball head to remain unsecured in the boot. This could
cause damage to the boot upon sudden braking, and could put the safety
of the occupants at risk.■
Never remove the tow bar while the trailer is still coupled.
CAUTION
■ If the lever is held firmly and not pushed downwards as far as it can go, it will
go back up after the ball head is removed and will not latch into the ready po-
sition. The ball head then needs to be brought into this position before the
next time it is fitted » page 127, Adjusting the ready position .■
Tuck the ball bar in the ready position, with the golden key up, in the box -
otherwise there is a risk of damage to the key!
■
Do not use excessive force when handling the operating lever (e.g. do not
step on it).
Note
■ We recommend that you put the protective cap on the ball before removing
the ball head.■
Clean any dirt from the ball head before stowing it away in the box with the
vehicle tool kit.
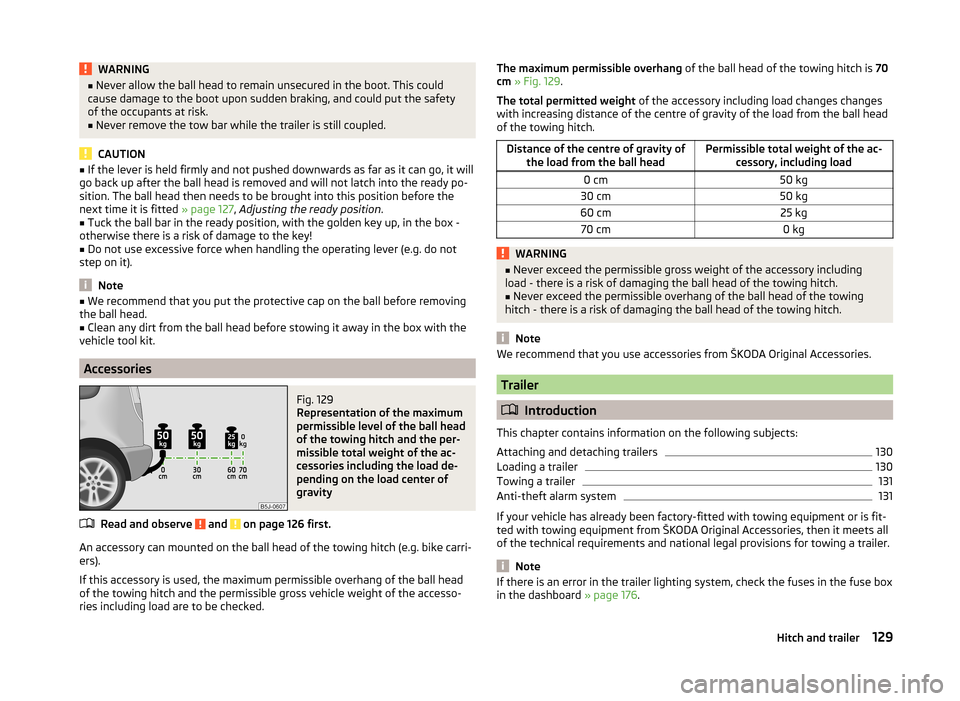
Accessories
Fig. 129
Representation of the maximum
permissible level of the ball head
of the towing hitch and the per-
missible total weight of the ac-
cessories including the load de-
pending on the load center of
gravity
Read and observe and on page 126 first.
An accessory can mounted on the ball head of the towing hitch (e.g. bike carri- ers).
If this accessory is used, the maximum permissible overhang of the ball head
of the towing hitch and the permissible gross vehicle weight of the accesso-
ries including load are to be checked.
The maximum permissible overhang of the ball head of the towing hitch is 70
cm » Fig. 129 .
The total permitted weight of the accessory including load changes changes
with increasing distance of the centre of gravity of the load from the ball head
of the towing hitch.Distance of the centre of gravity of the load from the ball headPermissible total weight of the ac- cessory, including load0 cm50 kg30 cm50 kg60 cm25 kg70 cm0 kgWARNING■Never exceed the permissible gross weight of the accessory including
load - there is a risk of damaging the ball head of the towing hitch.■
Never exceed the permissible overhang of the ball head of the towing
hitch - there is a risk of damaging the ball head of the towing hitch.
Note
We recommend that you use accessories from ŠKODA Original Accessories.
Trailer
Introduction
This chapter contains information on the following subjects:
Attaching and detaching trailers
130
Loading a trailer
130
Towing a trailer
131
Anti-theft alarm system
131
If your vehicle has already been factory-fitted with towing equipment or is fit-
ted with towing equipment from ŠKODA Original Accessories, then it meets all
of the technical requirements and national legal provisions for towing a trailer.
Note
If there is an error in the trailer lighting system, check the fuses in the fuse box
in the dashboard » page 176.129Hitch and trailer
Page 133 of 204
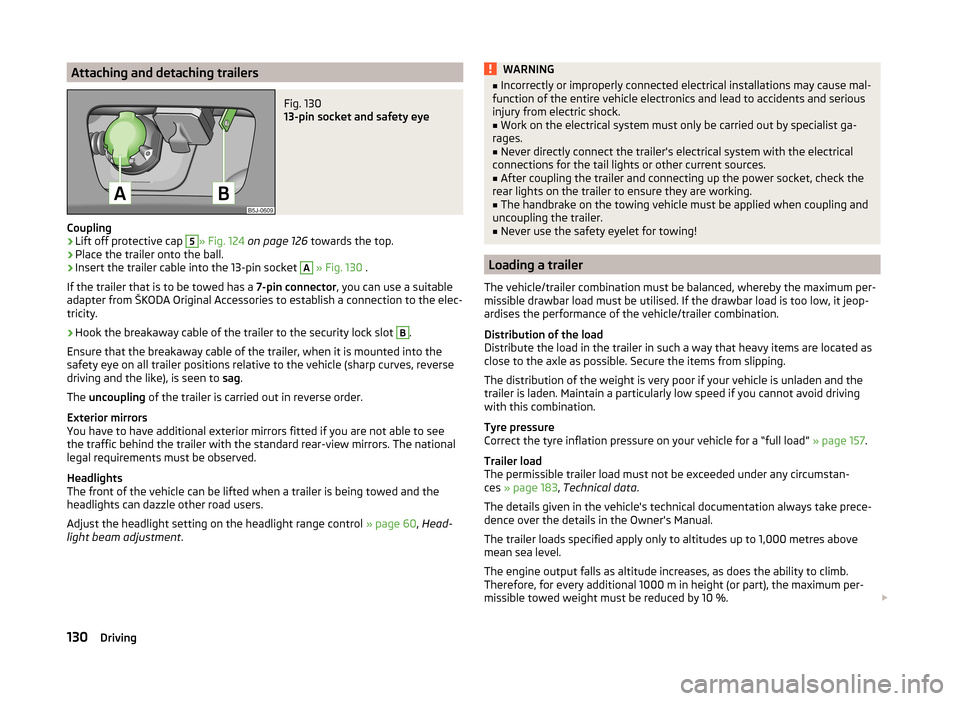
Attaching and detaching trailersFig. 130
13-pin socket and safety eye
Coupling
›
Lift off protective cap
5
» Fig. 124 on page 126 towards the top.
›
Place the trailer onto the ball.
›
Insert the trailer cable into the 13-pin socket
A
» Fig. 130 .
If the trailer that is to be towed has a 7-pin connector, you can use a suitable
adapter from ŠKODA Original Accessories to establish a connection to the elec-
tricity.
›
Hook the breakaway cable of the trailer to the security lock slot
B
.
Ensure that the breakaway cable of the trailer, when it is mounted into the
safety eye on all trailer positions relative to the vehicle (sharp curves, reverse
driving and the like), is seen to sag.
The uncoupling of the trailer is carried out in reverse order.
Exterior mirrors
You have to have additional exterior mirrors fitted if you are not able to see
the traffic behind the trailer with the standard rear-view mirrors. The national
legal requirements must be observed.
Headlights
The front of the vehicle can be lifted when a trailer is being towed and the
headlights can dazzle other road users.
Adjust the headlight setting on the headlight range control » page 60, Head-
light beam adjustment .
WARNING■
Incorrectly or improperly connected electrical installations may cause mal-
function of the entire vehicle electronics and lead to accidents and serious
injury from electric shock.■
Work on the electrical system must only be carried out by specialist ga-
rages.
■
Never directly connect the trailer's electrical system with the electrical
connections for the tail lights or other current sources.
■
After coupling the trailer and connecting up the power socket, check the
rear lights on the trailer to ensure they are working.
■
The handbrake on the towing vehicle must be applied when coupling and
uncoupling the trailer.
■
Never use the safety eyelet for towing!
Loading a trailer
The vehicle/trailer combination must be balanced, whereby the maximum per-
missible drawbar load must be utilised. If the drawbar load is too low, it jeop-
ardises the performance of the vehicle/trailer combination.
Distribution of the load
Distribute the load in the trailer in such a way that heavy items are located as
close to the axle as possible. Secure the items from slipping.
The distribution of the weight is very poor if your vehicle is unladen and the
trailer is laden. Maintain a particularly low speed if you cannot avoid driving
with this combination.
Tyre pressure
Correct the tyre inflation pressure on your vehicle for a “full load” » page 157.
Trailer load
The permissible trailer load must not be exceeded under any circumstan-
ces » page 183 , Technical data .
The details given in the vehicle's technical documentation always take prece-
dence over the details in the Owner's Manual.
The trailer loads specified apply only to altitudes up to 1,000 metres above
mean sea level.
The engine output falls as altitude increases, as does the ability to climb.
Therefore, for every additional 1000 m in height (or part), the maximum per-
missible towed weight must be reduced by 10 %.
130Driving
Page 134 of 204
The towed weight comprises the actual weights of the (loaded) towing vehicle
and the (loaded) trailer.
The trailer and drawbar load information on the type plate of the towing
equipment are merely test data for the towing equipment. The vehicle-specific
values are detailed in the vehicle documents.WARNING■ The maximum permissible axle and drawbar load and the permissible
weight of the trailer must not exceed - this could cause an accident!■
A sliding cargo can significantly adversely affect stability and driving safe-
ty - there is a risk of accident!
Towing a trailer
Driving speed
For safety reasons, do not drive faster than 80 km/h when towing a trailer.
Immediately reduce your speed as soon as even the slightest swaying of the
trailer is detected. Never attempt to stop the trailer from “swaying” by acceler-
ating.
Brakes
Apply the brakes in good time! If the trailer is fitted with a trailer brake, apply
the brakes gently at first, then brake firmly. This will avoid brake jolts resulting
from the trailer wheels locking.
On downhill sections shift down a gear in good time to also use the engine as
a brake.
Engine overheating
The speed must be reduced immediately if the needle for the coolant tempera-
ture gauge moves into the right-hand area or the red area of the scale.
Stop and switch off the engine if the warning light in the instrument cluster
starts to flash. Wait a few minutes and check the level of coolant » page 151,
Checking the coolant level .
Further information » page 41,
Coolant
.
The coolant temperature can be reduced by switching on the heating.
WARNING■ Always drive particularly carefully with the trailer.■Adapt your speed to the conditions of the road surface and to the traffic
situation.
Note
If you tow a trailer frequently, you should also have your vehicle inspected be-
tween service intervals.
Anti-theft alarm system
When the vehicle is locked, the alarm is activated when the electrical connec-
tion to the trailer is interrupted.
Always switch off the anti-theft alarm system before a trailer is coupled or un-
coupled » page 53 .
Conditions for including a trailer in the anti-theft alarm system. The vehicle is factory-fitted with an anti-theft alarm system and towing
equipment.
The trailer is electrically connected to the towing vehicle by means of the
trailer socket.
The electrical system of the vehicle and trailer is functional.
The vehicle is locked with the vehicle key and the anti-theft alarm system
is activated.
CAUTION
For technical reasons, trailers with rear LED lights cannot be connected to the
anti-theft alarm system.131Hitch and trailer
Page 135 of 204
General Maintenance
Car care
Services, modifications and technical alterations
Introduction
This chapter contains information on the following subjects:
Vehicle operating under different weather conditions
132
Statutory checks
132
ŠKODA Service Partners
133
ŠKODA Original parts
133
ŠKODA Original accessories
133
Spoiler
134
Airbags
134
The instructions and guidelines from ŠKODA AUTO a.s. must be observed when
carrying out all modifications, repairs or technical alterations to your vehicle.
Adhering to these instructions and guidelines helps ensure road safety and
helps keep your vehicle in a good technical condition. After carrying out modifi-
cations, repairs or technical alterations, the vehicle will comply with German
road transport regulations (StVZO)
Always consult a ŠKODA Partner » page 133before buying accessories or
parts, or before carrying out any modifications, repairs or technical alterations
to your vehicle.
WARNING■ Works on your vehicle, which have been carried out unprofessionally, can
cause operational faults – risk of accident!■
Interference on the electronic components and their software can lead to
operational faults. This interference can also impair not directly affected
systems because of the networking of the electronic components. The op-
erational safety of the vehicle may be at significant risk and can lead to in-
creased wear of parts.
For the sake of the environmentTechnical documents regarding alterations carried out on the vehicle must be
kept by the vehicle user in order to be handed over to the recyclers at a later
date. This ensures that the vehicle is recycled in an environmentally sound
manner.
Note
■ We recommend only having these modifications and technical alterations
carried out by a specialist garage.■
Any damage caused by technical alterations made without the approval of
the manufacturer is excluded from the warranty » Service schedule .
■
The ŠKODA Partner does not assume any liability for products that have not
been approved by ŠKODA AUTO a.s. even though these may be products with
an operational approval or that have been approved by a government testing
institute.
■
We advise you only to use ŠKODA Original Accessories and ŠKODA Original
Parts which have been expressly approved for use on your vehicle. Reliability,
safety and suitability for your vehicle are guaranteed with these.
■
ŠKODA Original Accessories and ŠKODA Original Parts can be purchased from
ŠKODA Partners, who will also perform the professional assembly of the pur-
chased parts.
Vehicle operating under different weather conditions
Read and observe
on page 132 first.
If you would like to operate your vehicle in countries other than those with itsintended weather conditions, you should contact a ŠKODA Partner.
He will advise you if certain precautions need to be taken to ensure the full
functioning of the vehicle as well as to prevent damage.
This involves, for example, the coolant, battery replacement and the like.
Statutory checks
Read and observe
on page 132 first.
Many countries have legislation requiring the operational reliability and roadworthiness and/or exhaust gas properties of a vehicle to be tested at specific
intervals. These tests can be carried out by workshops or testing stations that
have been legally authorised for this purpose.
132General Maintenance
Page 136 of 204
The ŠKODA Service Partners are up-to-date on the legally required tests and
will prepare the vehicle for the tests as part of a service operation if required,
or will be responsible for carrying out these tests. The specialist garages can
carry out the specified tests directly, if required by the customer, if they are
authorised to do so. This saves you time and money.
Even if you want to take your vehicle to an officially approved test centre for
prior checking in preparation of a legally required test, we recommend that you
consult the service consultant of your ŠKODA Service Partner beforehand.
Based on their appraisal, the service consultant will tell you which areas you
should focus on in order to ensure that your vehicle will pass the technical test
without any problems. This allows you to avoid additional expenses resulting
from a possible subsequent test.
ŠKODA Service Partners
Read and observe
on page 132 first.
ŠKODA Service Partners are equipped with modern, specially developed tools
and equipment. Here, trained specialists have access to a comprehensive
range of ŠKODA Original Parts and ŠKODA Original Accessories for carrying out
modifications, repairs and technical alterations.
All ŠKODA service partners operate according to the latest guidelines and in-
structions from ŠKODA AUTO a.s. All service and repair work is therefore car-
ried out on time and to the appropriate quality. Adhering to these instructions
and guidelines helps ensure road safety and helps keep your vehicle in a good
technical condition.
ŠKODA Service Partners are therefore properly prepared to service your vehicle
and to provide quality work. We therefore advise you to have all modifications,
repairs and technical alterations to your vehicle carried out by a ŠKODA Service
Partner.
ŠKODA Original parts
Read and observe
on page 132 first.
We recommend the use of ŠKODA Genuine Parts for your vehicle, since these
parts are approved by ŠKODA AUTO a.s. They correspond exactly to ŠKODA
AUTO a.s. specifications in respect of design, dimensional accuracy and materi-
al and are identical to the components used in the batch production.
ŠKODA AUTO a.s. can guarantee the safety, suitability, and long life of these
products. We therefore recommend that you only use ŠKODA Genuine Parts.
ŠKODA AUTO a.s. supplies the market with a complete range of ŠKODA Genu-
ine Parts not only while the model is still in production but with wear-and-tear parts for at least 15 years after the end of series production and with all other
vehicle parts for at least 10 years.
ŠKODA service partners are liable for any defects in ŠKODA original parts for a
period of 2 years after sale in accordance with materials defect liability under
the law unless otherwise agreed in the purchase agreement. You should keep
the confirmed warranty certificate and the receipt for these components for
this period, so that the commencement of the warranty term may be verified.
Body repairs
ŠKODA vehicles are designed so that if the body suffers damage, it is only nec-
essary to replace those parts which are in fact damaged.
Before you decide to have damaged body parts replaced, however, you should first contact your specialist garage to determine whether or not such parts can
also be repaired. Repairs to body parts are usually cheaper.
ŠKODA Original accessories
Read and observe
on page 132 first.
You should note the following if you wish to fit accessories to your vehicle:
We recommend that you use ŠKODA Genuine Accessories in your vehicle.
ŠKODA AUTO a.s. offers a warranty on the reliability, safety and suitability for
your particular vehicle of these accessories. Although we constantly monitor
the market, we are not able to assess or offer a warranty on other products
even though in some instances such products may have a type approval or
may have been approved by a nationally recognised approval authority.
All accessory products go through a fastidious process of technical develop-
ment (technical tests) and quality inspection (customer tests), and only if all
tests are positive does the product become a ŠKODA Genuine Accessory.
Our ŠKODA Genuine Accessories service also provides expert advice and pro-
fessional fitting if requested by the customer.
ŠKODA Service Partners are liable for any defects in ŠKODA Genuine Parts for a period of 2 years after installation or delivery in accordance with materials de-
fect liability legislation, unless otherwise agreed in the purchase contract or in
133Car care
Page 137 of 204
any other agreements. You should keep the confirmed warranty certificate and
the receipt for these accessories for this period, so that the commencement of
the warranty term may be verified.
In addition, ŠKODA Service Partners also stock a range of suitable car care
products as well as those parts which are subject to natural wear and tear,
such as tyres, batteries, bulbs and wiper blades.
Note
The accessories authorized by ŠKODA AUTO a.s. will be offered by the ŠKODA
Partners in all countries where ŠKODA AUTO a.s. has a sales and service net- work. This will usually be in the form of a printed catalogue of Original ŠKODA
Accessories, in the form of separate printed brochures or in the form of offers
for ŠKODA Genuine Accessories on the ŠKODA Partner's website.
Spoiler
Read and observe
on page 132 first.
If your new vehicle is fitted with a spoiler on the front bumper in combination
with the spoiler on the luggage compartment lid, then the following instruc-
tions must be adhered to.
› For safety reasons, the vehicle must only be fitted with a spoiler on the front
bumper in combination with the associated spoiler on the luggage compart-
ment lid.
› This kind of spoiler cannot be left on the front bumper either on its own, in
combination with another spoiler not on the luggage compartment lid or in
combination with an unsuitable spoiler on the luggage compartment lid.
› We recommend that you consult the ŠKODA service partner for any repairs to
or replacement, addition or removal of spoilers.
WARNING■ If work on your vehicle's spoilers is not carried out properly, this can lead
to operational faults - risk of accident and serious injuries.■
If a front spoiler, full wheel trim, etc. is mounted retrospectively, it must
be ensured that the air supply to the front wheel brakes is not reduced.
The front brakes may overheat, which can have a negative impact on the
functioning of the braking system – there is a risk of an accident!
Airbags
Read and observe
on page 132 first.
The system components of the airbag system can be situated in the front
bumper, doors, front seats, roof lining or body.
WARNINGAny work on the airbag system including the installation and removal of
system components due to other repair work (e.g. removal of the steering
wheel) must only be carried out by a specialist garage.■
Modifications, repairs and technical alterations that have been carried out
unprofessionally can cause damage and operational faults, and can also se-
riously impair the effectiveness of the airbag system – risk of accident and
fatal injury!
■
The airbag system will then have to be replaced if the airbag is deployed.
Airbag modules cannot be repaired.
WARNINGInformation on the use of the airbag system■It is prohibited to manipulate individual parts of the airbag system, as this
might result in the airbag being deployed.■
Never install any airbag parts into the vehicle that have been removed
from old cars or have been recycled.
■
Never install damaged airbag parts in the vehicle. The airbags may then
not be deployed properly or even at all in the event of an accident.
■
No modifications of any kind must be made to parts of the airbag system.
WARNING■ A change to the vehicle's wheel suspension, including the use of non-ap-
proved wheels and tire combinations, can alter the functioning of the air-
bag system - risk of accident and fatal injury!■
Never make any changes to the front bumper or the bodywork.
134General Maintenance
Page 158 of 204
Vehicles with a START-STOP system are fitted with a battery control unit for
checking the energy level for the recurring engine start.
We recommend that you have the acid level checked regularly by a specialist garage, especially in the following cases.
› High external temperatures.
› Longer day trips.
› After each charge.
Winter time
The vehicle battery only has some of its starting power at low temperatures. A
discharged vehicle battery may freeze at temperatures just below 0 °C .
We therefore recommend that you have the battery checked and, if necessary,
recharged by a specialist garage before the start of the winter.
CAUTION
For technical reasons, on vehicles with the description “AGM”, the electrolyte
level cannot be checked.
Note
The battery acid level is also checked regularly by a specialist garage as part of
the inspection service.
Charging
Read and observe
and on page 153 first.
A properly charged vehicle battery is essential for reliably starting the engine.
›
Switch off the ignition and all of the electrical components.
›
Disconnect both battery cables (“negative” first, then “positive”) only when“rapid charging” the battery.
›
Attach the terminal clamps of the charger to the battery terminals (red =
“positive”, black = “negative”).
›
Plug the mains cable of the charger into the power socket and switch the
charger on.
›
Once charging is complete: Switch off the charger and remove the mains ca-
ble from the power socket.
›
Only then disconnect the charger's terminal clamps.
›
Reconnect the cables to the battery (first “positive”, then “negative”).
It is not necessary to disconnect the battery cables if you are recharging the
vehicle battery using low amperages (for example from a mini-charger). Refer
to the charger manufacturer's instructions .
A charging current of 0.1 multiple of the total vehicle battery capacity (or low-
er) must be used until full charging is achieved.
Both cables must be disconnected before charging the battery with high
amperages, known as “ rapid charging”.
The vent plugs of the vehicle battery should not be opened for charging.WARNING“Quick-charging” the vehicle battery is dangerous and requires a special
charger and specialist knowledge.
CAUTION
On vehicles with the START/STOP system, the pole terminal of the charger
must not be connected directly to the negative terminal of the vehicle battery,
but only to the engine earth » page 173, Jump-starting in vehicles with the
START-STOP system .
Note
We therefore recommend that vehicle batteries be rapid charged by a special-
ist garage.
Replacing
Read and observe
and on page 153 first.
The new vehicle battery must have the same capacity, voltage, current and
size as the original battery. Suitable vehicle battery types can be purchased
from a specialist garage.
We recommend having the battery replaced by a specialist garage, where the
new vehicle battery will be installed properly and the original battery will be
disposed of in accordance with national regulations.
Disconnecting or reconnecting
Read and observe
and on page 153 first.
The following functions are initially deactivated or are no longer able to oper-
ate faultlessly after the vehicle battery has been disconnected and reconnec-
ted.
155Inspecting and replenishing
Page 163 of 204
CAUTION■Use the pressure of your hand only, do not strike the full wheel trim! The
cover could be damaged.■
When using the anti-theft wheel bolt, ensure that it is in the hole in the
valve area.
■
If wheel trims are fitted, an adequate flow of air must be assured in order to
cool the brake system.
Note
We recommend that you use child seats from ŠKODA Original Accessories.
Wheel bolts
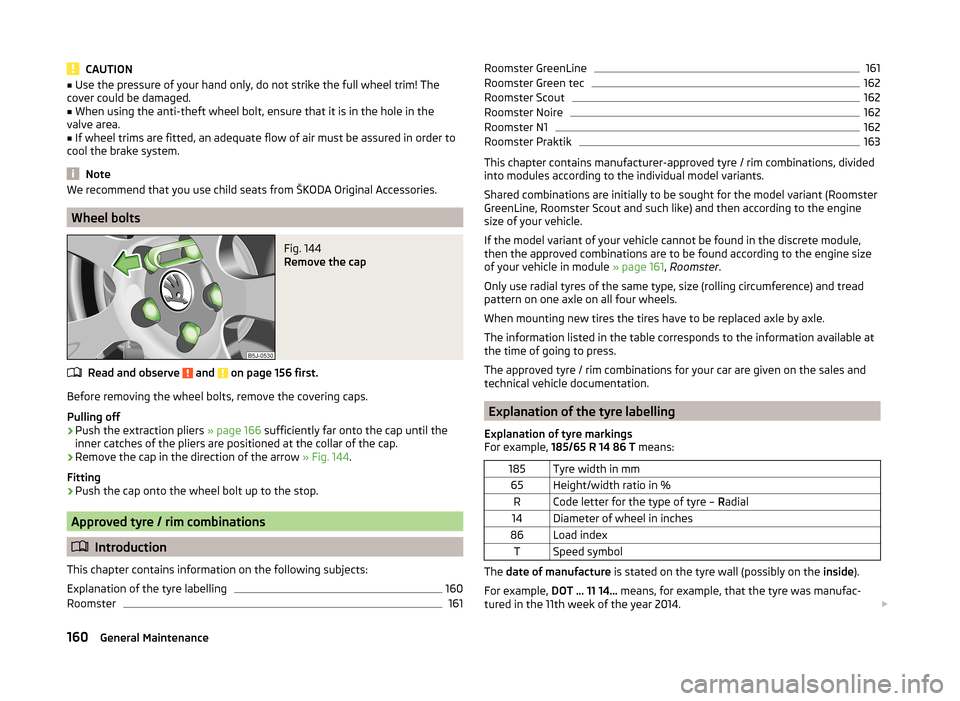
Fig. 144
Remove the cap
Read and observe and on page 156 first.
Before removing the wheel bolts, remove the covering caps.
Pulling off
›
Push the extraction pliers » page 166 sufficiently far onto the cap until the
inner catches of the pliers are positioned at the collar of the cap.
›
Remove the cap in the direction of the arrow » Fig. 144.
Fitting
›
Push the cap onto the wheel bolt up to the stop.
Approved tyre / rim combinations
Introduction
This chapter contains information on the following subjects:
Explanation of the tyre labelling
160
Roomster
161Roomster GreenLine161Roomster Green tec162
Roomster Scout
162
Roomster Noire
162
Roomster N1
162
Roomster Praktik
163
This chapter contains manufacturer-approved tyre / rim combinations, divided
into modules according to the individual model variants.
Shared combinations are initially to be sought for the model variant (Roomster GreenLine, Roomster Scout and such like) and then according to the engine
size of your vehicle.
If the model variant of your vehicle cannot be found in the discrete module,
then the approved combinations are to be found according to the engine size
of your vehicle in module » page 161, Roomster .
Only use radial tyres of the same type, size (rolling circumference) and tread
pattern on one axle on all four wheels.
When mounting new tires the tires have to be replaced axle by axle.
The information listed in the table corresponds to the information available at the time of going to press.
The approved tyre / rim combinations for your car are given on the sales and
technical vehicle documentation.
Explanation of the tyre labelling
Explanation of tyre markings
For example, 185/65 R 14 86 T means:
185Tyre width in mm65Height/width ratio in %RCode letter for the type of tyre – Radial14Diameter of wheel in inches86Load indexTSpeed symbol
The date of manufacture is stated on the tyre wall (possibly on the inside).
For example, DOT ... 11 14... means, for example, that the tyre was manufac-
tured in the 11th week of the year 2014.
160General Maintenance
Page 164 of 204
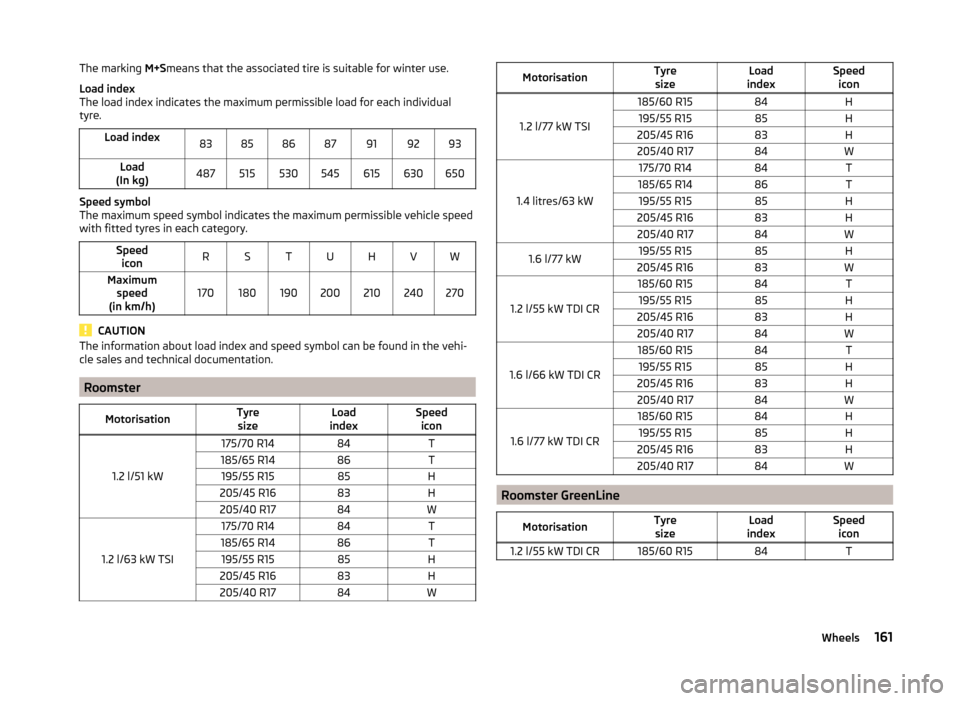
The marking M+Smeans that the associated tire is suitable for winter use.
Load index
The load index indicates the maximum permissible load for each individual
tyre.Load index83858687919293Load
(In kg)487515530545615630650
Speed symbol
The maximum speed symbol indicates the maximum permissible vehicle speed
with fitted tyres in each category.
Speed iconRSTUHVWMaximum speed
(in km/h)170180190200210240270
CAUTION
The information about load index and speed symbol can be found in the vehi-
cle sales and technical documentation.
Roomster
MotorisationTyre sizeLoad
indexSpeed icon
1.2 l/51 kW
175/70 R1484T185/65 R1486T195/55 R1585H205/45 R1683H205/40 R1784W
1.2 l/63 kW TSI
175/70 R1484T185/65 R1486T195/55 R1585H205/45 R1683H205/40 R1784WMotorisationTyresizeLoad
indexSpeed icon
1.2 l/77 kW TSI
185/60 R1584H195/55 R1585H205/45 R1683H205/40 R1784W
1.4 litres/63 kW
175/70 R1484T185/65 R1486T195/55 R1585H205/45 R1683H205/40 R1784W1.6 l/77 kW195/55 R1585H205/45 R1683W
1.2 l/55 kW TDI CR
185/60 R1584T195/55 R1585H205/45 R1683H205/40 R1784W
1.6 l/66 kW TDI CR
185/60 R1584T195/55 R1585H205/45 R1683H205/40 R1784W
1.6 l/77 kW TDI CR
185/60 R1584H195/55 R1585H205/45 R1683H205/40 R1784W
Roomster GreenLine
MotorisationTyresizeLoad
indexSpeed icon1.2 l/55 kW TDI CR185/60 R1584T161Wheels