dimensions SKODA ROOMSTER 2014 1.G Owner's Manual
[x] Cancel search | Manufacturer: SKODA, Model Year: 2014, Model line: ROOMSTER, Model: SKODA ROOMSTER 2014 1.GPages: 204, PDF Size: 14.15 MB
Page 162 of 204

Spare and temporary spare wheelFig. 143
Fixing the spare or temporary
spare wheel
Read and observe and on page 156 first.
The spare wheel is located in a well under the floor covering in the boot and is
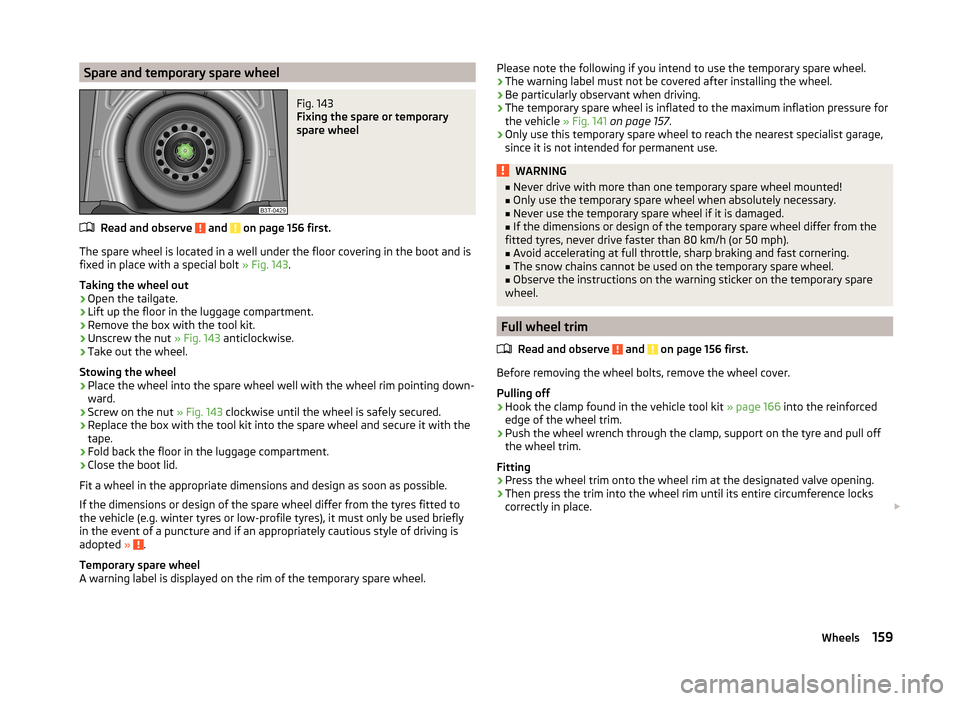
fixed in place with a special bolt » Fig. 143.
Taking the wheel out
›
Open the tailgate.
›
Lift up the floor in the luggage compartment.
›
Remove the box with the tool kit.
›
Unscrew the nut » Fig. 143 anticlockwise.
›
Take out the wheel.
Stowing the wheel
›
Place the wheel into the spare wheel well with the wheel rim pointing down-
ward.
›
Screw on the nut » Fig. 143 clockwise until the wheel is safely secured.
›
Replace the box with the tool kit into the spare wheel and secure it with the
tape.
›
Fold back the floor in the luggage compartment.
›
Close the boot lid.
Fit a wheel in the appropriate dimensions and design as soon as possible.
If the dimensions or design of the spare wheel differ from the tyres fitted to
the vehicle (e.g. winter tyres or low-profile tyres), it must only be used briefly
in the event of a puncture and if an appropriately cautious style of driving is
adopted »
.
Temporary spare wheel
A warning label is displayed on the rim of the temporary spare wheel.
Please note the following if you intend to use the temporary spare wheel.
› The warning label must not be covered after installing the wheel.
› Be particularly observant when driving.
› The temporary spare wheel is inflated to the maximum inflation pressure for
the vehicle » Fig. 141 on page 157 .
› Only use this temporary spare wheel to reach the nearest specialist garage,
since it is not intended for permanent use.WARNING■ Never drive with more than one temporary spare wheel mounted!■Only use the temporary spare wheel when absolutely necessary.■
Never use the temporary spare wheel if it is damaged.
■
If the dimensions or design of the temporary spare wheel differ from the
fitted tyres, never drive faster than 80 km/h (or 50 mph).
■
Avoid accelerating at full throttle, sharp braking and fast cornering.
■
The snow chains cannot be used on the temporary spare wheel.
■
Observe the instructions on the warning sticker on the temporary spare
wheel.
Full wheel trim
Read and observe
and on page 156 first.
Before removing the wheel bolts, remove the wheel cover.
Pulling off
›
Hook the clamp found in the vehicle tool kit » page 166 into the reinforced
edge of the wheel trim.
›
Push the wheel wrench through the clamp, support on the tyre and pull off
the wheel trim.
Fitting
›
Press the wheel trim onto the wheel rim at the designated valve opening.
›
Then press the trim into the wheel rim until its entire circumference locks
correctly in place.
159Wheels
Page 168 of 204

Do-it-yourself
Emergency equipment and self-help
Emergency equipment
Introduction
This chapter contains information on the following subjects:
First aid kit and warning triangle
165
fire extinguisher
165
Vehicle tool kit
166
First aid kit and warning triangle
Fig. 145
Placing of the warning triangle
A warning triangle with the maximum dimensions 39 x 68 x 450 mm can be
attached to the trim panel of the rear wall with rubber straps » Fig. 145.
WARNINGThe first-aid kit and warning triangle must always be secured safely so that
they do not come loose when making an emergency braking or in a vehicle
collision which could cause injuries to occupants.
Note
■ Pay attention to the expiration date of the first-aid kit.■We recommend using a first-aid kit from ŠKODA Original Accessories, which
are available from a ŠKODA Partner.fire extinguisherFig. 146
Fire extinguisher
The fire extinguisher is attached by two straps in a bracket under the driver's
seat.
Removing/attaching
›
Loosen the two straps by pulling the buckles in the direction of the ar-
row » Fig. 146 .
›
Remove the fire extinguisher.
›
For mounting, fit the fire extinguisher back into the holder and secure it with
straps.
Please read carefully the instructions which are attached to the fire extin-
guisher.
The fire extinguisher must be checked by an authorised person once a year.
National legal requirements must be observed.
WARNINGThe fire extinguisher must always be secured safely so that they do not
come loose when making an emergency braking or in a vehicle collision
which could cause injuries to occupants.
Note
■ The fire extinguisher must comply with national legal requirements.■Pay attention to the expiration date of the fire extinguisher. Proper function-
ing of the fire extinguisher is not assured once it has passed its expiry date.■
The fire extinguisher is part of the scope of delivery in certain countries only.
165Emergency equipment and self-help
Page 186 of 204

Technical data
Technical data
Vehicle data
Introduction
This chapter contains information on the following subjects:
Vehicle characteristics
183
Operating weight and payload
184
Measurement of fuel consumption and CO 2 emissions according to ECE
Regulations and EU Directives
184
Dimensions
185
Vehicle-specific details per engine type
186
The details given in the vehicle's technical documentation always take prece-
dence over the details in the Owner's Manual.
The listed performance values were determined without performance-reduc- ing equipment, e.g. air conditioning system.
Vehicle characteristics
Fig. 171
Vehicle data sticker/type plate
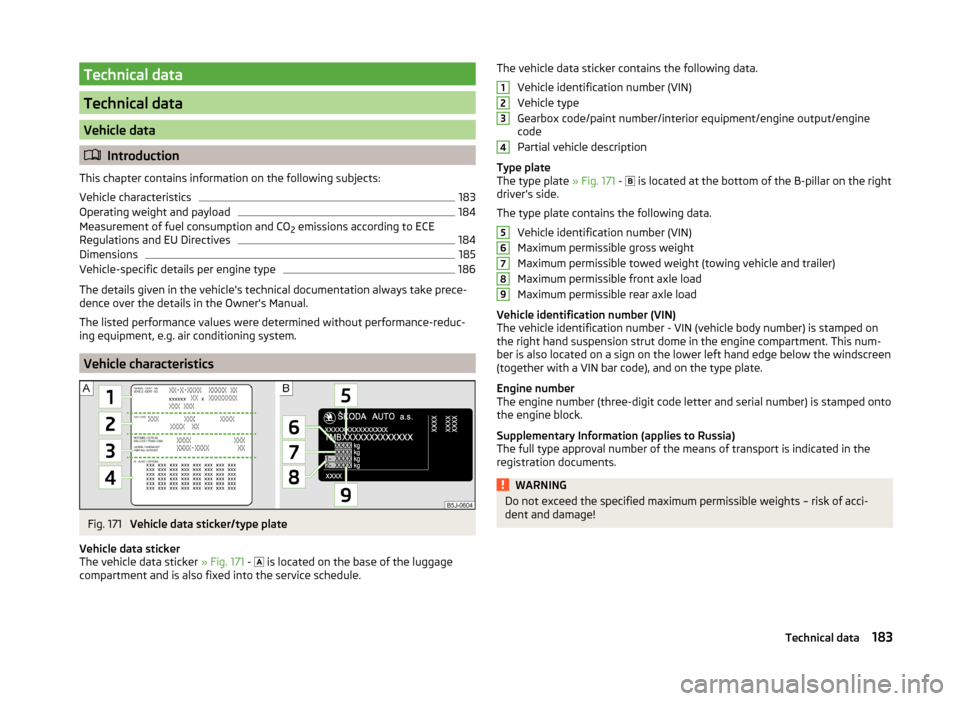
Vehicle data sticker
The vehicle data sticker » Fig. 171 -
is located on the base of the luggage
compartment and is also fixed into the service schedule.
The vehicle data sticker contains the following data.
Vehicle identification number (VIN)
Vehicle type
Gearbox code/paint number/interior equipment/engine output/engine
code
Partial vehicle description
Type plate
The type plate » Fig. 171 -
is located at the bottom of the B-pillar on the right
driver's side.
The type plate contains the following data. Vehicle identification number (VIN)
Maximum permissible gross weight
Maximum permissible towed weight (towing vehicle and trailer)
Maximum permissible front axle load
Maximum permissible rear axle load
Vehicle identification number (VIN)
The vehicle identification number - VIN (vehicle body number) is stamped on
the right hand suspension strut dome in the engine compartment. This num-
ber is also located on a sign on the lower left hand edge below the windscreen
(together with a VIN bar code), and on the type plate.
Engine number
The engine number (three-digit code letter and serial number) is stamped onto
the engine block.
Supplementary Information (applies to Russia)
The full type approval number of the means of transport is indicated in the
registration documents.WARNINGDo not exceed the specified maximum permissible weights – risk of acci-
dent and damage!123456789183Technical data
Page 188 of 204

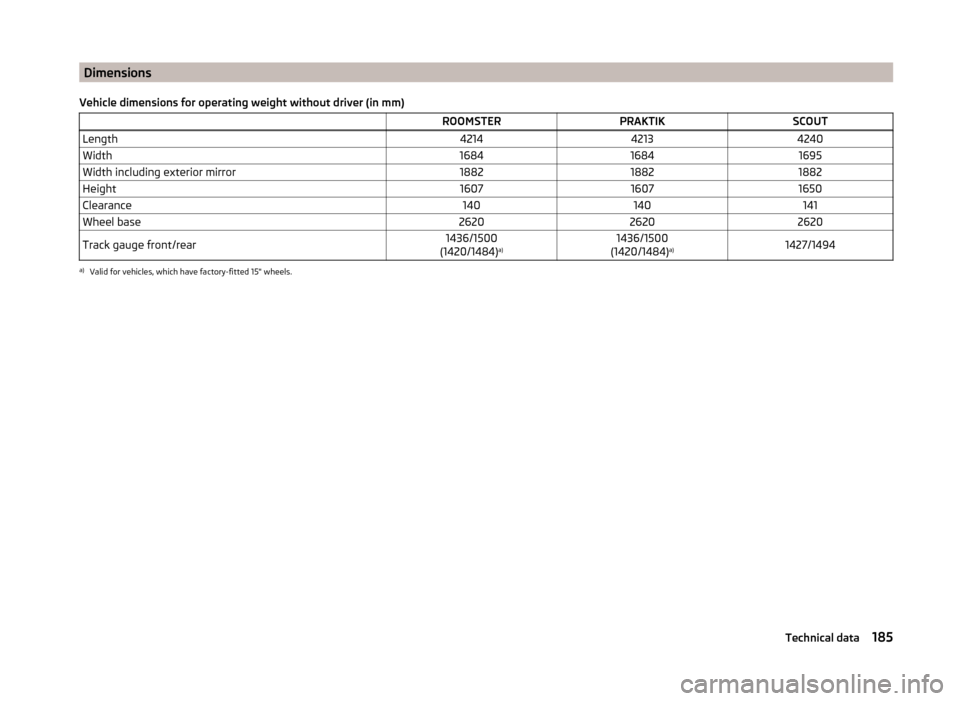
Dimensions
Vehicle dimensions for operating weight without driver (in mm) ROOMSTERPRAKTIKSCOUTLength421442134240Width168416841695Width including exterior mirror188218821882Height160716071650Clearance140140141Wheel base262026202620Track gauge front/rear1436/1500
(1420/1484) a)1436/1500
(1420/1484) a)1427/1494a)
Valid for vehicles, which have factory-fitted 15" wheels.
185Technical data
Page 199 of 204

Washing by hand135
Wash system135
Wax treatment137
Taking care of your vehicles Fabric covers
141
Technical data183
Telephone97
Temporary spare wheel159
the rear seats fold down seat backrest and fold seat fully for-ward
71
Tiptronic111
Tire size see wheels
161
Tools166
TOP TETHER26
Tourist lights62
Towing173
Towing a trailer131
Towing device Description
126
Use and care139
Towing eye Front
174
Rear174
Towing protection54
Traction Control System (ASR)120
Trailer129
13-pin socket130
connection and disconnection130
Loading130
Safety eye130
Towing a trailer131
Trailer operation126
Transport Boot
73
Roof rack system80
Transporting children safely22
Trays folding table in the middle back seat86
Turning the light on and off
59
Turning the light on and off59
Turn signals61
Two-way radio systems97
Tyre Explanation of the labelling
160
see wheels160
Tyre load-bearing capacity Refer to Wheels
161
Tyre pressure Indicator light
45
Tyre pressure monitoring125
Display45
Save tyre pressure values125
Tyre repair Preparations
171
Pressure test171
Sealing and inflating the tyre171
Tyres156
Inflation pressure157
Sizes157
Tyre wear indicator157
Tyre size160, 161
see wheels160
U
Underbody protection
139
Unleaded petrol118
unlock Central locking system
51
Unlocking Remote control
52
without central locking49
Unlocking and locking47
USB104
Useful equipment80
12-volt power outlet82
Ashtray81
Car park ticket holder83
Cigarette lighter82
Clothes hood83
Cupholders81
Using the selector lever110
V
Variable loading floor
76
Dividing the luggage compartment77
Removing and refitting77
Vehicle battery Automatic load deactivation
156
Charging155
Checking the battery electrolyte level154
Cover154
Disconnecting and reconnecting155
Operation in winter154
Replacing155
Safety instructions153
Vehicle care Alcantara
141
Fabrics141
Synthetic leather141
washing135
Vehicle data sticker183
Vehicle data sticker and nameplate Vehicle data sticker and nameplate
183
Vehicle dimensions185
Vehicle height185
Vehicle Identification Number (VIN)183
Vehicle key47
Vehicle length185
Vehicle status see Auto Check Control
38
Vehicle tool kit166
Vehicle width185
196Index