mirror SKODA ROOMSTER 2014 1.G Owner's Manual
[x] Cancel search | Manufacturer: SKODA, Model Year: 2014, Model line: ROOMSTER, Model: SKODA ROOMSTER 2014 1.GPages: 204, PDF Size: 14.15 MB
Page 11 of 204
Safety
Passive Safety
General information
Introduction
This chapter contains information on the following subjects:
Before setting off
8
Driving safety
8
Safety equipment
8
In this section you will find important information, tips and notes on the sub-
ject of passive safety in your vehicle.
We have combined everything here which you should be familiar with, for ex-
ample, regarding seat belts, airbags, child seats and safety of children.
WARNING■ This chapter contains important information on how to use the vehicle for
the driver and his occupants.■
You can find further information on safety concerning you and those trav-
elling with you in the following chapters of this owner's manual.
■
The complete on-board literature should always be in the vehicle. This
applies in particular, if you rent out or sell the vehicle.
Before setting off
Read and observe
on page 8 first.
For your own safety and the safety of the people travelling with you, please
pay attention to the following points before setting off.
Ensure that the lighting and the turn signal system are functioning proper-
ly.
Ensure that the function of the wiper and the condition of the wiper
blades are free of any defects.
Ensure that all of the windows offer good visibility to the outside.
Adjust the rear-view mirror so that vision to the rear is guaranteed.
Ensure that the mirrors are not covered.
Check the tyre inflation pressure.
Check the engine oil, brake fluid and coolant level.
Secure all items of luggage.
Do not exceed the permissible axle loads and permissible gross weight of
the vehicle.
Close all doors as well as the bonnet and boot lid.
Ensure that no objects can obstruct the pedals.
Protect children in suitable child seats with correctly fastened seat
belts » page 22 , Transporting children safely .
Adopt the correct seated position » page 9, Correct and safe seated
position . Tell your passengers to assume the correct seated position.
Driving safety
Read and observe
on page 8 first.
The driver is fully responsible for himself and his occupants. If your driving
safety is effected, you place yourself and the oncoming traffic at risk.
The following guidelines must therefore be observed. Do not become distracted from concentrating on the traffic situation, e.g.
by your passengers or mobile phone calls.
Never drive when your driving ability is impaired, e.g. due to medication, al-
cohol or drugs.
Keep to the traffic regulations and the permissible speed limit.
Always adjust the driving speed to the road, traffic and weather condi-
tions.
Take regular breaks on long journeys – at least every two hours.
Safety equipment
Read and observe
on page 8 first.
The following list contains only part of the safety equipment in your vehicle.
› Three-point seat belts for all the seats.
› Belt force limiters for the front seats.
› Belt tensioners for the front seats.
› Seat belt height adjusters for the front seats.
› Front airbag for the driver and the front passenger.
› Side airbags.
8Safety
Page 32 of 204
Operation
Cockpit
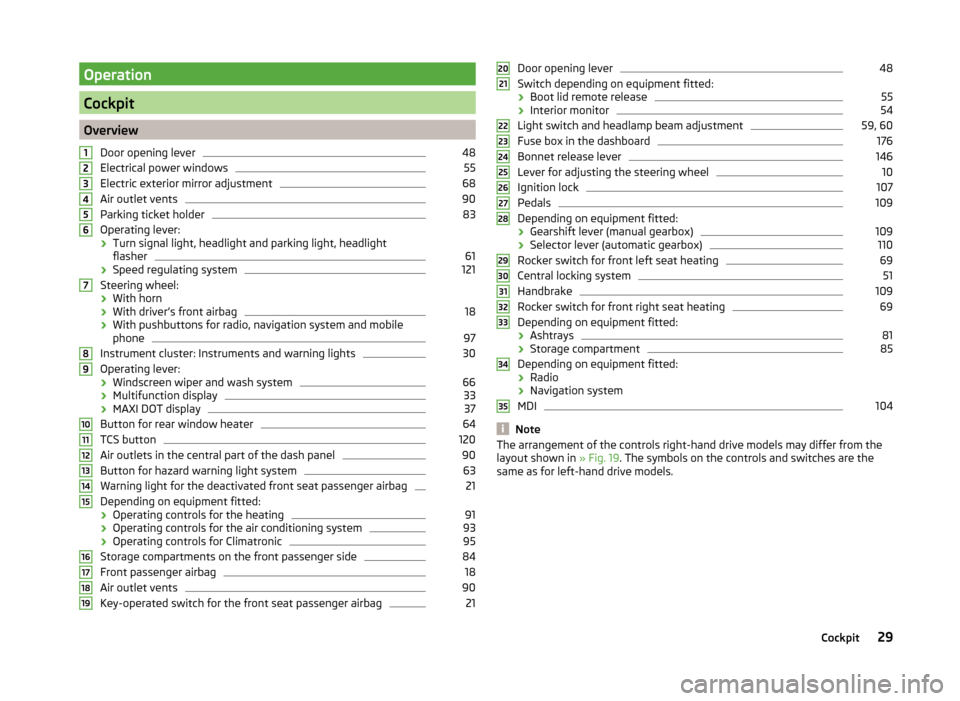
OverviewDoor opening lever
48
Electrical power windows
55
Electric exterior mirror adjustment
68
Air outlet vents
90
Parking ticket holder
83
Operating lever:
› Turn signal light, headlight and parking light, headlight
flasher
61
› Speed regulating system
121
Steering wheel:
› With horn
› With driver’s front airbag
18
›With pushbuttons for radio, navigation system and mobile
phone
97
Instrument cluster: Instruments and warning lights
30
Operating lever:
› Windscreen wiper and wash system
66
›Multifunction display
33
›MAXI DOT display
37
Button for rear window heater
64
TCS button
120
Air outlets in the central part of the dash panel
90
Button for hazard warning light system
63
Warning light for the deactivated front seat passenger airbag
21
Depending on equipment fitted:
› Operating controls for the heating
91
›Operating controls for the air conditioning system
93
›Operating controls for Climatronic
95
Storage compartments on the front passenger side
84
Front passenger airbag
18
Air outlet vents
90
Key-operated switch for the front seat passenger airbag
2112345678910111213141516171819Door opening lever48
Switch depending on equipment fitted:
› Boot lid remote release
55
›Interior monitor
54
Light switch and headlamp beam adjustment
59, 60
Fuse box in the dashboard
176
Bonnet release lever
146
Lever for adjusting the steering wheel
10
Ignition lock
107
Pedals
109
Depending on equipment fitted:
› Gearshift lever (manual gearbox)
109
›Selector lever (automatic gearbox)
110
Rocker switch for front left seat heating
69
Central locking system
51
Handbrake
109
Rocker switch for front right seat heating
69
Depending on equipment fitted:
› Ashtrays
81
›Storage compartment
85
Depending on equipment fitted:
› Radio
› Navigation system
MDI
104
Note
The arrangement of the controls right-hand drive models may differ from the
layout shown in » Fig. 19. The symbols on the controls and switches are the
same as for left-hand drive models.2021222324252627282930313233343529Cockpit
Page 56 of 204
automatically locked again and the safe securing system or anti-theft alarm
system is reactivated. This function is intended to prevent the car being un-
locked unintentionally.
In addition, when the car is unlocked, the electrically adjustable seats and ex-
terior mirrors move into the position assigned to this key. The stored setting of
driver seat and exterior mirrors is retrieved.
Locking
The turn signal lights flash once to confirm that the vehicle has been correctly
locked.
If the doors or the boot lid remain open after the vehicle has been locked, the
turn signal lights do not flash until they have been closed.
Note
■ Only operate the remote control when the doors and boot lid are closed and
the vehicle is in your line of sight.■
A ŠKODA partner can also activate/deactivate the acoustic signals on vehi-
cles with an anti-theft alarm system.
Synchronization
If the vehicle does not unlock when the remote control is pressed, the key may
not be synchronised. This can occur when the buttons on the remote control
key are pressed several times outside the operating range of the equipment or
if the battery in the remote control key has been replaced.
Synchronise the key as follows.
›
Press any button on the remote control key.
›
Unlock the door with the key within 1 minute of pressing the button.
Anti-theft alarm system
Introduction
This chapter contains information on the following subjects:
Operation
53
Interior monitor and towing protection
54
The anti-theft alarm system increases the level of protection against people
trying to break into the vehicle.
The alarm system triggers audible and visual signals if an attempt is made to
break into the vehicle (hereafter referred to only as alarm).
Note
■ The working life of the alarm siren is 5 years.■Before leaving the vehicle, check that all the doors and windows are closed
in order to ensure that the anti-theft alarm system is fully operational.■
Coding of the radio remote control and the receiver unit precludes the use of
the radio remote control from other vehicles.
Operation
How is the alarm system activated?
The anti-theft alarm system is activated when the vehicle is locked with the
radio remote control or the key in the driver's door . It is activated 30 seconds
after locking the door.
How is the alarm system deactivated?
The alarm system is deactivated by pressing the button on the remote con-
trol. The anti-theft alarm system is reactivated if the vehicle is not opened
within 30 seconds after transmitting the radio signal.
Triggering the alarm
The alarm is triggered when the following unauthorized actions are carried out
on the locked vehicle.
› Opening the bonnet.
› Opening the boot lid.
› Opening the doors.
› Manipulation of the ignition lock.
› Towing the vehicle
» page 54.
› Movement in the vehicle
» page 54.
› Sudden and significant voltage drop of the electrical system.
› Uncoupling the trailer
» page 129.
If the driver's door of a vehicle with a remote control is unlocked and opened
by the lock cylinder, then the alarm is triggered.
Switching off the alarm
The alarm is turned off by pressing the button on the radio remote control
key or switching on the ignition.
53Unlocking and locking
Page 59 of 204
WARNING■If the vehicle is locked from the outside, do not leave anybody in the vehi-
cle as it is not possible to open the windows from the inside in the event of
an emergency.■
The system is fitted with a force limiter » page 57. If there is an obsta-
cle, the closing process is stopped and the window goes down by several
centimetres. The windows should nevertheless be closed carefully – risk of
injury.
■
Deactivating the electrically operated power windows in the rear doors is
recommended (safety push button)
S
when children are being transported
in the rear seats » Fig. 38 on page 56 .
■
When closing the windows, proceed with caution so as to avoid causing
crushing injuries - risk of injury!
CAUTION
■ Keep the windows clean to ensure the correct functionality of the electric
windows.■
If the windows are frozen, first of all remove the ice » page 138, Windows
and exterior mirrors . Only then can the electrical power windows be operated,
as otherwise the window seal and the electrical power window mechanism
could be damaged.
■
In the winter, ice on the window may cause greater resistance as the win-
dow is closed. The window will stop and open again by several centimetres.
■
Make sure that the windows are closed whenever you leave the locked vehi-
cle.
For the sake of the environment
At high speeds, you should keep the windows closed to prevent unnecessarily high fuel consumption.
Note
■ After switching the ignition off, it is still possible to open or close the win-
dows for approx. 10 minutes. After the driver's or front passenger's door has
been opened, the windows can only be operated by using button A
» Fig. 38
on page 56 .
■
When driving always use the existing heating, air conditioning and ventila-
tion system for ventilating the interior of the vehicle. If the windows are
opened, dust as well as other dirt can get into the vehicle and in addition the wind noise is more at certain speeds.
Opening/closing the windowsFig. 38
Buttons on the driver's door/in the rear doors
Read and observe
and on page 56 first.
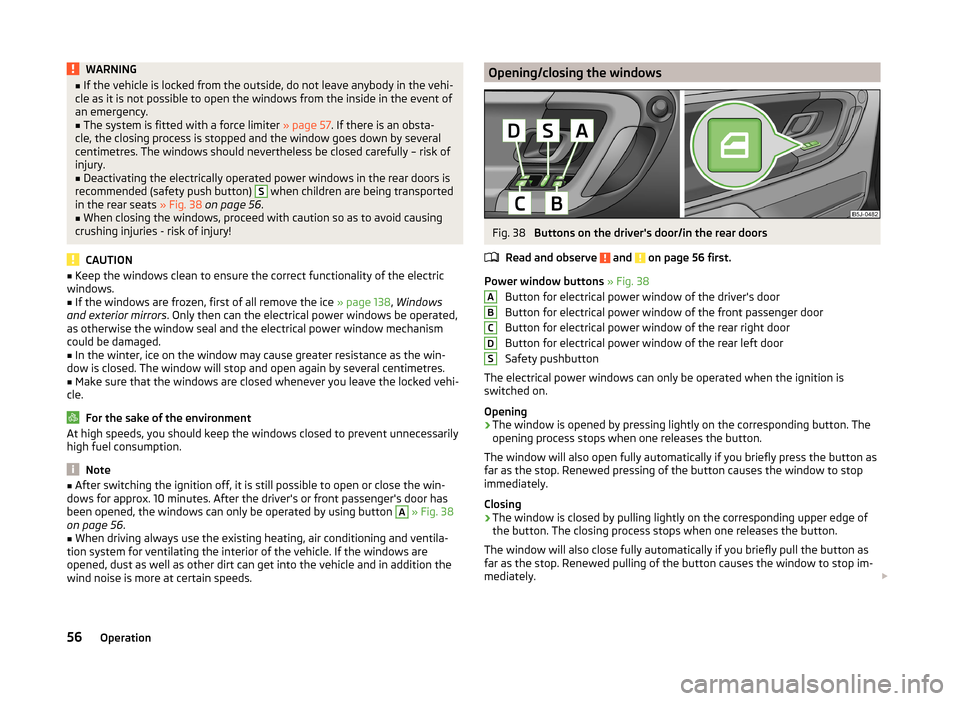
Power window buttons » Fig. 38
Button for electrical power window of the driver's door
Button for electrical power window of the front passenger door
Button for electrical power window of the rear right door
Button for electrical power window of the rear left door
Safety pushbutton
The electrical power windows can only be operated when the ignition is
switched on.
Opening
›
The window is opened by pressing lightly on the corresponding button. The
opening process stops when one releases the button.
The window will also open fully automatically if you briefly press the button as
far as the stop. Renewed pressing of the button causes the window to stop
immediately.
Closing
›
The window is closed by pulling lightly on the corresponding upper edge of
the button. The closing process stops when one releases the button.
The window will also close fully automatically if you briefly pull the button as
far as the stop. Renewed pulling of the button causes the window to stop im-
mediately.
ABCDS56Operation
Page 61 of 204
Mechanical windows
Introduction
This chapter contains information on the following subjects:
Open / close window
58
The window can be operated mechanically by means of the handle attached to
the respective door panel.
WARNINGThe windows should nevertheless be closed carefully – risk of injury!
CAUTION
■ In the event that the windows are frozen, first of all eliminate the
ice » page 138 , Windows and exterior mirrors and only then operate the elec-
trical power windows. Otherwise, the window sealing and the electrical power
window mechanism could be damaged.■
Always make sure that the windows are closed when you leave the locked
vehicle.
For the sake of the environment
At high speeds, you should keep the windows closed to prevent unnecessarily high fuel consumption.
Note
When driving always use the existing heating, air conditioning and ventilation
system for ventilating the interior of the vehicle. If the windows are opened,
dust as well as other dirt can get into the vehicle and in addition the wind
noise is more at certain speeds.Open / close windowFig. 39
Window operation: left / right
Read and observe
and on page 58 first.
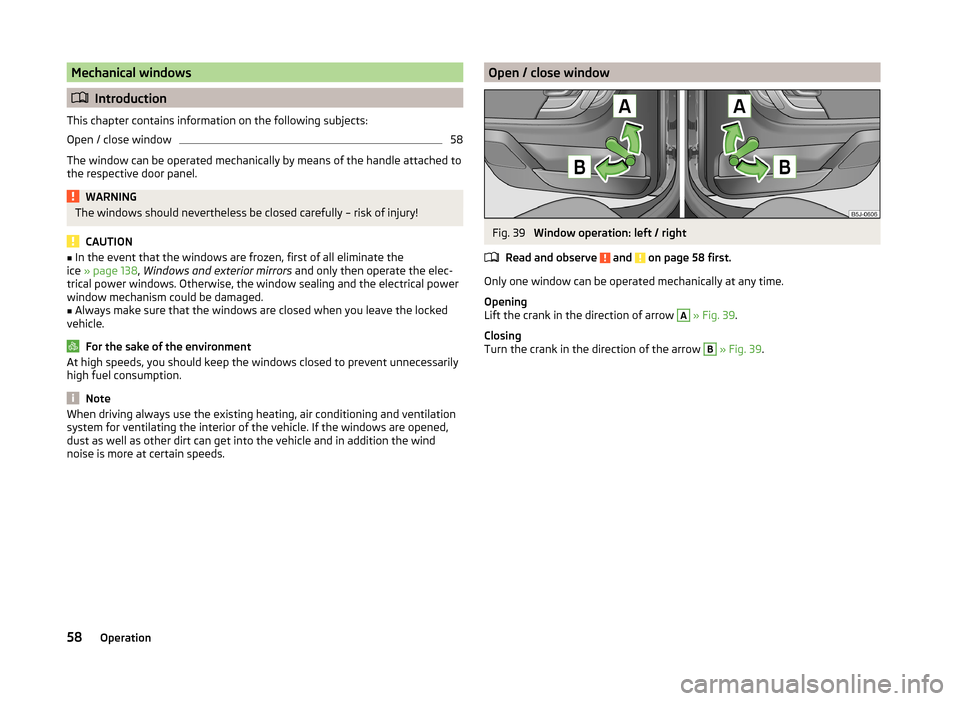
Only one window can be operated mechanically at any time.
Opening
Lift the crank in the direction of arrow
A
» Fig. 39 .
Closing
Turn the crank in the direction of the arrow
B
» Fig. 39 .
58Operation
Page 68 of 204
NoteIf the on-board voltage drops, the rear window heater switches off automati-
cally, in order to provide sufficient electrical energy for the engine con-
trol » page 156 , Automatic load deactivation .
Sun visors
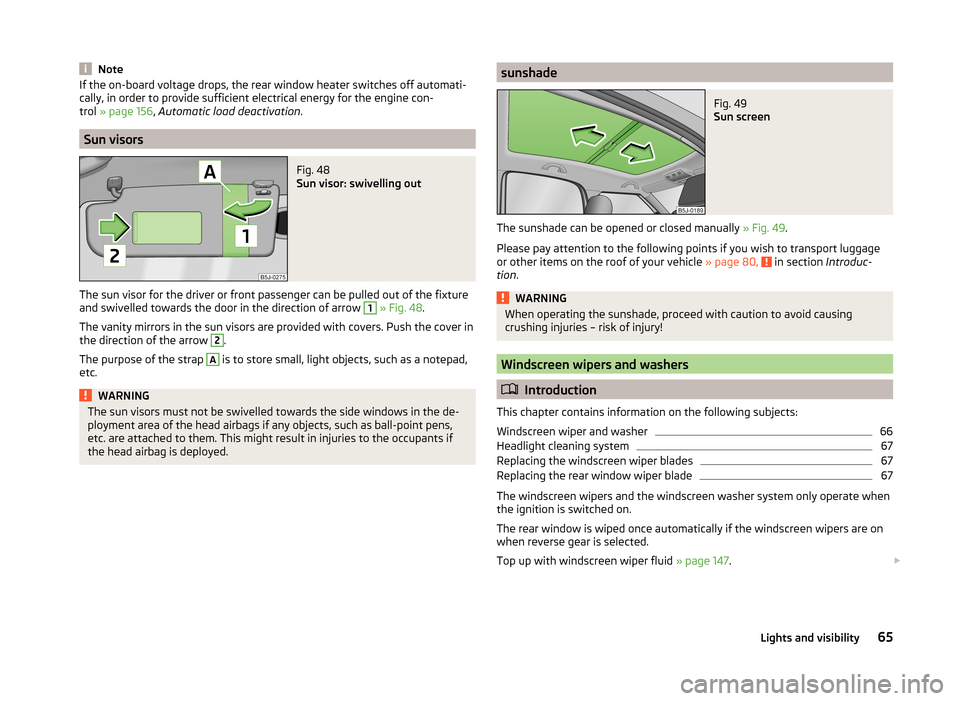
Fig. 48
Sun visor: swivelling out
The sun visor for the driver or front passenger can be pulled out of the fixture
and swivelled towards the door in the direction of arrow
1
» Fig. 48 .
The vanity mirrors in the sun visors are provided with covers. Push the cover in
the direction of the arrow
2
.
The purpose of the strap
A
is to store small, light objects, such as a notepad,
etc.
WARNINGThe sun visors must not be swivelled towards the side windows in the de-
ployment area of the head airbags if any objects, such as ball-point pens,
etc. are attached to them. This might result in injuries to the occupants if
the head airbag is deployed.sunshadeFig. 49
Sun screen
The sunshade can be opened or closed manually » Fig. 49.
Please pay attention to the following points if you wish to transport luggage
or other items on the roof of your vehicle » page 80,
in section Introduc-
tion .
WARNINGWhen operating the sunshade, proceed with caution to avoid causing
crushing injuries – risk of injury!
Windscreen wipers and washers
Introduction
This chapter contains information on the following subjects:
Windscreen wiper and washer
66
Headlight cleaning system
67
Replacing the windscreen wiper blades
67
Replacing the rear window wiper blade
67
The windscreen wipers and the windscreen washer system only operate when
the ignition is switched on.
The rear window is wiped once automatically if the windscreen wipers are on
when reverse gear is selected.
Top up with windscreen wiper fluid » page 147.
65Lights and visibility
Page 70 of 204
Headlight cleaning systemRead and observe
and on page 66 first.
The headlights are sprayed briefly if the low beam or main beam are switchedon and the windscreen wiper stalk is pulled to position
5
» Fig. 50 on
page 66 . To clean the headlights, the windshield is also sprayed after every
five squirts.
You should remove stubborn dirt (such as insect residues) from the headlight
lenses at regular intervals, for example when refuelling. The following guide-
lines must be observed » page 138, Headlight lenses .
To ensure the proper operation of the cleaning system during the winter, any
snow should be removed from the washer nozzle fixtures and ice should be
cleared with a de-icing spray.
CAUTION
Never remove the nozzles from the headlight cleaning system by hand – there
is risk of damage.
Replacing the windscreen wiper blades
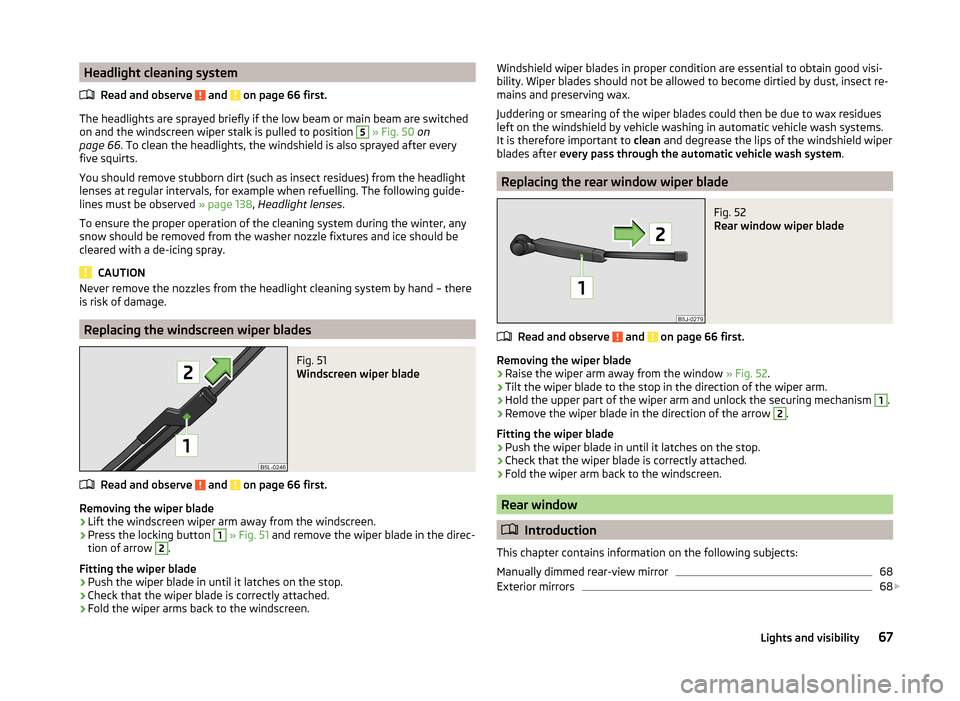
Fig. 51
Windscreen wiper blade
Read and observe and on page 66 first.
Removing the wiper blade
›
Lift the windscreen wiper arm away from the windscreen.
›
Press the locking button
1
» Fig. 51 and remove the wiper blade in the direc-
tion of arrow
2
.
Fitting the wiper blade
›
Push the wiper blade in until it latches on the stop.
›
Check that the wiper blade is correctly attached.
›
Fold the wiper arms back to the windscreen.
Windshield wiper blades in proper condition are essential to obtain good visi-
bility. Wiper blades should not be allowed to become dirtied by dust, insect re-
mains and preserving wax.
Juddering or smearing of the wiper blades could then be due to wax residues
left on the windshield by vehicle washing in automatic vehicle wash systems.
It is therefore important to clean and degrease the lips of the windshield wiper
blades after every pass through the automatic vehicle wash system .
Replacing the rear window wiper blade
Fig. 52
Rear window wiper blade
Read and observe and on page 66 first.
Removing the wiper blade
›
Raise the wiper arm away from the window » Fig. 52.
›
Tilt the wiper blade to the stop in the direction of the wiper arm.
›
Hold the upper part of the wiper arm and unlock the securing mechanism
1
.
›
Remove the wiper blade in the direction of the arrow
2
.
Fitting the wiper blade
›
Push the wiper blade in until it latches on the stop.
›
Check that the wiper blade is correctly attached.
›
Fold the wiper arm back to the windscreen.
Rear window
Introduction
This chapter contains information on the following subjects:
Manually dimmed rear-view mirror
68
Exterior mirrors
68
67Lights and visibility
Page 71 of 204
WARNING■Make sure that the mirror is not covered by ice, snow, condensation or
other objects.■
Convex (curved outward) or aspheric exterior mirrors increase the field of
vision. They do, however, make objects appear smaller in the mirror. These
mirrors are therefore only of limited use for estimating distances to the fol-
lowing vehicles.
■
Whenever possible use the interior mirror for estimating the distances to
the following vehicles.
Manually dimmed rear-view mirror
Read and observe
on page 68 first.
Basic setting
›
Adjust the lever at the lower edge of the mirror towards the windshield.
Dimming mirror
›
Pull the lever on the lower edge of the mirror away from the windscreen.
Exterior mirrors
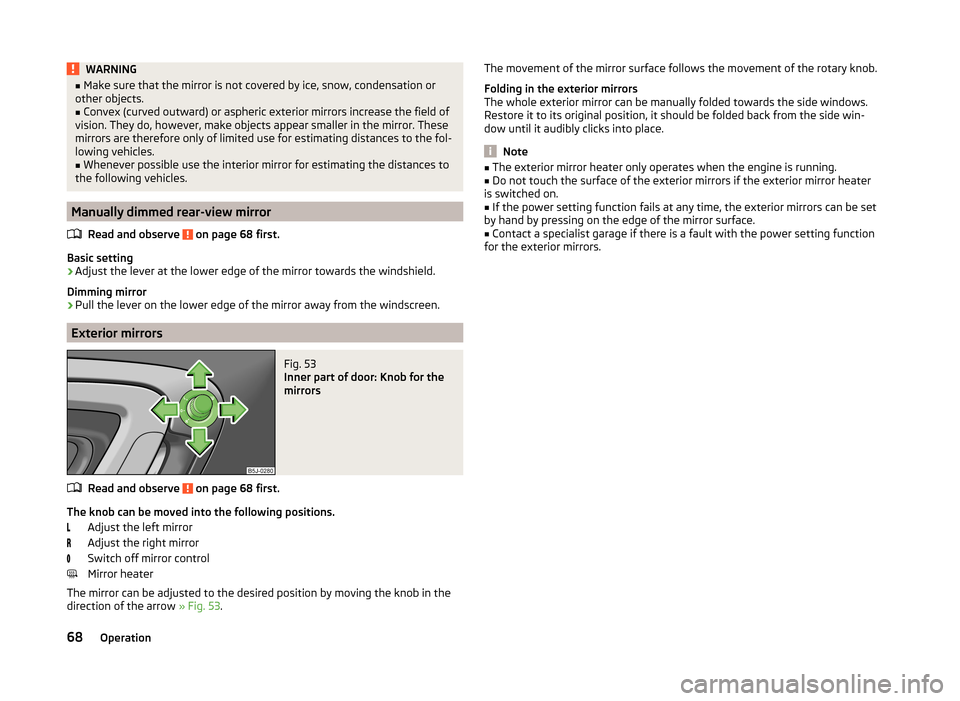
Fig. 53
Inner part of door: Knob for the
mirrors
Read and observe on page 68 first.
The knob can be moved into the following positions.
Adjust the left mirror
Adjust the right mirror
Switch off mirror control
Mirror heater
The mirror can be adjusted to the desired position by moving the knob in the
direction of the arrow » Fig. 53.
The movement of the mirror surface follows the movement of the rotary knob.
Folding in the exterior mirrors
The whole exterior mirror can be manually folded towards the side windows.
Restore it to its original position, it should be folded back from the side win-
dow until it audibly clicks into place.
Note
■ The exterior mirror heater only operates when the engine is running.■Do not touch the surface of the exterior mirrors if the exterior mirror heater
is switched on.■
If the power setting function fails at any time, the exterior mirrors can be set
by hand by pressing on the edge of the mirror surface.
■
Contact a specialist garage if there is a fault with the power setting function
for the exterior mirrors.
68Operation
Page 133 of 204
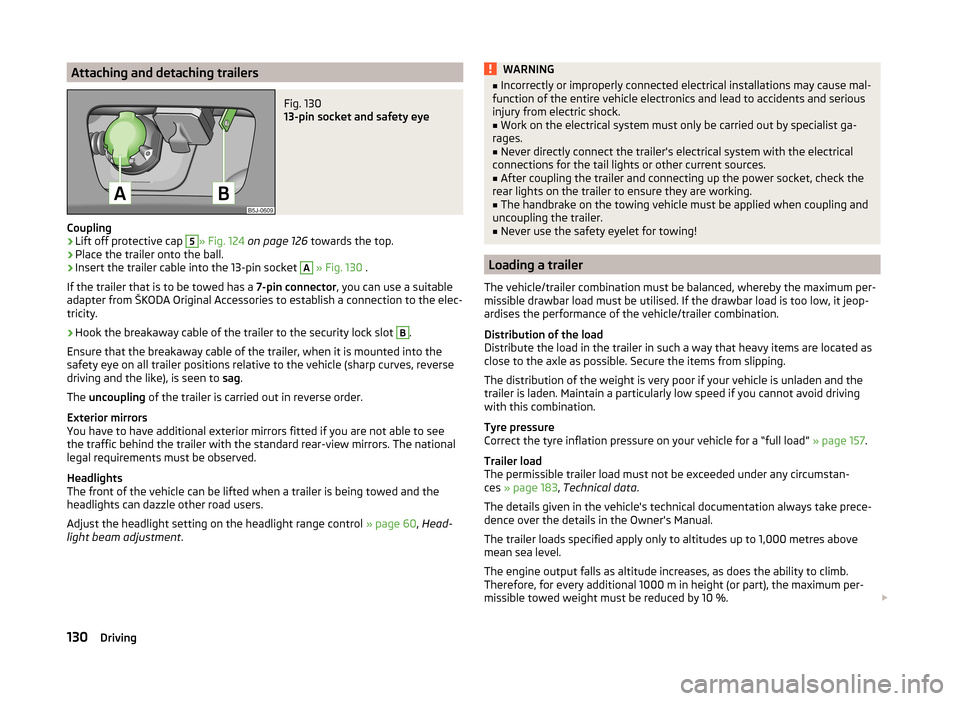
Attaching and detaching trailersFig. 130
13-pin socket and safety eye
Coupling
›
Lift off protective cap
5
» Fig. 124 on page 126 towards the top.
›
Place the trailer onto the ball.
›
Insert the trailer cable into the 13-pin socket
A
» Fig. 130 .
If the trailer that is to be towed has a 7-pin connector, you can use a suitable
adapter from ŠKODA Original Accessories to establish a connection to the elec-
tricity.
›
Hook the breakaway cable of the trailer to the security lock slot
B
.
Ensure that the breakaway cable of the trailer, when it is mounted into the
safety eye on all trailer positions relative to the vehicle (sharp curves, reverse
driving and the like), is seen to sag.
The uncoupling of the trailer is carried out in reverse order.
Exterior mirrors
You have to have additional exterior mirrors fitted if you are not able to see
the traffic behind the trailer with the standard rear-view mirrors. The national
legal requirements must be observed.
Headlights
The front of the vehicle can be lifted when a trailer is being towed and the
headlights can dazzle other road users.
Adjust the headlight setting on the headlight range control » page 60, Head-
light beam adjustment .
WARNING■
Incorrectly or improperly connected electrical installations may cause mal-
function of the entire vehicle electronics and lead to accidents and serious
injury from electric shock.■
Work on the electrical system must only be carried out by specialist ga-
rages.
■
Never directly connect the trailer's electrical system with the electrical
connections for the tail lights or other current sources.
■
After coupling the trailer and connecting up the power socket, check the
rear lights on the trailer to ensure they are working.
■
The handbrake on the towing vehicle must be applied when coupling and
uncoupling the trailer.
■
Never use the safety eyelet for towing!
Loading a trailer
The vehicle/trailer combination must be balanced, whereby the maximum per-
missible drawbar load must be utilised. If the drawbar load is too low, it jeop-
ardises the performance of the vehicle/trailer combination.
Distribution of the load
Distribute the load in the trailer in such a way that heavy items are located as
close to the axle as possible. Secure the items from slipping.
The distribution of the weight is very poor if your vehicle is unladen and the
trailer is laden. Maintain a particularly low speed if you cannot avoid driving
with this combination.
Tyre pressure
Correct the tyre inflation pressure on your vehicle for a “full load” » page 157.
Trailer load
The permissible trailer load must not be exceeded under any circumstan-
ces » page 183 , Technical data .
The details given in the vehicle's technical documentation always take prece-
dence over the details in the Owner's Manual.
The trailer loads specified apply only to altitudes up to 1,000 metres above
mean sea level.
The engine output falls as altitude increases, as does the ability to climb.
Therefore, for every additional 1000 m in height (or part), the maximum per-
missible towed weight must be reduced by 10 %.
130Driving
Page 138 of 204
Washing vehicle
Introduction
This chapter contains information on the following subjects:
Washing by hand
135
Automatic car wash systems
135
Washing with a high-pressure cleaner
136
The best way to protect your vehicle against harmful environmental influences
is frequent washing.
How often the vehicle should be washed depends on factors such as:
› Frequency of use.
› Parking situation (garage, under trees etc.).
› Season.
› Weather conditions.
› Environmental influences.
The longer insect residues, bird droppings, tree sap, road and industrial dust,
tar, soot particles, road salt and other aggressive deposits remain adhering to
the paintwork of your vehicle, the more detrimental their destructive effect
can be. High temperatures, such as those caused by intensive sun's rays, ac-
centuate this caustic effect.
It is essential to also thoroughly clean the underside of the vehicle at the end
of the winter.
WARNING■ When washing your vehicle in the winter: Water and ice in the braking
system can affect the braking efficiency – risk of accident!■
Only wash the vehicle when the ignition is switched off – risk of accident!
CAUTION
Do not wash your vehicle in bright sunlight – risk of paint damage.
For the sake of the environment
Only wash the vehicle at washing bays intended for this purpose.Washing by hand
Read and observe
and on page 135 first.
Soak the dirt with plenty of water and rinse as well as possible.
Clean the vehicle with a soft sponge, a washing glove or a washing brush .
Work from the top to the bottom - starting with the roof.
Only use a car shampoo for stubborn dirt.
Wash out the sponge or washing glove thoroughly at short intervals.
Clean wheels, door sills and similar parts last. Use a second sponge for such
areas.
Give the vehicle a good rinse after washing it and dry it off using a chamois
leather.
CAUTION
■ When washing the car by hand, protect your hands and arms from sharp-
edged metal parts (e.g. when cleaning the underfloor, the inside of the wheel
housings or the wheel trims, etc.) - There is a risk of cuts!■
Only apply slight pressure when cleaning the vehicle's paintwork.
Automatic car wash systems
Read and observe
and on page 135 first.
The usual precautionary measures must be taken before washing the vehicle
in an automatic car wash system (e.g. closing the windows and the sliding/tilt-
ing roof etc.).
If your vehicle is fitted with any particular attached parts, such as a spoiler,
roof rack system, two-way radio aerial etc., it is best to consult the operator of
the car wash system beforehand.
After an automatic wash with wax treatment, the lips of the wipers should be
cleaned with cleaning agents specially designed for the purpose, and then de-
greased.
WARNINGFold in the exterior mirrors to prevent damage before washing the vehicle
in an automatic car wash system.135Car care