seats SKODA SUPERB 2003 1.G / (B5/3U) Owner's Guide
[x] Cancel search | Manufacturer: SKODA, Model Year: 2003, Model line: SUPERB, Model: SKODA SUPERB 2003 1.G / (B5/3U)Pages: 259
Page 86 of 259

Seats and Stowage85
Using the systemSafetyDriving TipsGeneral MaintenanceBreakdown assistanceTechnical Data
CargoFlex folding box*
Lowering and securing folding box
You can transport the folding box in two different positions - in the
transport position against the partition ⇒fig. 71 of the luggage
compartment, or in the ready position lowered onto the floor of
the luggage compartment ⇒ fig. 72.
Lowering folding box in to the ready position
– Pull the snap handle in direction of arrow 1 ⇒ fig. 71 . The
folding box is lowered to just above the floor of the luggage
compartment.
– Press the folding box at the arrow positions 2 ⇒ fig. 72 onto
the floor of the luggage compartment until it locks in place. If
correctly locked, the snap handle moves back into its initial
position (the top red surface of the handle is not visible).
Securing folding box in the transport position against
partition of luggage compartment
– Lower the folding box into the ready position ⇒page 87.
– Pull the snap handle in direction of arrow 1 ⇒ page 85, fig. 71 .
The folding box is raised up from the luggage compartment
floor.
– Raise and press the folding box against the partition of the luggage compartment, it is secured audibly in this way in the
transport position. If correctly locked, the snap handle moves
back into its initial position (the top red surface of the handle
is not visible).
Opening folding box ⇒page 86.
Fig. 71 Folding box:
Transport position
Fig. 72 Folding box:
ready position
Page 87 of 259

Seats and Stowage
86
Caution
The parts of the folding box can be damaged if handled roughly or in an
unprofessional way.
Opening folding box
You can transport the opened folding box in the secured end or
middle position against the partition of the luggage compartment.
Opening folding box
– Lower the folding box into the ready position ⇒page 85.
– Press the button marked “PUSH” ⇒page 86, fig. 73 .
– Grasp the folding box at the handle and push it in direction of arrow 1 against the partition of the luggage compartment
into the secured position. The lock below the button must be
heard to engage. If correctly locked, the button marked
“PUSH” moves back into its initial position.
– Raise the lid in direction of arrow 2 ⇒ page 86, fig. 74 .
Fig. 73 Luggage
compartment: folding
box
Fig. 74 Opening
folding box
AB
AA
AB
Page 88 of 259

Seats and Stowage87
Using the systemSafetyDriving TipsGeneral MaintenanceBreakdown assistanceTechnical Data
– Press on the bottom part of the handle and open the
compartments in the direction of arrow 3. The compartment
wall must be heard to engage in the slot in the bottom part of
the box.
Moving folding box into secured middle position
– Press on the button marked “PUSH” ⇒page 86, fig. 74
and carefully push the folding box into the secured middle
position. If correctly locked, the button marked “PUSH” is
moved back into its initial position. You can now use the space
which has become available for stowing further items of
luggage.
Caution
•The parts of the folding box can be damaged if handled roughly or in
an unprofessional way.
•The maximum weight of goods to be loaded should not exceed 25
kg.
Lowering folding boxAC
AD
AD
Fig. 75 Lowering
folding box
Fig. 76 Securing
folding box
Page 89 of 259

Seats and Stowage
88
– Press the bottom part of the handle ⇒page 87, fig. 75 and
fold the compartments in direction of arrow 1. The compart-
ments must be heard to engage in the lid.
– Close the lid in direction of arrow 2.
– Press on the button marked “PUSH” ⇒page 87, fig. 76
and push the folding box into the secured middle position.
– Once again press on the button marked “PUSH” and push the folding box carefully into the secured position against the
partition of the luggage compartment in direction of arrow
(ready position). If correctly locked, the button marked “PUSH” is moved back into its initial position.
You can leave the folding box in the ready position for use, or lower it into
the transport position ⇒page 85.
Caution
•The parts of the folding box can be damaged if handled roughly or in
an unprofessional way.
•First check for yourself whether the cover for the through-loading bag*
is closed before you lower the folding box into the ready position on the
partition of the luggage compartment ⇒page 81.
The roof luggage rack system
Description
Pay attention to the following points if you wish to transport luggage or
other items on the roof of your vehicle:
•Your car has streamlined rain channels integrated into the roof. For
this reason, it is not possible to use conventional roof racks. We therefore
recommend that you only use base roof bars from the Škoda Genuine
Accessories.
•These base roof bars are the supporting elements for a complete roof
bar system. Separate additional components are required for safety
reasons for transporting luggage, bikes, surfboards, skis and boats. All
these system components are available from Škoda Dealers.
Caution
•If you use other roof rack systems or if the roof bars are not properly
fitted, then any damage which may result to your car is not covered by the
warranty agreements. It is therefore essential to pay attention to the fitting
instructions supplied with the roof luggage rack system.
•On models fitted with a power sliding/tilting roof, ensure that the
opened sliding/tilting roof does not strike any items of luggage transported
on the roof.
For the sake of the environment
The increased aerodynamic drag results in a higher fuel consumption.
One should therefore take off the roof bar system after use.
AA
AB
AB
A3
AB
Page 90 of 259

Seats and Stowage89
Using the systemSafetyDriving TipsGeneral MaintenanceBreakdown assistanceTechnical Data
Attachment points
Installing
When fitting on the feet of the roof bars, ensure that they are positioned
exactly between the arrow markings in the sealing strip on the roof
⇒fig. 77 . The markings are visible only when the doors are open.
Roof load
Distribute weight evenly over the roof luggage rack system. The maximum
permissible roof load (including roof rack system) of 100 kg and the
maximum permissible total weight of the vehicle should not be exceeded.
You cannot make full use of the permissible roof load if you use a roof
luggage rack system with a lower load carrying capacity. The load trans-
ported on the roof luggage rack system must not exceed the weight limit
which is stated in the fitting instructions.
Fig. 77 Attachment
points for roof bars
WARNING
•The items which you transport on the roof bar system must be
reliably attached - risk of accident!
•You must on no account exceed the permissible roof load, the
permissible axle loads and the permissible gross weight of your
vehicle - risk of accident!
•Please note that the handling properties of your vehicle change
when you transport heavy or bulky items on the roof bar system as
a result of the displacement of the centre of gravity and the
increased wind attack area - risk of accident! You must absolutely
adapt your style of driving and the speed of the vehicle to the
specific circumstances.
Page 91 of 259

Seats and Stowage
90
Drinks can holder
Drinks can holder in front compartment
You can place two cups or beverage cans into the recesses ⇒fig. 78 .
Drinks can holder in armrest of the rear seats*
The drinks can holder is provided in the stowage compartment.
Access to drinks can holder
– Raise the cover of the armrest.
– You can take off the drinks can holder. Unlock it ⇒fig. 79 and
attach it to the cover of the armrest.
Only place cans into the drinks can holder which are held tight in the
holder.
It is possible to place up to two beverage cans in the drinks can holder of
the armrest.
WARNING
•Do not place any hot beverages into the cup holder while the car
is moving. The hot beverages may spill - risk of scalding!
•Do not use any cups or beakers which are made of hard or
brittle material (e.g. glass, porcelain). You might be injured by them
in the event of an accident.
Fig. 78 Centre
console: Drinks can
holder
Fig. 79 Drinks can
holder in rear armrest
Page 92 of 259

Seats and Stowage91
Using the systemSafetyDriving TipsGeneral MaintenanceBreakdown assistanceTechnical Data
Ashtray
Ashtray at the front
Opening ashtray
– Press on the bottom part of the cover of the ashtray - refer to
⇒ fig. 80. Removing the ashtray insert
– Grasp the ashtray insert
⇒fig. 80 at the side recesses and
pull it out.
Replacing the ashtray insert
– Press the ashtray insert into the mount.
Ashtray at the rear*
Opening ashtray
– Press on the top part of the cover of the ashtray.
WARNING
•Do not place any hot beverages into the can holder while the car
is moving. The hot beverages may spill - risk of scalding!
•Do not use any cups or beakers which are made of hard or
brittle material (e.g. glass, porcelain). You might be injured by them
in the event of an accident.
Fig. 80 Centre
console: opened
ashtray
AA
WARNING
Never lay flammable objects in the ashtray basin - risk of fire!
AB
Fig. 81 Ashtray at the
rear
Page 93 of 259

Seats and Stowage
92
Removing the ashtray insert
– Press the cover of the ashtray down slightly as far as the stop.
– Grasp the ashtray insert and pull it out at an angle of about 45°.
Replacing the ashtray insert
– Position the ashtray insert at an angle of about 45° and press it into the mount as far the stop.
Ashtray in the armrest*
Ashtray located in the armrest of the rear right door
Opening ashtray
– Press on the middle part of the cover of the ashtray.
Removing the ashtray insert
– Press on the top part of the opened ashtray in position , the ashtray insert is raised ⇒fig. 82 .
Replacing the ashtray insert
– Press the ashtray insert into the armrest.
WARNING
Never lay flammable objects in the ashtray basin - risk of fire!
Fig. 82 Ashtray in the
armrest of the rear right
door
WARNING
Never lay flammable objects in the ashtray basin - risk of fire!
AA
AB
Page 94 of 259
Seats and Stowage93
Using the systemSafetyDriving TipsGeneral MaintenanceBreakdown assistanceTechnical Data
Cigarette lighters and power sockets
Cigarette lighter
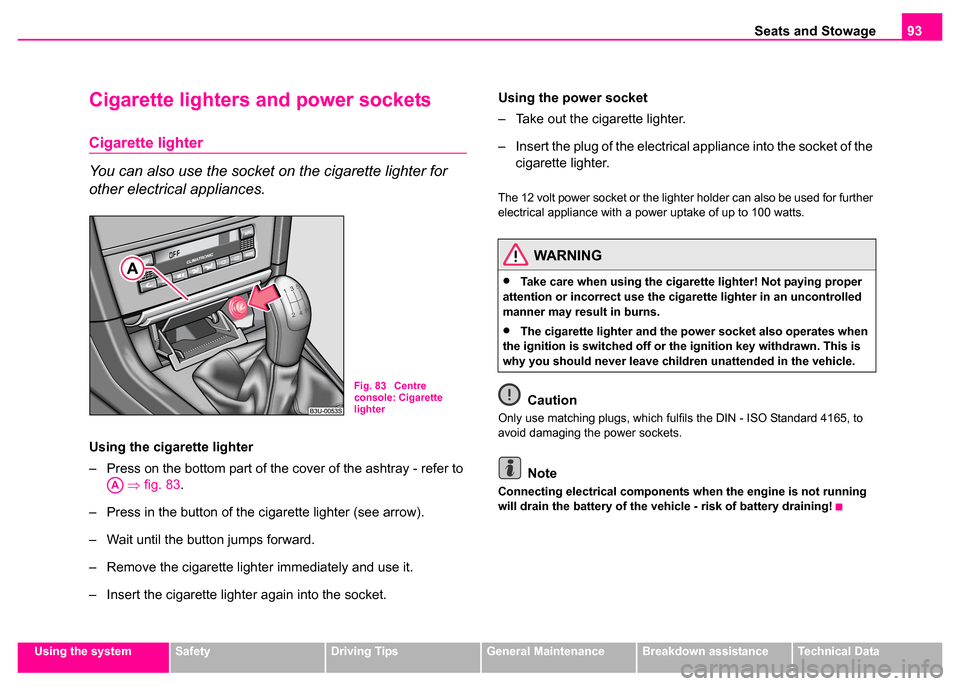
You can also use the socket on the cigarette lighter for
other electrical appliances.
Using the cigarette lighter
– Press on the bottom part of the cover of the ashtray - refer to
⇒ fig. 83.
– Press in the button of the cigarette lighter (see arrow).
– Wait until the button jumps forward.
– Remove the cigarette lighter immediately and use it.
– Insert the cigarette lighter again into the socket. Using the power socket
– Take out the cigarette lighter.
– Insert the plug of the electrical appliance into the socket of the
cigarette lighter.
The 12 volt power socket or the lighter holder can also be used for further
electrical appliance with a power uptake of up to 100 watts.
Caution
Only use matching plugs, which fulfils the DIN - ISO Standard 4165, to
avoid damaging the power sockets.
Note
Connecting electrical components when the engine is not running
will drain the battery of the vehicle - risk of battery draining!
Fig. 83 Centre
console: Cigarette
lighter
AA
WARNING
•Take care when using the cigarette lighter! Not paying proper
attention or incorrect use the cigarette lighter in an uncontrolled
manner may result in burns.
•The cigarette lighter and the power socket also operates when
the ignition is switched off or th e ignition key withdrawn. This is
why you should never leave children unattended in the vehicle.
Page 95 of 259

Seats and Stowage
94
Cigarette lighter in rear compartment
Operating and further information regarding the use of the cigarette lighter
⇒page 93.
Power socket in the luggage compartment
– Open the cover of the power socket ⇒fig. 85.
– Connect the plug of the electrical appliance to the socket.
It fulfils the requirements of DIN standard ISO 4165 and must only be used
for connecting approved electrical accessories with a power uptake of up
to 100 watts. The vehicle battery will be discharged in the process if the
engine is stationary.
Further information concerning use of the power socket ⇒page 93.
Fig. 84 Centre
console: Cigarette
lighterFig. 85 Luggage
compartment: Power
socket