belt SKODA SUPERB 2003 1.G / (B5/3U) Owner's Guide
[x] Cancel search | Manufacturer: SKODA, Model Year: 2003, Model line: SUPERB, Model: SKODA SUPERB 2003 1.G / (B5/3U)Pages: 259
Page 167 of 259
Transporting children safely
166
Attaching a child seat using the “ISOFIX” system*
There are two fixing eyes between the backrest and the seat itself
on both of the outer rear seats for fixing the “ISOFIX” system child
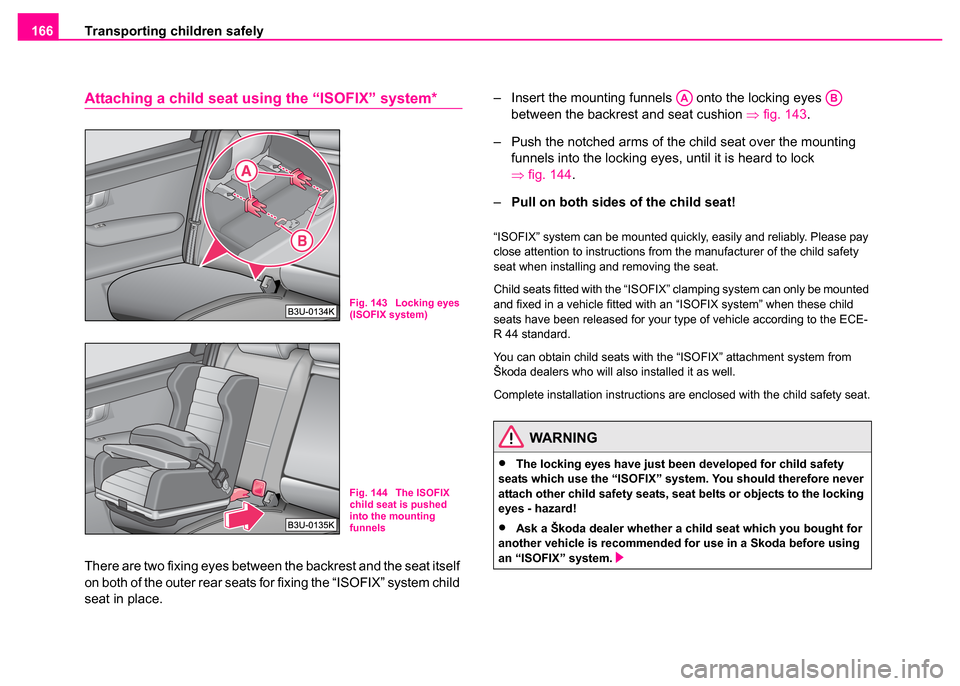
seat in place. – Insert the mounting funnels onto the locking eyes
between the backrest and seat cushion ⇒fig. 143 .
– Push the notched arms of the child seat over the mounting funnels into the locking eyes, until it is heard to lock
⇒fig. 144 .
– Pull on both sides of the child seat!
“ISOFIX” system can be mounted quickly, easily and reliably. Please pay
close attention to instructions from the manufacturer of the child safety
seat when installing and removing the seat.
Child seats fitted with the “ISOFIX” clamping system can only be mounted
and fixed in a vehicle fitted with an “ISOFIX system” when these child
seats have been released for your type of vehicle according to the ECE-
R 44 standard.
You can obtain child seats with the “ISOFIX” attachment system from
Škoda dealers who will also installed it as well.
Complete installation instructions are enclosed with the child safety seat.
Fig. 143 Locking eyes
(ISOFIX system)
Fig. 144 The ISOFIX
child seat is pushed
into the mounting
funnels
WARNING
•The locking eyes have just been developed for child safety
seats which use the “ISOFIX” system. You should therefore never
attach other child safety seats, seat belts or objects to the locking
eyes - hazard!
•Ask a Škoda dealer whether a child seat which you bought for
another vehicle is recommended for use in a Skoda before using
an “ISOFIX” system.
AAAB
Page 168 of 259
Transporting children safely 167
Using the systemSafetyDriving TipsGeneral MaintenanceBreakdown assistanceTechnical Data
Note
Child seats which use the “ISOFIX” system are currently available for chil-
dren weighing from 9 up to 18 kg. This corresponds to an age range of
from 9 months to 4 years.
WARNING (continued)
•Certain child seats which use the “ISOFIX” system can be
attached with standard three-point seat belts. Please pay close
attention to instructions from the manufacturer of the child safety
seat when installing and removing the seat.
Page 196 of 259

Care and cleaning195
Using the systemSafetyDriving TipsGeneral MaintenanceBreakdown assistanceTechnical Data
Leather cleaning and care
In view of the exclusiveness of the qualities and characteristics of the
leathers used (such as sensitivity to oils, greases, dirt etc.) a certain care-
fulness in use and particular care are required. Dark items of clothing, for
example, (particularly if these are moist and have poor quality dyeing)
may colour the leather seats. Dust and dirt particles in pores, creases and
seams may chafe and damage the surface. For this reason, care for the
leather regularly, or according to the wear-and-tear. After a lengthy period
of use, your leather seats will acquire a typical and unique patina. This is
characteristic of the natural product leather and is a sign of genuine
quality.
Please pay attention to the following notes in order to retain the value of
the natural material over its full life:
Caution
•Avoid leaving your vehicle for lengthy periods in bright sunlight in order
to avoid bleaching the leather. If you leave your vehicle parked in the open
for lengthy periods, protect the leather from the direct rays of the sun by
covering it over.
•Sharp-edged objects on items of clothing such as zip fasteners, rivets,
sharp-edged belts may leave permanent scratches or signs of rubbing on
the surface.
Note
•Use a care cream with light blocker and impregnation effect regularly
and each time after cleaning the leather. The cream nourishes the leather,
allows it to breathe and keeps it supple and also provides moisture. It also
creates surface protection.
•Clean the leather every 2 to 3 months, remove fresh soiling each time
this occurs.
•Remove fresh stains such as those from ball-point pens, ink, lipstick,
shoe cream etc., as quickly as possible.
•Care also for the leather dye. Refreshen areas which have lost their
colour with a special coloured leather cream as required.
Cleaning and care of leather upholstery
Normal cleaning
– Clean soiled areas of the leather with slightly moistened
cotton or woollen cloth.
Severe soiling
– Clean severely soiled areas with a cloth dipped in a mild soapy solution (2 spoonfuls of natural soap to 1 litre of water).
– Ensure that the leather is not soaked through at any point and that no water gets into the stitching of the seams.
– Dry off the leather with a soft, dry cloth.
Removing stains
– Remove fresh stains which are water-based (e.g. coffee, tea,
juices, blood etc.) with an absorbent cloth or household paper
or use the cleaner from the care set for a stain which has
already dried in.
– Remove fresh stains which are oil based (e.g. butter, mayon-
naise, chocolate etc.) with an absorbent cloth or household
cleaning paper or with the cleaner from the care set if the stain
has not yet penetrated into the surface.
– Use a grease dissolver for grease stains which have dried
in .
Page 197 of 259
Care and cleaning
196
–Eliminate special stains (e.g. ball-point pens, felt pen, nail
varnish, dispersion paint, shoe cream etc.) with a special stain
remover suitable for leather.
Leather care
– Treat the leather every six months with the leather care product available from Škoda dealers.
– Apply only a small amount of the care product.
– Dry the leather off with a soft cloth
It is best to consult your Škoda dealer if you have any questions regarding
cleaning and care of the leather interior.
Caution
You must on no account treat the leather with solvents (e.g. gasoline,
turpentine), floor wax, shoe cream or such like.
Alcantara upholstery
Do not use any leather care products for cleaning Alcantara upholsteries.
Eliminating dust and dirt
Wipe the Alcantara upholstery with a slightly moistened, soft cloth or clean
the covers with a suitable shampoo.
Removing stains
Moisten a soft cloth with lukewarm water or diluted methylated spirits and
dab the stain from the edges toward the middle.
Seat belts
– Keep the seat belts clean.
– Wash seat belts which have become soiled using a mild soapy solution.
– Inspect the seat belts regularly to ensure they are in good condition.
Belt webbing which has become severely soiled may prevent the inertia
reel from reeling up the belt properly.
Engine compartment
Good corrosion protection is very important, particularly in winter when
one often drives over its salt-strewn roads. One should therefore clean the
whole engine compartment and the radiator tank before and after the salt
spreading period and treat with preservative in order to prevent the salt
from being destructive.
WARNING
•The seat belts must not be removed for cleaning.
•Never clean the seat belts chemically as dry cleaning may
destroy the fabric. The seat belts must also not be allowed to come
into contact with corrosive liquids (such as acids etc.).
•Seat belts which have damage to the webbing, the connections,
the inertia reel or the lock should be replaced by a Škoda dealer.
•Inertia reel belts must be completely dried before being reeled
up.
Page 202 of 259

Fuel201
Using the systemSafetyDriving TipsGeneral MaintenanceBreakdown assistanceTechnical Data
•Vehicles fitted with catalytic converter should never be allowed to let
the fuel tank to run completely empty. An irregular supply of fuel to the
engine can result in misfiring and unburnt fuel may get into the exhaust
system, which may result in overheating and damage to the catalytic
converter.
For the sake of the environment
The fuel tank is full just as soon as the pump nozzle switches off for the
first time, provided the nozzle has been operated properly. You should not
continue refuelling - otherwise the expansion chamber in the fuel tank will
also be filled with fuel. Fuel might flow out of the tank when it heats up.
Emergency release of fuel filler flap
If the electric lock is faulty, you can also unlock the fuel filler flap
manually. – Open the boot lid/luggage compartment door.
– Unscrew the clip attaching the right-hand side trim panel and
pull the trim panel off the body.
– Pull on the loop in direction of arrow in order to unlock the fuel filler flap ⇒fig. 152 .
Fig. 152 Luggage
compartment: Emer-
gency release of fuel
filler flap
WARNING
Reel up the belt webbing once again until it is fitted snugly against
the child seat.
Page 204 of 259
Inspecting and Replenishing203
Using the systemSafetyDriving TipsGeneral MaintenanceBreakdown assistanceTechnical Data
The bonnet is held in the opened position by a pressurized gas spring.
Caution
•Never open the bonnet using the handle - danger of causing damage.
•Before opening the bonnet, ensure that the arms of the windscreen
wipers are correctly in place against the windscreen. Otherwise, there is
a risk of damage to the paintwork.
Working in the en gine compartment
Particular care is required when carrying out any work in
the engine compartment!
There is a risk of injuries, scalding , accidents and fire when working
in the engine compartment, e.g. inspecting and replenishing oil and
other fluids. For this reason, it is essential to comply with the
warning instructions st ated below and with the general applicable
rules of safety. The engine compartment of your car is a hazardous
area ⇒ .
WARNING
•Never open the bonnet if you see that steam or coolant is
flowing out of the engine compartmen t - risk of scalding! Wait long
enough until the steam or coolant has stopped escaping.
•For safety reasons, the bonnet must always be properly closed
when driving. One should therefore check that the lock has in fact
engaged properly after closing the bonnet.
•Stop your vehicle immediately wh ile driving if you notice that
the lock is not properly engaged and close the bonnet properly -
risk of an accident!
WARNING
•Switch off the engine and pull out the ignition key.
•Apply the handbrake firmly.
•If your vehicle is fitted with a manual gearbox, move the gear-
shift lever into Neutral, or if it is fitted with automatic gearbox,
move the selector lever into position P.
•Allow the engine to cool down.
•Keep children clear of the engine compartment.
•Never spill oil and other fluids over the hot engine. Such fluids
(e.g. the antifreeze contained in the coolant) may ignite!
•Avoid short circuits in the electrical system - particularly on the
battery.
•Never place your hand into the radiator fan as long as the
engine is still warm. The fan might suddenly start running!
•Never open the cap of the coolant expansion bottle as long as
the engine is still warm. The cooling system is pressurized!
•Cover over the cap of the coolant expansion reservoir with a
large cloth when opening it as protection for your face, hands and
arms from hot steam or hot coolant.
•In cases where it be necessary to carry out inspection work
when the engine is running there is an additional risk from rotating
parts (e.g. the V-ribbed belt, alternator, radiator fan) and from the
high-voltage ignition system.
•Please also comply with the warning instructions stated below
when carrying out any essential work on the fuel system or on the
electrical system:
−Always separate the car battery from the electrical system.
− Do not smoke.
− Never carry out any work close to naked flames.
Page 219 of 259
Inspecting and Replenishing
218
Spark plugs are constantly being further developed. It is therefore advis-
able to just obtain spark plugs from Skoda dealers since they are informed
about latest developments.
V-ribbed belts
The V-ribbed is one of the most highly loaded components on a vehicle.
This is why there are high demands on quality made on the V-ribbed belt.
It not sufficient when replacing the V-ribbed belt to choose just any one of
the same size. One should only use the V-ribbed belt foreseen for use
on that vehicle for safety reason.
V-ribbed belts are constantly being further developed. It is therefore advis-
able to just obtain them from Skoda dealers since they are informed about
latest developments.
The dust and pollen filter*
The dust and pollen filter for the heating and ventilation system is located
in the heater. The filter is replaced according to directions given in the
Service Plan. The filter should be replaced even earlier when the air flow
is reduced significantly.
Changing of the filter is undertaken by a Skoda dealer as part of the
inspection service.
Page 252 of 259
Index251
Index
A
ABS . . . . . . . . . . . . . . . . . . . . . . . . . . . . . . . 173
Accessories . . . . . . . . . . . . . . . . . . . . . . . . . 226
Adjusting seats . . . . . . . . . . . . . . . . . . . . . . . 69
Adjusting front seats manually . . . . . . . . . 69
electrically . . . . . . . . . . . . . . . . . . . . . . . . 70
Adjusting the steering wheel . . . . . . . . . . . . 114
Air outlet vents . . . . . . . . . . . . . . . . . . . . . . . 106
Airbag . . . . . . . . . . . . . . . . . . . . . . . . . . . . . 145 Deactivating . . . . . . . . . . . . . . . . . . . . . . 154
Deployment . . . . . . . . . . . . . . . . . . . . . . 146
Front airbags . . . . . . . . . . . . . . . . . . . . . 147
Head airbags . . . . . . . . . . . . . . . . . . . . . 152
Side airbags . . . . . . . . . . . . . . . . . . . . . . 149
Warning light . . . . . . . . . . . . . . . . . . . . . . 30
Airbag system . . . . . . . . . . . . . . . . . . . . . . . 145
Alarm . . . . . . . . . . . . . . . . . . . . . . . . . . . . . . . 47
Alcantara . . . . . . . . . . . . . . . . . . . . . . . . . . . 196
An overview Cockpit . . . . . . . . . . . . . . . . . . . . . . . . . . . 11
Antilock Brake System . . . . . . . . . . . . . . . . 173
Antilock brake system (ABS) Warning light . . . . . . . . . . . . . . . . . . . . . . 34
Anti-theft alarm system . . . . . . . . . . . . . . . . . 47
Ashtray . . . . . . . . . . . . . . . . . . . . . . . . . . . . . 91
Auto Check Control . . . . . . . . . . . . . . . . . . . . 25 Automatic gearbox
5-speed automatic gearbox . . . . . . . . . . 123
Dynamic shift programme . . . . . . . . . . . 127
Emergency programme . . . . . . . . . . . . . 129
Kickdown function . . . . . . . . . . . . . . . . . 126
Selector lever lock . . . . . . . . . . . . . . . . . 126
Selector lever positions . . . . . . . . . . . . . 124
Tiptronic . . . . . . . . . . . . . . . . . . . . . . . . . 128
Automatic seat adjustment . . . . . . . . . . . . . . 71
Automatic vehicle wash systems . . . . . . . . . 190
Avoiding damage to your vehicle . . . . . . . . . 178
B
Belt tensioners . . . . . . . . . . . . . . . . . . . . . . . 143
Belts . . . . . . . . . . . . . . . . . . . . . . . . . . . . . . . 138
Biodiesel . . . . . . . . . . . . . . . . . . . . . . . . . . . 198
Bonnet . . . . . . . . . . . . . . . . . . . . . . . . . . . . . 202
Boot lid . . . . . . . . . . . . . . . . . . . . . . . . . . . . . . 44
Brake Assist . . . . . . . . . . . . . . . . . . . . . . . . . 174
Brake booster . . . . . . . . . . . . . . . . . . . . . . . 172
Brake fluid . . . . . . . . . . . . . . . . . . . . . . . . . . 210
Brake pads . . . . . . . . . . . . . . . . . . . . . . . . . . . 32
Brake system Warning light . . . . . . . . . . . . . . . . . . . . . . 35
Bulbs Warning light . . . . . . . . . . . . . . . . . . . . . . 33 Button on the driver's door
Central locking system . . . . . . . . . . . . . . . 42
C
Car jack . . . . . . . . . . . . . . . . . . . . . . . . 228, 233
CargoFlex . . . . . . . . . . . . . . . . . . . . . . . . . . . 85
CargoFlex folding box . . . . . . . . . . . . . . . . . . 85
Catalytic converter . . . . . . . . . . . . . . . . . . . . 177
Central locking system . . . . . . . . . . . . . . . . . . 39
Opening a single door . . . . . . . . . . . . . . . 43
Unlocking . . . . . . . . . . . . . . . . . . . . . . . . . 41
Changing a wheel . . . . . . . . . . . . . . . . . . . . 229
Changing bulbs . . . . . . . . . . . . . . . . . . . . . . 243
Changing oil . . . . . . . . . . . . . . . . . . . . . . . . . 207
Changing wheels around . . . . . . . . . . . . . . . 222
Charging . . . . . . . . . . . . . . . . . . . . . . . . . . . . 36
Charging the battery . . . . . . . . . . . . . . . . . . 214
Chassis number . . . . . . . . . . . . . . . . . . . . . . 249
Child safety . . . . . . . . . . . . . . . . . . . . . . . . . 157 Side airbags . . . . . . . . . . . . . . . . . . . . . . 160
Child safety locks rear doors . . . . . . . . . . . . . . . . . . . . . . . . . 45
Child safety seats ISOFIX system . . . . . . . . . . . . . . . . . . . . 166
Page 255 of 259
Index
254
Multifunction steering wheel . . . . . . . . . . . . 130
Operating cruise control system . . . . . . 130
Operation of radio . . . . . . . . . . . . . . . . . 131
Multi-functional indicator . . . . . . . . . . . . . . . . 18
N
Natural leather . . . . . . . . . . . . . . . . . . . . . . 194
Navigation system . . . . . . . . . . . . . . . . 27, 135
O
Oil . . . . . . . . . . . . . . . . . . . . . . . . . . . . . . . . 205 Warning light . . . . . . . . . . . . . . . . . . . . . . 32
Onboard computer . . . . . . . . . . . . . . . . . . . . 18
Open door Warning light . . . . . . . . . . . . . . . . . . . . . . 33
Opening a single door . . . . . . . . . . . . . . . . . . 43
Operation in winter Biodiesel . . . . . . . . . . . . . . . . . . . . . . . . 199
De-icing windows . . . . . . . . . . . . . . . . . 192
Snow chains . . . . . . . . . . . . . . . . . . . . . 225
The battery . . . . . . . . . . . . . . . . . . . . . . 214
Tyres . . . . . . . . . . . . . . . . . . . . . . . . . . . 224
Overview of the engine compartment . . . . . 204
P
Paint . . . . . . . . . . . . . . . . . . . . . . . . . . . . . . 192
Paint damage . . . . . . . . . . . . . . . . . . . . . . . 192
Parking aid . . . . . . . . . . . . . . . . . . . . . . . . . 119
Parking light . . . . . . . . . . . . . . . . . . . . . . . . . 59 Parking lights . . . . . . . . . . . . . . . . . . . . . . . . 56
Pedals . . . . . . . . . . . . . . . . . . . . . . . . . . . . . . 78
Petrol . . . . . . . . . . . . . . . . . . . . . . . . . . . . . . 198
Polishing . . . . . . . . . . . . . . . . . . . . . . . . . . . 191
Power socket . . . . . . . . . . . . . . . . . . . . . 93, 94
Power steering . . . . . . . . . . . . . . . . . . . . . . 174
Power windows
Central locking system . . . . . . . . . . . . . . 51
Operational problems . . . . . . . . . . . . . . . 52
Switch on the driver's door . . . . . . . . . . . 49
Switches in front passenger door and in rear doors . . . . . . . . . . . . . . . . . . . . . . . . . . . 51
R
Rear fog light . . . . . . . . . . . . . . . . . . . . . . . . . 57
Warning light . . . . . . . . . . . . . . . . . . . . . . 31
Rear window heater . . . . . . . . . . . . . . . . . . . 62
Rear-view mirror Exterior mirrors . . . . . . . . . . . . . . . . . . . . 67
Interior rear-view mirror . . . . . . . . . . . . . . 66
Recirculated air mode Heating and ventilation . . . . . . . . . . . . . 105
Refuelling . . . . . . . . . . . . . . . . . . . . . . . . . . 200 Emergency release of fuel filler flap . . . 201
Remote control . . . . . . . . . . . . . . . . . . . . . . . 46 Synchronisation . . . . . . . . . . . . . . . . . . . . 47
Replacing fuses . . . . . . . . . . . . . . . . . . . . . 241
Roof aerial . . . . . . . . . . . . . . . . . . . . . . . . . . 190
Running in the car . . . . . . . . . . . . . . . . . . . . 176
S
Safety instructions Engine compartment . . . . . . . . . . . . . . . 203
Safety wheel bolts . . . . . . . . . . . . . . . . . . . . 235
Saving energy . . . . . . . . . . . . . . . . . . . . . . . 179
Seat belt height adjuster . . . . . . . . . . . . . . . 142
Seat belt warning light . . . . . . . . . . . . . . . . . 141
Seat belts . . . . . . . . . . . . . . . . . . . . . . 138, 143 Belt tensioners . . . . . . . . . . . . . . . . . . . . 143
Blocking . . . . . . . . . . . . . . . . . . . . . . . . . 143
Cleaning . . . . . . . . . . . . . . . . . . . . . . . . . 196
Fasten . . . . . . . . . . . . . . . . . . . . . . . . . . 141
Height adjustment . . . . . . . . . . . . . . . . . 142
Safety instructions . . . . . . . . . . . . . . . . . 140
taking off . . . . . . . . . . . . . . . . . . . . . . . . 142
Warning light . . . . . . . . . . . . . . . . . . . . . . 36
Seat heaters . . . . . . . . . . . . . . . . . . . . . . . . . 77
Service Interval Display . . . . . . . . . . . . . . . . . 17
Service key . . . . . . . . . . . . . . . . . . . . . . . . . . 37
Setting temperature The air conditioning system . . . . . . . . . . 103
Setting the clock . . . . . . . . . . . . . . . . . . . . . . 15
Shifting gears . . . . . . . . . . . . . . . . . . . . . . . 118
Ski bag . . . . . . . . . . . . . . . . . . . . . . . . . . . . . 81
Sliding/tilting roof . . . . . . . . . . . . . . . . . . . . . . 52
Snow chains . . . . . . . . . . . . . . . . . . . . . . . . 225
Spare wheel . . . . . . . . . . . . . . . . . . . . . . . . 229
Speedometer . . . . . . . . . . . . . . . . . . . . . . . . . 16