warning lights SKODA SUPERB 2003 1.G / (B5/3U) Service Manual
[x] Cancel search | Manufacturer: SKODA, Model Year: 2003, Model line: SUPERB, Model: SKODA SUPERB 2003 1.G / (B5/3U)Pages: 259
Page 155 of 259

Airbag system
154
Deactivating an airbag
Deactivating airbags
If any airbags have been deactivated, switch them on
again as soon as possible so that they are able to again
provide their proper protection.
There is the technical means installed within your vehicle to switch off the
front, side or head airbag (take out of commission).
This is why you should have the deactivation of the airbags carried out by
a Škoda dealer. On vehicles equipped with the switch for deactivation of the airbags, you
can deactivate the front and side passenger airbag by means of this
switch
⇒page 155.
Deactivation of airbags is envisaged only for particular instances,
such as if
•Yo u m u s t i n exceptional cases use a child seat on the front
passenger seat where the child is seated with its back to the direction of
travel (in some countries this must be in the direction of travel due to other
legal regulations applying) ⇒page 157.
•You are not able to maintain the distance of at least 25 cm between
middle of steering wheel and chest, despite the driver seat being correctly
adjusted.
•Special attachments are required in the area of the steering wheel
because of a physical disability.
•You have installed other seats (e.g. orthopaedic seats without side
airbags).
Monitoring the airbag system
The functionality of the airbag system is monitored electronically, also
when the airbags have been switched off
An airbag which has been switched off by a Skoda dealer using the
vehicle system tester:
•The warning light for the airbag system lights up for 3 seconds after
switching on the ignition and then flashes for 12 seconds afterwards in 2
second intervals.
Front passenger airbags switched off using the switch for front
passenger airbags* in stowage compartment on the front passenger
side:
•The airbag indicator light in the instrument cluster comes on for about
3 seconds each time the ignition is switched on.
WARNING (continued)
•The sun visors must not be swivelled to the side windows into
the deployment area of the head airbags if any objects, such as
ball-point pens etc. are attached to them. This might result in inju-
ries to the occupants if the head airbag is deployed.
•Installing accessories in the area of the head airbag may
considerably impair the protection offered by the head airbag in
the event of it being deployed. When the deployed head airbag is
inflated, parts of the accessories fitted may in certain circum-
stances be thrown into the interior of the car and cause injuries to
the occupants.
•Any work on the head airbag system including installing and
removing system components because of other repair work (e.g.
removing headliner) must only be carried out by a Škoda Dealer.
Page 157 of 259

Airbag system
156
– Turn the slot of the airbag switch using the main or emergency key in the opposite direction of the arrow to the position ON
⇒ page 155, fig. 135. The slot of the airbag switch must be
located in the horizontal position.
– Check whether the airbag indicator light
in the
middle of the dash panel lights up ⇒page 155, fig. 136 when
the ignition is turned on.
The airbags should only be switched off under exceptional circumstances
⇒ page 154.
Indicator light
(airbag switched off)
The airbag indicator light in the middle of the dash panel does not light up
⇒ page 155, fig. 136 .
If the front passenger airbag is switched on, the airbag warning light
comes on for a few seconds each time the ignition is switched on.
When the front and side passenger airbag is switched off, the indicator
light comes on after the ignition is switched on.
There is a system fault present in the airbag switch off ⇒ if the indi-
cator light flashes. Please have the vehicle inspected without delay by
a Škoda dealer.
WARNING
•Only switch off the airbag when the ignition is switched off!
Otherwise a fault can arise on the airbag system and therefore
could cause the airbag to trigger.
•The driver is responsible for whether the airbag is switched on
or switched off.
•If the indicator light flashes:
WARNING (continued)
− There is a risk of the front passenger airbag or the side
passenger airbag not being deployed in the event of an acci-
dent.
− There is the risk, if someone is sitting on the front passenger
seat, that the front passenger will suffer injury if the airbag is
suddenly deployed.
Page 171 of 259
Intelligent Technology
170
The ESP warning light ⇒page 34 lights up in the instrument cluster when
there is a fault on the ESP.
Switching off
You can switch the ESP off and on again as you wish, by pressing the
button ⇒page 169, fig. 145 . The ESP warning light ⇒page 34 lights up
in the instrument cluster when the ESP is switched off.
The ESP should normally always be switched on. It may be good practice
to switch the system off only in particular exceptional situations if you
desire wheel slip.
Examples:
•when driving with snow chains
•when driving in deep snow or on a loose surface
•when it is necessary to rock a car free when it has become stuck
then you should switch on the ESP again.
Note
•All four wheels must be fitted with the same tyres in order to achieve
problem-free operation of the ESP. Differing rolling circumferences of the
tyres can lead to an undesirable reduction in the engine output.
•Changes to vehicle (e.g. on engine, on the brakes, on chassis or other
assignment of tyres and wheels) can influence the function of the ESP
⇒ page 226.
Traction control system (TCS)*
The traction control system prevents the driven wheels
from spinning when accelerating.
General
The TCS makes it much easier, and sometimes at all possible, to start off,
accelerate and climb a steep hill when the conditions of the road surface
are unfavourable.
Operating principle
The TCS switches on automatically when the engine is started and then
conducts a self-test. The system monitors the speeds of the driven wheels
with the aid of the ABS sensors. If the wheels are spinning, the force trans-
WARNING
It is also not possible for the ESP to overcome the physical limits
of the vehicle. Even if a vehicle fitted with ESP you should still
always adapt your style of driving to the condition of the road
surface and the traffic situation. This particularly applies when
driving on slippery and wet roads. The increased safety offered
must not tempt you to take greater risks than otherwise - risk of an
accident!
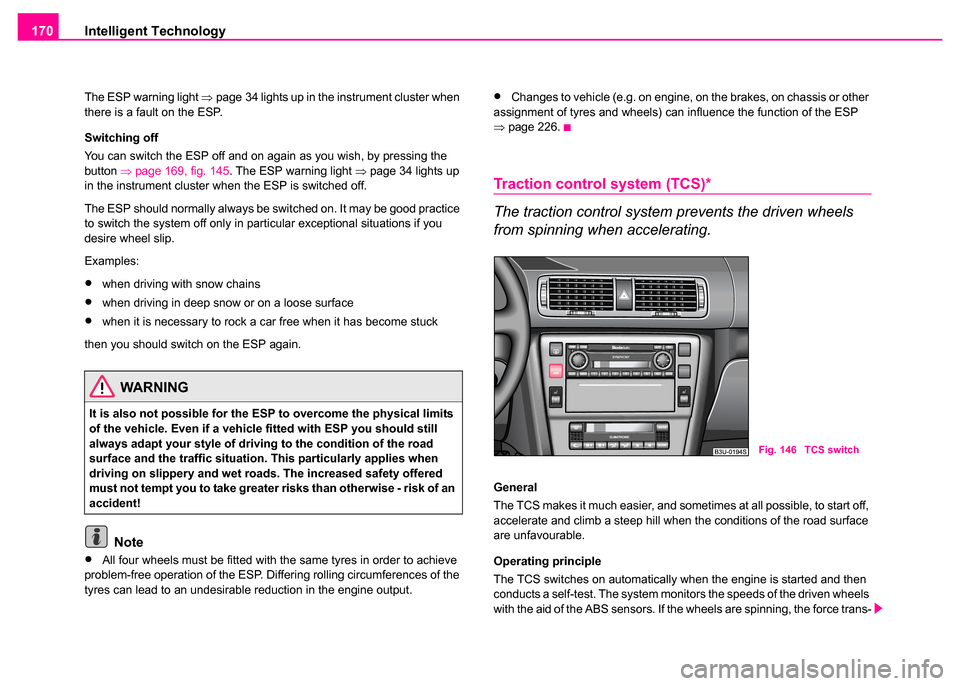
Fig. 146 TCS switch
Page 172 of 259
Intelligent Technology171
Using the systemSafetyDriving TipsGeneral MaintenanceBreakdown assistanceTechnical Data
mitted to the road surface is automatically adapted by reducing the engine
speed. This occurs at all speeds.
The TCS operates in combination with the ABS
⇒page 173. The TCS will
not function if a fault exists in the ABS system.
The TCS warning light ⇒page 34 lights up in the instrument cluster when
there is a fault on the TCS.
Switching off
You can switch the TCS off and on again as you wish by pressing the
button ⇒page 170, fig. 146 . The TCS warning light ⇒page 28 lights up
in the instrument cluster when the TCS is switched off.
The TCS should normally always be switched on. It may be good practice
to switch the system off only in particular exceptional situations if you
desire wheel slip.
Examples:
•when driving with snow chains
•when driving in deep snow or on a loose surface
•when it is necessary to rock a car free when it has become stuck
then you should switch on the TCS again.
The EDL ⇒page 171 is a part of the TCS. THE EDL operates independ-
ently of the TCS (also when the TCS has been switched off using the TCS
button).
Note
•All four wheels must be fitted with the same tyres in order to achieve
problem-free operation of the TCS. Differing rolling circumferences of the
tyres can lead to an undesirable reduction in the engine output.
•Changes to vehicle (e.g. on engine, on the brakes, on chassis or other
assignment of tyres and wheels) can influence the function of the TCS
⇒ page 226.
Electronic Differential Lock (EDL)*
The electronic differential lock prevents an individual
wheel from slipping.
General
The EDL makes it much easier, and sometimes at all possible, to start off,
accelerate and climb a steep hill when the conditions of the road surface
are unfavourable.
Operating principle
The EDL is activated automatically, that is without any action on the part
of the driver. It monitors the speeds of the driven wheels with the aid of the
ABS sensors. Should only one drive wheel begin spinning on a slippery
surface there will be an appreciable difference in the speed of the driven
wheels. The EDL function brakes the slipping wheel and the differential
transmits a greater driving force to the other driven wheel. This control
process is also accompanied by noises.
Overheating of the brakes
The EDL switches off automatically if unusually severe stresses exist in
order to avoid excessive heat generation in the disc brake on the wheel
which is being braked. The vehicle can continue to be driven and has the
same characteristics as a vehicle not fitted with EDL.
WARNING
You should always adjust your style of driving to the conditions of
the road surface and the traffic situation. The increased safety
offered must not tempt you to take greater risks than otherwise -
risk of an accident!
Page 231 of 259
Breakdown assistance
230
– Have all the occupants get out. While changing a wheel, the
occupants of the vehicle should not stand on the road (it is
better behind a crash barrier).
– Apply the handbrake firmly.
– Engage 1st gear or if your vehicle is fitted with an automatic
gearbox, position the selector lever into position P .
– If a trailer is coupled, uncouple it.
– Take the vehicle tool kit and the spare wheel ⇒ page 229
out of the luggage compartment.
Caution
If you have to change a wheel on a slope first block the opposite wheel
with a stone or similar object in order to secure the vehicle from unexpect-
edly rolling away.
Note
Comply with the national legal regulations.
Changing a wheel
Always change a wheel on a level surface as far as possible.
– Take off the full wheel trim/wheel trim cap ⇒page 232,
“Wheel trim caps*” or the caps ⇒page 232, “Wheel bolts with
caps*”.
– Slacken the wheel bolts ⇒ page 233.
– Jack up the vehicle until the wheel is clear of the ground ⇒page 233.
– Unscrew the wheel bolts and place them on a clean surface (cloth, paper etc.).
– Take off the wheel.
– Fit on the spare wheel and tighten the wheel bolts slightly.
– Lower the car.
– Tighten the wheel bolts firmly, alternately and diagonally using the wheel wrench ⇒page 233.
– Mount the full wheel trim/wheel trim cap or the caps.
Note
•All bolts must be clean and must turn easily.
•You must never grease or oil the wheel bolts!
WARNING
•If you find yourself in flowing traffic put on the hazard warning
lights system and place the warning triangle on the side of the road
at the prescribed distance from your vehicle while observing all
national legal provisions. In this way you are protecting not only
yourself but also other road users.
•Never start the engine with the vehicle sitting on the raised jack
- danger of suffering injury!
Page 243 of 259
Fuses and light bulbs
242
Caution
•Never attempt to “repair” fuses and also do not replace them with a
fuse of a higher amperage - risk of fire! This may also cause damage at
another part of the electrical system.
•Have the electrical system checked as quickly as possible by a Škoda
dealer if a newly inserted fuse blows again after a short time.
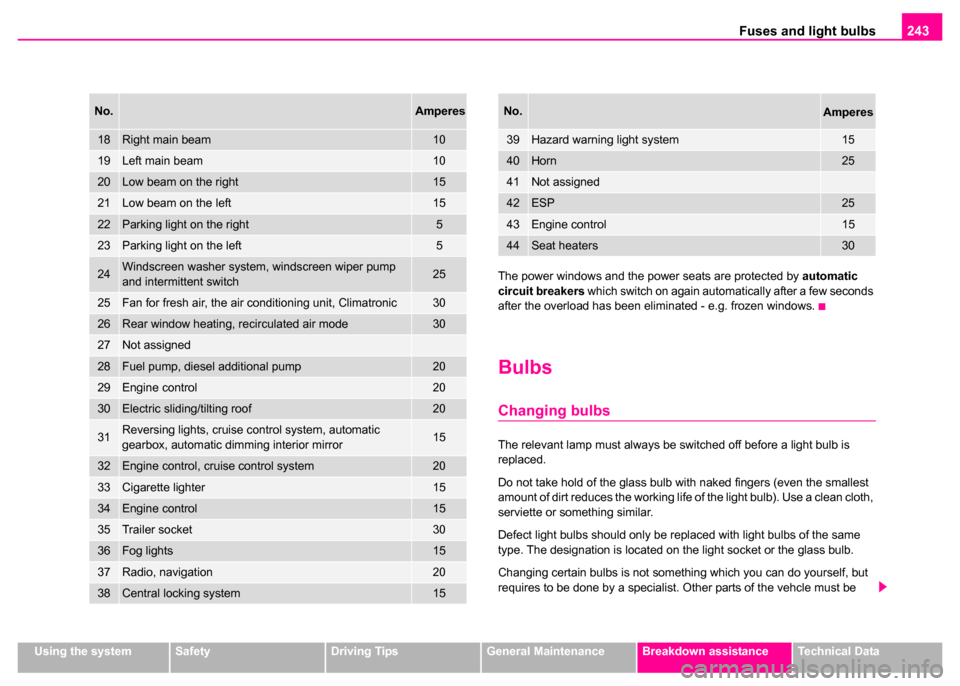
Fuse assignment
Certain electrical components are only standard on certain vehicle model
versions or only suppliable as optional equipment for certain models.
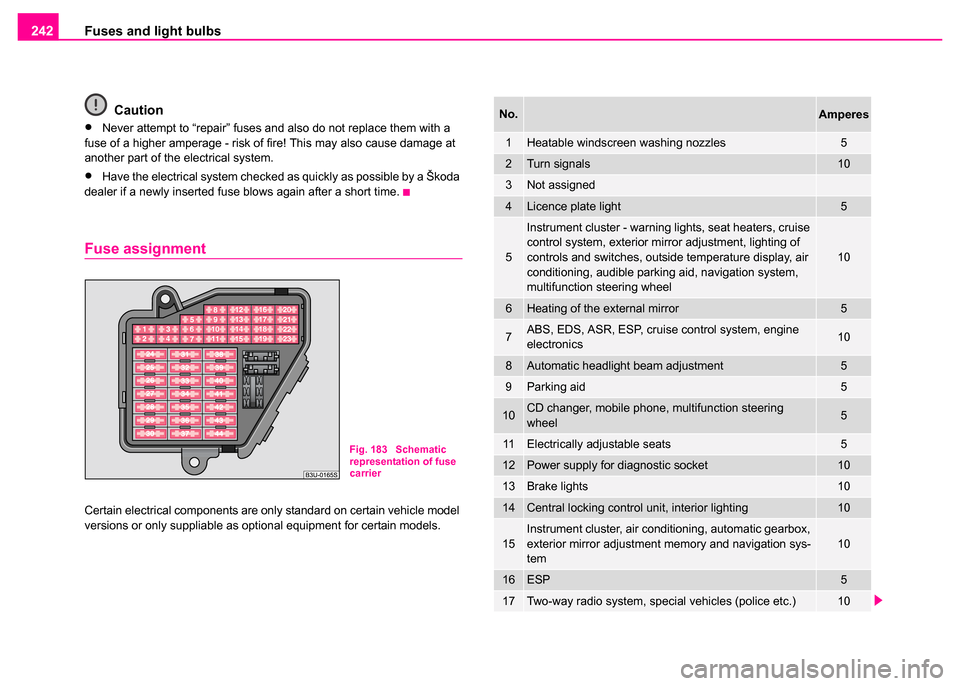
Fig. 183 Schematic
representation of fuse
carrier
No.Amperes
1Heatable windscreen washing nozzles5
2Turn signals10
3Not assigned
4Licence plate light5
5
Instrument cluster - warning lights, seat heaters, cruise
control system, exterior mirror adjustment, lighting of
controls and switches, outside temperature display, air
conditioning, audible parking aid, navigation system,
multifunction steering wheel
10
6Heating of the external mirror5
7ABS, EDS, ASR, ESP, cruise control system, engine
electronics10
8Automatic headlight beam adjustment5
9Parking aid5
10CD changer, mobile phone, multifunction steering
wheel5
11Electrically adjustable seats5
12Power supply for diagnostic socket10
13Brake lights10
14Central locking control unit, interior lighting10
15Instrument cluster, air conditioning, automatic gearbox,
exterior mirror adjustment memory and navigation sys-
tem10
16ESP5
17Two-way radio system, special vehicles (police etc.)10
Page 244 of 259
Fuses and light bulbs243
Using the systemSafetyDriving TipsGeneral MaintenanceBreakdown assistanceTechnical Data
The power windows and the power seats are protected by
automatic
circuit breakers which switch on again automatically after a few seconds
after the overload has been eliminated - e.g. frozen windows.
Bulbs
Changing bulbs
The relevant lamp must always be switched off before a light bulb is
replaced.
Do not take hold of the glass bulb with naked fingers (even the smallest
amount of dirt reduces the working life of the light bulb). Use a clean cloth,
serviette or something similar.
Defect light bulbs should only be replaced with light bulbs of the same
type. The designation is located on the light socket or the glass bulb.
Changing certain bulbs is not something which you can do yourself, but
requires to be done by a specialist. Other parts of the vehcle must be
18Right main beam10
19Left main beam10
20Low beam on the right15
21Low beam on the left15
22Parking light on the right5
23Parking light on the left5
24Windscreen washer system, windscreen wiper pump
and intermittent switch25
25Fan for fresh air, the air conditioning unit, Climatronic30
26Rear window heating, recirculated air mode30
27Not assigned
28Fuel pump, diesel additional pump20
29Engine control20
30Electric sliding/tilting roof20
31Reversing lights, cruise control system, automatic
gearbox, automatic dimming interior mirror15
32Engine control, cruise control system20
33Cigarette lighter15
34Engine control15
35Trailer socket30
36Fog lights15
37Radio, navigation 20
38Central locking system15
No.Amperes
39Hazard warning light system15
40Horn25
41Not assigned
42ESP25
43Engine control15
44Seat heaters30
No.Amperes
Page 245 of 259
Fuses and light bulbs
244
removed in order to change the light bulbs. This applies, in particular, to
bulbs which can only be reached from the engine compartment.
We therefore recommend that you have any bulbs changed by a Škoda
dealer or, in exceptional cases, by calling on other professional assist-
ance.
Please note that the engine compartment is a hazardous area
⇒ page 203, “Working in the engine compartment”.
We recommend that you carry the set of light bulbs with you which was
delivered in your vehicle. Replacement light bulbs
5) are available at
Škoda dealers.
Fitted with a xenon headlight
Change of light bulbs on Xenon lights (low beam lights, parking lights and
main beam lights) should be undertaken by a Skoda dealer.
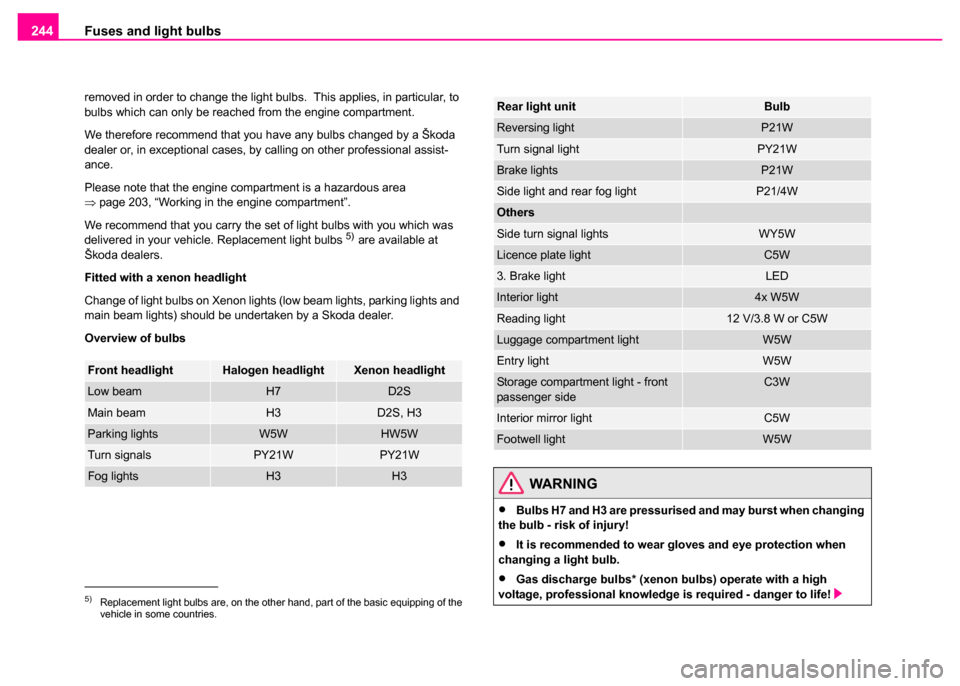
Overview of bulbs
5)Replacement light bulbs are, on the other hand, part of the basic equipping of the
vehicle in some countries.
Front headlightHalogen headlightXenon headlight
Low beamH7D2S
Main beamH3D2S, H3
Parking lightsW5WHW5W
Turn signalsPY21WPY21W
Fog lightsH3H3
Rear light unitBulb
Reversing lightP21W
Turn signal lightPY21W
Brake lightsP21W
Side light and rear fog lightP21/4W
Others
Side turn signal lightsWY5W
Licence plate lightC5W
3. Brake lightLED
Interior light4x W5W
Reading light12 V/3.8 W or C5W
Luggage compartment lightW5W
Entry lightW5W
Storage compartment light - front
passenger sideC3W
Interior mirror lightC5W
Footwell lightW5W
WARNING
•Bulbs H7 and H3 are pressurised and may burst when changing
the bulb - risk of injury!
•It is recommended to wear gloves and eye protection when
changing a light bulb.
•Gas discharge bulbs* (xenon bu lbs) operate with a high
voltage, professional knowledge is required - danger to life!
Page 253 of 259
Index
252
Child seat . . . . . . . . . . . . . . . . . . . . . . . . . . 161
Attaching . . . . . . . . . . . . . . . . . . . . . . . . 164
Child seat protection . . . . . . . . . . . . . . . 164
Classification into groups . . . . . . . . . . . 161
on the front passenger seat . . . . . . . . . 158
Safety instructions . . . . . . . . . . . . . . . . . 157
Use of child seats . . . . . . . . . . . . . . . . . 161
Cigarette lighter . . . . . . . . . . . . . . . . . . . . . . 93
Cleaning . . . . . . . . . . . . . . . . . . . . . . . . . . . 189
Climatronic Air outlet vents . . . . . . . . . . . . . . . . . . . 112
Blower . . . . . . . . . . . . . . . . . . . . . . . . . . 111
Defrosting windows . . . . . . . . . . . . . . . . 108
economic use . . . . . . . . . . . . . . . . . . . . 108
Keeping windows demisted . . . . . . . . . . 109
Operational problems . . . . . . . . . . . . . . 108
Recirculated air mode . . . . . . . . . . . . . . 110
Setting temperature . . . . . . . . . . . . . . . . 111
Climatronic (automatic air conditioning) . . . 107
Clothes hooks . . . . . . . . . . . . . . . . . . . . . . . 101
Cockpit An overview . . . . . . . . . . . . . . . . . . . . . . . 11
Coming Home . . . . . . . . . . . . . . . . . . . . . . . . 60
Compartments . . . . . . . . . . . . . . . . . . . . . . . 95
Convenience operation . . . . . . . . . . . . . . . . . 51
Converting/masking over headlights . . . . . . 178
Cool box . . . . . . . . . . . . . . . . . . . . . . . . . . . . 82
Coolant . . . . . . . . . . . . . . . . . . . . . . . . . 31, 208 replenishing . . . . . . . . . . . . . . . . . . . . . . 209
Coolant temperature gauge . . . . . . . . . . . . . 14 Coolant temperature/coolant level
Warning light . . . . . . . . . . . . . . . . . . . . . . 31
Counter for distance driven . . . . . . . . . . . . . . 16
Cruise control . . . . . . . . . . . . . . . . . . . . . . . 120
Cruise control system . . . . . . . . . . . . . . . . . 120
D
Deactivating an airbag . . . . . . . . . . . . . . . . 154
Defrosting windows The air conditioning system . . . . . . . . . . 104
De-icing windows . . . . . . . . . . . . . . . . . . . . 192
Detachable towing device . . . . . . . . . . . . . . 186
Diesel . . . . . . . . . . . . . . . . . . . . . . . . . . . . . 198
Digital clock . . . . . . . . . . . . . . . . . . . . . . . . . . 15
Dipstick . . . . . . . . . . . . . . . . . . . . . . . . . . . . 206
Direction indicators . . . . . . . . . . . . . . . . . . . . 59 Warning light . . . . . . . . . . . . . . . . . . . . . . 29
Doors Child safety locks . . . . . . . . . . . . . . . . . . . 45
Drinks can holder at the front . . . . . . . . . . . . . . . . . . . . . . . . 90
at the rear . . . . . . . . . . . . . . . . . . . . . . . . 90
Driving economically . . . . . . . . . . . . . . . . . . 179
Dynamo Warning light . . . . . . . . . . . . . . . . . . . . . . 36
E
EDLSee Electronic Differential Lock . . . . . . . . 34 Electric sliding/tilting roof . . . . . . . . . . . . . . . . 52
Electronic Differential Lock
Operating principle . . . . . . . . . . . . . . . . . 171
Warning light . . . . . . . . . . . . . . . . . . . . . . 34
Electronic stability programme Operating principle . . . . . . . . . . . . . . . . . 169
Electronic stability programme (ESP) Warning light . . . . . . . . . . . . . . . . . . . . . . 34
Emergency key . . . . . . . . . . . . . . . . . . . . . . . 37
Emergency operation Fuel filler flap . . . . . . . . . . . . . . . . . . . . . 201
Engine compartment Safety instructions . . . . . . . . . . . . . . . . . 203
Engine electronics EPC warning light . . . . . . . . . . . . . . . . . . 31
Engine oil . . . . . . . . . . . . . . . . . . . . . . . . . . . 205 changing . . . . . . . . . . . . . . . . . . . . . . . . 207
replenishing . . . . . . . . . . . . . . . . . . . . . . 207
Engine revolutions counter . . . . . . . . . . . . . . 14
Environmental compatibility . . . . . . . . . 179, 183
Exterior mirrors . . . . . . . . . . . . . . . . . . . . . . . 67
F
First-aid box . . . . . . . . . . . . . . . . . . . . . . . . . 227
Fog lights . . . . . . . . . . . . . . . . . . . . . . . . . . . . 57 Warning light . . . . . . . . . . . . . . . . . . . 30, 31
For the first 1 500 kilometres . . . . . . . . . . . . 176
Front airbags . . . . . . . . . . . . . . . . . . . . . . . . 147
Front armrest . . . . . . . . . . . . . . . . . . . . . . . . 100
Page 254 of 259
Index253
Fuel . . . . . . . . . . . . . . . . . . . . . . . . . . . . . . . 198
Diesel . . . . . . . . . . . . . . . . . . . . . . . . . . . 198
Fuel gauge . . . . . . . . . . . . . . . . . . . . . . . . 15
Petrol . . . . . . . . . . . . . . . . . . . . . . . . . . . 198
saving . . . . . . . . . . . . . . . . . . . . . . . . . . . 179
Fuel consumption . . . . . . . . . . . . . . . . . . . . . 21
Fuel gauge . . . . . . . . . . . . . . . . . . . . . . . . . . 15
Fuel reserve Warning light . . . . . . . . . . . . . . . . . . . . . . 32
Fuse . . . . . . . . . . . . . . . . . . . . . . . . . . . . . . 241 Assignment . . . . . . . . . . . . . . . . . . . . . . 242
G
Glow plug system . . . . . . . . . . . . . . . . . . . . 116Warning light . . . . . . . . . . . . . . . . . . . . . . 31
H
Handbrake . . . . . . . . . . . . . . . . . . . . . . . . . . 118
Hazard warning light system . . . . . . . . . . . . . 58Warning light . . . . . . . . . . . . . . . . . . . . . . 29
Head restraint . . . . . . . . . . . . . . . . . . . . . . . . 74
Headlight flasher . . . . . . . . . . . . . . . . . . . . . . 59
Headlights Fog lights . . . . . . . . . . . . . . . . . . . . . . . . . 57
Headlight cleaning system . . . . . . . . . . . . 65
Heated windscreen washer nozzles . . . . . . . 64
Heating . . . . . . . . . . . . . . . . . . . . . . . . . . . . 102
Heating of the external mirror . . . . . . . . . . . . 67
Horn . . . . . . . . . . . . . . . . . . . . . . . . . . . . . . . . 11
I
Ignition lock . . . . . . . . . . . . . . . . . . . . . . . . . 114
Information display . . . . . . . . . . . . . . . . . . . . . 22
Instrument cluster . . . . . . . . . . . . . . . . . . . . . 13
Instrument lighting . . . . . . . . . . . . . . . . . . . . . 57
Instruments . . . . . . . . . . . . . . . . . . . . . . . . . . 13
Interior lighting at the front . . . . . . . . . . . . . . . . . . . . . . . . 60
at the rear . . . . . . . . . . . . . . . . . . . . . . . . . 61
Luggage compartment . . . . . . . . . . . . . . . 62
Interior monitoring . . . . . . . . . . . . . . . . . . . . . 49
Intermittent wipe . . . . . . . . . . . . . . . . . . . . . . 64
Isofix . . . . . . . . . . . . . . . . . . . . . . . . . . . . . . 166
ISOFIX system . . . . . . . . . . . . . . . . . . . . . . . 166
J
Jacking points . . . . . . . . . . . . . . . . . . . . . . . 233
Jump-starting . . . . . . . . . . . . . . . . . . . . 236, 237
K
Keeping windows demisted The air conditioning system . . . . . . . . . . 104
Keys . . . . . . . . . . . . . . . . . . . . . . . . . . . . . . . . 37
L
Leather care . . . . . . . . . . . . . . . . . . . . . . . . . 195
Lighting of the interior of the vehicle . . . . . . . 60 Lights
switching them on and off . . . . . . . . . . . . . 56
Lights and Visibility . . . . . . . . . . . . . . . . . . . . 58
Locking . . . . . . . . . . . . . . . . . . . . . . . . . . . . . . 39 Central locking system . . . . . . . . . . . . . . . 41
Remote control . . . . . . . . . . . . . . . . . . . . . 46
Locking and unlocking from inside . . . . . . . . . 42
Low beam . . . . . . . . . . . . . . . . . . . . . . . . . . . 56 Warning light . . . . . . . . . . . . . . . . . . . . . . . 30
Luggage compartment . . . . . . . . . . . . . . . . . . 78 CD-ROM player . . . . . . . . . . . . . . . . . . . . 80
Folding double hooks . . . . . . . . . . . . . . . . 80
Lashing eyes . . . . . . . . . . . . . . . . . . . . . . 79
Luggage compartment opening . . . . . . . . 81
Luggage compartment door Lighting . . . . . . . . . . . . . . . . . . . . . . . . . . . 62
Lumbar support . . . . . . . . . . . . . . . . . . . . . . . 70
M
Main beam . . . . . . . . . . . . . . . . . . . . . . . . 56, 59 Warning light . . . . . . . . . . . . . . . . . . . . . . . 29
Manual gearbox . . . . . . . . . . . . . . . . . . . . . . 118
Memory for the on-board computer . . . . . . . . 19
Mirror Storing and retrieving settings . . . . . . . . . 72
Mobile phone . . . . . . . . . . . . . . . . . . . . 132, 135
Motoring abroad . . . . . . . . . . . . . . . . . . . . . . 178 Headlights . . . . . . . . . . . . . . . . . . . . . . . . 178