airbag SKODA SUPERB 2003 1.G / (B5/3U) Owner's Manual
[x] Cancel search | Manufacturer: SKODA, Model Year: 2003, Model line: SUPERB, Model: SKODA SUPERB 2003 1.G / (B5/3U)Pages: 259
Page 4 of 259
Contents3
Contents
Layout of this Owner's
Manual
. . . . . . . . . . . . . . . . . . . . . . . . . . . . .
Using the system . . . . . . . . . . . . . . .
Cockpit . . . . . . . . . . . . . . . . . . . . . . . . . . . . . . .
An overview . . . . . . . . . . . . . . . . . . . . . . . . . .
Instruments and Indicator/Warning LightsGeneral view of the instrument cluster . . . . . .
Engine revolutions counter . . . . . . . . . . . . . . .
Coolant temperature gauge . . . . . . . . . . . . . .
Fuel gauge . . . . . . . . . . . . . . . . . . . . . . . . . . .
Digital clock . . . . . . . . . . . . . . . . . . . . . . . . . .
Speedometer with counter for distance driven
Service Interval Display . . . . . . . . . . . . . . . . .
Multi-functional indicator* . . . . . . . . . . . . . . . .
Information display* . . . . . . . . . . . . . . . . . . . .
Auto Check Control . . . . . . . . . . . . . . . . . . . .
Warning lights . . . . . . . . . . . . . . . . . . . . . . . . .
Unlocking and locking . . . . . . . . . . . . . . . . . .
Keys . . . . . . . . . . . . . . . . . . . . . . . . . . . . . . . .
Central locking system . . . . . . . . . . . . . . . . . .
Child safety locks . . . . . . . . . . . . . . . . . . . . . .
Remote control . . . . . . . . . . . . . . . . . . . . . . . .
Anti-theft alarm system . . . . . . . . . . . . . . . . . .
Power windows . . . . . . . . . . . . . . . . . . . . . . .
Electric sliding/tilting roof* . . . . . . . . . . . . . . .
Lights and Visibility. . . . . . . . . . . . . . . . . . . . .
Lights . . . . . . . . . . . . . . . . . . . . . . . . . . . . . . .
Interior lighting . . . . . . . . . . . . . . . . . . . . . . . .
Visibility . . . . . . . . . . . . . . . . . . . . . . . . . . . . . The windscreen wiper and washing system .
Rear-view mirror . . . . . . . . . . . . . . . . . . . . . .
Seats and Stowage . . . . . . . . . . . . . . . . . . . .
Front seats . . . . . . . . . . . . . . . . . . . . . . . . . . .
Adjusting front seats manually . . . . . . . . . . . .
Adjusting front seats electrically* . . . . . . . . . .
Front passenger seat with a folding central back
rest* . . . . . . . . . . . . . . . . . . . . . . . . . . . . . . . .
Footrest at the rear* . . . . . . . . . . . . . . . . . . . .
Seat heaters* . . . . . . . . . . . . . . . . . . . . . . . . .
Pedals . . . . . . . . . . . . . . . . . . . . . . . . . . . . . .
Luggage compartment . . . . . . . . . . . . . . . . . .
The cool box in the armrest of rear seats* . . .
CargoFlex folding box* . . . . . . . . . . . . . . . . . .
The roof luggage rack system . . . . . . . . . . . .
Drinks can holder . . . . . . . . . . . . . . . . . . . . . .
Ashtray . . . . . . . . . . . . . . . . . . . . . . . . . . . . . .
Cigarette lighters and power sockets . . . . . . .
Storage facilities . . . . . . . . . . . . . . . . . . . . . . .
Heating and air conditioning system . . . . .
The air conditioning system . . . . . . . . . . . . . .
Climatronic* (automatic air conditioning) . . . .
Starting-off and Driving. . . . . . . . . . . . . . . . .
Setting steering wheel position . . . . . . . . . . .
Ignition lock . . . . . . . . . . . . . . . . . . . . . . . . . .
Starting engine . . . . . . . . . . . . . . . . . . . . . . . .
Switching the engine off . . . . . . . . . . . . . . . . .
Shifting gears . . . . . . . . . . . . . . . . . . . . . . . . .
Handbrake . . . . . . . . . . . . . . . . . . . . . . . . . . .
Parking aid* . . . . . . . . . . . . . . . . . . . . . . . . . .
Cruise control system (CCS)* . . . . . . . . . . . .
Automatic gearbox*. . . . . . . . . . . . . . . . . . . .
5-speed automatic gearbox . . . . . . . . . . . . . .
Communicating and Navigating . . . . . . . . .
Multifunction steering wheel* . . . . . . . . . . . . .
Mobile phone, two-way radio system and
navigation system . . . . . . . . . . . . . . . . . . . . .
Safety. . . . . . . . . . . . . . . . . . . . . . . . . . . . . .
Passive Safety . . . . . . . . . . . . . . . . . . . . . . . .
Driving the safe way . . . . . . . . . . . . . . . . . . .
Requirements for maximum safety . . . . . . . .
Seat belts. . . . . . . . . . . . . . . . . . . . . . . . . . . . .
Why seat belts? . . . . . . . . . . . . . . . . . . . . . . .
The physical principle of a frontal collision . .
Important safety information regarding the use
of seat belts . . . . . . . . . . . . . . . . . . . . . . . . . .
How are seat belts correctly fastened? . . . . .
Belt tensioners . . . . . . . . . . . . . . . . . . . . . . . .
Airbag system. . . . . . . . . . . . . . . . . . . . . . . . .
Description of the airbag system . . . . . . . . . .
Front airbags . . . . . . . . . . . . . . . . . . . . . . . . .
Side airbags . . . . . . . . . . . . . . . . . . . . . . . . . .
Head airbags* . . . . . . . . . . . . . . . . . . . . . . . .
Deactivating an airbag . . . . . . . . . . . . . . . . . .
Transporting children safely . . . . . . . . . . . .
What you should know about transporting
children! . . . . . . . . . . . . . . . . . . . . . . . . . . . . .
Child seat . . . . . . . . . . . . . . . . . . . . . . . . . . . .
Attaching child safety seat . . . . . . . . . . . . . . .
7
9
11
11
13
13
14
14
15
15
16
17
18
22
25
28
37
37
39
45
46
47
49
52
56
56
60
62 64
66
69
69
69
70
75
77
77
78
78
82
85
88
90
91
93
95
102
102
107 11 4
11 4
11 4
11 5
11 7
11 8
11 8
11 9
120
123
123 130
130
132
137
137
137
137
138
138
139
140
141
143
145
145
147
149
152
154
157
157
161
164
Page 12 of 259
Cockpit11
Using the systemSafetyDriving TipsGeneral MaintenanceBreakdown assistanceTechnical Data
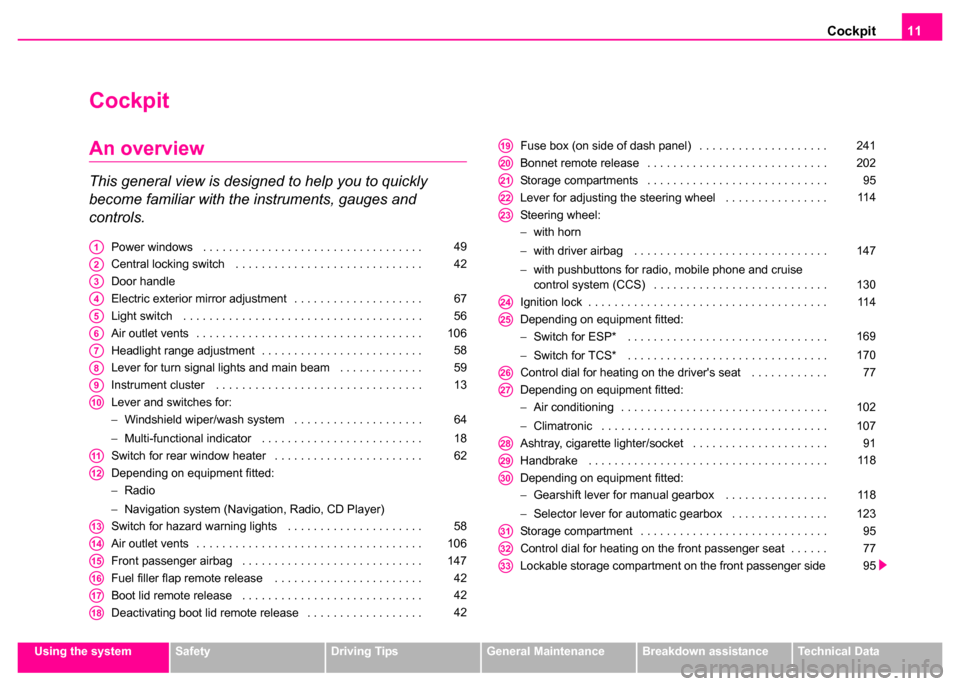
Cockpit
An overview
This general view is designed to help you to quickly
become familiar with the instruments, gauges and
controls.
Power windows . . . . . . . . . . . . . . . . . . . . . . . . . . . . . . . . . .
Central locking switch . . . . . . . . . . . . . . . . . . . . . . . . . . . . .
Door handle
Electric exterior mirror adjustment . . . . . . . . . . . . . . . . . . . .
Light switch . . . . . . . . . . . . . . . . . . . . . . . . . . . . . . . . . . . . .
Air outlet vents . . . . . . . . . . . . . . . . . . . . . . . . . . . . . . . . . . .
Headlight range adjustment . . . . . . . . . . . . . . . . . . . . . . . . .
Lever for turn signal lights and main beam . . . . . . . . . . . . .
Instrument cluster . . . . . . . . . . . . . . . . . . . . . . . . . . . . . . . .
Lever and switches for:
−Windshield wiper/wash system . . . . . . . . . . . . . . . . . . . .
− Multi-functional indicator . . . . . . . . . . . . . . . . . . . . . . . . .
Switch for rear window heater . . . . . . . . . . . . . . . . . . . . . . .
Depending on equipment fitted:
− Radio
− Navigation system (Navigation, Radio, CD Player)
Switch for hazard warning lights . . . . . . . . . . . . . . . . . . . . .
Air outlet vents . . . . . . . . . . . . . . . . . . . . . . . . . . . . . . . . . . .
Front passenger airbag . . . . . . . . . . . . . . . . . . . . . . . . . . . .
Fuel filler flap remote release . . . . . . . . . . . . . . . . . . . . . . .
Boot lid remote release . . . . . . . . . . . . . . . . . . . . . . . . . . . .
Deactivating boot lid remote release . . . . . . . . . . . . . . . . . . Fuse box (on side of dash panel) . . . . . . . . . . . . . . . . . . . .
Bonnet remote release . . . . . . . . . . . . . . . . . . . . . . . . . . . .
Storage compartments . . . . . . . . . . . . . . . . . . . . . . . . . . . .
Lever for adjusting the steering wheel . . . . . . . . . . . . . . . .
Steering wheel:
−
with horn
− with driver airbag . . . . . . . . . . . . . . . . . . . . . . . . . . . . . .
− with pushbuttons for radio, mobile phone and cruise
control system (CCS) . . . . . . . . . . . . . . . . . . . . . . . . . . .
Ignition lock . . . . . . . . . . . . . . . . . . . . . . . . . . . . . . . . . . . . .
Depending on equipment fitted:
− Switch for ESP* . . . . . . . . . . . . . . . . . . . . . . . . . . . . . . .
− Switch for TCS* . . . . . . . . . . . . . . . . . . . . . . . . . . . . . . .
Control dial for heating on the driver's seat . . . . . . . . . . . .
Depending on equipment fitted:
− Air conditioning . . . . . . . . . . . . . . . . . . . . . . . . . . . . . . . .
− Climatronic . . . . . . . . . . . . . . . . . . . . . . . . . . . . . . . . . . .
Ashtray, cigarette lighter/socket . . . . . . . . . . . . . . . . . . . . .
Handbrake . . . . . . . . . . . . . . . . . . . . . . . . . . . . . . . . . . . . .
Depending on equipment fitted:
− Gearshift lever for manual gearbox . . . . . . . . . . . . . . . .
− Selector lever for automatic gearbox . . . . . . . . . . . . . . .
Storage compartment . . . . . . . . . . . . . . . . . . . . . . . . . . . . .
Control dial for heating on the front passenger seat . . . . . .
Lockable storage compartment on the front passenger sideA149
A242
A3
A467
A556
A6106
A758
A859
A913
A10
64
18
A1162
A12
A1358
A14106
A15147
A1642
A1742
A1842
A19241
A20202
A2195
A2211 4
A23
147
130
A2411 4
A25
169
170
A2677
A27
102
107
A2891
A2911 8
A30
11 8
123
A3195
A3277
A3395
Page 29 of 259
Instruments and Indicator/Warning Lights
28
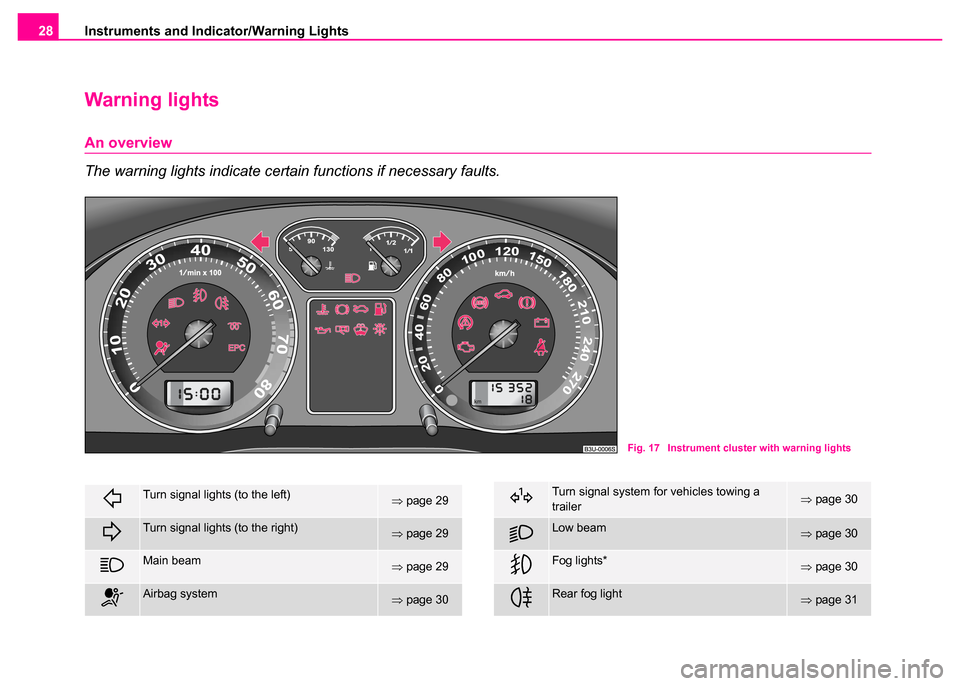
Warning lights
An overview
The warning lights indicate certain functions if necessary faults.
Fig. 17 Instrument cluster with warning lights
Turn signal lights (to the left)⇒ page 29
Turn signal lights (to the right)⇒page 29
Main beam⇒page 29
Airbag system⇒page 30
Turn signal system for vehicles towing a
trailer⇒page 30
Low beam⇒page 30
Fog lights*⇒page 30
Rear fog light⇒page 31
Page 31 of 259
Instruments and Indicator/Warning Lights
30
Further information about the main beam ⇒page 59.
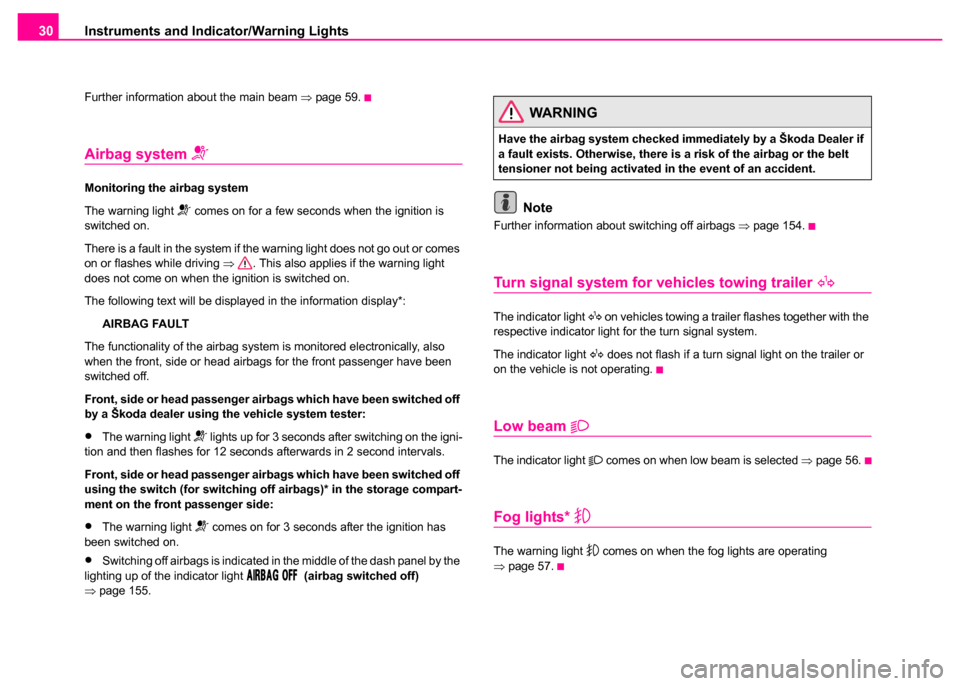
Airbag system
Monitoring the airbag system
The warning light
comes on for a few seconds when the ignition is
switched on.
There is a fault in the system if the warning light does not go out or comes
on or flashes while driving ⇒. This also applies if the warning light
does not come on when the ignition is switched on.
The following text will be displayed in the information display*:
AIRBAG FAULT
The functionality of the airbag system is monitored electronically, also
when the front, side or head airbags for the front passenger have been
switched off.
Front, side or head passenger airbags which have been switched off
by a Škoda dealer using the vehicle system tester:
•The warning light lights up for 3 seconds after switching on the igni-
tion and then flashes for 12 seconds afterwards in 2 second intervals.
Front, side or head passenger airbags which have been switched off
using the switch (for switching off airbags)* in the storage compart-
ment on the front passenger side:
•The warning light comes on for 3 seconds after the ignition has
been switched on.
•Switching off airbags is indicated in the middle of the dash panel by the
lighting up of the indicator light (airbag switched off)
⇒ page 155.
Note
Further information about switching off airbags ⇒page 154.
Turn signal system for vehicles towing trailer
The indicator light on vehicles towing a trailer flashes together with the
respective indicator light for the turn signal system.
The indicator light
does not flash if a turn signal light on the trailer or
on the vehicle is not operating.
Low beam
The indicator light comes on when low beam is selected ⇒page 56.
Fog lights*
The warning light comes on when the fog lights are operating
⇒ page 57.
WARNING
Have the airbag system checked immediately by a Škoda Dealer if
a fault exists. Otherwise, there is a risk of the airbag or the belt
tensioner not being activated in the event of an accident.
Page 41 of 259
Unlocking and locking
40
Safe securing
The central locking system is equipped with a safe securing system.
Locking the vehicle from the outside causes the door locks to be automat-
ically blocked. It is not possible to pull out the locking buttons. The indi-
cator light in the driver's door flashes. It is not possible to open the doors
with the door handle either from the inside or from the outside. This acts
as an effective deterrent for attempts to break into your vehicle.
•You can deactivate the safe securing system. This is done by locking
the vehicle with the key or radio-operated key twice within 2 seconds.
•Deactivating the safe securing system means that the warning light
next to the securing knob in the driver's door will not flash. This is not the
case, however, for an activated anti-theft alarm system since the indicator
light is showing that the system is active ⇒page 47.
•The safe securing system is again activated the next time the vehicle
is unlocked and locked again.
The doors can be opened from the inside if the vehicle is locked and the
safe securing system is deactivated:
•The door is unlocked by actuating the door-opening lever.
•The door opens upon actuating the door-opening lever again.
Automatic locking*
All the doors and the boot lid are locked automatically once the car
reaches a speed of about 15 km/h.
If the ignition key is withdrawn, the car is then automatically unlocked
again. In addition, it is possible for the driver to unlock the car by pressing
the central locking button
or by pulling the door opening lever.
If you wish, your Škoda Dealer can convert the central locking system of
your car to the automatic locking mode.
Note
•After unlocking the vehicle see, if the securing knobs are located on all
doors at the bottom.
•The vehicle is unlocked automatically if an airbag is deployed.
•Should the central locking system not operate properly, you can lock
and unlock the front doors and the boot lid with the key. Emergency
unlocking of fuel filler flap ⇒page 201.
•It is not possible for you to activate the safe securing system and the
anti-theft alarm system* if the central locking system fails.
•The anti-theft alarm system is also armed when the car is closed
without activating the safe securing system. In this case, always switch off
the interior monitoring sensor* ⇒page 49 first of all to avoid an alarm
being triggered unintentionally.
WARNING
If the vehicle is locked from the outside and the safe securing
system is activated, there must not be any person and animals in
the vehicle as it is then not possible to open either a door or a
window from the inside. The locked doors make it more difficult for
rescuers to get into the vehicle in an emergency - hazard!
Page 44 of 259
Unlocking and locking43
Using the systemSafetyDriving TipsGeneral MaintenanceBreakdown assistanceTechnical Data
to avoid inadvertently being locked out of the vehicle. You then have to
lock a door separately after closing it.
•In the event of an accident in which the airbags are deployed, the
locked doors are automatically unlocked from the inside in order to enable
rescuers to gain access to the vehicle.
Note
The door opening lever and the button for the central locking system do
not operate if the safe securing system is activated.
Opening a single door
The single door opening function makes it possible to
unlock only the driver door. The rest of the vehicle remains
locked.
Unlocking only driver door
– Turn the key once in opening direction or press the unlock
button of the remote control once. Unlocking all doors and the boot lid
– Turn the key
twice in opening direction within 5 seconds or
press the unlock button of the remote control twice within 5
seconds.
Also if only the driver door is unlocked, the anti-theft protection and the
anti-theft alarm system* are immediately deactivated.
Note
The single door opening function can be first activated by recoding the
control unit of the central locking system. this work is carried out by a
Škoda dealer.
WARNING
The central locking system also operates if the ignition is switched
off. All the doors and the boot lid are locked. Children should never
be left unattended in the vehicle since it is difficult to provide
assistance from the outside when the doors are locked. Locked
doors make it difficult for rescuers to get into the vehicle in an
emergency - hazard!
Page 70 of 259
Seats and Stowage69
Using the systemSafetyDriving TipsGeneral MaintenanceBreakdown assistanceTechnical Data
Seats and Stowage
Front seats
Basic information
The front seats have a wide range of different settings and can thus be
matched to the physical characteristics of the driver and front passenger.
Correct adjustment of the seats is particularly important for
•safely and quickly reaching the controls,
•a relaxed, fatigue-free body position,
•achieving the maximum protection offered by the seat belts and
the airbag system.
The chapters which follow describe the procedure which you should adopt
for adjusting the seats.
Adjusting front seats manually
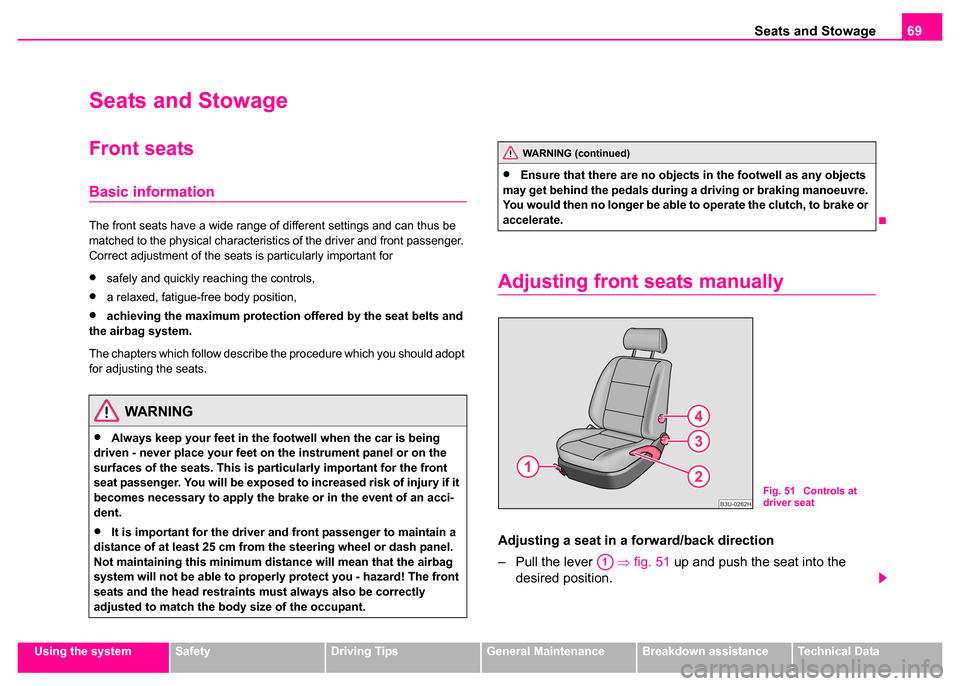
Adjusting a seat in a fo rward/back direction
– Pull the lever ⇒fig. 51 up and push the seat into the
desired position.
WARNING
•Always keep your feet in the footwell when the car is being
driven - never place your feet on the instrument panel or on the
surfaces of the seats. This is particularly important for the front
seat passenger. You will be exposed to increased risk of injury if it
becomes necessary to apply the brake or in the event of an acci-
dent.
•It is important for the driver and front passenger to maintain a
distance of at least 25 cm from the steering wheel or dash panel.
Not maintaining this minimum distan ce will mean that the airbag
system will not be able to properly protect you - hazard! The front
seats and the head restraints must always also be correctly
adjusted to match the body size of the occupant.
WARNING (continued)
•Ensure that there are no objects in the footwell as any objects
may get behind the pedals during a driving or braking manoeuvre.
You would then no longer be able to operate the clutch, to brake or
accelerate.
Fig. 51 Controls at
driver seat
A1
Page 71 of 259
Seats and Stowage
70
– Release the lever and push the seat further until the lock is heard to engage.
Adjusting height of seat
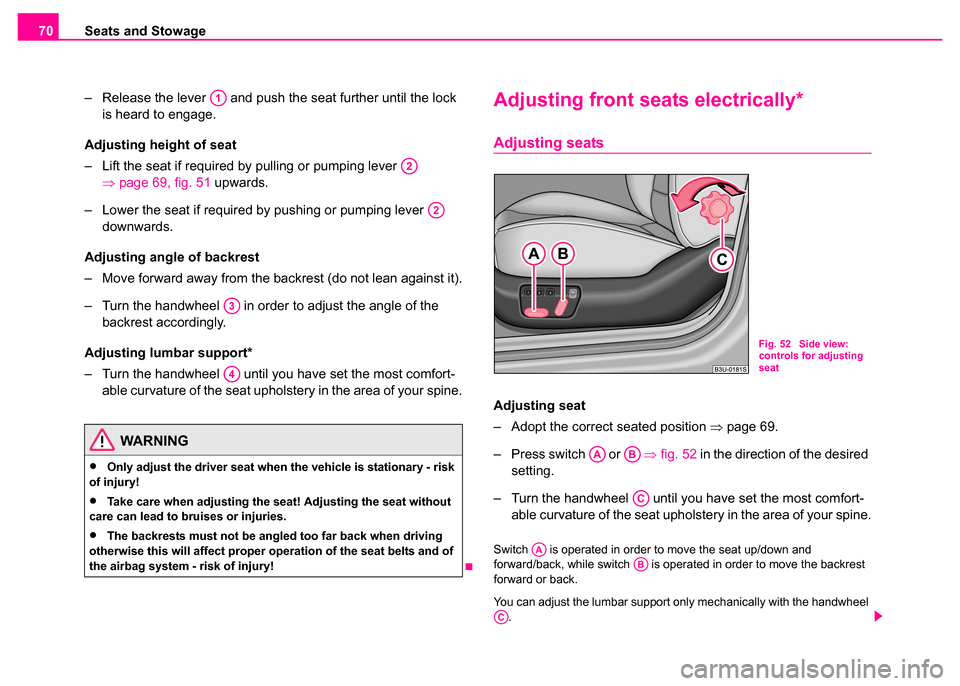
– Lift the seat if required by pulling or pumping lever ⇒page 69, fig. 51 upwards.
– Lower the seat if required by pushing or pumping lever downwards.
Adjusting angle of backrest
– Move forward away from the backrest (do not lean against it).
– Turn the handwheel in order to adjust the angle of the backrest accordingly.
Adjusting lumbar support*
– Turn the handwheel until you have set the most comfort- able curvature of the seat upholstery in the area of your spine.
Adjusting front seats electrically*
Adjusting seats
Adjusting seat
– Adopt the correct seated position ⇒page 69.
– Press switch or ⇒fig. 52 in the direction of the desired
setting.
– Turn the handwheel until you have set the most comfort- able curvature of the seat upholstery in the area of your spine.
Switch is operated in order to move the seat up/down and
forward/back, while switch is operated in order to move the backrest
forward or back.
You can adjust the lumbar support only mechanically with the handwheel
.
WARNING
•Only adjust the driver seat when the vehicle is stationary - risk
of injury!
•Take care when adjusting the seat! Adjusting the seat without
care can lead to bruises or injuries.
•The backrests must not be angled too far back when driving
otherwise this will affect proper operation of the seat belts and of
the airbag system - risk of injury!
A1
A2
A2
A3
A4
Fig. 52 Side view:
controls for adjusting
seat
AAAB
AC
AAAB
AC
Page 72 of 259
Seats and Stowage71
Using the systemSafetyDriving TipsGeneral MaintenanceBreakdown assistanceTechnical Data
Caution
If the movement of the seat is inadvertently interrupted during an adjust-
ment, once again press the switch in the appropriate direction and
continue with the adjustment of the seat to the end.
Memory for the seat
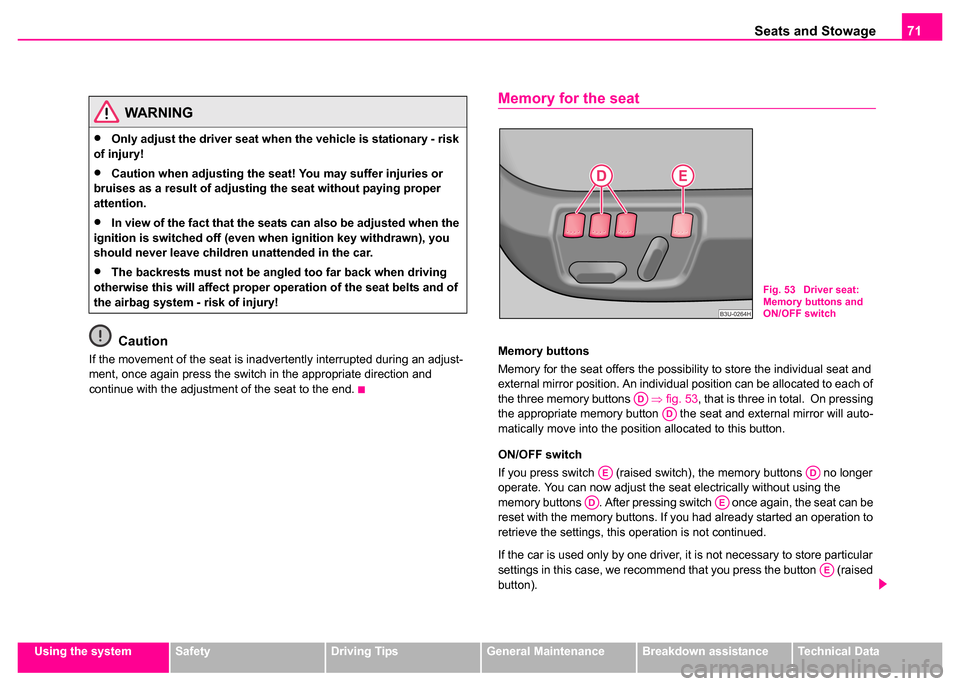
Memory buttons
Memory for the seat offers the possibility to store the individual seat and
external mirror position. An individual position can be allocated to each of
the three memory buttons ⇒fig. 53 , that is three in total. On pressing
the appropriate memory button the seat and external mirror will auto-
matically move into the position allocated to this button.
ON/OFF switch
If you press switch (raised switch), the memory buttons no longer
operate. You can now adjust the seat electrically without using the
memory buttons . After pressing switch once again, the seat can be
reset with the memory buttons. If you had already started an operation to
retrieve the settings, this operation is not continued.
If the car is used only by one driver, it is not necessary to store particular
settings in this case, we recommend that you press the button (raised
button).
WARNING
•Only adjust the driver seat when the vehicle is stationary - risk
of injury!
•Caution when adjusting the seat! You may suffer injuries or
bruises as a result of adjusting the seat without paying proper
attention.
•In view of the fact that the seats can also be adjusted when the
ignition is switched off (even when ignition key withdrawn), you
should never leave children unattended in the car.
•The backrests must not be angled too far back when driving
otherwise this will affect proper operation of the seat belts and of
the airbag system - risk of injury!
Fig. 53 Driver seat:
Memory buttons and
ON/OFF switch
ADAD
AEAD
ADAE
AE
Page 99 of 259
Seats and Stowage
98
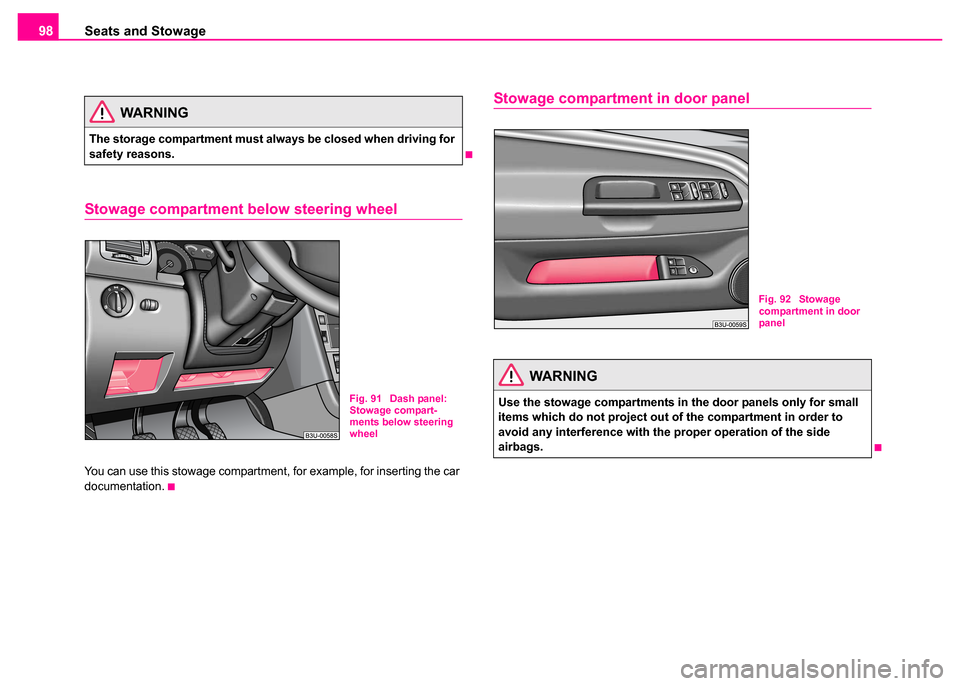
Stowage compartment below steering wheel
You can use this stowage compartment, for example, for inserting the car
documentation.
Stowage compartment in door panelWARNING
The storage compartment must always be closed when driving for
safety reasons.
Fig. 91 Dash panel:
Stowage compart-
ments below steering
wheel
WARNING
Use the stowage compartments in the door panels only for small
items which do not project out of the compartment in order to
avoid any interference with the proper operation of the side
airbags.
Fig. 92 Stowage
compartment in door
panel