cooling SKODA SUPERB 2003 1.G / (B5/3U) Owner's Manual
[x] Cancel search | Manufacturer: SKODA, Model Year: 2003, Model line: SUPERB, Model: SKODA SUPERB 2003 1.G / (B5/3U)Pages: 259
Page 5 of 259
Contents
4
Driving Tips . . . . . . . . . . . . . . . . . . . . . .
Intelligent Technology . . . . . . . . . . . . . . . . . .
Electronic stability programme (ESP)* . . . . . .
Brakes . . . . . . . . . . . . . . . . . . . . . . . . . . . . . .
Antilock brake system (ABS) . . . . . . . . . . . . .
Brake Assist* . . . . . . . . . . . . . . . . . . . . . . . . .
Power steering . . . . . . . . . . . . . . . . . . . . . . . .
Driving and the Environment. . . . . . . . . . . .
The first 1 500 kilometres and then afterwards
Catalytic converter . . . . . . . . . . . . . . . . . . . . .
Motoring abroad . . . . . . . . . . . . . . . . . . . . . . .
Avoiding damage to your vehicle . . . . . . . . . .
Driving in an economical and environmentally
conscious manner . . . . . . . . . . . . . . . . . . . . .
Environmental compatibility . . . . . . . . . . . . . .
Towing a trailer . . . . . . . . . . . . . . . . . . . . . . . .
Towing a trailer . . . . . . . . . . . . . . . . . . . . . . . .
Detachable towing device* . . . . . . . . . . . . . .
General Maintenance . . . . . . . . . .
Care and cleaning . . . . . . . . . . . . . . . . . . . . .
General . . . . . . . . . . . . . . . . . . . . . . . . . . . . .
Care of the exterior of vehicle . . . . . . . . . . . .
Care of the interior of vehicle . . . . . . . . . . . . .
Engine compartment . . . . . . . . . . . . . . . . . . .
Fuel. . . . . . . . . . . . . . . . . . . . . . . . . . . . . . . . . .
Petrol . . . . . . . . . . . . . . . . . . . . . . . . . . . . . . .
Diesel . . . . . . . . . . . . . . . . . . . . . . . . . . . . . . .
Refuelling . . . . . . . . . . . . . . . . . . . . . . . . . . . .
Inspecting and Replenishing. . . . . . . . . . . .
Engine compartment . . . . . . . . . . . . . . . . . . .
Overview of the engine compartment . . . . . .
Engine oil . . . . . . . . . . . . . . . . . . . . . . . . . . . .
Cooling system . . . . . . . . . . . . . . . . . . . . . . . Brake fluid . . . . . . . . . . . . . . . . . . . . . . . . . . .
The battery . . . . . . . . . . . . . . . . . . . . . . . . . .
Windscreen Wiper and Washer System . . . .
Spark plugs . . . . . . . . . . . . . . . . . . . . . . . . . .
V-ribbed belts . . . . . . . . . . . . . . . . . . . . . . . . .
The dust and pollen filter* . . . . . . . . . . . . . . .
Wheels and Tyres . . . . . . . . . . . . . . . . . . . . .
Wheels . . . . . . . . . . . . . . . . . . . . . . . . . . . . .
Accessories, changes and replacement of
parts . . . . . . . . . . . . . . . . . . . . . . . . . . . . . . . . .
General . . . . . . . . . . . . . . . . . . . . . . . . . . . . .
Breakdown assistance . . . . . . . .
Breakdown assistance . . . . . . . . . . . . . . . . .
First-aid box* . . . . . . . . . . . . . . . . . . . . . . . . .
Warning triangle . . . . . . . . . . . . . . . . . . . . . .
Fire extinguisher* . . . . . . . . . . . . . . . . . . . . . .
Vehicle tool kit . . . . . . . . . . . . . . . . . . . . . . . .
Spare wheel . . . . . . . . . . . . . . . . . . . . . . . . . .
Changing a wheel . . . . . . . . . . . . . . . . . . . . .
Jump-starting . . . . . . . . . . . . . . . . . . . . . . . . .
Tow-starting and towing vehicle . . . . . . . . . . .
Fuses and light bulbs . . . . . . . . . . . . . . . . . .
Electric fuses . . . . . . . . . . . . . . . . . . . . . . . . .
Bulbs . . . . . . . . . . . . . . . . . . . . . . . . . . . . . . .
Technical Data. . . . . . . . . . . . . . . . . . .
General . . . . . . . . . . . . . . . . . . . . . . . . . . . . . .
Vehicle identification data . . . . . . . . . . . . . . .
Index. . . . . . . . . . . . . . . . . . . . . . . . . . . . . . .
169
169
169
172
173
174
174
176
176
177
178
178
179
183
184
184
186
189
189
189
189
194
196
198
198
198
200
202
202
204
205
208 210
212
217
217
218
218
219
219
226
226
227
227
227
227
228
228
229
229
236
238
241
241
243
249
249
249
251
Page 15 of 259
Instruments and Indicator/Warning Lights
14
Engine revolutions counter
The start of the red zone in the revolutions counter ⇒page 13, fig. 3
indicates the maximum permissible engine speed for all gears for an
engine which has been run in and operating at a normal temperature. You
should shift into the next higher gear before this red zone is reached, or
move the selector lever into position D if your car is fitted with an automatic
gearbox.
One should shift to the next lower gear at the latest when the engine is no
longer running smoothly.
Avoid high engine speeds during the running-in period ⇒page 176
Caution
The needle of the revolutions counter must on no account move into the
red zone of the scale: Risk of damage to the engine!
For the sake of the environment
Shifting up early helps you save fuel and reduce the operating noise of
your vehicle.
Coolant temperature gauge
The coolant temperature gauge ⇒page 13, fig. 3 only operates when
the ignition is switched on.
In order to avoid any damage to the engine, please pay attention to the
following notes regarding the temperature ranges: Cold range
If the pointer is still in the left-hand area of the scale it means that the
engine has not yet reached its operating temperature. Avoid running at
high engine speeds, at full throttle and at severe engine loads.
The operating range
The engine has reached its operating temperature as soon as the pointer
moves into the mid-range of the scale. The pointer may also move further
to the right at high engine loads and high outside temperatures. This is not
critical provided the warning symbol
in the instrument cluster does not
flash.
If the symbol
in the instrument cluster flashes it means that either the
coolant temperature is too high or the coolant level is too low. Please
refer to the guidelines ⇒page 31, “Coolant temperature/coolant level ”.
Caution
Additional headlights and other attached components in front of the fresh
air inlet impair the cooling efficiency of the coolant. There is then a risk of
the engine overheating at high outside temperatures and high engine
loads!
A1
A2
WARNING
Pay attention to the warning notes ⇒page 203, “Working in the
engine compartment” before opening the bonnet and inspecting
the coolant level.
Page 33 of 259
Instruments and Indicator/Warning Lights
32
Please also refer to the additional instructions ⇒page 209.
The following text will be displayed in the information display*:
STOP CHECK COOLANT SERVICE MANUAL
Brake pad wear
If the warning light comes on, contact a Škoda Dealer and have the
brake pads of all the wheels inspected.
A peep sounds as an additional warning signal.
The following text will be displayed in the information display*:
CHECK BRAKE PADS
Bonnet
The warning light comes on when the ignition is switched on if the
bonnet is unlocked.
Fuel reserve
The warning light comes on if the fuel level in the tank has dropped to
about 8 litres.
A peep sounds as an additional warning signal.
The following text will be displayed in the information display*:
PLEASE REFUEL
Engine oil
The warning light lights up red (low oil pressure)
The warning light comes on for several seconds after the ignition is
switched on.
2)
Stop the vehicle and switch the engine off if the warning light does not
go off after the engine has started or flashes while driving. Check the oil
level and top up with oil as necessary ⇒page 207.
3 peeps sound as an additional warning signal.
Do not continue your journey if for some reason it is not possible under
the conditions prevailing to top up with oil. Switch of the engine and
contact and obtain professional assistance from a Škoda dealer.
Do not drive any further if the warning light remains on even if the oil is
at the correct level. Do not run the engine not at idling speed either.
Contact the nearest Škoda dealer to obtain professional assistance.
WARNING
•Take care when opening the coolant expansion bottle. If the
engine is hot, the cooling system is pressurized - risk of scalding.
It is best to allow the engine to cool down before removing the cap.
•Do not touch the coolant fan The coolant fan may switch on
automatically even if the ignition is off.
2)The warning light on vehicles fitted with information display does not come on
after switching the ignition on, but only if a fault exists or the engine oil level is too
low.
Page 37 of 259
Instruments and Indicator/Warning Lights
36
. Visit the next Škoda dealer immediately and have the brake system
checked.
3 peeps sound as an additional warning signal.
One should get used to high pedal forces, long braking distances and long
free play of the brake pedal when driving to the next Škoda dealer.
The following text will be displayed in the information display*:
STOP BRAKE FAULT SERVICE MANUAL
For further information on the brake system ⇒page 172.
Handbrake applied
The warning light
also comes on if the handbrake is applied. An audible
warning is also given if you drive the vehicle for at least 3 seconds at a
speed of more than 6 km/h.
The following text will be displayed in the information display*:
HANDBRAKE ON
Dynamo
The warning light comes on after the ignition has been switched on. It
should go out after the engine has started.
If the warning light does not go out after the engine has started, or comes
on when driving, drive to the nearest Škoda Dealer. The vehicle battery
will be discharged in this case so switch off all non-essential electrical
components.
The following text will be displayed in the information display*:
ALTERNATOR WORKSHOP!
Caution
If the warning light comes on when driving and in addition the warning
light (cooling system fault) also comes on in display, you must then
stop the car immediately and switch the engine off - risk of engine
damage!
Seat belt warning light
The warning light comes on for a few seconds after the ignition is
switched on as a reminder to fasten the seat belt.
If you do not fasten the seat belt, a long warning signal sounds for 6
seconds.
For further information on the seat belts ⇒page 138.
The following text will be displayed in the information display*: FASTEN SEATBELT
For further information on the seat belts ⇒page 138.
WARNING
•Pay attention to the following instructions ⇒page 203 before
checking the brake fluid level and opening the bonnet.
•If the brake system warning light does not go out a few
seconds after switching on the ignition or comes on when driving,
stop immediately and check the brake fluid in the reservoir
⇒ page 210. If the fluid level has dropped below the MIN marking,
do not drive any further - risk of accident! Contact a Škoda dealer
to obtain professional assistance.
Page 83 of 259

Seats and Stowage
82
– Pull the seat belt tight in direction of arrow ⇒page 81,
fig. 66 .
Stowing
– Close the cover for the through-loading bag in the boot.
– Carefully fold the through-loading bag together (approx. 11 cm packet).
– Close the cover in the interior of the car.
– Move the armrest back into its original position.
Note
Never fold the though-loading bag together if it is moist.
The cool box in the armrest of rear seats*
Using the system
The contents of the cool box is cooled to a temperature of about
20 °C below the ambient temperature, but to a maximum of
approx.+ 5 °C.
Opening and Closing
– Pull the handle ⇒fig. 67 and pull the lid downwards.
– Open up the lid of the cool box upwards until it is heard to lock.
Switching on and off
– The cooling action of the cool box is switched on and off using switch ⇒fig. 67 . It is signalised by the lighting up of the
indicator light on the switch.
WARNING
After placing items into the through-loading bag, you must secure
the bag with the belt .
AC
AAFig. 67 Cool box
AA
Page 85 of 259

Seats and Stowage
84
Removing and installing the cool box
Removing
– Switch the cooling mode of the cool box off ⇒page 82. – Remove the locking mechanism
⇒fig. 69 .
– Open the lid of the cool box.
– Press open the upper side of the cool box from the inside in the direction of arrow and put away the cool box in the
luggage compartment (see arrow ).
– Unplug the plug connector (the plug connector is located in the luggage compartment in the lower part of the fixing frame
for the cool box).
Installing
– Place the cool box on the luggage compartment partition and plug in the plug.
– Remove the locking mechanism ⇒fig. 69 .
– Fold the lid of the cool box onto the fixing frame ⇒fig. 70 .
– Lift the cool box with the palm of the hand on the inside of the upper wall of the cool box.
– Insert the cool box with the lower edge into the lower holding bracket on the luggage compartment partition.
– Pull the cool box forwards to the upper edge until the stop (see arrow ), press with the palm of the hand onto the upper wall
(see arrow ), pull the box again forwards and press down-
wards (see arrow ).
– Push the locking mechanism ⇒fig. 69 up to the stop into
the fixing frame.
– Close the lid of the cool box.
Fig. 69 Removing the
cool box
Fig. 70 Installing the
cool box
AA
A1
A2
AA
A1
A2
A3
AA
Page 97 of 259

Seats and Stowage
96
Two holders for placing drink cans are located on the inside of the lid.
Cooling of storage compar tment on front passenger
side
– You can switch the cooling system on or off using the control
dial ⇒fig. 87 .
The cooling of the storage compartment operates only if the air condi-
tioning system is switched on. We recommend that you switch off the cooling (opening concealed) if it is operating in the heating mode or if you
are not using the cooling system for the storage compartment.
Storage drawer*
– Press in the middle of the storage compartment
⇒fig. 88 and
the storage compartment will come out.
WARNING
•The storage compartment must always be closed when driving
for safety reasons.
•The drinks can holder should not be used while driving.
Fig. 87 Storage
compartment: Control
dial for the cooling
system
WARNING
•The storage compartment is not a substitute for the ashtray and
must also not be used for such purposes. Risk of fire!
•The storage compartment must always be closed when driving
for safety reasons.
Fig. 88 Dash panel:
Storage drawer
Page 101 of 259
Seats and Stowage
100
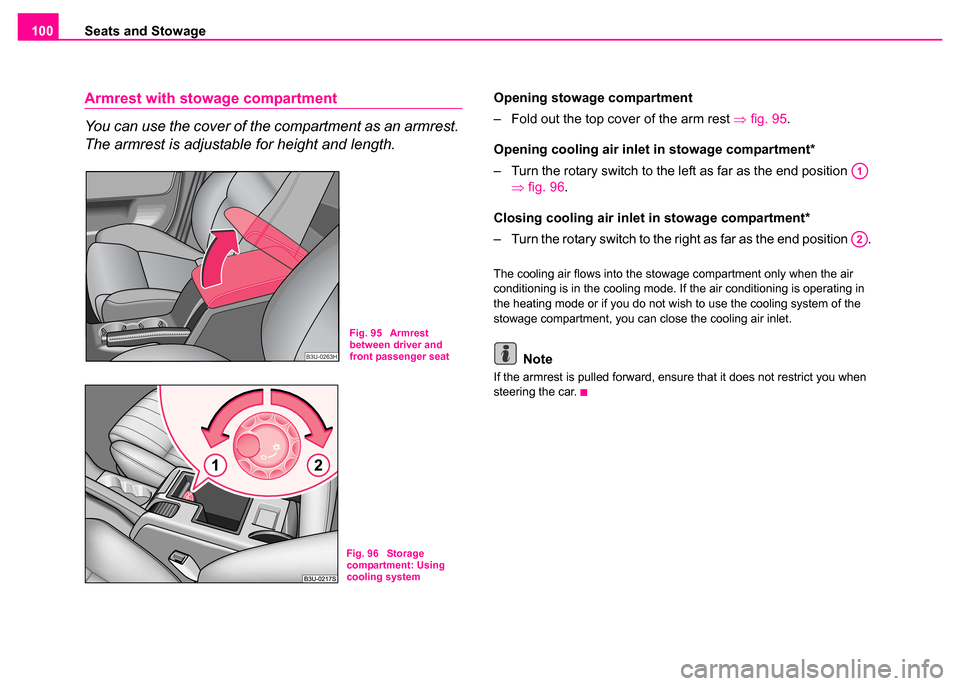
Armrest with stow age compartment
You can use the cover of the compartment as an armrest.
The armrest is adjustable for height and length.Opening stowag e compartment
– Fold out the top cover of the arm rest ⇒ fig. 95.
Opening cooling air inlet in stowage compartment*
– Turn the rotary switch to the left as far as the end position ⇒fig. 96.
Closing cooling air inlet in stowage compartment*
– Turn the rotary switch to the right as far as the end position .
The cooling air flows into the stowage compartment only when the air
conditioning is in the cooling mode. If the air conditioning is operating in
the heating mode or if you do not wish to use the cooling system of the
stowage compartment, you can close the cooling air inlet.
Note
If the armrest is pulled forward, ensure that it does not restrict you when
steering the car.
Fig. 95 Armrest
between driver and
front passenger seat
Fig. 96 Storage
compartment: Using
cooling system
A1
A2
Page 103 of 259

Heating and air conditioning system
102
Heating and air conditioning system
The air conditioning system
Description
The air conditioning system is a combined cooling and
heating system. It makes it possible to optimally control
the air temperature at any season of the year.
Description of the air conditioning system
It is important for your safety and for your driving comfort that the air condi-
tioning system is operating properly.
The air conditioning system operates when switch ⇒page 103,
fig. 99 is pressed and the following conditions are met:
•engine running
•outside temperature above +5 °C
•blower switch switched on (positions 1 to 4)
If the air conditioning system is switched on, the temperature and air
humidity drops in the vehicle. The wellbeing of the occupants of the car is
enhanced as a result of this particularly at high outside temperatures and
a high air humidity. The system prevents the windows misting up during
the cold season of the year.
The heating effect is dependent upon the coolant temperature, thus full
heat output only occurs when the engine has reached its operating
temperature.
It is possible to briefly activate recirculated air mode in order to enhance
the cooling effect ⇒ . Air at a temperature of about 5°C may flow out of the vents under certain
circumstances when the air conditioning system is operating. Lengthy and
uneven distribution of the air flow out of the vents (in particular at the leg
area) and large differences in temperature, for example when getting out
of the vehicle, can result in chills in sensitive persons.
The air inlet in front of the windscreen must be free of ice, snow or leaves
in order to ensure that the heating and ventilation systems operate prop-
erly.
After switching on the air conditioning
Condensation from the evaporator
of the air conditioning may drip down and form a puddle below the vehicle.
This is quite normal and not an indication of a leak!
Aeration of the vehicle when ignition is switched off*
On models fitted with power sliding/tilting roof with sollar cells, the fresh
air blower is automatically switched over to “solar mode ” if the sun ray's
are sufficient after switching off the ignition. The solar cells on the
sliding/tilting roof deliver power for the fresh air blower. This supplies the
interior of the car with fresh air.
For an optimum ventilation, the air outlet vents 3 and 4 must be opened
⇒ page 106.
The ventilation functions only when the sliding/tilting roof is closed.
ACAE
WARNING
•For your own safety and that of other road users, ensure that all
the windows are free of ice, snow and misting. Please familiarize
yourself about how to correctly operate the heating and ventilation
systems, how to demist and defrost the windows, as well as with
the cooling mode.
Page 105 of 259

Heating and air conditioning system
104
Note
•If the windscreen is misted up, turn the air distributor regulator into
position . It is not possible to operate the recirculated air mode,
however, in this position.
•The whole heat output will be needed to unfrost the windscreen and
side windows. No warm air will be fed to the footwell. This can lead to
restriction of the heating comfort.
•If the air conditioning system has not been switched on for a lengthy
period, odours may be produced at the evaporator because of deposits.
Switch the air conditioning system on at least once a month for approxi-
mately 5 minutes at the highest blower stage - also during the cold season
of the year - in order to remove such odours. Also open a window for a
short time.
•Please refer to the information regarding recirculated air mode
⇒ page 105.
Setting air conditioning system
Recommended settings of air conditioning controls:
Defrosting the windscreen and side windows
•Turn control dial ⇒page 103, fig. 99 to the right up to the stop
•Blower switch in position 4
•Turn the air distribution control into the position
•Close the air outlet vents 3
•Open air outlet vents 4 ⇒ page 106, fig. 100 and point towards the
side window. Keeping winscreen demisted
We recommend that you use the following setting in cases where the
windows are misted up more than usual (e.g. when it is raining):
•Blower switch in position
2
•Turn the air distribution control into the position between and
•Close the air outlet vents 3
•Open air outlet vents 4 and point towards the side window
•Switch on the air conditioning system using switch
Warming up the inside of the ve hicle as rapidly as possible
•Turn control dial to the right up to the stop
•Blower switch in position 3 or 4
•Turn the air distribution control into the position
•Open air outlet vents 3 and 4
•we recommend that you press the switch - recirculated air
mode - for a short time
Heating the vehicle to a comfortable temperature
We recommend the following setting once the windows are no longer
misted up and the desired teperature has been reached:
•Control dial at the desired heat output
•Blower switch in position 1 or 2
•Turn the air distribution control into the position
•Close the air outlet vents 3
•Open the air outlet vents 4
•Set the air distribution regulator between positions and , if the
windscreen gets misted up again, as required.
Cooling down the inside of the vehicle as rapidly as possible
•Turn the control dial to the left up to the stop
•Blower switch in position 3 or 4
AC
AA
AB
AC
AB
AC
ACAE
AA
AB
AC
AD
AA
AB
AC
AC
AA
AB