fuel consumption SKODA SUPERB 2004 1.G / (B5/3U) Owner's Manual
[x] Cancel search | Manufacturer: SKODA, Model Year: 2004, Model line: SUPERB, Model: SKODA SUPERB 2004 1.G / (B5/3U)Pages: 270
Page 1 of 270
ŠkodaSuperb
S I M P LY C L E V E R
OWNER´ S MANUAL
How you can contribute to a cleaner en-
vironment
The fuel consumption of your Škoda - and thus
the level of pollutants contained in the exhaust
- is also determined by how you drive.
The noise level and wear and tear are also influ-
enced by how you personally handle your vehi-
cle. This Owner ´s Manual tells you how to drive your Škoda to achieve the minimum impact on
the environment, and how to save money at
the same time. Look up „Environment“ in the
Index to find out more.
Please also refer to all the texts identif
ied with a
` in this Owner ´s Manual.
Make your contribution - for the sake of
the environment.Návod k obsluze
Superb anglicky 05.04 S73.5610.05.20
3U0 012 003 GA
www.skoda-auto.com
Superb anglicky 05.04 S73.5610.05.20
Page 9 of 270
Layout of this Owner's Manual (symbol explanation)
8
Layout of this Owner's Ma nual (symbol explanation)
The Owner's Manual has been systematically designed, in order to make
it easy for you to find and absorb the information you require.
Chapters, table of contents and subject index
The text of the manual are divided into relatively short sections which are
combined into easy-to-read chapters. The chapter you are reading at any
particular moment is highlighted at the bottom right of the page.
The Table of contents is arranged according to the chapters and the
detailed Subject index at the end of the Owner's Manual helps you to
rapidly find the information you are looking for.
Sections
The majority of Sections apply to all models.
Since there is a wide range of different equipment and options available it
is clearly unavoidable, despite dividing the contents into sections, that
mention may be made of equipment which is not fitted to your vehicle.
Equipment which is marked * is only standard on certain vehicle model
versions or only suppliable as optional equipment for certain models.
Brief information and instructions
Each section has a Heading.
This is followed by Brief information (in large italic lettering), which tells
you the subject which is dealt with in this section.
Most of the illustrations are accompanied by an Instruction (in relatively
large letters) which explains to you in a straightforward way the action you
have to take. Work steps which have to be carried out are illustrated with
a hyphen.
Notes
There are 4 different notes. Such guidelines are presented together at the
end of the section.
WARNING
The most important notes are marked with the heading Warning.
These Warning notes draw your attention to a serious risk of acci-
dent or injury. While reading the text you will frequently encounter
a double arrow followed by a small warning symbol. This symbol is
intended to draw your attention to a Warning note at the end of the
section to which you must pay careful attention.
Caution
OnA Caution note draws your attention to the possibility of damage to
your vehicle (e.g. damage to gearbox), or points out general risks of an
accident .
For the sake of the environment
An Environmental note draws your attention to environmental protection
aspects. This is where you will, for example, find tips aimed at reducing
your fuel consumption.
Note
A normal Note draws your attention in a general way to important informa-
tion.
Direction indications
All direction indications such as “left”, “right”, “front”, “rear” relate to the
direction of travel of the vehicle.
Page 19 of 270
Instruments and Indicator/Warning Lights
18
Multi-functional indicator (onboard
computer)
Introduction
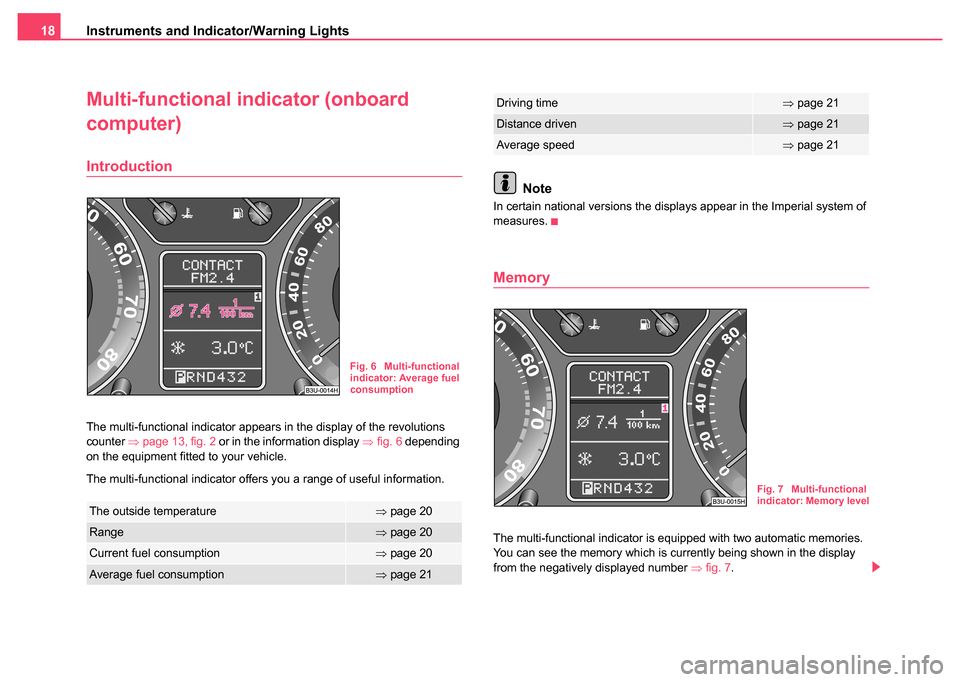
The multi-functional indicator appears in the display of the revolutions
counter ⇒page 13, fig. 2 or in the information display ⇒fig. 6 depending
on the equipment fitted to your vehicle.
The multi-functional indicator offers you a range of useful information.
Note
In certain national versions the displays appear in the Imperial system of
measures.
Memory
The multi-functional indicator is equipped with two automatic memories.
You can see the memory which is currently being shown in the display
from the negatively displayed number ⇒fig. 7 .
The outside temperature⇒page 20
Range⇒page 20
Current fuel consumption⇒page 20
Average fuel consumption⇒page 21
Fig. 6 Multi-functional
indicator: Average fuel
consumption
Driving time⇒page 21
Distance driven⇒page 21
Average speed⇒page 21
Fig. 7 Multi-functional
indicator: Memory level
Page 21 of 270
Instruments and Indicator/Warning Lights
20
The following readouts of the selected memory will be set to zero by
button :
•Average fuel consumption
•Distance driven
•Average speed
•Driving time
You can only operate the multi-functional indicator when the ignition is
switched on. After the ignition is switched on, the function displayed is the
one which you last selected before switching off the ignition.
The outside temperature indicator will appear with an ice chrystal symbol
when the outside temperature lies between +5°C and -5°C. The symbol
warns the driver of the possible danger of ice on the road. After the rocker
switch is pressed, the function displays the one which you last selected
before switching off the ignition.
The outside temperature
The outside temperature appears in the display when the ignition is
switched on.
The correct outside temperature will be indicated with a delay of 5
minutes. If the vehicle is stationary (or driven at a very low speed) the
temperature indicated may be slightly higher than the actual outside
temperature because of heat radiated by the engine.
The outside temperature indicator will appear with an ice chrystal symbol
when the outside temperature lies between +5°C and -5°C.
WARNING
Please note that black ice may also be present on the road surface
even at temperatures around +5°C - warning, drive with care!
Note
The outside temperature is not indicating when showing navigation data
(guidance to the destination). It must be called up over the menu (valid for
vehicles which have a navigation and information display).
Range
The estimated range in kilometres is shown on the display. It indicates the
distance you can still drive with your vehicle based on the present level of
fuel in the tank for the same style of driving. The readout is shown in steps
of 5 km.
The fuel consumption for the last 50 km is taken as a basis for calculating
the range. If you drive in a more economical manner from this moment on,
the range will be increased accordingly.
You first drive 50 km if the readout is reset (after disconnecting the battery)
before a new readout for the range is displayed.
Current fuel consumption
The current fuel consumption level is shown in the display in litres/100 km.
This information can help you to adapt your style of driving to the fuel
consumption you wish to achieve.
The display appears in litres/hour if the vehicle is stationary or driving at a
low speed.
AB
AA
Page 22 of 270
Instruments and Indicator/Warning Lights21
Using the systemSafetyDriving TipsGeneral MaintenanceBreakdown assistanceTechnical Data
Average fuel consumption
The average fuel consumption since the memory was last erased is
shown in the display in litres/100 km ⇒page 18. This information can help
you to adapt your style of driving to the fuel consumption you wish to
achieve.
If you wish to determine the average fuel consumption over a certain
period of time you must first erase the memory at the start of the new
measurement using the button ⇒ page 19, fig. 8. A zero appears in
the display for the first 300 metres you drive after erasing the memory.
The indicated value will be updated every 30 metres while you are driving.
Note
The amount of fuel consumed will not be indicated.
Driving time
The driving time which has elapsed since the memory was last erased,
appears in the display ⇒page 18. If you wish to calculate the driving time
from a particular time of day you must first erase the memory at this
moment in time by pressing the button ⇒page 19, fig. 8 .
The maximum time indicated in both switch positions is 99 hours and 59
minutes. The indicator is set back to null if this period is exceeded.
Distance driven
The distance driven since the memory was last erased appears in the
display ⇒ page 18. If you wish to calculate the distance driven from a particular time of day you must first erase the memory at this moment in
time by pressing the button
⇒page 19, fig. 8 .
The maximum distance indicated in both switch positions is 9 999 km.
The indicator is set back to null if this period is exceeded.
Average speed
The average speed since the memory was last erased is shown in the
display in km/hour ⇒page 18. If you wish to determine the average speed
over a certain period of time you must first erase the memory at the start
of the new measurement using the button ⇒page 19, fig. 8 .
A zero appears in the display for the first 100 metres you drive after
erasing the memory.AB
AB
AB
AB
Page 64 of 270
Lights and Visibility63
Using the systemSafetyDriving TipsGeneral MaintenanceBreakdown assistanceTechnical Data
– Press switch ⇒page 62, fig. 43 to switch on the rear window
heater.
The rear window heater operates only if the ignition is switched on. An
indicator light in the switch is illuminated when the rear window heater is
switched on.
The rear window heater switches off automatically after a few minutes.
For the sake of the environment
You should switch off the rear window heater as soon as the rear window
is clear. The reduced current consumption will have a favourable effect on
fuel economy ⇒page 189.
Sun visors
Using the sun visors can contribute to increasing road
safety.
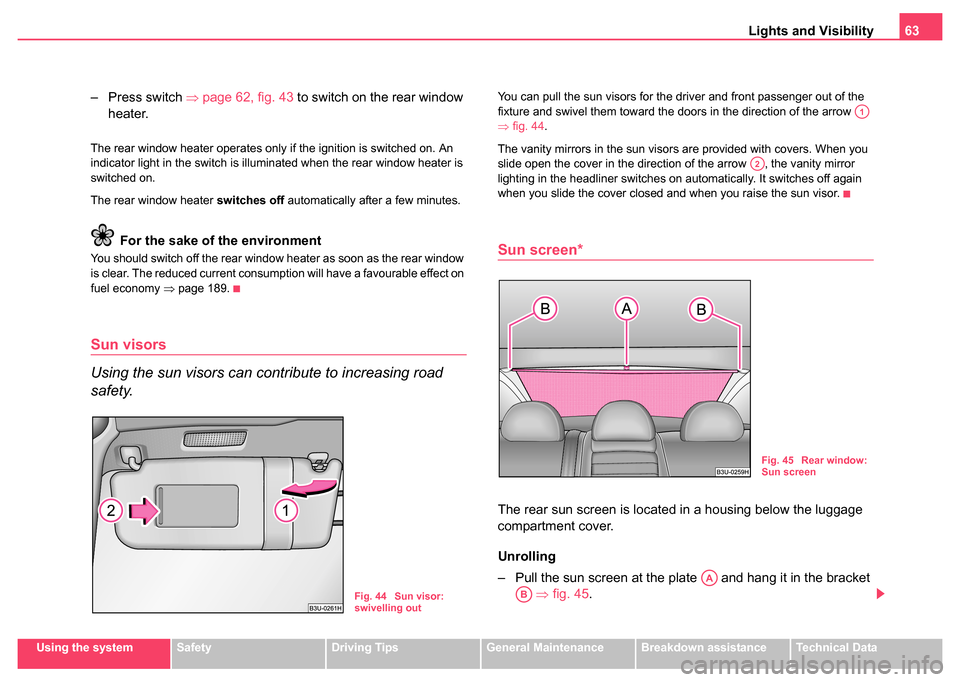
You can pull the sun visors for the driver and front passenger out of the
fixture and swivel them toward the doors in the direction of the arrow
⇒fig. 44 .
The vanity mirrors in the sun visors are provided with covers. When you
slide open the cover in the direction of the arrow , the vanity mirror
lighting in the headliner switches on automatically. It switches off again
when you slide the cover closed and when you raise the sun visor.
Sun screen*
The rear sun screen is located in a housing below the luggage
compartment cover.
Unrolling
– Pull the sun screen at the plate and hang it in the bracket ⇒ fig. 45 .
Fig. 44 Sun visor:
swivelling out
A1
A2
Fig. 45 Rear window:
Sun screen
AA
AB
Page 91 of 270
Seats and Stowage
90
– Close the lid in direction of arrow 2.
– Press on the button marked “PUSH” ⇒page 89, fig. 77
and push the folding box into the secured middle position.
– Once again press on the button marked “PUSH” and push the folding box carefully into the secured position against the
partition of the luggage compartment in direction of arrow
(ready position). If correctly locked, the button marked “PUSH” is moved back into its initial position.
You can leave the folding box in the ready position for use, or lower it into
the transport position ⇒page 87.
Caution
•The parts of the folding box can be damaged if handled roughly or in
an unprofessional way.
•First check for yourself whether the cover for the through-loading bag*
is closed before you lower the folding box into the ready position on the
partition of the luggage compartment ⇒page 83.
The roof luggage rack system
Description
Pay attention to the following points if you wish to transport luggage or
other items on the roof of your vehicle:
•Your car has streamlined rain channels integrated into the roof. For
this reason, it is not possible to use conventional roof racks. We therefore recommend that you only use base roof bars from the Škoda Genuine
Accessories.
•These base roof bars are the supporting elements for a complete roof
bar system. Separate additional components are required for safety
reasons for transporting luggage, bikes, surfboards, skis and boats. All
these system components are available from Škoda Dealers.
Caution
•If you use other roof rack systems or if the roof bars are not properly
fitted, then any damage which may result to your car is not covered by the
warranty agreements. It is therefore essential to pay attention to the fitting
instructions supplied with the roof luggage rack system.
•On models fitted with a power sliding/tilting roof, ensure that the
opened sliding/tilting roof does not strike any items of luggage transported
on the roof.
For the sake of the environment
The increased aerodynamic drag results in a higher fuel consumption.
One should therefore take off the roof bar system after use.
AB
AB
A3
AB
Page 109 of 270
Heating and air conditioning system
108
Air outlet vents
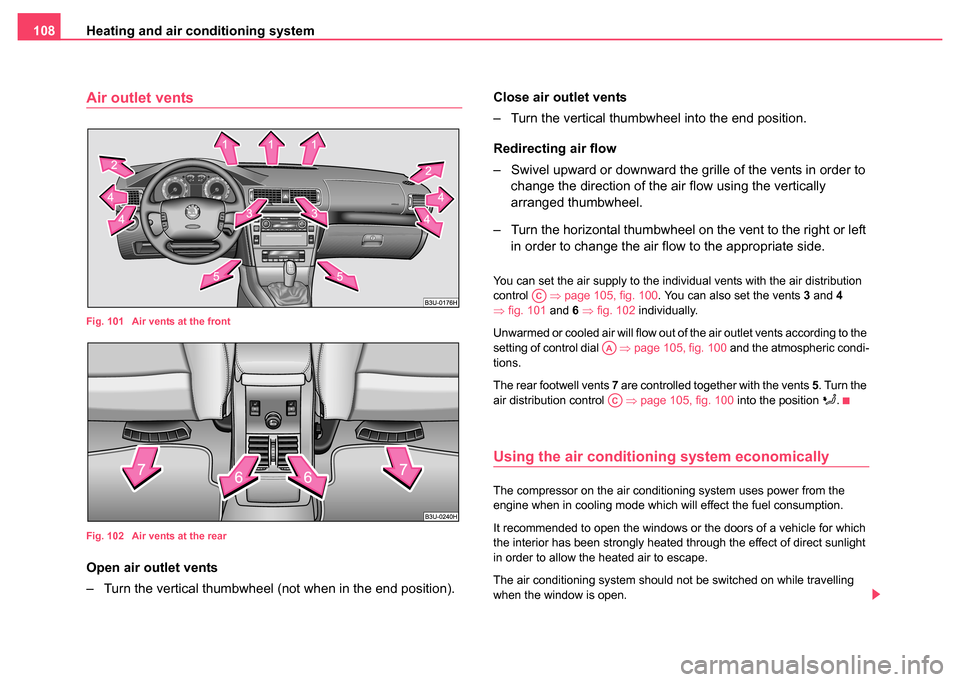
Fig. 101 Air vents at the front
Fig. 102 Air vents at the rear
Open air outlet vents
– Turn the vertical thumbwheel (not when in the end position). Close air outlet vents
– Turn the vertical thumbwheel into the end position.
Redirecting air flow
– Swivel upward or downward the gr
ille of the vents in order to
change the direction of the air flow using the vertically
arranged thumbwheel.
– Turn the horizontal thumbwheel on the vent to the right or left in order to change the air flow to the appropriate side.
You can set the air supply to the individual vents with the air distribution
control ⇒page 105, fig. 100 . You can also set the vents 3 and 4
⇒ fig. 101 and 6 ⇒ fig. 102 individually.
Unwarmed or cooled air will flow out of the air outlet vents according to the
setting of control dial ⇒ page 105, fig. 100 and the atmospheric condi-
tions.
The rear footwell vents 7 are controlled together with the vents 5. Turn the
air distribution control ⇒page 105, fig. 100 into the position
.
Using the air conditioning system economically
The compressor on the air conditioning system uses power from the
engine when in cooling mode which will effect the fuel consumption.
It recommended to open the windows or the doors of a vehicle for which
the interior has been strongly heated through the effect of direct sunlight
in order to allow the heated air to escape.
The air conditioning system should not be switched on while travelling
when the window is open.
AC
AA
AC
Page 118 of 270

Starting-off and Driving117
Using the systemSafetyDriving TipsGeneral MaintenanceBreakdown assistanceTechnical Data
way (e.g. in the middle of the steering wheel or at the inner steering
wheel edge). In such cases, injuries to the arms, the hands and the
head can occur when the driver airbag is deployed.
Ignition lock
Petrol engines
- ignition switched off, engine off
- ignition switched on
- start engine
Diesel engines - fuel supply interrupted, ignition switched off, engine off
- heating glow plugs on, ignition switched on
•You should not switch on any major electrical components during the
heating period otherwise the vehicle battery will be drained unnecessarily.
- start engine
Applies to all models:
Position
To lock the steering , with the ignition key withdrawn, turn the steering
wheel until the steering locking pin is heard to engage. You should always
lock the steering as a general rule if you leave your vehicle. This acts as
a deterrent against possible theft of your vehicle ⇒.
Position
Move the steering wheel back and forward a little if the ignition key cannot,
or cannot easily be turned into this position, in order to release the
steering lock.
Position
The engine is started in this position. At the same time switched on low
beam or main beam or other electrical components with major power
consumption are briefly switched off. The ignition key moves back into
position when one releases the key.
The ignition key must be turned back into position each time before
starting the engine again. The starter repeat lock in the ignition lock
prevents the starter being engaged when the engine is running and thus
getting damaged.
Ignition key withdrawal lock (automatic gearbox)
You can only withdraw the ignition key after switching off the ignition if the
selector lever is in position P.
WARNING
•When driving, the ignition key must always be in the position
(ignition switched on) without the engine running. This position is
WARNING (continued)
Fig. 108 Ignition lock
positions
A1
A2
A3
A1
A2
A3
A1
A2
A3
A2
A1
A2
Page 131 of 270

Automatic gearbox*
130
Dynamic shift programme
The automatic gearbox of your vehicle is controlled electronically. Shifting
up and down through the gears is performed automatically on the basis of
pre-defined driving programmes.
Adopting a moderate style of driving will cause the gearbox to select the
most economical driving programme. Shifting up into a higher gear as
soon as possible and shifting down as late as possible will have a favour-
able effect on your fuel consumption.
Adopting a faster style of driving with rapid movements of the acceler-
ator pedal combined with sharp acceleration and frequent changes in
speed, exploiting the top speed of the car or operating the kickdown func-
tion, will cause the gearbox to switch over to the sporty driving
programme. Shifting up later into a higher gear makes it possible to fully
exploit the power reserves of the engine. The gearbox also then shifts
down at higher engine speeds than is the case for the economy-oriented
programmes.
Selecting the most appropriate driving programme for the particular style
of driving is a continuous process. Irrespective of this it is, however,
possible to switch into a sporty driving programme by depressing the
accelerator rapidly. The gearbox shifts down into a lower gear matching
the speed of the car and this allows you to accelerate rapidly (e.g. when
overtaking) without having to depress the accelerator pedal fully into the
kickdown range. The original programme will be reactivated to match your
particular style of driving once the gearbox has shifted up again.
When driving in hilly regions, the gears are selected to match uphill and
downhill sections. This avoids the gearbox frequently shifting up and down
when negotiating an uphill stretch. Depressing the brake pedal while
driving downhill causes the gearbox to shift down into the next lower gear.
This makes it possible for you to exploit the engine braking power without
the need for shifting gears manually.
Tiptronic
The Tiptronic allows the driver to also shift gears manually.
Fig. 115 Selector
lever: Manual shifting
of gears
Fig. 116 Information
display: Manual
shifting of gears