lock SKODA SUPERB 2004 1.G / (B5/3U) Owners Manual
[x] Cancel search | Manufacturer: SKODA, Model Year: 2004, Model line: SUPERB, Model: SKODA SUPERB 2004 1.G / (B5/3U)Pages: 270
Page 239 of 270

Breakdown assistance
238
•Do not drive with this spare wheel at more than 80 km/h - risk of acci-
dent. Avoid accelerating at full throttle, sharp braking and fast cornering.
•The inflation pressure for this spare wheel is identical to the inflation
pressure of the standard tyres.
•Use this spare wheel only to reach the nearest service station as it is
not intended for continuous use.
Changing a wheel
Preliminary work
The following steps should be carried out before actually
changing the wheel.
– If it is necessary to change a wheel, park the vehicle as far away as possible from the traffic flow. The place you choose
should be level.
– Have all the occupants get out. While changing a wheel, the
occupants of the vehicle should not stand on the road (it is
better behind a crash barrier).
– Apply the handbrake firmly.
– Engage 1st gear or if your vehicle is fitted with an automatic
gearbox, position the selector lever into position P .
– If a trailer is coupled, uncouple it.
– Take the vehicle tool kit and the spare wheel ⇒ page 237
out of the luggage compartment.
WARNING
•If you find yourself in flowing traffic switch on the hazard
warning lights system and place the warning triangle on the side of
the road at the prescribed distance from your vehicle while
observing all national legal provisions. In this way you are
protecting not only yourself but also other road users.
•Never start the engine with the vehicle sitting on the raised jack
- danger of suffering injury!
Caution
If you have to change a wheel on a slope first block the opposite wheel
with a stone or similar object in order to secure the vehicle from unexpect-
edly rolling away.
Note
Comply with the national legal regulations.
Changing a wheel
Always change a wheel on a level surface as far as possible.
– Take off the full wheel trim* ⇒page 239 or the caps
⇒ page 241.
– In the case of light alloy wheels remove the wheel trim cap ⇒page 240.
– Slacken the wheel bolts ⇒page 241.
Page 241 of 270

Breakdown assistance
240
Installing
– First press the full wheel trim onto the wheel at the valve opening provided. Then press the full wheel trim into the
wheel in such a way that its entire circumference locks
correctly in place.
Caution
•Use the pressure of your hand, do not knock on the full wheel trim!
Heavy knocks mainly on the points where the full wheel trim has not been
inserted into the wheel, can result in damage to the guide and centering
elements of the full wheel trim.
•First check for yourself that the theft-deterrent wheel bolt is located
⇒ page 244, “Securing wheels against being stolen” in the hole in the
area of the valve before fitting the full wheel trim onto a steel wheel which
is attached with a theft-deterrent wheel bolt.
Wheel trim caps*
Removing
– Carefully ⇒fig. 178 lever off the wheel trim cap using the
removal hook .
Fig. 178 Changing a
wheel: Pulling off the
wheel trim cap
Page 244 of 270

Breakdown assistance243
Using the systemSafetyDriving TipsGeneral MaintenanceBreakdown assistanceTechnical Data
•It is important to support the vehicle with suitable supporting
blocks if you wish to work under the lifted vehicle - risk of injury!
Taking off and fitting on wheel
After you have slackened the wheel bolts and have raised the car
with the car jack, replace the wheel as follows:
Changing a wheel
– Turn the wheel bolt which is farthest to the top fully out with
the hexagon socket in the screwdriver handle (car tool kit)
and place the bolt down on a clean surface ⇒ fig. 182.
– Screw the assembly pin (car tool kit) into the vacant hole ⇒fig. 183.
– Unscrew the remaining wheel bolts as described above.
– Take off the wheel.
Fitting on wheel
– Push the spare wheel over the assembly pin.
WARNING (continued)
Fig. 182 Changing a
wheel: Remove bolts
with hexagon in screw-
driver
Fig. 183 Changing a
wheel: assembly pin
Page 247 of 270
Breakdown assistance
246
•The discharged battery must be properly connected to the system of
the vehicle.
•Switch off any mobile phone, pay attention to the instructions for use
of the mobile phone in such a situation.
•We recommend purchasing jump-start cables from a Škoda dealer as
a Škoda original accessory or from retailers who sell branded batteries.
Starting engine
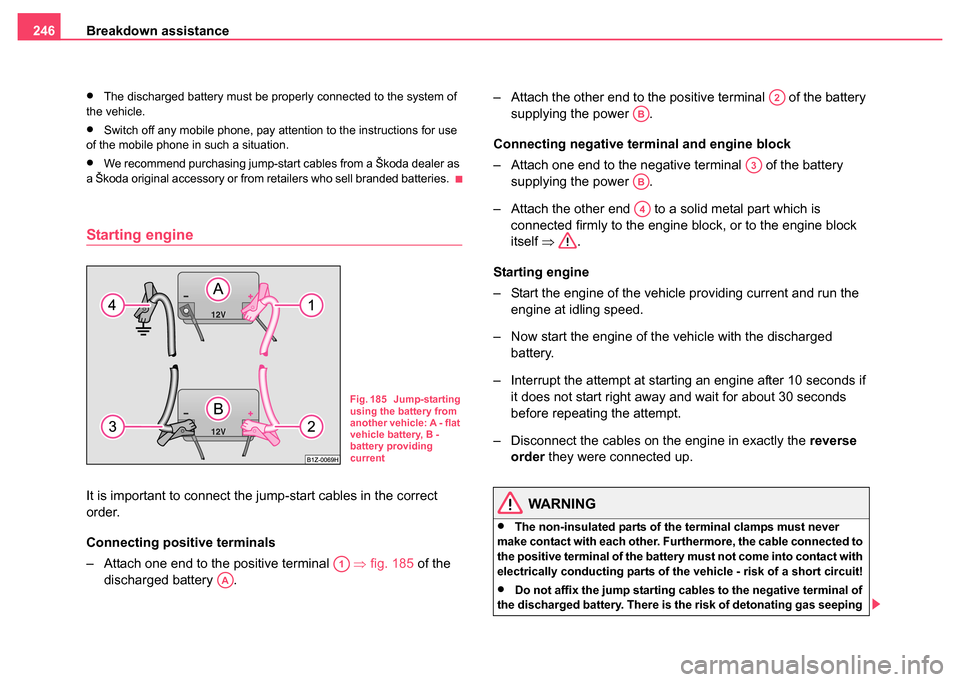
It is important to connect the jump-start cables in the correct
order.
Connecting positive terminals
– Attach one end to the positive terminal ⇒fig. 185 of the
discharged battery . – Attach the other end to the positive terminal of the battery
supplying the power .
Connecting negative terminal and engine block
– Attach one end to the negative terminal of the battery supplying the power .
– Attach the other end to a solid metal part which is connected firmly to the engine block, or to the engine block
itself ⇒ .
Starting engine
– Start the engine of the vehicle providing current and run the engine at idling speed.
– Now start the engine of the vehicle with the discharged battery.
– Interrupt the attempt at starting an engine after 10 seconds if it does not start right away and wait for about 30 seconds
before repeating the attempt.
– Disconnect the cables on the engine in exactly the reverse
order they were connected up.WARNING
•The non-insulated parts of the terminal clamps must never
make contact with each other. Furthermore, the cable connected to
the positive terminal of the battery must not come into contact with
electrically conducting parts of the vehicle - risk of a short circuit!
•Do not affix the jump starting cables to the negative terminal of
the discharged battery. There is the risk of detonating gas seeping
Fig. 185 Jump-starting
using the battery from
another vehicle: A - flat
vehicle battery, B -
battery providing
current
A1
AA
A2
AB
A3
AB
A4
Page 248 of 270
Breakdown assistance247
Using the systemSafetyDriving TipsGeneral MaintenanceBreakdown assistanceTechnical Data
out the battery being ignited by the strong spark which results from
the engine being started.
•Do not affix the cable end to parts of the fuel and brake
system.
•Run the jump-start cables so that they cannot be caught by any
rotating parts in the engine compartment.
•Do not bend over the batteries - risk of caustic burns!
•The vent screws of the battery cells must be tightened firmly.
•Keep any sources of ignition (naked flame, smouldering ciga-
rettes etc.) away from the battery - risk of an explosion!
Tow-starting and towing vehicle
General
Please pay attention to the following instructions if you are going
to use a tow rope:
Driver of the towing vehicle
– Do not drive off until the tow rope is taught.
– Release the clutch particularly gently when starting off or depress the accelerator particularly gently if your vehicle is
fitted with an automatic gearbox. Driver of the towed vehicle
– Switch the ignition on so that the steering wheel is not blocked
and you can also operate the turn signal lights, the headlight
flasher, the windscreen wipers and windscreen washer
system.
– Take the vehicle out of gear or move the selector lever into position N if your vehicle is fitted with an automatic gearbox.
– Note that the brake servo unit and power steering only operate if the engine is running. You will require significantly greater
physical force to depress the brake pedal and to steer the
vehicle if the engine is not running.
– Ensure that the tow rope is always kept taught.
Tow rope or tow bar
A tow bar is safest way of towing a vehicle and also minimizes any
shocks. You can use a tow rope only if a suitable tow bar is not available.
The tow rope must be elastic to protect the vehicle. Thus one should only
use plastic fibre rope or a rope made out of a similarly elastic material.
Attach the tow rope or the tow bar only to the towing eyes provided for
this purpose ⇒page 248, “Front towing eye” and ⇒page 248, “Rear
towing eye”.
Driving style
Towing another vehicle requires a certain amount of practice. Both drivers
should be familiar with the particular points about towing a vehicle.
Unskilled drivers should not attempt to tow in another vehicle or to be
towed in.
One should be constantly vigilant not to allow impermissibly high towing
forces or jerky loadings. There is always a risk of excessive stresses and
WARNING (continued)
A4
Page 252 of 270
Fuses and light bulbs251
Using the systemSafetyDriving TipsGeneral MaintenanceBreakdown assistanceTechnical Data
Caution
•Never attempt to “repair” fuses and also do not replace them with a
fuse of a higher amperage - risk of fire! This may also cause damage at
another part of the electrical system.
•Have the electrical system checked as quickly as possible by a Škoda
dealer if a newly inserted fuse blows again after a short time.
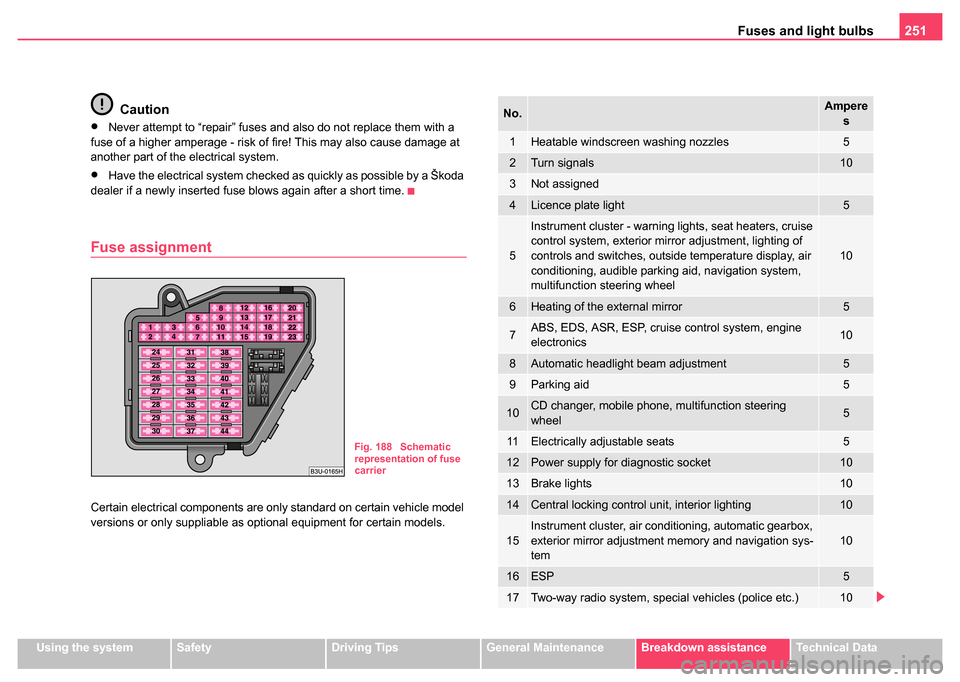
Fuse assignment
Certain electrical components are only standard on certain vehicle model
versions or only suppliable as optional equipment for certain models.
Fig. 188 Schematic
representation of fuse
carrier
No.Ampere s
1Heatable windscreen washing nozzles5
2Turn signals10
3Not assigned
4Licence plate light5
5
Instrument cluster - warning lights, seat heaters, cruise
control system, exterior mirror adjustment, lighting of
controls and switches, outside temperature display, air
conditioning, audible parking aid, navigation system,
multifunction steering wheel
10
6Heating of the external mirror5
7ABS, EDS, ASR, ESP, cruise control system, engine
electronics10
8Automatic headlight beam adjustment5
9Parking aid5
10CD changer, mobile phone, multifunction steering
wheel5
11Electrically adjustable seats5
12Power supply for diagnostic socket10
13Brake lights10
14Central locking control unit, interior lighting10
15Instrument cluster, air conditioning, automatic gearbox,
exterior mirror adjustment memory and navigation sys-
tem10
16ESP5
17Two-way radio system, special vehicles (police etc.)10
Page 253 of 270
Fuses and light bulbs
252
The power windows and the power seats are protected by automatic
circuit breakers which switch on again automatically after a few seconds
after the overload has been eliminated - e.g. frozen windows.
Bulbs
Changing bulbs
The relevant lamp must always be switched off before a light bulb is
replaced.
Do not take hold of the glass bulb with naked fingers (even the smallest
amount of dirt reduces the working life of the light bulb). Use a clean cloth,
serviette or something similar.
Defect light bulbs should only be replaced with light bulbs of the same
type. The designation is located on the light socket or the glass bulb.
Changing certain bulbs is not something which you can do yourself, but
requires to be done by a specialist. Other parts of the vehcle must be
18Right main beam10
19Left main beam10
20Low beam on the right15
21Low beam on the left15
22Parking light on the right5
23Parking light on the left5
24Windscreen washer system, windscreen wiper pump
and intermittent switch25
25Fan for fresh air, the air conditioning unit, Climatronic30
26Rear window heating, recirculated air mode30
27Not assigned
28Fuel pump, diesel additional pump20
29Engine control20
30Electric sliding/tilting roof20
31Reversing lights, cruise control system, automatic
gearbox, automatic dimming interior mirror15
32Engine control, cruise control system20
33Cigarette lighter15
34Engine control15
35Trailer socket30
36Fog lights15
37Radio, navigation 20
38Central locking system15
No.Ampere
s
39Hazard warning light system15
40Horn25
41Not assigned
42ESP25
43Engine control15
44Seat heaters30
No.Amperes
Page 255 of 270
Fuses and light bulbs
254
Note
This Owner's Manual only describes the replacement of bulbs where it is
assumed that no major complications will arise. Other light bulbs should
be changed by your Škoda dealer.
Rear light unit
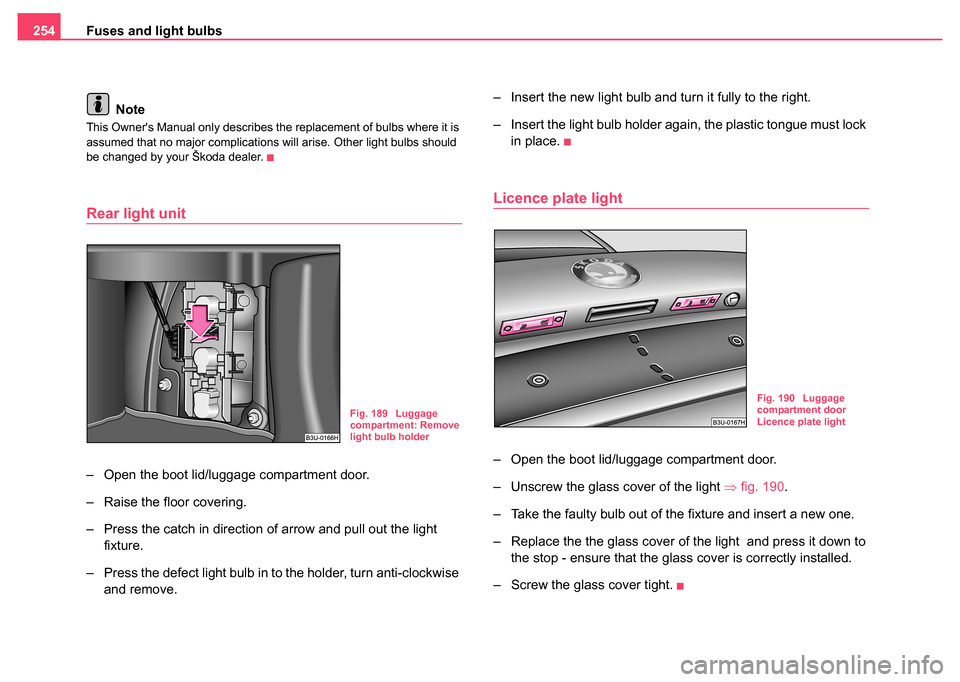
– Open the boot lid/luggage compartment door.
– Raise the floor covering.
– Press the catch in direction of arrow and pull out the light fixture.
– Press the defect light bulb in to the holder, turn anti-clockwise and remove. – Insert the new light bulb and turn it fully to the right.
– Insert the light bulb holder again, the plastic tongue must lock
in place.
Licence plate light
– Open the boot lid/luggage compartment door.
– Unscrew the glass cover of the light ⇒fig. 190 .
– Take the faulty bulb out of the fixture and insert a new one.
– Replace the the glass cover of the light and press it down to the stop - ensure that the glass cover is correctly installed.
– Screw the glass cover tight.
Fig. 189 Luggage
compartment: Remove
light bulb holderFig. 190 Luggage
compartment door
Licence plate light
Page 256 of 270
Fuses and light bulbs255
Using the systemSafetyDriving TipsGeneral MaintenanceBreakdown assistanceTechnical Data
Luggage compartment light
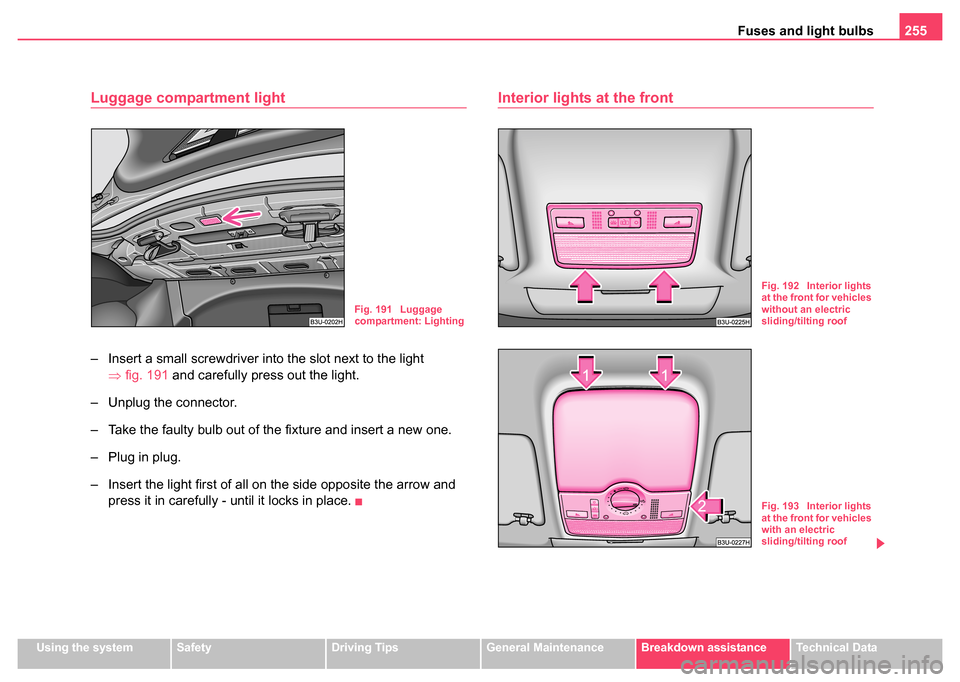
– Insert a small screwdriver into the slot next to the light
⇒fig. 191 and carefully press out the light.
– Unplug the connector.
– Take the faulty bulb out of the fixture and insert a new one.
– Plug in plug.
– Insert the light first of all on the side opposite the arrow and press it in carefully - until it locks in place.
Interior lights at the front
Fig. 191 Luggage
compartment: Lighting
Fig. 192 Interior lights
at the front for vehicles
without an electric
sliding/tilting roof
Fig. 193 Interior lights
at the front for vehicles
with an electric
sliding/tilting roof
Page 257 of 270
Fuses and light bulbs
256
Changing the bulb for interior light of vehicles without an
electric sliding/tilting roof
– Insert a small screwdriver into the slot next to the light ⇒page 255, fig. 192.
– Carefully press out the light and remove it from the headliner.
– Take the faulty bulb out of and insert a new one.
– First of all place the lights in the mounts at the rear and press them into the headliner, until they lock into place.
Changing the bulb for interior light of vehicles with an
electric sliding/tilting roof
– Position a small screwdriver carefully against the rear edge of the cover of the power roof drive - arrows 1- ⇒page 255,
fig. 193.
– Lever off the cover down carefully.
– Insert a small screwdriver into the slot next to the light - arrow 2-.
– Carefully press out the light and remove it from the headliner.
– Take the faulty bulb out of and insert a new one.
– First of all place the lights in the side plastic mounts and press them upwards, until they lock into place.
– Press on the cover again by first of all inserting the plastic lugs and then pushing the cover up.
Interior lights at the rear
Changing the bulb for lights without interior monitoring
sensors
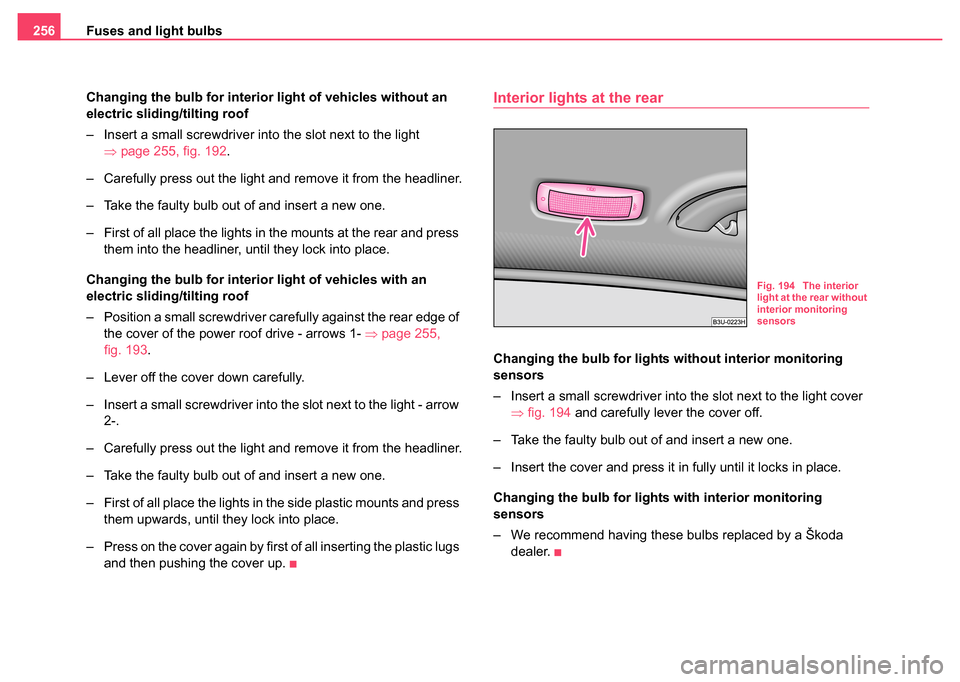
– Insert a small screwdriver into the slot next to the light cover ⇒fig. 194 and carefully lever the cover off.
– Take the faulty bulb out of and insert a new one.
– Insert the cover and press it in fully until it locks in place.
Changing the bulb for lights with interior monitoring
sensors
– We recommend having these bulbs replaced by a Škoda dealer.
Fig. 194 The interior
light at the rear without
interior monitoring
sensors