engine SKODA SUPERB 2004 1.G / (B5/3U) Owner's Guide
[x] Cancel search | Manufacturer: SKODA, Model Year: 2004, Model line: SUPERB, Model: SKODA SUPERB 2004 1.G / (B5/3U)Pages: 270
Page 57 of 270
Lights and Visibility
56
Lights and Visibility
Lights
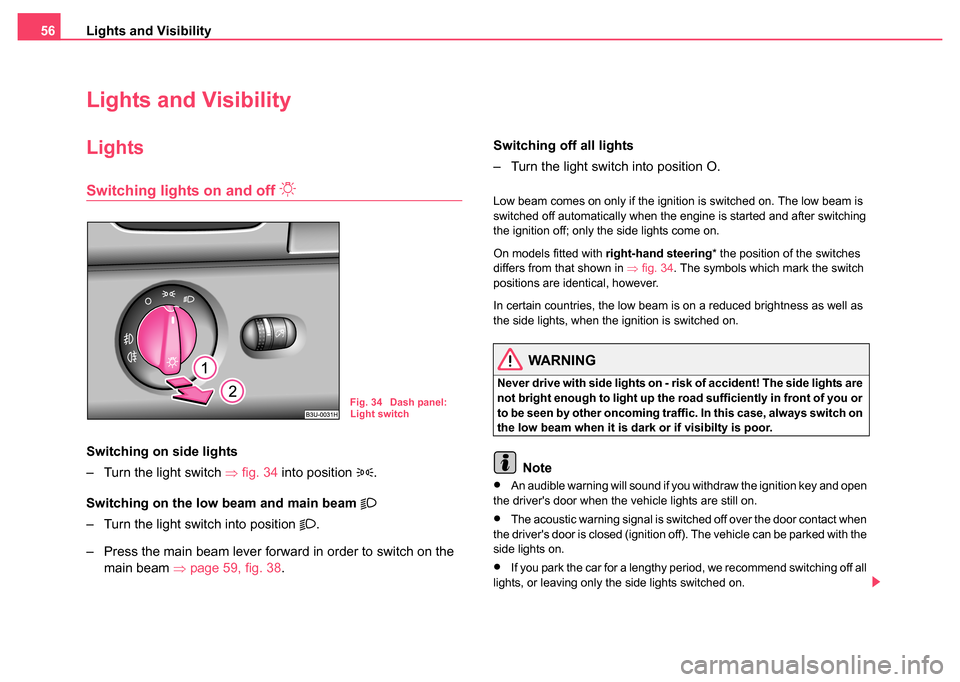
Switching lights on and off
Switching on side lights
– Turn the light switch ⇒fig. 34 into position
.
Switching on the low beam and main beam
– Turn the light switch into position .
– Press the main beam lever forward in order to switch on the main beam ⇒page 59, fig. 38 . Switching off all lights
– Turn the light switch into position O.
Low beam comes on only if the ignition is switched on. The low beam is
switched off automatically when the engine is started and after switching
the ignition off; only the side lights come on.
On models fitted with
right-hand steering* the position of the switches
differs from that shown in ⇒fig. 34 . The symbols which mark the switch
positions are identical, however.
In certain countries, the low beam is on a reduced brightness as well as
the side lights, when the ignition is switched on.
WARNING
Never drive with side lights on - ri sk of accident! The side lights are
not bright enough to light up the road sufficiently in front of you or
to be seen by other oncoming traffic. In this case, always switch on
the low beam when it is dark or if visibilty is poor.
Note
•An audible warning will sound if you withdraw the ignition key and open
the driver's door when the vehicle lights are still on.
•The acoustic warning signal is switched off over the door contact when
the driver's door is closed (ignition off). The vehicle can be parked with the
side lights on.
•If you park the car for a lengthy period, we recommend switching off all
lights, or leaving only the side lights switched on.
Fig. 34 Dash panel:
Light switch
Page 80 of 270
Seats and Stowage79
Using the systemSafetyDriving TipsGeneral MaintenanceBreakdown assistanceTechnical Data
Caution
•You should not kneel on the seats or otherwise apply pressure at
specific points in order to avoid damaging the heating elements of the seat
heaters.
•Do not clean the seats moist ⇒page 201.
Note
The seat heating should only be switched on when the engine is running.
This has a significant effect of saving on the battery capacity.
Pedals
You should use only footmats which do not obstruct the movement of the
pedals and have an anti-slip protection.
Operation of the pedals must not be hindered!
WARNING
•Greater pedal distances may be needed when there is a fault in
the brake system.
•Do not place any footmats or other additional floor coverings in
the area of the pedals in order to ensure that all the pedals can be
fully depressed and are able to return unobstructed to their initial
position - risk of accident!
•There must be no objects on the floor which could roll under the
pedals. You would then no longer be able to apply the brakes,
operate the clutch or accelerator - risk of accident!
Luggage compartment
Loading the luggage compartment
Please observe the following in the interest of having good
handling characteristics of your vehicle:
– Distribute the items of luggage as evenly as possible.
– Place heavy objects as far forward as possible.
– Attach the items of luggage with the safety net* or with tensioning straps attached to the lashing eyes ⇒page 80.
In the event of an accident, there is such a high kinetic energy which is
produced by small and light objects that they can cause severe injuries.
The magnitude of the kinetic energy depends on the speed at which the
vehicle is travelling and on the weight of the object. The speed at which
the vehicle is travelling is in this case the more significant factor.
Example: In the event of a frontal collision at a speed of 50 km/h, an unse-
cured object with a weight of 4.5 kg produces an energy, which corre-
sponds to 20 times its own weight. This means that it results in a weight
of approx. 90 kg. You can imagine the injuries that can occur, if this “bullet”
is flying through the interior compartment and hits an occupant.
WARNING
•Store the objects in the luggage compartment and attach them
to the lashing eyes.
•Loose objects in the passenger compartment can be thrown
forward during a sudden manoeuvre or in case of an accident and
can injure the occupants or other onc oming traffic. This risk is still
increased, if the objects which are flying around are hit by a
Page 96 of 270
Seats and Stowage95
Using the systemSafetyDriving TipsGeneral MaintenanceBreakdown assistanceTechnical Data
Cigarette lighters and power sockets
Cigarette lighter
You can also use the socket on the cigarette lighter for
other electrical appliances.
Using the cigarette lighter
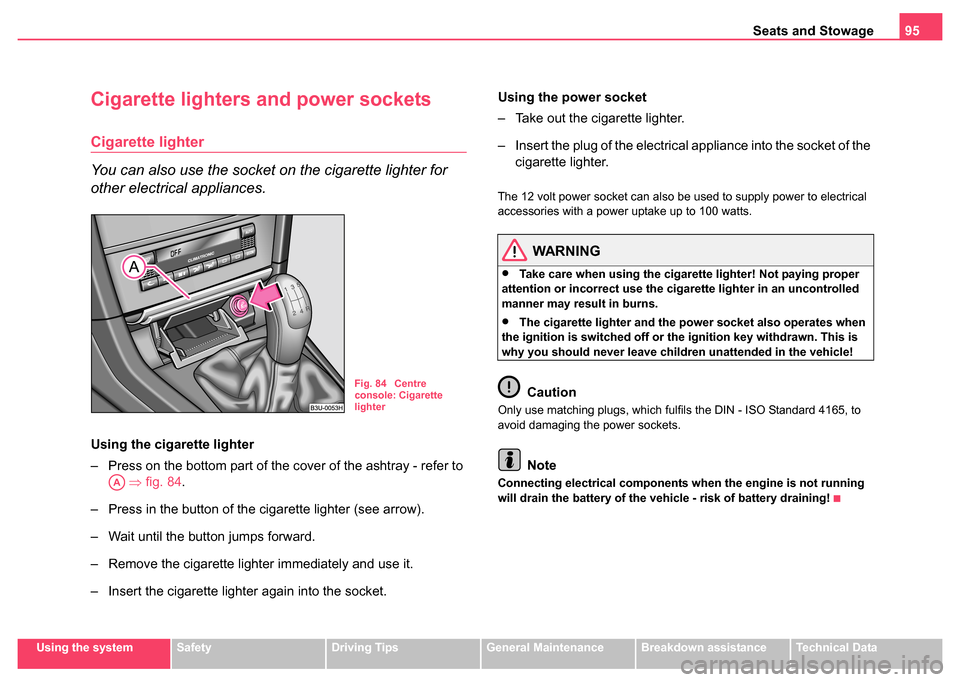
– Press on the bottom part of the cover of the ashtray - refer to
⇒ fig. 84.
– Press in the button of the cigarette lighter (see arrow).
– Wait until the button jumps forward.
– Remove the cigarette lighter immediately and use it.
– Insert the cigarette lighter again into the socket. Using the power socket
– Take out the cigarette lighter.
– Insert the plug of the electrical appliance into the socket of the
cigarette lighter.
The 12 volt power socket can also be used to supply power to electrical
accessories with a power uptake up to 100 watts.
WARNING
•Take care when using the cigarette lighter! Not paying proper
attention or incorrect use the cigarette lighter in an uncontrolled
manner may result in burns.
•The cigarette lighter and the power socket also operates when
the ignition is switched off or the ignition key withdrawn. This is
why you should never leave children unattended in the vehicle!
Caution
Only use matching plugs, which fulfils the DIN - ISO Standard 4165, to
avoid damaging the power sockets.
Note
Connecting electrical components when the engine is not running
will drain the battery of the vehicle - risk of battery draining!
Fig. 84 Centre
console: Cigarette
lighter
AA
Page 97 of 270
Seats and Stowage
96
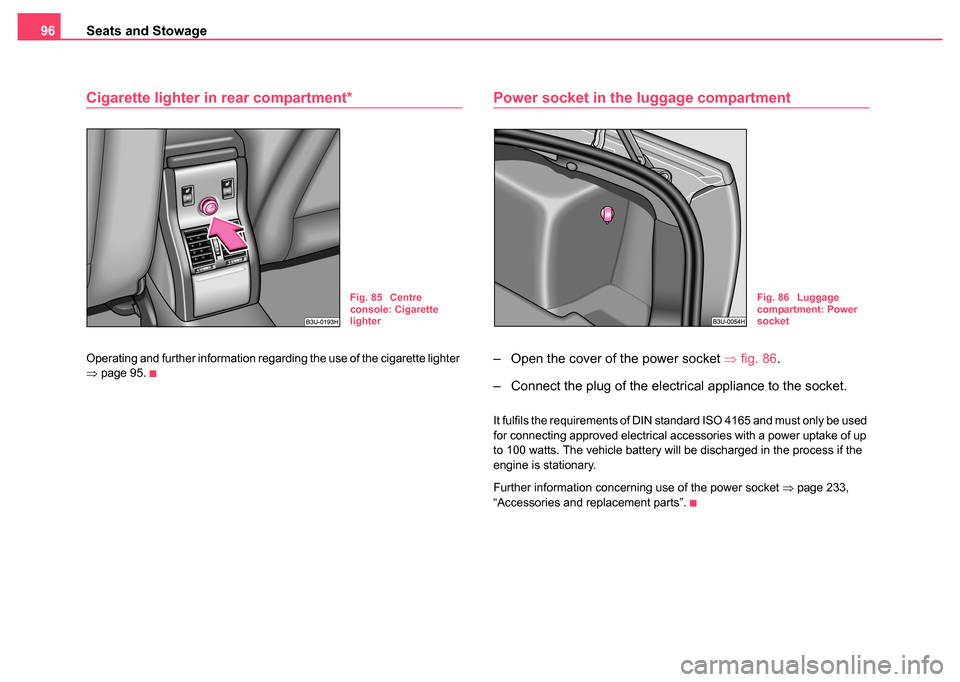
Cigarette lighter in rear compartment*
Operating and further information regarding the use of the cigarette lighter
⇒page 95.
Power socket in the luggage compartment
– Open the cover of the power socket ⇒fig. 86 .
– Connect the plug of the electrical appliance to the socket.
It fulfils the requirements of DIN standard ISO 4165 and must only be used
for connecting approved electrical accessories with a power uptake of up
to 100 watts. The vehicle battery will be discharged in the process if the
engine is stationary.
Further information concerning use of the power socket ⇒page 233,
“Accessories and replacement parts”.
Fig. 85 Centre
console: Cigarette
lighterFig. 86 Luggage
compartment: Power
socket
Page 105 of 270
Heating and air conditioning system
104
Heating and air conditioning system
The air conditioning system
Description
The air conditioning system is a combined cooling and
heating system. It makes it possible to optimally control
the air temperature at any season of the year.
Description of the air conditioning system
It is important for your safety and for your driving comfort that the air condi-
tioning system is operating properly.
The air conditioning system operates when switch ⇒page 105,
fig. 100 is pressed and the following conditions are met:
•engine running
•outside temperature above +5 °C
•blower switch switched on (positions 1 to 4)
If the air conditioning system is switched on, the temperature and air
humidity drops in the vehicle. The wellbeing of the occupants of the car is
enhanced as a result of this particularly at high outside temperatures and
a high air humidity. The system prevents the windows misting up during
the cold season of the year.
The heating effect is dependent upon the coolant temperature, thus full
heat output only occurs when the engine has reached its operating
temperature.
It is possible to briefly activate recirculated air mode in order to enhance
the cooling effect ⇒. Air at a temperature of about 5°C may flow out of the vents under certain
circumstances when the air conditioning system is operating. Lengthy and
uneven distribution of the air flow out of the vents (in particular at the leg
area) and large differences in temperature, for example when getting out
of the vehicle, can result in chills in sensitive persons.
The air inlet in front of the windscreen must be free of ice, snow or leaves
in order to ensure that the heating and ventilation systems operate prop-
erly.
After switching on the air conditioning
Condensation from the evaporator
of the air conditioning may drip down and form a puddle below the vehicle.
This is quite normal and not an indication of a leak!
Aeration of the vehicle when ignition is switched off*
On models fitted with power sliding/tilting roof with sollar cells, the fresh
air blower is automatically switched over to “solar mode ” if the sun ray's
are sufficient after switching off the ignition. The solar cells on the
sliding/tilting roof deliver power for the fresh air blower. This supplies the
interior of the car with fresh air.
For an optimum ventilation, the air outlet vents 3 and 4 must be opened
⇒ page 108.
The ventilation functions only when the sliding/tilting roof is closed.
WARNING
•For your own safety and that of other road users, ensure that all
the windows are free of ice, snow and misting. Please familiarize
yourself about how to correctly op erate the heating and ventilation
systems, how to demist and defrost the windows, as well as with
the cooling mode.
ACAE
Page 109 of 270
Heating and air conditioning system
108
Air outlet vents
Fig. 101 Air vents at the front
Fig. 102 Air vents at the rear
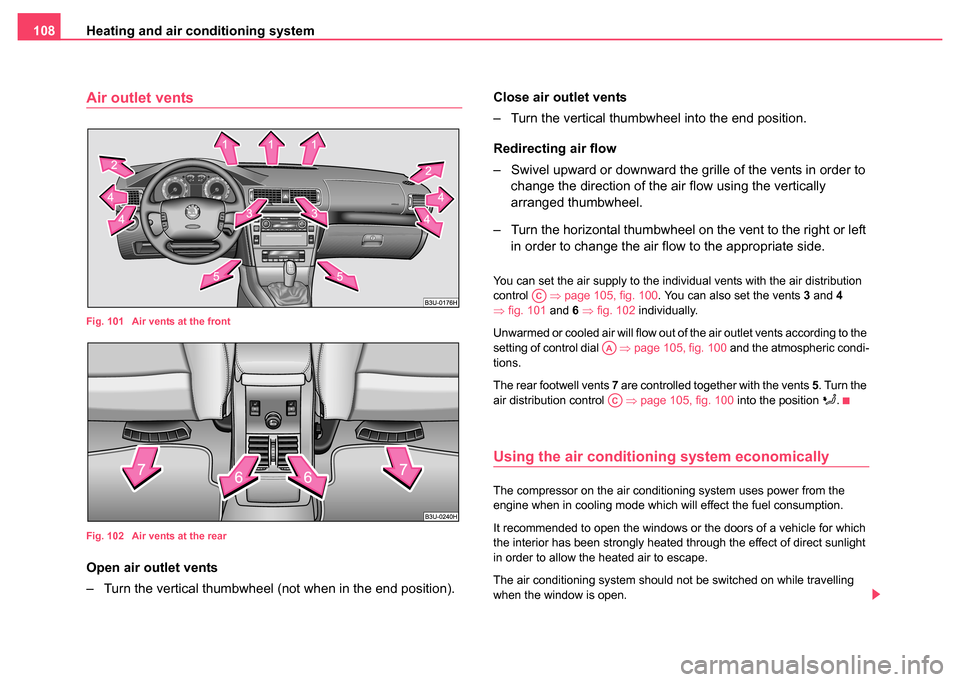
Open air outlet vents
– Turn the vertical thumbwheel (not when in the end position). Close air outlet vents
– Turn the vertical thumbwheel into the end position.
Redirecting air flow
– Swivel upward or downward the gr
ille of the vents in order to
change the direction of the air flow using the vertically
arranged thumbwheel.
– Turn the horizontal thumbwheel on the vent to the right or left in order to change the air flow to the appropriate side.
You can set the air supply to the individual vents with the air distribution
control ⇒page 105, fig. 100 . You can also set the vents 3 and 4
⇒ fig. 101 and 6 ⇒ fig. 102 individually.
Unwarmed or cooled air will flow out of the air outlet vents according to the
setting of control dial ⇒ page 105, fig. 100 and the atmospheric condi-
tions.
The rear footwell vents 7 are controlled together with the vents 5. Turn the
air distribution control ⇒page 105, fig. 100 into the position
.
Using the air conditioning system economically
The compressor on the air conditioning system uses power from the
engine when in cooling mode which will effect the fuel consumption.
It recommended to open the windows or the doors of a vehicle for which
the interior has been strongly heated through the effect of direct sunlight
in order to allow the heated air to escape.
The air conditioning system should not be switched on while travelling
when the window is open.
AC
AA
AC
Page 110 of 270
Heating and air conditioning system 109
Using the systemSafetyDriving TipsGeneral MaintenanceBreakdown assistanceTechnical Data
The desired interior temperature can also be achieved without switching
in the air conditioning system just by switching to fresh air mode.
For the sake of
the environment
When you economize on fuel, you also reduce pollutant emissions.
Operational problems
If the cooling system does not operate at outside temperatures higher
than +5°C, there is a problem in the system. The reasons for this may be:
•The fuse of the air conditioning system is defective ⇒page 250.
Check the fuse, replace it if necessary.
•The cooling system has switched off automatically for a short time
because the coolant temperature of the engine is too hot.
If you are not able to rectify the operational problem yourself, or if the
cooling capacity decreases, switch the air conditioning system off. Please
contact your Škoda dealer.
Climatronic* (automatic air conditioning)
Description
The Climatronic system is a combination of an automatic heating, fresh air
and cooling system which provides optimal comfort for the occupants of
the car.
The Climatronic maintains a constant temperature fully automatically,
once it has been set. This is achieved by automatically varying the temperature of the outflowing air, the blower stages and the air distribu-
tion. It is not necessary to manually alter the settings. The
automatic
mode ⇒ page 111 ensures maximum wellbeing of the occupants at all
times of the year.
Description of Climatronic system
The Climatronic can only operate if the following conditions are met:
•engine running
•outside temperature above +5 °C,
•the button is not pressed.
If the Climatronic system is switched on, the temperature and air humidity
drops in the vehicle. The wellbeing of the occupants of the car is enhanced
as a result of this particularly at high outside temperatures and a high air
humidity. The system prevents the windows misting up during the cold
season of the year.
It is possible to briefly activate recirculated air mode in order to enhance
the cooling effect ⇒.
The heating effect is dependent upon the coolant temperature, thus full
heat output only occurs when the engine has reached its operating
temperature.
Puddle of water below car
After switching on the air conditioning Condensation from the evaporator
of the air conditioning may drip down and form a puddle below the vehicle.
This is quite normal and not an indication of a leak!
Switching over from degrees Celsius to degrees Fahrenheit and vice
versa
First of all press and hold the button ⇒ page 110, fig. 103 and then
press the button . The temperature measuring unit appears in the
display.ECON
ECONAUTO
Page 118 of 270

Starting-off and Driving117
Using the systemSafetyDriving TipsGeneral MaintenanceBreakdown assistanceTechnical Data
way (e.g. in the middle of the steering wheel or at the inner steering
wheel edge). In such cases, injuries to the arms, the hands and the
head can occur when the driver airbag is deployed.
Ignition lock
Petrol engines
- ignition switched off, engine off
- ignition switched on
- start engine
Diesel engines - fuel supply interrupted, ignition switched off, engine off
- heating glow plugs on, ignition switched on
•You should not switch on any major electrical components during the
heating period otherwise the vehicle battery will be drained unnecessarily.
- start engine
Applies to all models:
Position
To lock the steering , with the ignition key withdrawn, turn the steering
wheel until the steering locking pin is heard to engage. You should always
lock the steering as a general rule if you leave your vehicle. This acts as
a deterrent against possible theft of your vehicle ⇒.
Position
Move the steering wheel back and forward a little if the ignition key cannot,
or cannot easily be turned into this position, in order to release the
steering lock.
Position
The engine is started in this position. At the same time switched on low
beam or main beam or other electrical components with major power
consumption are briefly switched off. The ignition key moves back into
position when one releases the key.
The ignition key must be turned back into position each time before
starting the engine again. The starter repeat lock in the ignition lock
prevents the starter being engaged when the engine is running and thus
getting damaged.
Ignition key withdrawal lock (automatic gearbox)
You can only withdraw the ignition key after switching off the ignition if the
selector lever is in position P.
WARNING
•When driving, the ignition key must always be in the position
(ignition switched on) without the engine running. This position is
WARNING (continued)
Fig. 108 Ignition lock
positions
A1
A2
A3
A1
A2
A3
A1
A2
A3
A2
A1
A2
Page 119 of 270
Starting-off and Driving
118
indicated by the warning lights coming on. If this is not the case, it
could result in unexpected locking of the steering wheel - risk of
accident!
•Only remove the ignition key fr om the ignition lock when the
vehicle has come to a standstill (put on the handbrake or select the
selector lever position P). The steering lock might otherwise
engage unintentionally - risk of accident!
•Always withdraw the ignition key if you are going to leave the
vehicle, even for a short time. This is particularly important if chil-
dren are left in the vehicle. The children might otherwise start the
engine or operate electrical equi pment (e.g. power windows) - risk
of injury!
Starting engine
General
You can only start the engine only using an original ignition
key.
•Place the gearshift lever into neutral (or place the selector lever to the
position P or N in the case of an automatic gearbox) and put on the hand-
brake firmly before starting the engine.
•The clutch pedal should be fully depressed when starting the engine
which means that the starter only has to crank the engine.
•Let go of the key as soon as the engine starts otherwise there may be
damage to the starter.
The engine running noises may louder at first be louder for a short time
after starting the cold engine until oil pressure can be built up in the hydraulic valve clearance compensation. This is quite normal and is not
an operating problem.
If the engine does not start ...
You can use the battery of another vehicle as a jump-start aid
⇒
page 245.
It is only possible to tow-start vehicles fitted with a manual gearbox. The
tow-starting distance must not be more than 50 metres ⇒page 247.
WARNING
•Never run the engine in non ventilated or enclosed areas. The
exhaust gases of the engine contain besides the odorless and
colourless carbon monoxide a poisonous gas - hazard! Carbon
monoxide can cause unconsciousness and death.
•Never leave your vehicle unattended with the engine running.
Caution
•The starter may only be operated (ignition key position ), if the
engine is not running. If the starter is immediately operated after switching
off the engine, the starter or the engine can be damaged.
•Avoid high engine revolutions, full throttle and high engine loads as
long as the engine has not yet reached its normal operating temperature
- risk of damaging the engine!
•Vehicles which are fitted with an exhaust gas catalytic converter
should not be tow-started over a distance of more than 50 metres.
For the sake of the environment
Never warm up the engine when the vehicle is standing. Drive off right
away. Through this the engine reaches its operating temperature more
rapidly and the pollutant emissions are lower.
WARNING (continued)
A3
Page 120 of 270
Starting-off and Driving119
Using the systemSafetyDriving TipsGeneral MaintenanceBreakdown assistanceTechnical Data
Petrol engines
These engines are fitted with a starter system which selects the correct
fuel/air mixture for every external air temperature.
•Do not operate accelerator before and when starting engine.
•Interrupt the attempt at starting after 10 seconds if the engine does not
start right awayand wait for about 30 seconds before repeating the
attempt.
•It is possible that the fuse on the electrical fuel pump is defect if the
engine still does not start. Check the fuse and replace it if necessary
⇒ page 250.
•Contact the nearest Škoda dealer to obtain professional assistance.
It may be necessary, if the engine is very hot, to slightly depress the
accelerator after the engine has started.
Diesel engines
Glow plug system
Diesel engines are equipped with a glow plug system, the preglow period
being controlled automatically in line with the coolant temperature and
outside temperature.
The preglow indicator light
comes on after the ignition has been
switched on.
You should not switch on any major electrical components during
the heating period otherwise the ve hicle battery will be drained
unnecessarily.
•You should start the engine immediately after the glow plug warning
light has gone out.
•The glow plug warning light will come on for about one second if the
engine is at a normal operating temperature or if the outside temperature
is above +5°C. This means that you can start the engine right away.
•Interrupt the attempt at starting after 10 seconds if the engine does not
start right awayand wait for about 30 seconds before repeating the
attempt.
•It is possible that the fuse on the diesel preglow system is defect if the
engine still does not start. Check the fuse and replace it if necessary
⇒ page 250.
•Contact the nearest Škoda dealer to obtain professional assistance.
Starting the engine after fuel tank has run dry
It may take longer than normal to start the engine after refuelling if the fuel
tank has run completely dry - up to one minute. This is because the fuel
system must first of all be filled while the attempting to start the engine.
Switching the engine off
– Turn the ignition key into position ⇒page 117, fig. 108 .
WARNING
•Never switch off the engine before the vehicle is stationary - risk
of accident!
•The brake booster only operates when the engine is running.
Greater physical effort for braking is required when engine is
switched off. Because if you do not stop as normal, this can cause
an accident and severe injuries.
A1