service SKODA SUPERB 2004 1.G / (B5/3U) Owner's Guide
[x] Cancel search | Manufacturer: SKODA, Model Year: 2004, Model line: SUPERB, Model: SKODA SUPERB 2004 1.G / (B5/3U)Pages: 270
Page 213 of 270
Inspecting and Replenishing
212
Note
•Before a long drive we recommend that you purchase and carry with
you engine oil which complies with the specification for your vehicle.
Consequently, you will always have the correct engine oil for refilling.
•We recommend using a preservative from the Škoda original accesso-
ries offered by your Škoda dealer.
•For further information - see Service Schedule.
Inspecting the engine oil level
The dipstick indicates the level of oil in the engine.
Checking the oil level
– Park the vehicle on a horizontal surface.
– Switch the engine off. – Open the bonnet
⇒ in “Working in the engine compart-
ment” on page 209.
– Wait a few minutes and pull out the oil dipstick.
– Wipe off the dipstick with a clean cloth and insert it again fully.
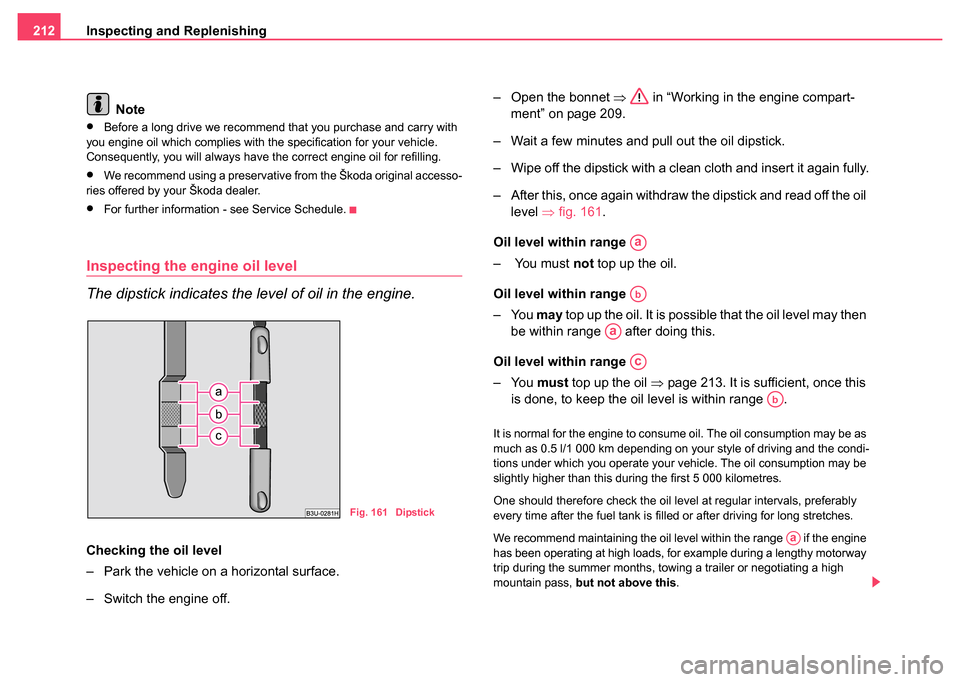
– After this, once again withdraw the dipstick and read off the oil level ⇒fig. 161 .
Oil level within range
– You must not top up the oil.
Oil level within range
–You may top up the oil. It is possible that the oil level may then
be within range after doing this.
Oil level within range
–You must top up the oil ⇒page 213. It is sufficient, once this
is done, to keep the oil level is within range .
It is normal for the engine to consume oil. The oil consumption may be as
much as 0.5 l/1 000 km depending on your style of driving and the condi-
tions under which you operate your vehicle. The oil consumption may be
slightly higher than this during the first 5 000 kilometres.
One should therefore check the oil level at regular intervals, preferably
every time after the fuel tank is filled or after driving for long stretches.
We recommend maintaining the oil level within the range if the engine
has been operating at high loads, for example during a lengthy motorway
trip during the summer months, towing a trailer or negotiating a high
mountain pass, but not above this.
Fig. 161 Dipstick
Aa
Ab
Aa
Ac
Ab
Aa
Page 214 of 270
Inspecting and Replenishing213
Using the systemSafetyDriving TipsGeneral MaintenanceBreakdown assistanceTechnical Data
The warning light in the instrument cluster will indicate whether the oil
level is too low
⇒page 28. In this case, check the oil level as soon as
possible. Top up with an appropriate quantity of oil.
WARNING
Read and observe the warning notes ⇒page 209, “Working in the
engine compartment” before working in the engine compartment.
Caution
•The oil level must on no account extend beyond the range . Danger
of damaging the catalytic converter.
•Do not continue your journey if for some reason it is not possible
under the conditions prevailing to top up with oil. Switch of the engine
and obtain professional assistance from a Škoda dealer.
Replenishing engine oil
– Inspect the oil level ⇒page 212.
– Unscrew the cap of the engine oil filler opening.
– Pour in a suitable grade of oil in portions of 0.5 litres ⇒page 211, “Engine oil specifications”.
– Inspect the oil level ⇒page 212.
– Carefully screw on the cap of the filler opening and push the dipstick in fully.
The location of the engine oil filler opening is shown in the illustration of
the engine compartment ⇒page 210.
WARNING
•Avoid dripping oil onto hot parts of the engine when topping up
will oil - a risk of fire!
•Read and observe the warning notes ⇒page 209, “Working in
the engine compartment” before working in the engine compart-
ment.
For the sake of the environment
The oil level must on no account be above the range ⇒page 212,
fig. 161 . Oil will otherwise be drawn in through the crankcase ventilation
and may pass through the exhaust system to atmosphere. The oil may
combust in the catalytic converter and damage it.
Changing engine oil
The engine oil must be changed at the intervals stated in the Service
Schedule or according to the service interval indicator ⇒page 16.
WARNING
•Only carry out the engine oil change, if you have the required
professional knowledge!
•Read and observe the warning notes ⇒page 209, “Working in
the engine compartment” before working in the engine compart-
ment.
•Let the engine cool down - risk of burning from hot oil.
Aa
Aa
Page 219 of 270

Inspecting and Replenishing
218
Replacing brake fluid
Brake fluid absorbs moisture. This causes the fluid to absorb moisture
from the surrounding air over a period of time. Excessive water in the
brake fluid may be the cause of corrosion in the brake system. The water
content also lowers the boiling point of the brake fluid. This is why brake
fluid must be replaced every two years.
One may only use new genuine brake fluid from Škoda Auto. The specifi-
cation for the brake fluid is “FMVSS 116 DOT 4”.
We recommend that you have the brake fluid replaced by a Škoda dealer
as part of an Inspection Service.
WARNING
•Using old brake fluid can result in severe stress on the brakes
because of the formation of vapour bubbles in the brake system.
This greatly impairs the braking efficiency and thus also the safety
of your vehicle.
•Brake fluid is toxic! It must therefore be kept safely in closed
original containers and well away from children and unauthorized
persons.
Caution
Brake fluid damages the paintwork of the vehicle.
For the sake of the environment
In view of the problems involved with proper disposal of brake fluid, the
special tools and the professional knowledge required, you should have
the brake fluid replaced by a Škoda dealer.
The battery
Working on the battery
Particular care is required when carrying out any work on
the battery!
The battery is located in the engine compartment in the plenum
chamber below a cover.
Taking off cover
– Press the cover in direction of arrow ⇒fig. 164 .
There is a risk of injuries, scalding, accidents and burns when carrying out
any work on the battery and on the electrical system. It is essential to
comply with the warning instructions stated below ⇒ and with the
general applicable rules of safety.
Fig. 164 Engine
compartment: plenum
chamber - battery
cover
Page 221 of 270

Inspecting and Replenishing
220
Note
Please also refer to the guidelines ⇒page 223, “Disconnecting and
reconnecting the battery”, also after connecting the battery.
Battery with a charge level indicator, the so-called
magic eye
There is a so-called magic eye ⇒fig. 165 located on the top of the battery.
The “magic eye” changes its colour in line with the charge state of and
electrolyte level in the battery.
Air bubbles can influence the colour of the “magic eye”. For this reason
carefully knock on the “magic eye” before carrying out the check.
•Green colour - the battery is adequately charged.
•Dark colour - the battery has to be charged
•Colourless or yellow - the electrolyte level is too low, no indication
r
egarding the charge state is possible. The battery must be replenished
with distilled water.
Batteries, which are more than 5 years old, must be replaced. We recom-
mend you have the electrolyte level inspected and adjusted to the correct
level or the battery replaced if necessary by a Škoda dealer.
Caution
If the vehicle has not been driven for more than 3 to 4 weeks, the battery
will discharge gradually as a result from electrical components such as the
control units which were not switched off. You can prevent the discharging
of the battery by disconnecting the negative terminal or charging the
battery constantly with a very low charging current. Please also refer to
the notes when working on the battery ⇒page 218, “Working on the
battery”.
Inspecting the electrolyte level
The battery is practically maintenance-free under normal operating
conditions. We do, however, recommend that you have the electrolyte
level inspected from time to time by a Škoda dealer when outside temper-
atures are high or when driving on long trips. You should also check the
electrolyte level ⇒page 221 each time the battery is charged.
The battery acid level will also be checked as part of the Inspection
Service.Fig. 165 Engine
compartment: Battery
with magic eye
Page 239 of 270

Breakdown assistance
238
•Do not drive with this spare wheel at more than 80 km/h - risk of acci-
dent. Avoid accelerating at full throttle, sharp braking and fast cornering.
•The inflation pressure for this spare wheel is identical to the inflation
pressure of the standard tyres.
•Use this spare wheel only to reach the nearest service station as it is
not intended for continuous use.
Changing a wheel
Preliminary work
The following steps should be carried out before actually
changing the wheel.
– If it is necessary to change a wheel, park the vehicle as far away as possible from the traffic flow. The place you choose
should be level.
– Have all the occupants get out. While changing a wheel, the
occupants of the vehicle should not stand on the road (it is
better behind a crash barrier).
– Apply the handbrake firmly.
– Engage 1st gear or if your vehicle is fitted with an automatic
gearbox, position the selector lever into position P .
– If a trailer is coupled, uncouple it.
– Take the vehicle tool kit and the spare wheel ⇒ page 237
out of the luggage compartment.
WARNING
•If you find yourself in flowing traffic switch on the hazard
warning lights system and place the warning triangle on the side of
the road at the prescribed distance from your vehicle while
observing all national legal provisions. In this way you are
protecting not only yourself but also other road users.
•Never start the engine with the vehicle sitting on the raised jack
- danger of suffering injury!
Caution
If you have to change a wheel on a slope first block the opposite wheel
with a stone or similar object in order to secure the vehicle from unexpect-
edly rolling away.
Note
Comply with the national legal regulations.
Changing a wheel
Always change a wheel on a level surface as far as possible.
– Take off the full wheel trim* ⇒page 239 or the caps
⇒ page 241.
– In the case of light alloy wheels remove the wheel trim cap ⇒page 240.
– Slacken the wheel bolts ⇒page 241.
Page 249 of 270
Breakdown assistance
248
damage resulting at the points to which you attach the tow rope or tow bar
when you attempt to tow a vehicle which is not standing on a paved road.
Caution
If the gearbox of your vehicle no longer contains any oil because of a
defect, your vehicle must only be towed in with the driven wheels raised
clear of the ground, or on a special vehicle transporter or trailer.
Note
•Please comply with any legal requirements particularly regarding the
switched on signal systems, when towing in or tow-starting another
vehicle.
•The tow rope must not be twisted as it may in certain circumstances
result in the front towing eye being unscrewed out of your vehicle.
Front towing eye
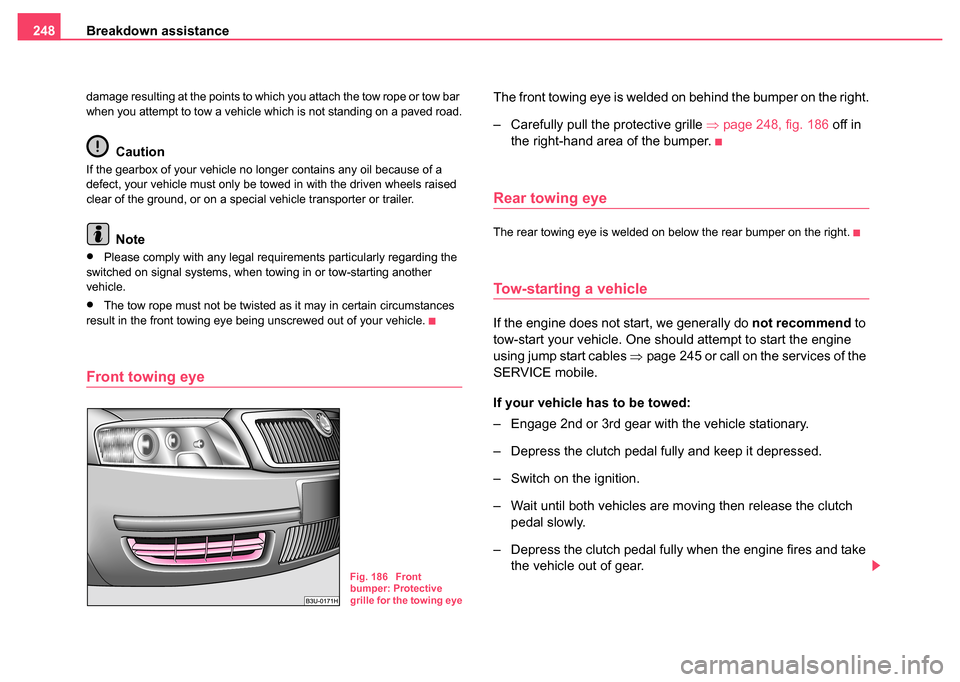
The front towing eye is welded on behind the bumper on the right.
– Carefully pull the protective grille ⇒page 248, fig. 186 off in
the right-hand area of the bumper.
Rear towing eye
The rear towing eye is welded on below the rear bumper on the right.
Tow-starting a vehicle
If the engine does not start, we generally do not recommend to
tow-start your vehicle. One should attempt to start the engine
using jump start cables ⇒page 245 or call on the services of the
SERVICE mobile.
If your vehicle has to be towed:
– Engage 2nd or 3rd gear with the vehicle stationary.
– Depress the clutch pedal fully and keep it depressed.
– Switch on the ignition.
– Wait until both vehicles are moving then release the clutch pedal slowly.
– Depress the clutch pedal fully when the engine fires and take the vehicle out of gear.
Fig. 186 Front
bumper: Protective
grille for the towing eye
Page 260 of 270
General259
Using the systemSafetyDriving TipsGeneral MaintenanceBreakdown assistanceTechnical Data
Technical Data
General
Identification data
Vehicle data sticker
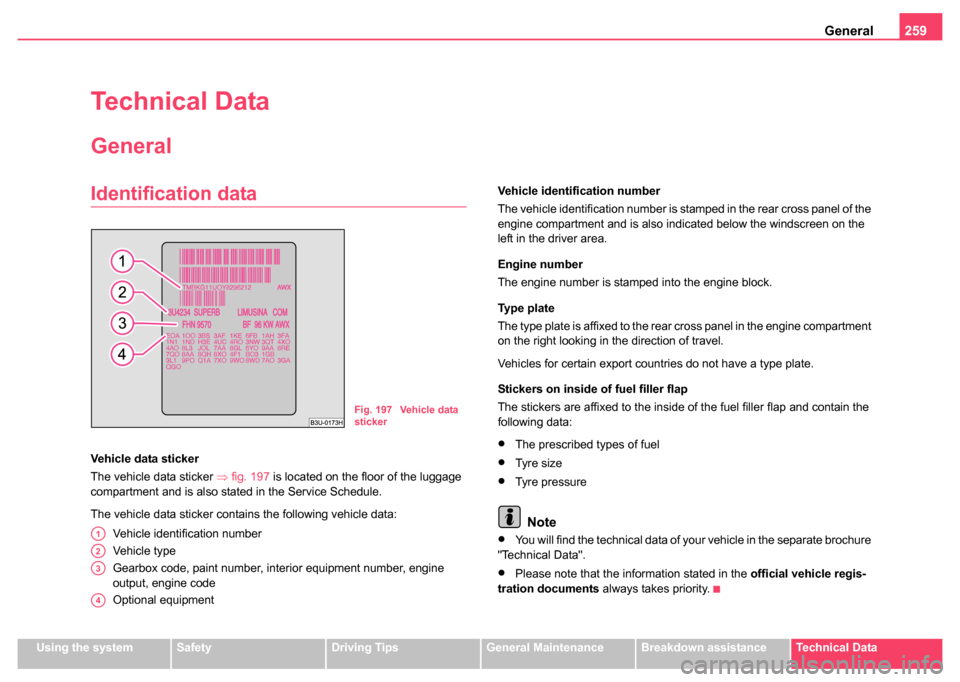
The vehicle data sticker ⇒fig. 197 is located on the floor of the luggage
compartment and is also stated in the Service Schedule.
The vehicle data sticker contains the following vehicle data:
Vehicle identification number
Vehicle type
Gearbox code, paint number, interior equipment number, engine
output, engine code
Optional equipment Vehicle identification number
The vehicle identification number is stamped in the rear cross panel of the
engine compartment and is also indicated below the windscreen on the
left in the driver area.
Engine number
The engine number is stamped into the engine block.
Ty p e p l a t e
The type plate is affixed to the rear cross panel in the engine compartment
on the right looking in the direction of travel.
Vehicles for certain export countries do not have a type plate.
Stickers on inside of fuel filler flap
The stickers are affixed to the inside of the fuel filler flap and contain the
following data:•The prescribed types of fuel
•Tyre size
•Tyre pressure
Note
•You will find the technical data of your vehicle in the separate brochure
"Technical Data".
•Please note that the information stated in the official vehicle regis-
tration documents always takes priority.
Fig. 197 Vehicle data
sticker
A1
A2
A3
A4
Page 266 of 270
Index265
Operation in winter
Biodiesel . . . . . . . . . . . . . . . . . . . . . . . . 205
De-icing windows . . . . . . . . . . . . . . . . . . 198
Snow chains . . . . . . . . . . . . . . . . . . . . . . 231
The battery . . . . . . . . . . . . . . . . . . . . . . . 221
Tyres . . . . . . . . . . . . . . . . . . . . . . . . . . . 230
Overview of the engine compartment . . . . . 210
P
Paint . . . . . . . . . . . . . . . . . . . . . . . . . . . . . . 198
Paint damage . . . . . . . . . . . . . . . . . . . . . . . 198
Parking . . . . . . . . . . . . . . . . . . . . . . . . . . . . 122
Parking aid . . . . . . . . . . . . . . . . . . . . . . . . . 122
Parking light . . . . . . . . . . . . . . . . . . . . . . . . . . 59
Parking lights . . . . . . . . . . . . . . . . . . . . . . . . . 56
Passive Safety . . . . . . . . . . . . . . . . . . . . . . . 139
Pedals . . . . . . . . . . . . . . . . . . . . . . . . . . . . . . 79
Petrol . . . . . . . . . . . . . . . . . . . . . . . . . . . . . . 204
Petrol engines Starting engine . . . . . . . . . . . . . . . . . . . . 119
Polishing . . . . . . . . . . . . . . . . . . . . . . . . . . . 197
Power socket . . . . . . . . . . . . . . . . . . . . . . 95, 96
Power steering . . . . . . . . . . . . . . . . . . . . . . 181
Power windows Central locking system . . . . . . . . . . . . . . . 52
Operational problems . . . . . . . . . . . . . . . . 52
Switch on the driver's door . . . . . . . . . . . . 50
Switches in front passenger door and in rear doors . . . . . . . . . . . . . . . . . . . . . . . . . . . 51
R
Raise vehicle . . . . . . . . . . . . . . . . . . . . . . . . 242
Range . . . . . . . . . . . . . . . . . . . . . . . . . . . . . . 20
Rear fog light . . . . . . . . . . . . . . . . . . . . . . . . . 57
Rear seats . . . . . . . . . . . . . . . . . . . . . . . . . . . 82
Rear window heater . . . . . . . . . . . . . . . . . . . . 62
Rear-view mirror
Exterior mirrors . . . . . . . . . . . . . . . . . . . . . 67
Interior rear-view mirror . . . . . . . . . . . . . . 66
Recirculated air mode Heating and ventilation . . . . . . . . . . . . . . 107
Refrigerator . . . . . . . . . . . . . . . . . . . . . . . . . . 84
Refuelling . . . . . . . . . . . . . . . . . . . . . . . . . . . 206 Emergency release of fuel filler flap . . . . 207
Remote control . . . . . . . . . . . . . . . . . . . . . . . 46 Synchronisation . . . . . . . . . . . . . . . . . . . . 48
Replacing fuses . . . . . . . . . . . . . . . . . . . . . . 250
Replacing windscreen wiper blades . . . . . . . 66
Roof aerial . . . . . . . . . . . . . . . . . . . . . . . . . . 196
Running in the car . . . . . . . . . . . . . . . . . . . . 182
S
Safe distance to steering wheel . . . . . . . . . . 116
Safe securing . . . . . . . . . . . . . . . . . . . . . . . . . 42
Safety . . . . . . . . . . . . . . . . . . . . . . . . . . . . . . 139
Safety instructions Engine compartment . . . . . . . . . . . . . . . 209
Safety wheel bolts . . . . . . . . . . . . . . . . . . . . 244 Saving electrical energy . . . . . . . . . . . . . . . . 185
Seat belt
Warning light . . . . . . . . . . . . . . . . . . . . . . . 36
Seat belt height adjuster . . . . . . . . . . . . . . . 149
Seat belt warning light . . . . . . . . . . . . . . . . . 148
Seat belts . . . . . . . . . . . . . . . . . . . . . . . . . . . 145 Belt tensioners . . . . . . . . . . . . . . . . . . . . 150
Blocking . . . . . . . . . . . . . . . . . . . . . . . . . 150
Cleaning . . . . . . . . . . . . . . . . . . . . . . . . . 203
Fasten . . . . . . . . . . . . . . . . . . . . . . . . . . . 148
Height adjustment . . . . . . . . . . . . . . . . . . 149
Safety instructions . . . . . . . . . . . . . . . . . 147
taking off . . . . . . . . . . . . . . . . . . . . . . . . . 149
Warning light . . . . . . . . . . . . . . . . . . . . . . . 36
Seat heaters . . . . . . . . . . . . . . . . . . . . . . . . . . 78
Seats . . . . . . . . . . . . . . . . . . . . . . . . . . . . . . . 69 Heating . . . . . . . . . . . . . . . . . . . . . . . . . . . 78
Selector lever . . . . . . . . . . . . . . . . . . . . . . . . 127
Selector lever position . . . . . . . . . . . . . . . . . 127
Service Interval Display . . . . . . . . . . . . . . . . . 16
Service intervals . . . . . . . . . . . . . . . . . . . . . . . 16
Service key . . . . . . . . . . . . . . . . . . . . . . . . . . 38
Setting temperature The air conditioning system . . . . . . . . . . 105
Setting the clock . . . . . . . . . . . . . . . . . . . . . . . 15
Shifting of gears . . . . . . . . . . . . . . . . . . . . . . 120
Side airbags . . . . . . . . . . . . . . . . . . . . . . . . . 157
Ski bag . . . . . . . . . . . . . . . . . . . . . . . . . . . . . . 83
Snow chains . . . . . . . . . . . . . . . . . . . . . . . . . 231
Spare wheel . . . . . . . . . . . . . . . . . . . . . . . . . 237
Page 269 of 270

S I M P LY C L E V E R
ŠkodaService
ŠkodaGenuine Parts
ŠkodaGenuine Accessories