display SKODA SUPERB 2004 1.G / (B5/3U) Owner's Guide
[x] Cancel search | Manufacturer: SKODA, Model Year: 2004, Model line: SUPERB, Model: SKODA SUPERB 2004 1.G / (B5/3U)Pages: 270
Page 128 of 270

Automatic gearbox*127
Using the systemSafetyDriving TipsGeneral MaintenanceBreakdown assistanceTechnical Data
is never completely interrupted, also not when the engine is idling
- the vehicle "creeps".
Selector lever position
The selector lever position you have engaged is shown in the information
display of the instrument cluster with the corresponding gear symbol high-
lighted
⇒fig. 114 .
P - Parklock
The driven wheels are locked mechanically in this position.
The Parklock must only be engaged when the vehicle is stationary ⇒.
If you wish to move the selector lever into or out of this position, you must
press the Shiftlock button in the handle of the selector lever and at the
same time depress the brake pedal.
R - Reverse
Reverse gear must only be engaged when the vehicle is stationary and
the engine idling ⇒.
The brake pedal must be depressed and at the same time the Shiftlock
must be pressed, if you wish to obtain the selector lever positions R, P or
N .
The reversing lights come on when the selector lever is moved into posi- tion R when the ignition is also on.
WARNING (continued)
Fig. 113 Selector lever
Fig. 114 Information
display: Selector lever
positions
Page 130 of 270

Automatic gearbox*129
Using the systemSafetyDriving TipsGeneral MaintenanceBreakdown assistanceTechnical Data
•You must move the selector lever into position P and firmly
apply the handbrake first before you or any other person opens the
bonnet and starts working on the engine when it is running - risk
of accident! It is also essential to observe all warnings ⇒page 209,
“Working in the engine compartment”.
Note
•Take your foot off the accelerator if you inadvertently shift into N when
driving and wait until the engine speed has dropped to the idling speed
range before shifting into D.
•If you shift gear manually it is possible to select positions 4, 3 and 2,
but the automatic gearbox will not shift down until there is no risk of the
engine overrevving.
Selector lever lock
Automatic selector lever lock
With the ignition on, the selector lever is locked when it is in the positions
P and N. You must depress the brake pedal first and press the Shiftlock
button if you wish to move the selector lever out of these positions. The
following will be displayed in the information display*:
"Apply foot brake when selecting gear with vehicle stationary"
Symbol
also lights up in the selector lever cover until the brake pedal
is actuated.
A time delay element ensures that the selector lever is not blocked when
rapidly switching over the position N (e.g. from R to D). This does, for
example, allow one to seesaw out a stuck vehicle. The selector lever lock will click into place if the lever is in the
N position for more than 2 seconds
without the brake pedal being pressed.
The selector lever lock is only active if the vehicle is stationary or moving
at speed of less than 5 km/hour. The lock is switched off automatically into
position N when the car is travelling at a higher speed.
Shiftlock button
The Shiftlock button in the handle of selector lever prevents certain
selector lever positions being engaged inadvertently. The selector lever
lock is cancelled when you press the Shiftlock button.
Keylock - Ignition key withdrawal lock
You can only withdraw the ignition key after switching off the ignition if the
selector lever is in position P. If the ignition key is withdrawn, the selector
lever is blocked in postion P.
Kickdown function
The kickdown function provides you with maximum accel-
eration power.
Depressing the accelerator pedal beyond the pressure point casues the
automatic gearbox to shift down into a lower gear (in line with vehicle
speed and engine speed). The gearbox shifts up into the next higher gear
when the engine has reached its maximum revolations.
WARNING
Please note that using the kickdown function can result in the
driven wheels spinning on a smooth or slippery road surface - risk
of skidding!
WARNING (continued)
Page 131 of 270

Automatic gearbox*
130
Dynamic shift programme
The automatic gearbox of your vehicle is controlled electronically. Shifting
up and down through the gears is performed automatically on the basis of
pre-defined driving programmes.
Adopting a moderate style of driving will cause the gearbox to select the
most economical driving programme. Shifting up into a higher gear as
soon as possible and shifting down as late as possible will have a favour-
able effect on your fuel consumption.
Adopting a faster style of driving with rapid movements of the acceler-
ator pedal combined with sharp acceleration and frequent changes in
speed, exploiting the top speed of the car or operating the kickdown func-
tion, will cause the gearbox to switch over to the sporty driving
programme. Shifting up later into a higher gear makes it possible to fully
exploit the power reserves of the engine. The gearbox also then shifts
down at higher engine speeds than is the case for the economy-oriented
programmes.
Selecting the most appropriate driving programme for the particular style
of driving is a continuous process. Irrespective of this it is, however,
possible to switch into a sporty driving programme by depressing the
accelerator rapidly. The gearbox shifts down into a lower gear matching
the speed of the car and this allows you to accelerate rapidly (e.g. when
overtaking) without having to depress the accelerator pedal fully into the
kickdown range. The original programme will be reactivated to match your
particular style of driving once the gearbox has shifted up again.
When driving in hilly regions, the gears are selected to match uphill and
downhill sections. This avoids the gearbox frequently shifting up and down
when negotiating an uphill stretch. Depressing the brake pedal while
driving downhill causes the gearbox to shift down into the next lower gear.
This makes it possible for you to exploit the engine braking power without
the need for shifting gears manually.
Tiptronic
The Tiptronic allows the driver to also shift gears manually.
Fig. 115 Selector
lever: Manual shifting
of gears
Fig. 116 Information
display: Manual
shifting of gears
Page 132 of 270
Automatic gearbox*131
Using the systemSafetyDriving TipsGeneral MaintenanceBreakdown assistanceTechnical Data
Switching over to manual
– Push the selector lever to the right out of position D. As soon
as the gearbox has switched over, 5 4 3 2 1 appears in the
display, with the gear engaged being highlighted.
Shifting up gears
– One-touch forward of the selector lever (in the Tiptronic posi- tion) ⇒page 130, fig. 115 .
Shifting down gears
– One-touch back of the selector lever (in the Tiptronic position) .
It is possible to switch over to manual both when the car is stationary and
also when driving.
When you accelerate, the gearbox shifts up automatically in gears 1, 2, 3
and 4 into the next higher gear just before the maximum permissible
engine speed is reached.
If you select a lower gear, the automatic gearbox does not shift down until
there is no risk of the engine overrevving.
If you operate the kickdown function, the gearbox shifts into a lower gear
in line with the vehicle speed and engine speed.
Emergency programme
An emergency programme exists in the event of a fault in
the system.
The gearbox operates in a corresponding emergency programme if there
are functional faults in the gearbox electronics. This is indicated by all of
the segments in the display lighting up or going out.
It is possible to continue to move the selector lever into all the positions.
The gearbox always shifts into 4th gear in the positions D, 4 , 3 and 2. It is
also possible to continue to engage reverse gear in the position R.
The manual shift programme (Tiptronic) is switched off in the emergency
mode.
If the gearbox has switched over to emergency mode, drive to the
nearest Škoda dealer in order to have the fault rectified.
Tow-starting and towing vehicle
Tow-starting a vehicle
For technical reasons it is not possible to tow-start a car fitted with an auto-
matic gearbox ⇒page 248.
you can use jump-start cables connected to the battery of another vehicle
for starting your car if the vehicle battery is flat ⇒page 246.
Towing a vehicle
Please pay attention to the following information if it comes necessary to
tow-in your car ⇒page 247.
A+
A-
Page 135 of 270
Communicating and Navigating
134
Operating mobile phone
– You can operate the mobile phone with buttons , and
⇒fig. 118 .
– You can switch over from the radio mode to the phone mode (or back again) by pressing the button in the position
MODE .
– You can accept or end a telephone call or select from the phonebook by briefly pressing the button in the position
.
– You can refuse a telephone call by pressing the button in the position
for more than 2 seconds.
– You can make the volume of the telephone call louder or softer by pressing the button in the positions VOL+ and VOL- .
– You call scroll through the telephone memory for names by briefly pressing the button in the position
or . – You can scroll alphabetically upward (A to Z) or downward (Z
to A) within the telephone memory by pressing for some
considerable time the button in the positions
and .
If you switch over with the button MODE on the multifunction steering
wheel ⇒page 132, fig. 117 to phone mode and the mobile phone is not in
the adapter, INSERT PHONE appears in the display. After inserting the
mobile phone, PHONE IN appears on the display.
Afterwards PHONE STARTUP appears on the display and the system
transmits the data from the mobile phone to the information display. The
following is shown in stages on the display:
•DIALED CALLS LOADING: xxx
•RCVD CALLS LOADING: xxx
•MISSED CALLS LOADING: xxx
•PHONEBOOK LOADING
One cannot scroll through the phonebook during data transfer out of the
mobile phone. After the data transfer has ended, the first name out of the
phonebook is shown on the display
You can scroll through the individual menus by pressing the button in
the position
and ⇒ fig. 118 .
Select the entry you want by pressing the button in the position
.
You will reach one level higher in the menu by pressing the button in
the position MODE.
In the main menu you can select the following entries:
•PHONEBOOK
•SETUP
•LAST CALLS
•RECEIVED CALLS
•MISSED CALLS
Fig. 118 Multifunction
steering wheel: control
buttons
A2A3A4
A2
A2
A2
A3
A4
A4
A4
A2
A2
Page 136 of 270
Communicating and Navigating135
Using the systemSafetyDriving TipsGeneral MaintenanceBreakdown assistanceTechnical Data
In the menu
SETUP you can select the following entries:
•LANGUAGE - Here you can set in which language the messages
should be displayed. You can select one of the following languages:
Czech, English, German, Italian, French, Spanish. The set language is
displayed inversely.
•MEMORY - Here you can set which telephone memory should be
transmitted into the information display after inserting the mobile phone in
the adapter. You can choose between the phonebook PHONE
PHONEBOOK and the memory of the SIM card SIM PHONEBOOK The
set memory is displayed inversely.
•Certain mobile phones do not have any phone phonebook, but only a
phonebook in the memory of the SIM card.
•Overview of the next possible functions and read outs:
Note
•If the setting of the memory is changed, you must take the mobile
phone out of the adapter and insert it again in order to transmit the data
from the newly set memory into the information display.
•If you do not operate the mobile phone (do not scroll in the memory, do
no call, etc.) it switches automatically over to radio mode after 60 seconds.
•If you switch the ignition off and leave the mobile phone inserted in the
adapter, the system switches off automatically the mobile phone after 30
minutes.
•If you have stored in the phonebook names with special characters
(ticks, lines, etc), the special characters will not always be correctly
displayed on the information display.
•The function of the convenience operating feature with the buttons on
the multifunction steering wheel is not available on all mobile phones and
adapters. Please contact your Škoda dealer, who will tell you which
adapter and which mobile phone you can use.
OperationRead out in display
selected call numberCALLING name
or
CALLING number
accepted callCALL name
or
CALL number
or
CALL
Call rejectedCALL REJECTED
End of callEND OF CALL
Number engagedLine Engaged
No service foundNO SERVICE
Enter PIN codeENTER PIN CODE
Page 139 of 270

Communicating and Navigating
138
Note
For technical reasons it is not possible to use simultaneously the front and
rear mobile phone. Ensure that the adapter is always inserted only in
the bracket .
Mobile phones and two-way radio systems
The installation of mobile phones and two-way radio systems in a vehicle
should generally be undertaken by a Škoda dealer.
Škoda Auto permits the operation of mobile phones and two-way radio
systems with a professionally installed external aerial and a maximum
transmission power of up to 10 watts.
Our Škoda dealers are also happy to inform you about the possibilities
available for installing and operating mobile telephones and radio trans-
mitters which have an output greater than 10 watts. The Škoda dealers
can provide you with details about the technical possibilities for retrofitting
of mobile telephones and radio transmitters.
The operation of commercially available mobile phones or two-way radio
systems may cause operational problems in the electronic systems of
your car. The reasons for this may be:
•no external aerial
•external aerial incorrectly installed
•transmission power greater than 10 watts.
You should therefore not operate a mobile phone or two-way radio
system inside the vehicle without the use of an external aerial, or with
an external aerial which has been incorrectly installed.
You should also note that only an external aerial makes it possible to
achieve the optimal range of such equipment.
WARNING
•If a mobile phone or two-way radio system is operated inside the
vehicle without using an external aer ial, or with an external aerial
which has been incorrectly installed, the result can be excessive
electromagnetic fields which ma y cause harm to your health.
•Please always pay full attention to the traffic situation around
you!
•You must not install two-way radio systems, mobile phones or
mounts on the covers of the airbags or within the immediate
deployment range of airbags. This might result in injuries to the
occupants in the event of an accident!
Note
Please also refer to the operating instructions of the mobile phones and
two-way radio systems.
Navigation system*
The controls for the navigation system, radio, CD player are located in the
centre console on both sides of the monitor screen. Navigation data is
also shown in the information display.
Please refer to the relevant operating instructions for a detailed descrip-
tion of the navigation system.
AAAB
Page 159 of 270
Airbag system
158
In certain accident situations both the front airbags as well as the head
and side airbags may be deployed together.
If an airbag is deployed, the airbag is filled with propellant gas. The
airbags inflate in fractions of a second and at a high speed in order to be
able to offer that additional protection in the event of an accident.
A grey white, non harmful gas is released when airbag is inflated. This is
perfectly normal and is not an indication of a fire in the vehicle.
The load of the occupants is cushioned when plunging into the fully
inflated airbag and the risk of injury to the entire upper body (chest,
stomach and pelvis) is reduced on the side facing the door.
Important safety information on the side airbag
Correct use of the airbag system considerably reduces the
risk of injury!
WARNING
•It is essential to always switch off ⇒page 161, “Deactivating an
airbag” the front passenger airbag when attaching a child safety
seat on the front passenger seat where the child is seated with its
back facing in direction of travel (in some countries also when the
child is facing the direction of travel). If this is not done, there is a
risk of the child suffering severe or even fatal injuries if the front
passenger airbag is deployed. In certain countries national legal
provisions also require that the side or head passenger airbags be
deactivated. When transporting a child on the front passenger seat,
please comply with the appropriate national regulations regarding
the use of child safety seats.
•Your head should never be positioned in the deployment area of
the side airbag. You might suffer severe injuries in the event of an accident. This applies in particular to children who are transported
without using a suitable child safety seat
⇒page 167, “Child safety
and side airbags”.
•If children adopt an incorrect seated position when travelling,
they may be exposed to an increased risk of injury in the event of
an accident. This can result in serious injuries ⇒page 164, “What
you should know about transporting children!”.
•There must not be any further persons, animals as well as
objects positioned between the occupants and the deployment
area of the airbag. There must also be no accessories such as cup
holders, attached to the doors to enable the side airbags to activate
properly.
•Only hang light items of clothing on the clothes hooks to the
vehicle. Never leave any heavy or sharp-edged objects in the
pockets of the items of clothing.
•Ensure that there are no excessive forces, such as violent
knocks, kicks etc., impact on the backrests of the seats otherwise
the system may be damaged. The side airbags would not be
deployed in such a case!
•Any seat or protective covers which you fit to the driver or front
passenger seats must only be of the type expressly authorized by
Škoda Auto. In view of the fact that the airbag inflates out of the
backrest of the seat, use of non-approved seat or protective covers
would considerably impair the protective function of the side
airbag.
•Any damage to the original seat covers in the area of the side
airbag module must be repaired without delay by your Škoda
dealer.
•The airbag modules in the front seats must not display any
damage, cracks or deep scratches. It is not permissible to use force
in order to open the modules.
WARNING (continued)
Page 252 of 270
Fuses and light bulbs251
Using the systemSafetyDriving TipsGeneral MaintenanceBreakdown assistanceTechnical Data
Caution
•Never attempt to “repair” fuses and also do not replace them with a
fuse of a higher amperage - risk of fire! This may also cause damage at
another part of the electrical system.
•Have the electrical system checked as quickly as possible by a Škoda
dealer if a newly inserted fuse blows again after a short time.
Fuse assignment
Certain electrical components are only standard on certain vehicle model
versions or only suppliable as optional equipment for certain models.
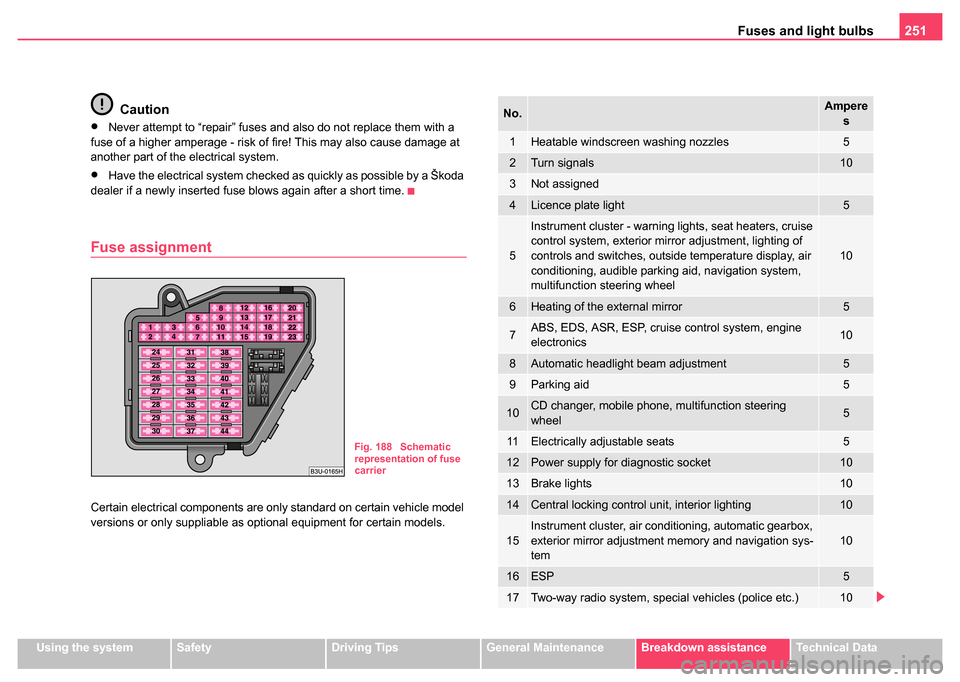
Fig. 188 Schematic
representation of fuse
carrier
No.Ampere s
1Heatable windscreen washing nozzles5
2Turn signals10
3Not assigned
4Licence plate light5
5
Instrument cluster - warning lights, seat heaters, cruise
control system, exterior mirror adjustment, lighting of
controls and switches, outside temperature display, air
conditioning, audible parking aid, navigation system,
multifunction steering wheel
10
6Heating of the external mirror5
7ABS, EDS, ASR, ESP, cruise control system, engine
electronics10
8Automatic headlight beam adjustment5
9Parking aid5
10CD changer, mobile phone, multifunction steering
wheel5
11Electrically adjustable seats5
12Power supply for diagnostic socket10
13Brake lights10
14Central locking control unit, interior lighting10
15Instrument cluster, air conditioning, automatic gearbox,
exterior mirror adjustment memory and navigation sys-
tem10
16ESP5
17Two-way radio system, special vehicles (police etc.)10
Page 263 of 270
Index
262
Child safety seats
ISOFIX system . . . . . . . . . . . . . . . . . . . 173
Child seat . . . . . . . . . . . . . . . . . . . . . . . . . . 168 attach . . . . . . . . . . . . . . . . . . . . . . . . . . 171
Child seat protection . . . . . . . . . . . . . . . 171
Classification into groups . . . . . . . . . . . 168
on the front passenger seat . . . . . . . . . 166
Safety instructions . . . . . . . . . . . . . . . . . 164
Use of child seats . . . . . . . . . . . . . . . . . 168
Children and safety . . . . . . . . . . . . . . . . . . . 164
Chrome parts . . . . . . . . . . . . . . . . . . . . . . . 198
Cigarette lighter . . . . . . . . . . . . . . . . . . . . . . 95
Cleaning . . . . . . . . . . . . . . . . . . . . . . . . . . . 195
Climatronic Air outlet vents . . . . . . . . . . . . . . . . . . . 114
Blower . . . . . . . . . . . . . . . . . . . . . . . . . . 113
Defrosting windows . . . . . . . . . . . . . . . . 110
economic use . . . . . . . . . . . . . . . . . . . . 110
Keeping windows demisted . . . . . . . . . . 111
Operational problems . . . . . . . . . . . . . . 110
Recirculated air mode . . . . . . . . . . . . . . 112
Setting temperature . . . . . . . . . . . . . . . . 113
Climatronic (automatic air conditioning) . . . 109
Clock . . . . . . . . . . . . . . . . . . . . . . . . . . . . . . . 15
Clothes hooks . . . . . . . . . . . . . . . . . . . . . . . 103
Cockpit An overview . . . . . . . . . . . . . . . . . . . . . . . 11
Coming Home . . . . . . . . . . . . . . . . . . . . . . . . 60
Compartments . . . . . . . . . . . . . . . . . . . . . . . 97
Computer . . . . . . . . . . . . . . . . . . . . . . . . . . . 18
Convenience operation . . . . . . . . . . . . . . . . . 52 Converting/masking over headlights . . . . . . 184
Cool box . . . . . . . . . . . . . . . . . . . . . . . . . . . . 84
Coolant . . . . . . . . . . . . . . . . . . . . . . . . . . . . 214
replenishing . . . . . . . . . . . . . . . . . . . . . . 216
Warning light . . . . . . . . . . . . . . . . . . . . . . 31
Coolant level Warning light . . . . . . . . . . . . . . . . . . . . . . 31
Coolant temperature gauge . . . . . . . . . . . . . 14
Coolant temperature/coolant level Warning light . . . . . . . . . . . . . . . . . . . . . . 31
Cooling Climatronic . . . . . . . . . . . . . . . . . . . . . . . 109
The air conditioning system . . . . . . . . . . 104
Correct seated position . . . . . . . . . . . . . . . . 141
Counter for distance driven . . . . . . . . . . . . . . 16
Cruise control . . . . . . . . . . . . . . . . . . . . . . . 123
Cruise control system . . . . . . . . . . . . . . . . . 123
D
Deactivating an airbag . . . . . . . . . . . . . . . . 161
Defrosting rear window . . . . . . . . . . . . . . . . . 62
Defrosting windows The air conditioning system . . . . . . . . . . 106
De-icing windows . . . . . . . . . . . . . . . . . . . . 198
Detachable towing device . . . . . . . . . . . . . . 192
Diesel . . . . . . . . . . . . . . . . . . . . . . . . . . . . . 204
Diesel engines Starting engine . . . . . . . . . . . . . . . . . . . 119
Differential Lock (EDL) . . . . . . . . . . . . . . . . 177 Digital clock . . . . . . . . . . . . . . . . . . . . . . . . . . 15
Dipstick . . . . . . . . . . . . . . . . . . . . . . . . . . . . 212
Direction indicators . . . . . . . . . . . . . . . . . . . . 59
Warning light . . . . . . . . . . . . . . . . . . . . . . 29
Display . . . . . . . . . . . . . . . . . . . . . . . . . . . . . . 22
Distance driven . . . . . . . . . . . . . . . . . . . . . . . 21
distance driven . . . . . . . . . . . . . . . . . . . . . . . 16
Door Child safety locks . . . . . . . . . . . . . . . . . . . 41
Warning light . . . . . . . . . . . . . . . . . . . . . . 33
Drinks can holder at the front . . . . . . . . . . . . . . . . . . . . . . . . 92
at the rear . . . . . . . . . . . . . . . . . . . . . . . . . 92
Driving economically . . . . . . . . . . . . . . . . . . 185
Driving time . . . . . . . . . . . . . . . . . . . . . . . . . . 21
Dynamo Warning light . . . . . . . . . . . . . . . . . . . . . . 36
E
EDL . . . . . . . . . . . . . . . . . . . . . . . . . . . . . . . 177
Electric sliding/tilting roof . . . . . . . . . . . . . . . . 53
Electrically adjustable rear mirror . . . . . . . . . 67
Electrically adjustable seats . . . . . . . . . . . . . 71
Electronic Differential LockWarning light . . . . . . . . . . . . . . . . . . . . . . 34
Electronic Differential Lock (EDL) . . . . . . . . 177
Electronic immobiliser Warning light . . . . . . . . . . . . . . . . . . . . . . 35
Electronic stability programme (ESP) . . . . . 175 Warning light . . . . . . . . . . . . . . . . . . . . . . 34