tow SKODA SUPERB 2004 1.G / (B5/3U) Repair Manual
[x] Cancel search | Manufacturer: SKODA, Model Year: 2004, Model line: SUPERB, Model: SKODA SUPERB 2004 1.G / (B5/3U)Pages: 270
Page 193 of 270

Towing a trailer
192
before negotiating a downhill section to allow the engine to also act as a
brake.
Engine overheating
Please keep a check on the coolant temperature gauge if you have to
negotiate a lengthy slope in a low gear at a high engine speed when the
outside temperature is very high ⇒page 14.
If the needle of the coolant temperature gauge moves into the right-hand
area or even the red area of the scale, reduce your speed immediately.
Stop and switch off the engine if the warning light
in the instrument
cluster begins flashing. Wait a few minutes and check the level of coolant
in the coolant expansion bottle ⇒page 215, “Inspecting the coolant level”.
Please refer to the following guidelines ⇒page 31, “Coolant tempera-
ture/coolant level ”.
The coolant temperature can be reduced by switching on the heating.
Any increase in the cooling effect of the coolant fan through shifting down
a gear and increasing the engine speed is not possible since the fan
speed is independent of the engine speed. One should also not drop a
gear for this reason when towing a trailer as long as the engine can
manage the slope without any drop in speed.
Detachable towing device*
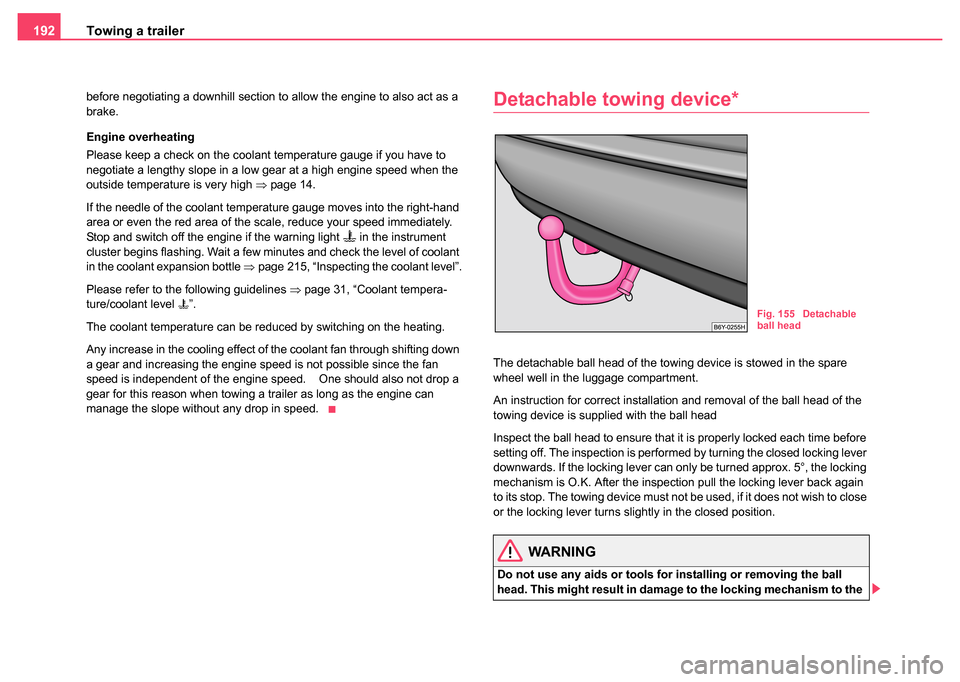
The detachable ball head of the towing device is stowed in the spare
wheel well in the luggage compartment.
An instruction for correct installation and removal of the ball head of the
towing device is supplied with the ball head
Inspect the ball head to ensure that it is properly locked each time before
setting off. The inspection is performed by turning the closed locking lever
downwards. If the locking lever can only be turned approx. 5°, the locking
mechanism is O.K. After the inspection pull the locking lever back again
to its stop. The towing device must not be used, if it does not wish to close
or the locking lever turns slightly in the closed position.
WARNING
Do not use any aids or tools for installing or removing the ball
head. This might result in damage to the locking mechanism to the
Fig. 155 Detachable
ball head
Page 194 of 270

Towing a trailer193
Using the systemSafetyDriving TipsGeneral MaintenanceBreakdown assistanceTechnical Data
extent that the safety of the towing device is no longer assured -
risk of an accident.
Note
•Do not carry out any modifications or repairs to the ball head or to any
other components on the towing device.
•Contact a Škoda dealer if you encounter any problems using the
device.
•Never unlock the ball head with a trailer coupled to it.
•You should take off the ball head if you drive without towing a trailer.
Inspect whether the end cover properly seals off the mounting shaft.
•Remove the ball head beforehand if you wish to clean your vehicle
using a steam jet. Ensure that the end cover properly seals the mounting
shaft.
•It is recommended to wear gloves when installing and removing.
WARNING (continued)
Page 195 of 270

Towing a trailer
194
Page 203 of 270

Care and cleaning
202
– Remove fresh stains which are oil based (e.g. butter, mayon-
naise, chocolate etc.) with an absorbent cloth or household
cleaning paper or with the cleaner from the care set if the stain
has not yet penetrated into the surface.
– Use a grease dissolver for grease stains which have dried
in .
–Eliminate special stains (e.g. ball-point pens, felt pen, nail
varnish, dispersion paint, shoe cream etc.) with a special stain
remover suitable for leather.
Leather care
– Treat the leather every six months with the leather care product available from Škoda dealers.
– Apply only a small amount of the care product.
– Dry the leather off with a soft cloth
It is best to consult your Škoda dealer if you have any questions regarding
cleaning and care of the leather interior.
Caution
•You must on no account treat the leather with solvents (e.g. gasoline,
turpentine), floor wax, shoe cream or such like.
•Avoid leaving your vehicle for lengthy periods in bright sunlight in order
to avoid bleaching the leather. If you leave your vehicle parked in the open
for lengthy periods, protect the leather from the direct rays of the sun by
covering it over.
•Sharp-edged objects on items of clothing such as zip fasteners, rivets,
sharp-edged belts may leave permanent scratches or signs of rubbing on
the surface.
Note
•Use a care cream with light blocker and impregnation effect regularly
and each time after cleaning the leather. The cream nourishes the leather,
allows it to breathe and keeps it supple and also provides moisture. It also
creates surface protection.
•Clean the leather every 2 to 3 months, remove fresh soiling each time
this occurs.
•Remove fresh stains such as those from ball-point pens, ink, lipstick,
shoe cream etc., as quickly as possible.
•Care also for the leather dye. Refreshen areas which have lost their
colour with a special coloured leather cream as required.
Alcantara upholstery
Do not use any leather care products for cleaning Alcantara upholsteries.
Eliminating dust and dirt
Wipe the Alcantara upholstery with a slightly moistened, soft cloth or clean
the covers with a suitable shampoo.
Removing stains
Moisten a soft cloth with lukewarm water or diluted methylated spirits and
dab the stain from the edges toward the middle.
Caution
•Do not use any leather care product on the Alcantara upholsteries.
•Avoid leaving your vehicle for lengthy periods in bright sunlight in order
to avoid bleaching the Alcantara upholsteries. If you leave your vehicle
parked in the open for lengthy periods, protect the Alcantara upholstery
from the direct rays of the sun by covering it over.
Page 213 of 270

Inspecting and Replenishing
212
Note
•Before a long drive we recommend that you purchase and carry with
you engine oil which complies with the specification for your vehicle.
Consequently, you will always have the correct engine oil for refilling.
•We recommend using a preservative from the Škoda original accesso-
ries offered by your Škoda dealer.
•For further information - see Service Schedule.
Inspecting the engine oil level
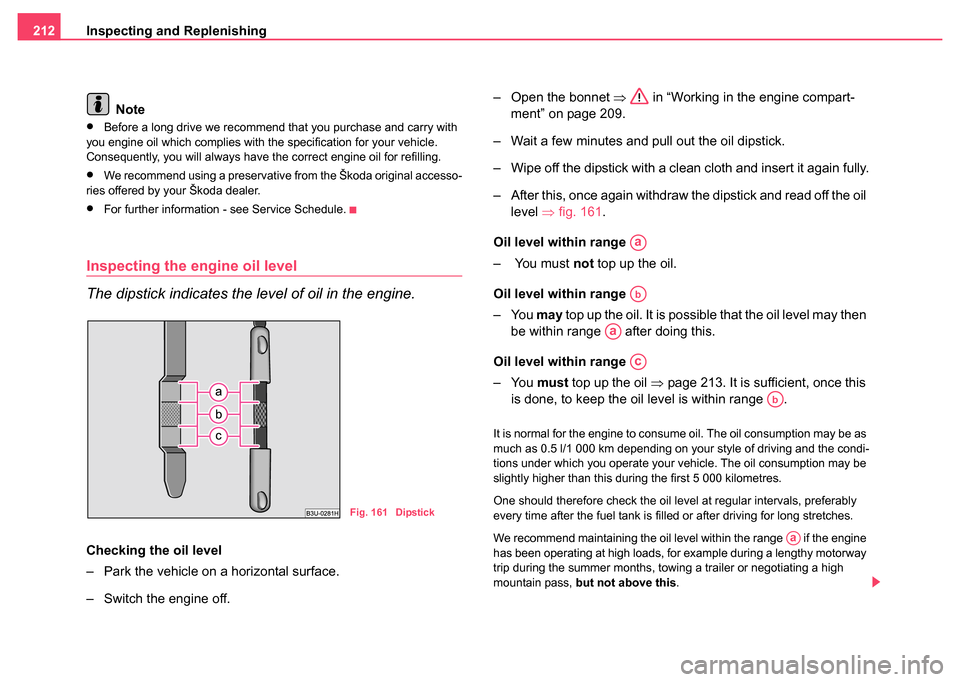
The dipstick indicates the level of oil in the engine.
Checking the oil level
– Park the vehicle on a horizontal surface.
– Switch the engine off. – Open the bonnet
⇒ in “Working in the engine compart-
ment” on page 209.
– Wait a few minutes and pull out the oil dipstick.
– Wipe off the dipstick with a clean cloth and insert it again fully.
– After this, once again withdraw the dipstick and read off the oil level ⇒fig. 161 .
Oil level within range
– You must not top up the oil.
Oil level within range
–You may top up the oil. It is possible that the oil level may then
be within range after doing this.
Oil level within range
–You must top up the oil ⇒page 213. It is sufficient, once this
is done, to keep the oil level is within range .
It is normal for the engine to consume oil. The oil consumption may be as
much as 0.5 l/1 000 km depending on your style of driving and the condi-
tions under which you operate your vehicle. The oil consumption may be
slightly higher than this during the first 5 000 kilometres.
One should therefore check the oil level at regular intervals, preferably
every time after the fuel tank is filled or after driving for long stretches.
We recommend maintaining the oil level within the range if the engine
has been operating at high loads, for example during a lengthy motorway
trip during the summer months, towing a trailer or negotiating a high
mountain pass, but not above this.
Fig. 161 Dipstick
Aa
Ab
Aa
Ac
Ab
Aa
Page 236 of 270

Breakdown assistance235
Using the systemSafetyDriving TipsGeneral MaintenanceBreakdown assistanceTechnical Data
Breakdown assistance
Breakdown assistance
First-aid box*
First-aid box
The compartment for stowing the first-aid box is located in the left of the
luggage compartment ⇒fig. 173 .
Note
Pay attention to the use-by-date of the contents of the first-aid box.
Warning triangle
– To remove the warning triangle, turn the rotary lock in direc-
tion of arrow ⇒fig. 174 and fold the fixture down.
Fig. 173 Compartment
for stowing first-aid
boxFig. 174 Warning
triangle fitted inside
boot lid
Page 237 of 270

Breakdown assistance
236
Fire extinguisher*
The fire extinguisher is located in the sheath below the driver's seat
⇒ fig. 175 (the installation position of the fire extinguisher differs on vehi-
cles fitted with electrically adjustable seats).
Please read carefully the instructions which are attached to the fire
extinguisher.
The fire extinguisher must be checked by an authorised person or
company annually (please observe the national legal equirements).
WARNING
If the fire extinguisher is not correctly attached, in case of sudden
manoeuvres or an accident it can be thrown through the interior
compartment and cause injuries.
Note
•The fire extinguisher must comply with the relevant and valid legal
requirements.
•Pay attention to the expiration date of the fire extinguisher. If the fire
extinguisher is used after the expiration date, its proper function is no
longer assured.
•The fire extinguisher is only supplied in certain countries within the
scope of delivery.
Vehicle tool kit
The car tool kit and the car jack are stowed in the left of the luggage
compartment ⇒fig. 176 below the floor covering.
The vehicle tool kit contains the following parts (depending on equipment
fitted):
Fig. 175 Front seat:
Fire extinguisher
Fig. 176 Luggage
compartment:
Compartment for
stowing the tool kit
Page 238 of 270

Breakdown assistance237
Using the systemSafetyDriving TipsGeneral MaintenanceBreakdown assistanceTechnical Data
•Hook for pulling off a full wheel trim
•Plastic clip for a wheel bolt cover
•Wheel wrench
•Assembly pin for changing wheel
•Screwdriver with reversible blade
•10 x 13 open-end wrench
•Adapter for the wheel bolts lock
After using the lifting jack, screw in the arm of the lifting jack fully before
placing it back in its stowage area.
WARNING
•The hexagon socket in the handle of the screwdriver should
only be used to fit on the wheel bolts. Never use the hexagon
socket of the screwdriver for tightening the wheel bolts because
you will not be able to achieve the necessary tightening torque with
the hexagon socket - risk of accident!
•The factory-supplied lifting jack is only intended for your model
of vehicle. On no account attempt to lift a heavier vehicle or other
loads - risk of injury!
•Ensure that the vehicle tool kit is safely attached in the luggage
compartment.
Spare wheel
The spare wheel is stowed in the spare wheel well in the
luggage compartment below the floor covering.
The spare wheel lies in a well in the luggage compartment under floor
covering and is fixed in place using special screws ⇒fig. 177 .
One should check the inflation pressure in the spare wheel (at best when
generally checking the tyre air pressures - see sign on the fuel filler flap
⇒ page 226) to ensure that the spare wheel is always ready to use.
Unidirectional tyres*
If you have such tyres on your vehicle, please refer to the notes below:
•The spare wheel provided with a car fitted with unidirectional tyres has
different dimensions. The wheel is provided with a warning sticker.
•After fitting on the wheel, the warning sticker must not be concealed
(e.g. by the wheel trim).
Fig. 177 Luggage
compartment: Spare
wheel
Page 240 of 270

Breakdown assistance239
Using the systemSafetyDriving TipsGeneral MaintenanceBreakdown assistanceTechnical Data
– Jack up the vehicle until the wheel is clear of the ground
⇒page 242.
– Unscrew the wheel bolts and place them on a clean surface (cloth, paper etc.).
– Take off the wheel.
– Fit on the spare wheel and tighten the wheel bolts slightly.
– Lower the car.
– Tighten the wheel bolts firmly, alternately and diagonally using the wheel wrench ⇒page 241.
– Mount the full wheel trim/wheel trim cap or the caps.
Note
•All bolts must be clean and must turn easily.
•You must never grease or oil the wheel bolts!
•When fitting on unidirectional tyres, ensure that the tyres rotate in the
correct direction ⇒page 225.
Subsequent steps
After changing the wheel, you must perform the following steps.
– Stow and attach the replaced wheel in the spare wheel well.
– Stow the vehicle tool kit in the space provided. –
Check the tyre pressure on the spare wheel just mounted as
soon as possible.
– Have the tightening torque of the wheel bolts checked with
a torque wrench as soon as possible. The tightening torque for
steel and light alloy wheels must be 120 Nm.
– Have the defective tyre repaired as soon as possible.
WARNING
It is necessary to observe the guidelines given on ⇒page 228,
“New tyres and wheels” if the vehicle is subsequently fitted with
tyres which are different to those it was fitted with at the works.
Note
•If you find, when changing the wheel, that the wheel bolts are corroded
and difficult to turn, the bolts must be replaced before checking the tight-
ening torque.
•Drive cautiously and only at a moderate speed to a workshop where
the tightening torque can be checked.
Full wheel trim*
Removing
– Hook the clamp (found in the vehicle toolkit) into the reinforced edge of the full wheel trim.
– Push the wheel key through the clamp, support the wheel key at the tyre and pull off the wheel trim.
Page 246 of 270

Breakdown assistance245
Using the systemSafetyDriving TipsGeneral MaintenanceBreakdown assistanceTechnical Data
– Have the tightening torque checked with a torque wrench as
soon as possible. The tightening torque must be 120 Nm.
The safety wheel bolts on vehicles fitted with them (one safety wheel bolt
per wheel) can only be loosened or tighten up by using the adapter
provided.
It is meaningful to note the code number hammered into the rear side of
the adapter or the rear side of the safety wheel bolts. You can obtain a
replacement adapter from a Škoda dealer, if necessary, by quoting this
number.
We recommend that you always carry the adapter for the wheel bolts with
you in the vehicle. It should be stowed in the vehicle tool kit.
Caution
•Damage can occur to the adapter and safety wheel bolt if the safety
wheel bolt is tightened up too much.
•On steel wheels, the theft-deterrent wheel bolt must always be
installed in the hole, which is close to the valve. Otherwise the full wheel
trim cannot be mounted and the full wheel trim can be damaged during the
assembly.
Note
The set of safety wheel bolts can be obtained from your Škoda dealer.
Jump-starting
Initial steps
You can use the battery of another vehicle for jump-starting yours if the
engine does not start because the battery on your vehicle is flat. You will
require jump-start cables for this purpose.
Both batteries must have a rated voltage of 12 V. The capacity (Ah) of the
battery supplying the power must not be significantly less than the
capacity of the discharged battery in your vehicle.
Jump-start cables
Only use jump-start cables which have an adequately large cross-section
and insulated terminal clamps. Please pay attention to the manufacturer's
instructions.
Positive cable - colour coding in the majority of cases red.
Negative cable - colour coding in the majority of cases black.
WARNING
•A discharged battery may already freeze at temperatures just
below 0°C. Never perform a jump start, if one of the batteries is
frozen - risk of explosion! Also after thawing there is a risk of
caustic burns due to leaking battery acid. Replace a frozen battery.
•Please pay attention to the warning instructions relating to
working in the engine compartment ⇒page 209.
Note
•There must not be any contact between the two vehicles otherwise
current may flow as soon as the negative terminals are connected.