headlight SKODA SUPERB 2004 1.G / (B5/3U) Owner's Manual
[x] Cancel search | Manufacturer: SKODA, Model Year: 2004, Model line: SUPERB, Model: SKODA SUPERB 2004 1.G / (B5/3U)Pages: 270
Page 12 of 270
Cockpit11
Using the systemSafetyDriving TipsGeneral MaintenanceBreakdown assistanceTechnical Data
Cockpit
An overview
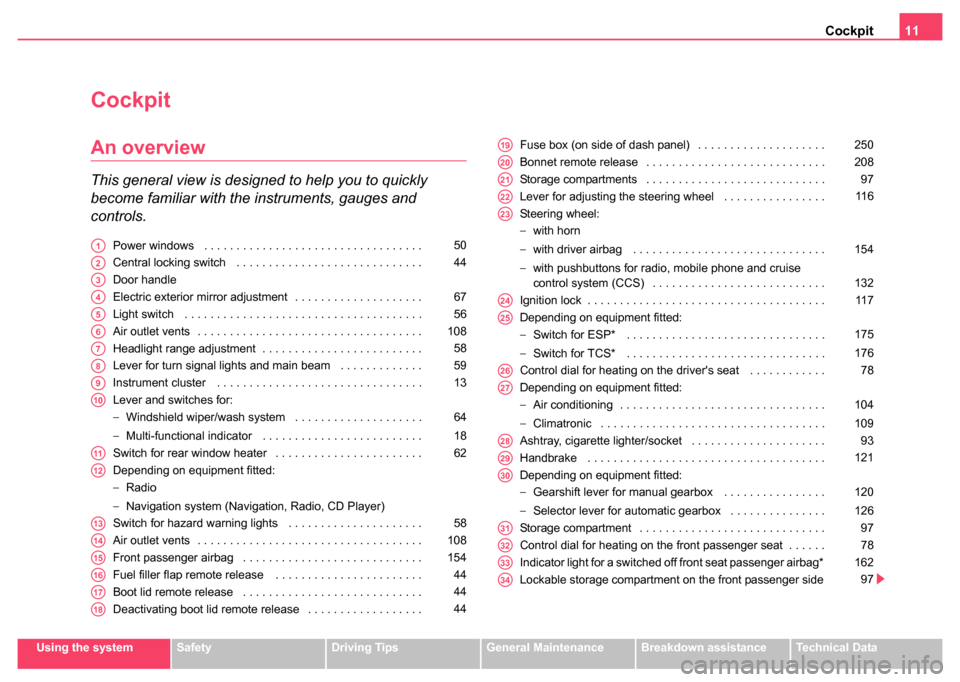
This general view is designed to help you to quickly
become familiar with the instruments, gauges and
controls.
Power windows . . . . . . . . . . . . . . . . . . . . . . . . . . . . . . . . . .
Central locking switch . . . . . . . . . . . . . . . . . . . . . . . . . . . . .
Door handle
Electric exterior mirror adjustment . . . . . . . . . . . . . . . . . . . .
Light switch . . . . . . . . . . . . . . . . . . . . . . . . . . . . . . . . . . . . .
Air outlet vents . . . . . . . . . . . . . . . . . . . . . . . . . . . . . . . . . . .
Headlight range adjustment . . . . . . . . . . . . . . . . . . . . . . . . .
Lever for turn signal lights and main beam . . . . . . . . . . . . .
Instrument cluster . . . . . . . . . . . . . . . . . . . . . . . . . . . . . . . .
Lever and switches for:
−Windshield wiper/wash system . . . . . . . . . . . . . . . . . . . .
− Multi-functional indicator . . . . . . . . . . . . . . . . . . . . . . . . .
Switch for rear window heater . . . . . . . . . . . . . . . . . . . . . . .
Depending on equipment fitted:
− Radio
− Navigation system (Navigation, Radio, CD Player)
Switch for hazard warning lights . . . . . . . . . . . . . . . . . . . . .
Air outlet vents . . . . . . . . . . . . . . . . . . . . . . . . . . . . . . . . . . .
Front passenger airbag . . . . . . . . . . . . . . . . . . . . . . . . . . . .
Fuel filler flap remote release . . . . . . . . . . . . . . . . . . . . . . .
Boot lid remote release . . . . . . . . . . . . . . . . . . . . . . . . . . . .
Deactivating boot lid remote release . . . . . . . . . . . . . . . . . . Fuse box (on side of dash panel) . . . . . . . . . . . . . . . . . . . .
Bonnet remote release . . . . . . . . . . . . . . . . . . . . . . . . . . . .
Storage compartments . . . . . . . . . . . . . . . . . . . . . . . . . . . .
Lever for adjusting the steering wheel . . . . . . . . . . . . . . . .
Steering wheel:
−
with horn
− with driver airbag . . . . . . . . . . . . . . . . . . . . . . . . . . . . . .
− with pushbuttons for radio, mobile phone and cruise
control system (CCS) . . . . . . . . . . . . . . . . . . . . . . . . . . .
Ignition lock . . . . . . . . . . . . . . . . . . . . . . . . . . . . . . . . . . . . .
Depending on equipment fitted:
− Switch for ESP* . . . . . . . . . . . . . . . . . . . . . . . . . . . . . . .
− Switch for TCS* . . . . . . . . . . . . . . . . . . . . . . . . . . . . . . .
Control dial for heating on the driver's seat . . . . . . . . . . . .
Depending on equipment fitted:
− Air conditioning . . . . . . . . . . . . . . . . . . . . . . . . . . . . . . . .
− Climatronic . . . . . . . . . . . . . . . . . . . . . . . . . . . . . . . . . . .
Ashtray, cigarette lighter/socket . . . . . . . . . . . . . . . . . . . . .
Handbrake . . . . . . . . . . . . . . . . . . . . . . . . . . . . . . . . . . . . .
Depending on equipment fitted:
− Gearshift lever for manual gearbox . . . . . . . . . . . . . . . .
− Selector lever for automatic gearbox . . . . . . . . . . . . . . .
Storage compartment . . . . . . . . . . . . . . . . . . . . . . . . . . . . .
Control dial for heating on the front passenger seat . . . . . .
Indicator light for a switched off front seat passenger airbag*
Lockable storage compartment on the front passenger sideA150
A244
A3
A467
A556
A6108
A758
A859
A913
A10
64
18
A1162
A12
A1358
A14108
A15154
A1644
A1744
A1844
A19250
A20208
A2197
A2211 6
A23
154
132
A2411 7
A25
175
176
A2678
A27
104
109
A2893
A29121
A30
120
126
A3197
A3278
A33162
A3497
Page 15 of 270
Instruments and Indicator/Warning Lights
14
Engine revolutions counter
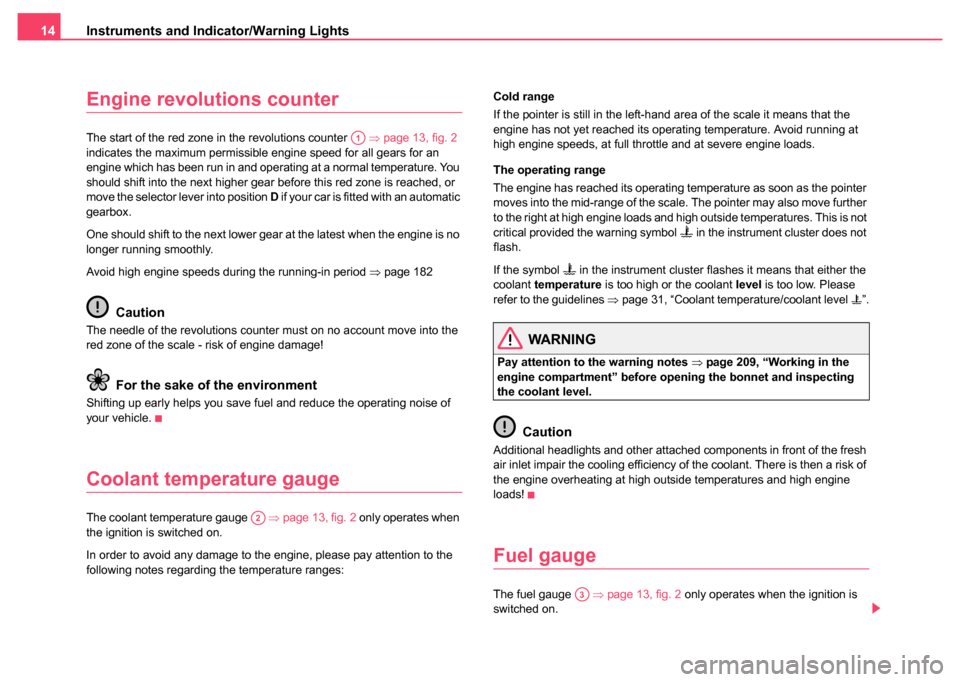
The start of the red zone in the revolutions counter ⇒page 13, fig. 2
indicates the maximum permissible engine speed for all gears for an
engine which has been run in and operating at a normal temperature. You
should shift into the next higher gear before this red zone is reached, or
move the selector lever into position D if your car is fitted with an automatic
gearbox.
One should shift to the next lower gear at the latest when the engine is no
longer running smoothly.
Avoid high engine speeds during the running-in period ⇒page 182
Caution
The needle of the revolutions counter must on no account move into the
red zone of the scale - risk of engine damage!
For the sake of the environment
Shifting up early helps you save fuel and reduce the operating noise of
your vehicle.
Coolant temperature gauge
The coolant temperature gauge ⇒page 13, fig. 2 only operates when
the ignition is switched on.
In order to avoid any damage to the engine, please pay attention to the
following notes regarding the temperature ranges: Cold range
If the pointer is still in the left-hand area of the scale it means that the
engine has not yet reached its operating temperature. Avoid running at
high engine speeds, at full throttle and at severe engine loads.
The operating range
The engine has reached its operating temperature as soon as the pointer
moves into the mid-range of the scale. The pointer may also move further
to the right at high engine loads and high outside temperatures. This is not
critical provided the warning symbol
in the instrument cluster does not
flash.
If the symbol
in the instrument cluster flashes it means that either the
coolant temperature is too high or the coolant level is too low. Please
refer to the guidelines ⇒page 31, “Coolant temperature/coolant level ”.
WARNING
Pay attention to the warning notes ⇒page 209, “Working in the
engine compartment” before opening the bonnet and inspecting
the coolant level.
Caution
Additional headlights and other attached components in front of the fresh
air inlet impair the cooling efficiency of the coolant. There is then a risk of
the engine overheating at high outside temperatures and high engine
loads!
Fuel gauge
The fuel gauge ⇒page 13, fig. 2 only operates when the ignition is
switched on.
A1
A2
A3
Page 31 of 270
Instruments and Indicator/Warning Lights
30
Switching off the hazard warning light system is switched on will cause all
of the turn signal lights as well as both indicator lights to flash.
Further information about the turn signal system ⇒page 59.
Main beam
The indicator light comes on when the main beam is selected or also
when the headlight flasher is operated.
Further information about the main beam ⇒page 59.
Airbag system
Monitoring the airbag system
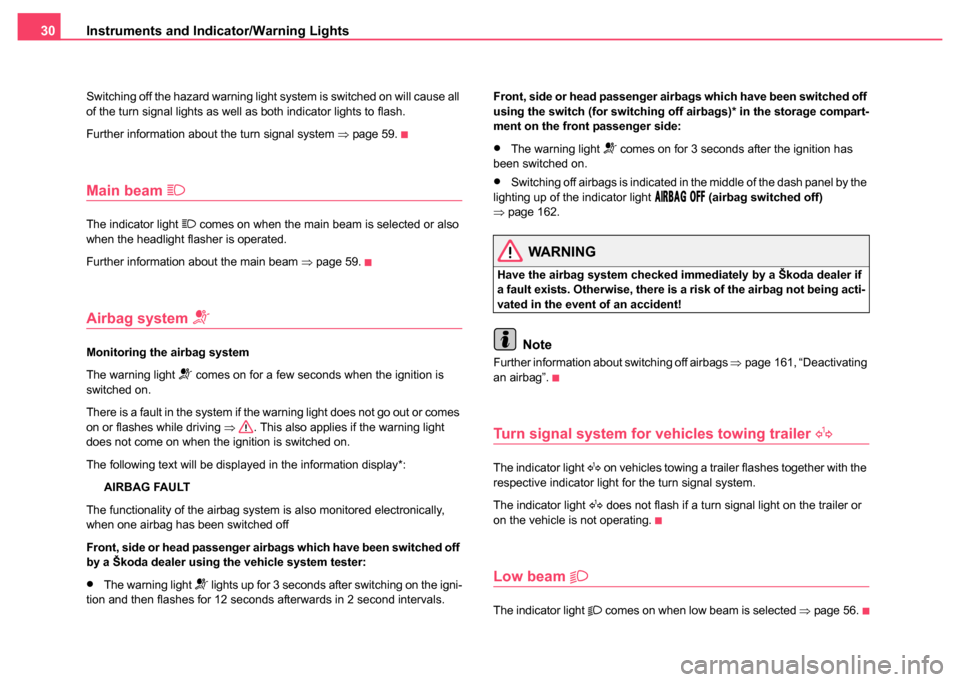
The warning light
comes on for a few seconds when the ignition is
switched on.
There is a fault in the system if the warning light does not go out or comes
on or flashes while driving ⇒. This also applies if the warning light
does not come on when the ignition is switched on.
The following text will be displayed in the information display*:
AIRBAG FAULT
The functionality of the airbag system is also monitored electronically,
when one airbag has been switched off
Front, side or head passenger airbags which have been switched off
by a Škoda dealer using the vehicle system tester:
•The warning light lights up for 3 seconds after switching on the igni-
tion and then flashes for 12 seconds afterwards in 2 second intervals. Front, side or head passenger airbags which have been switched off
using the switch (for switching off airbags)* in the storage compart-
ment on the front passenger side:
•The warning light comes on for 3 seconds after the ignition has
been switched on.
•Switching off airbags is indicated in the middle of the dash panel by the
lighting up of the indicator light (airbag switched off)
⇒ page 162.
WARNING
Have the airbag system checked immediately by a Škoda dealer if
a fault exists. Otherwise, there is a risk of the airbag not being acti-
vated in the event of an accident!
Note
Further information about switching off airbags ⇒page 161, “Deactivating
an airbag”.
Turn signal system for vehicles towing trailer
The indicator light on vehicles towing a trailer flashes together with the
respective indicator light for the turn signal system.
The indicator light
does not flash if a turn signal light on the trailer or
on the vehicle is not operating.
Low beam
The indicator light comes on when low beam is selected ⇒page 56.
Page 59 of 270
Lights and Visibility
58
Headlight range adjustment
Once the low beam is switched on you can then adapt the
range of the headlights to the load of the vehicle.
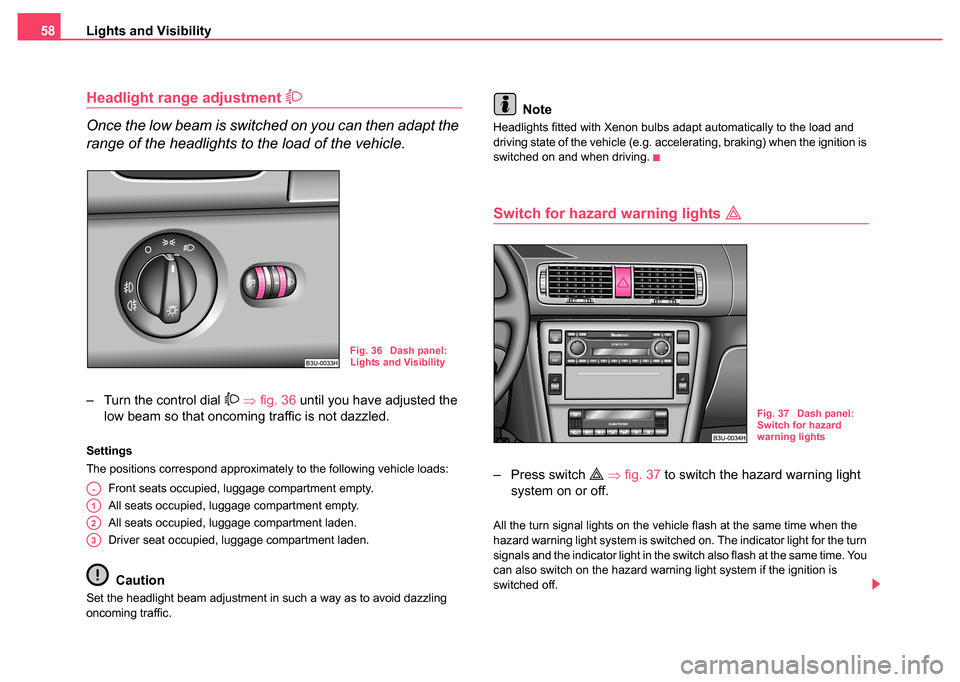
– Turn the control dial ⇒ fig. 36 until you have adjusted the
low beam so that oncoming traffic is not dazzled.
Settings
The positions correspond approximately to the following vehicle loads:
Front seats occupied, luggage compartment empty.
All seats occupied, luggage compartment empty.
All seats occupied, luggage compartment laden.
Driver seat occupied, luggage compartment laden.
Caution
Set the headlight beam adjustment in such a way as to avoid dazzling
oncoming traffic.
Note
Headlights fitted with Xenon bulbs adapt automatically to the load and
driving state of the vehicle (e.g. accelerating, braking) when the ignition is
switched on and when driving.
Switch for hazard warning lights
– Press switch ⇒ fig. 37 to switch the hazard warning light
system on or off.
All the turn signal lights on the vehicle flash at the same time when the
hazard warning light system is switched on. The indicator light for the turn
signals and the indicator light in the switch also flash at the same time. You
can also switch on the hazard warning light system if the ignition is
switched off.
Fig. 36 Dash panel:
Lights and Visibility
A-
A1
A2
A3
Fig. 37 Dash panel:
Switch for hazard
warning lights
Page 60 of 270
Lights and Visibility59
Using the systemSafetyDriving TipsGeneral MaintenanceBreakdown assistanceTechnical Data
Please comply with any legal requirements when using the hazard
warning light system.
Note
Switch on the hazard warning light system if, for example:
•you encounter traffic congestion,
•your car breaks down or an emergency situation occurs,
Turn signal and main beam lever
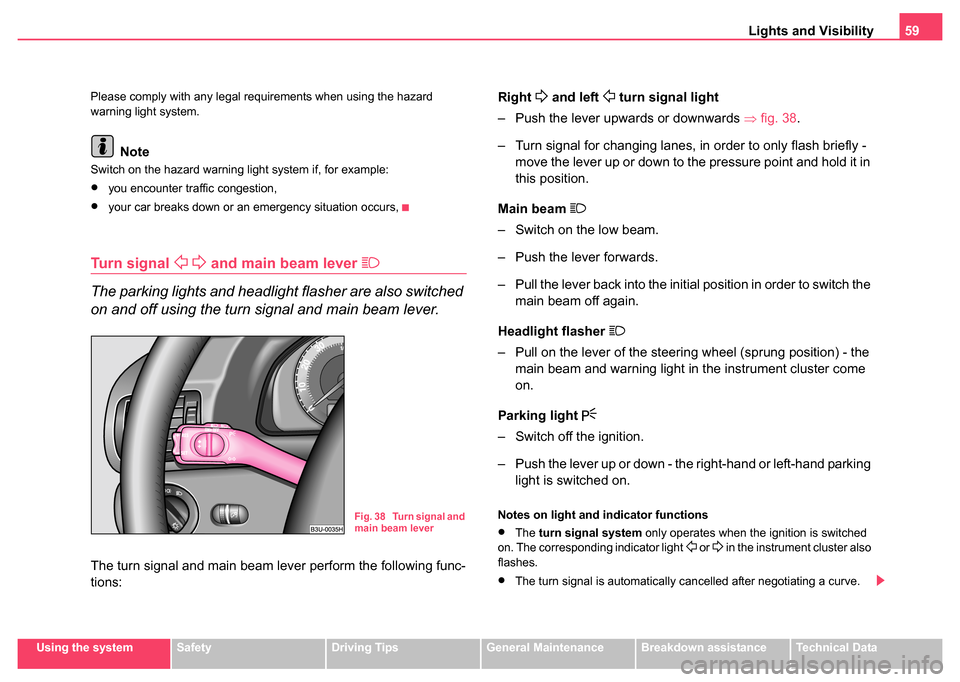
The parking lights and headlight flasher are also switched
on and off using the turn signal and main beam lever.
The turn signal and main beam lever perform the following func-
tions:
Right
and left turn signal light
– Push the lever upwards or downwards ⇒fig. 38 .
– Turn signal for changing lanes, in order to only flash briefly - move the lever up or down to the pressure point and hold it in
this position.
Main beam
– Switch on the low beam.
– Push the lever forwards.
– Pull the lever back into the initial position in order to switch the main beam off again.
Headlight flasher
– Pull on the lever of the steering wheel (sprung position) - the main beam and warning light in the instrument cluster come
on.
Parking light
– Switch off the ignition.
– Push the lever up or down - the right-hand or left-hand parking light is switched on.
Notes on light and indicator functions
•The turn signal system only operates when the ignition is switched
on. The corresponding indicator light or in the instrument cluster also
flashes.
•The turn signal is automatically cancelled after negotiating a curve.
Fig. 38 Turn signal and
main beam lever
Page 61 of 270
Lights and Visibility
60
•The side light and rear light on the appropriate side of the vehicle are
switched on when the parking light is selected. The parking light function
only operates if the ignition is switched off.
•An acoustic warning signal will sound when the driver's door is opened
if the lever is not in the middle position after removing the ignition key. The
acoustic warning signal will stop just as soon as the driver's door is closed.
Caution
Use main beam or the headlight flasher only if this does not risk dazzling
other road users.
Note
Use only in accordance with the legal requirements the described lighting
and signal systems.
Coming Home Function
This function makes it possible to switch on low or main beam for
a short time after leaving the car, e.g. to illuminate the path to
your front door, etc.
Selecting function
– Switch off the light.
– Switch off the ignition.
– Flash one time with the headlights.
– Open the door, the low beam lights up.
If you shift the lever into the main beam position, the main beam lights up. If the door remains open, the light remains on for about 3 minutes.
If the door is closed, the light remains on for about 30 seconds.
Interior lighting
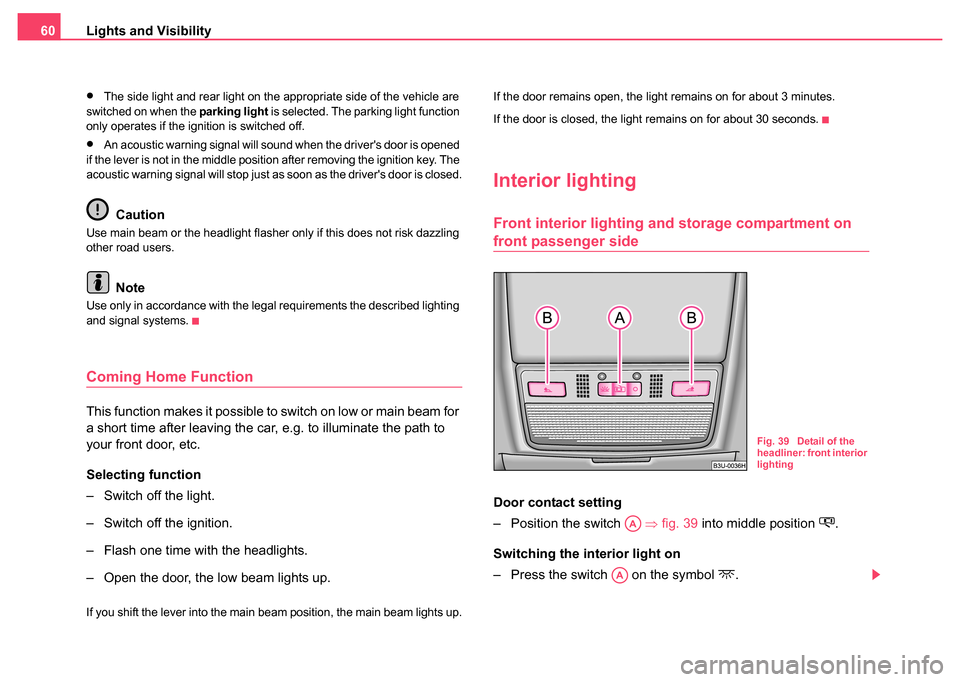
Front interior lighting and storage compartment on
front passenger side
Door contact setting
– Position the switch
⇒fig. 39 into middle position
.
Switching the interior light on
– Press the switch on the symbol
.
Fig. 39 Detail of the
headliner: front interior
lighting
AA
AA
Page 66 of 270
Lights and Visibility65
Using the systemSafetyDriving TipsGeneral MaintenanceBreakdown assistanceTechnical Data
– If you have switched the ignition off and on again, you must
then once again activate the sensor by moving the lever into
home position , and then back into position .
The windscreen wipers and the windscreen washer system only operate
if the ignition is switched on.
The windscreen washer nozzles are heated* when the ignition is switched
on.
The rain sensor* automatically regulates the break between the individual
wiper strokes depending on the intensity of the rain.
Top up with wash liquid ⇒page 223.
WARNING
•Properly maintained windscreen wiper blades are essential for
clear visibility and safe driving ⇒ page 66, “Replacing windscreen
wiper blades”.
•Do not use the windscreen washer system at low temperatures,
without heating the windscreen beforehand. Otherwise the window
cleaner could freeze on the windscreen and restrict the view to the
front.
Caution
In frosty weather, please first of all check whether the windscreen wiper
blades are not frozen to the windscreen before switching them on.
Switching on windscreen wipers when the blades are frozen to the wind-
screen may result in damage both to the blades and the motor of the wind-
screen wipers!
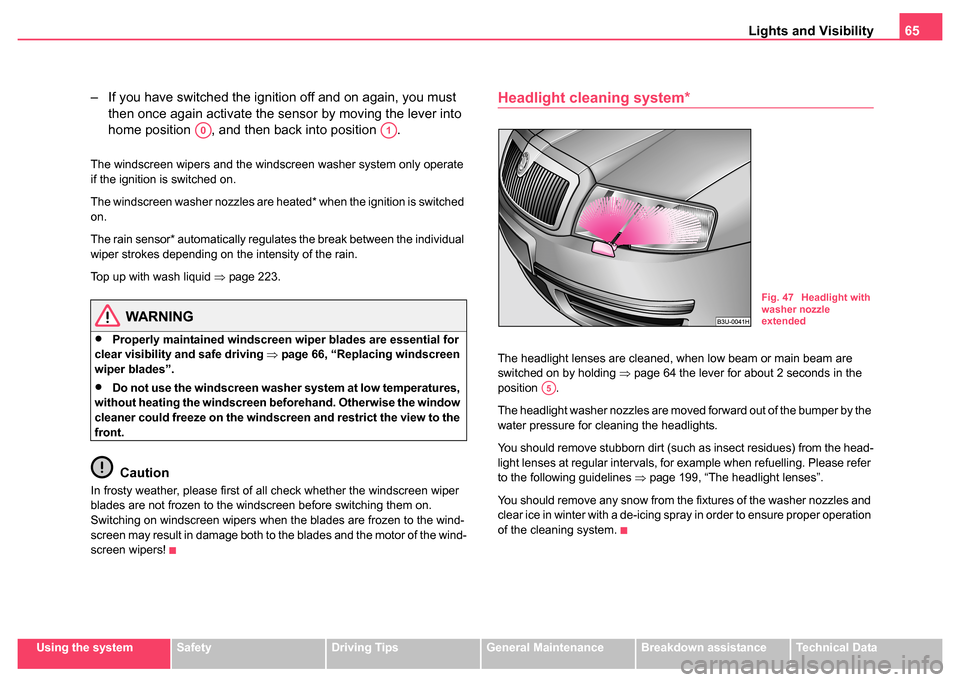
Headlight cleaning system*
The headlight lenses are cleaned, when low beam or main beam are
switched on by holding ⇒page 64 the lever for about 2 seconds in the
position .
The headlight washer nozzles are moved forward out of the bumper by the
water pressure for cleaning the headlights.
You should remove stubborn dirt (such as insect residues) from the head-
light lenses at regular intervals, for example when refuelling. Please refer
to the following guidelines ⇒page 199, “The headlight lenses”.
You should remove any snow from the fixtures of the washer nozzles and
clear ice in winter with a de-icing spray in order to ensure proper operation
of the cleaning system.
A0A1
Fig. 47 Headlight with
washer nozzle
extended
A5
Page 133 of 270
Communicating and Navigating
132
Communicating and Navigating
Multifunction steering wheel*
Introduction
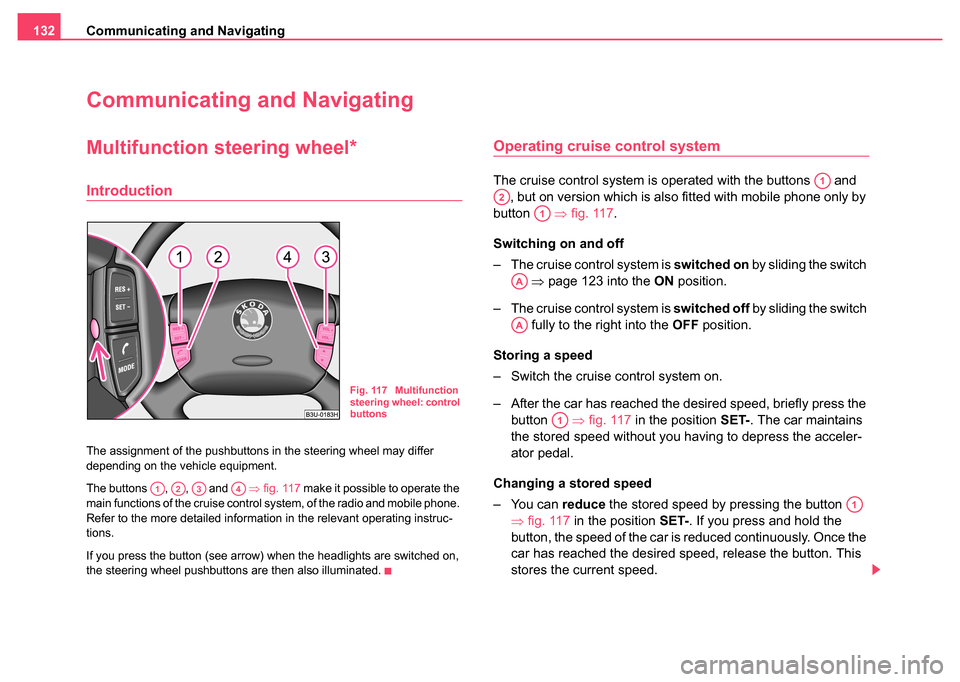
The assignment of the pushbuttons in the steering wheel may differ
depending on the vehicle equipment.
The buttons , , and ⇒fig. 117 make it possible to operate the
main functions of the cruise control system, of the radio and mobile phone.
Refer to the more detailed information in the relevant operating instruc-
tions.
If you press the button (see arrow) when the headlights are switched on,
the steering wheel pushbuttons are then also illuminated.
Operating cruise control system
The cruise control system is operated with the buttons and , but on version which is also fitted with mobile phone only by
button ⇒fig. 117 .
Switching on and off
– The cruise control system is switched on by sliding the switch
⇒ page 123 into the ON position.
– The cruise control system is switched off by sliding the switch
fully to the right into the OFF position.
Storing a speed
– Switch the cruise control system on.
– After the car has reached the desired speed, briefly press the button ⇒fig. 117 in the position SET-. The car maintains
the stored speed without you having to depress the acceler-
ator pedal.
Changing a stored speed
– You can reduce the stored speed by pressing the button
⇒ fig. 117 in the position SET-. If you press and hold the
button, the speed of the car is reduced continuously. Once the
car has reached the desired speed, release the button. This
stores the current speed.
Fig. 117 Multifunction
steering wheel: control
buttons
A1A2A3A4
A1
A2
A1
AA
AA
A1
A1
Page 185 of 270

Driving and the Environment
184
For the sake of the environment
Even if the exhaust system is operating properly, a sulphur-like exhaust
odour may be produced under certain operating conditions of the engine.
This depends on the sulphur content of the fuel. It is often sufficient to
refuel with unleaded premium-grade petrol of a different brand or at a
different filling station.
Motoring abroad
General
Other circumstances may exist abroad.
It is also possible, in certain countries, that the Škoda dealership network
has not been established yet. This is the reason why obtaining certain
spare parts may be somewhat complicated and specialist garage
personnel may only be able to make limited repairs. Škoda Auto in the
Czech Republic and relevant importers are happy to provide information
about technical aspects of the vehicle, required maintenance work and
possibilities for getting repairs done.
Unleaded petrol
A vehicle fitted with a petrol engine must always be refuelled with
unleaded petrol ⇒page 183. The automobile associations can provide
you with information regarding the locations of filling stations which offer
unleaded petrol.
Headlights
The low beam of your headlights is set asymmetrically. It illuminates the
side of the road on which you are driving to a greater extent. If you drive
abroad on the other side of the road, you will dazzle oncoming traffic.
It is necessary in order to avoid dazzling oncoming traffic to stick a sticker
over a certain part of the headlights.
Windscreen wiper stickers are available at Škoda dealers.
Headlights with Xenon lamps are designed for driving in countries with
traffic on the right or on the left. Have this done always at a Škoda dealer.
Note
You can obtain further information regarding masking over or converting
the headlights from your Škoda dealer.
Avoiding damage to your vehicle
When driving on poor roads and lanes or when driving over kerbstones,
steep ramps etc., you must pay particular attention to ensuring that any
low-slung parts of the vehicle, such as spoiler and exhaust, do not touch
the ground and get damaged.
This particularly applies to models with a lowered suspension (sport
suspension) and also when your vehicle is fully laden.
Page 192 of 270
Towing a trailer191
Using the systemSafetyDriving TipsGeneral MaintenanceBreakdown assistanceTechnical Data
Tyre pressure
Select the tyre inflation pressure on your vehicle for that of “fully laden”,
⇒
page 226. The inflation pressure of the tyres fitted to the trailer adjust
in accordance with the manufacturer's recommendation.
Exterior mirrors
You have to have additional exterior mirrors fitted if you are not able to see
the traffic behind the trailer with the standard rear-view mirrors. Both exte-
rior mirrors should be attached to folding arms. Adjust the mirrors so that
they provide you with an adequate field of view to the rear.
Headlights
Before starting off with a hitched trailer, also check the setting of the head-
lights. Alter the setting as necessary with the aid of the headlight beam
adjuster ⇒page 58.
Detachable ball head
The ball rod is detachable on vehicles which feature a factory-fitted towing
device. It is stowed together with separate fitting instructions in the spare
wheel well in the luggage compartment of the vehicle.
Further information on the towing device ⇒page 192.
Note
•We recommend that you also have your vehicle inspected between
service intervals if you tow a trailer frequently.
•The handbrake on the towing vehicle must be put on when coupling
and decoupling the trailer.
Driving Tips
Particular caution is required when towing a trailer.
– Do not, as far as possible, drive with your vehicle unladen and the trailer laden.
– Do not make full use of the legal maximum speeds. This applies in particular to downhill sections.
– Apply the brakes in good time.
– Keep a check on the coolant temperature gauge if the outside temperature is high.
Distribution of weight
The distribution of the weight is very poor if your vehicle is unladen and
the trailer is laden. Maintain a particularly low speed if you cannot avoid
driving with this combination.
Driving speed
Do not drive faster than 80 km/hour for safety reasons. This also applies
for countries in which higher speeds are allowed.
The fact that the driving stability of the vehicle + trailer combination
reduces with increasing speed means that the legally allowed speed
should not be used when there are unfavourable road, weather or wind
conditions, particularly near accident black spots.
You must always reduce your speed immediately as soon as you detect
even just the slightest swaying of the trailer. On no account attempt to
stop the trailer from “swaying” by accelerating.
Apply the brakes in good time! If the trailer is fitted with a trailer brake,
apply the brakes gently at first, then brake firmly. This will avoid brake jolts
resulting from the trailer wheels locking. Shift down gears in good time