key battery SKODA SUPERB 2004 1.G / (B5/3U) Owner's Manual
[x] Cancel search | Manufacturer: SKODA, Model Year: 2004, Model line: SUPERB, Model: SKODA SUPERB 2004 1.G / (B5/3U)Pages: 270
Page 40 of 270
Unlocking and locking39
Using the systemSafetyDriving TipsGeneral MaintenanceBreakdown assistanceTechnical Data
by giving this number. You should also therefore give this key ring to the
purchaser when selling the vehicle.
WARNING
•Always withdraw the key whenever you leave the vehicle - even
if it is only for a short time. This is particularly important if children
are left in the vehicle. The children might otherwise start the engine
or operate electrical equipment (e.g. power windows) - risk of
injury!
•Do not withdraw the ignition key from the ignition lock until the
vehicle has come to a stop. The steering lock might otherwise
engage unintentionally - risk of accident!
Caution
•Each key contains electronic components; therefore protect them
against moisture and severe shocks.
•Keep the groove of the keys absolutely clean as impurities (textile
fibres, dust etc.) have a negative effect on proper operation of the keys
and the ignition lock.
Note
Please approach a Škoda dealer if you lose a key since he can obtain a
new one for you.
Changing the key battery
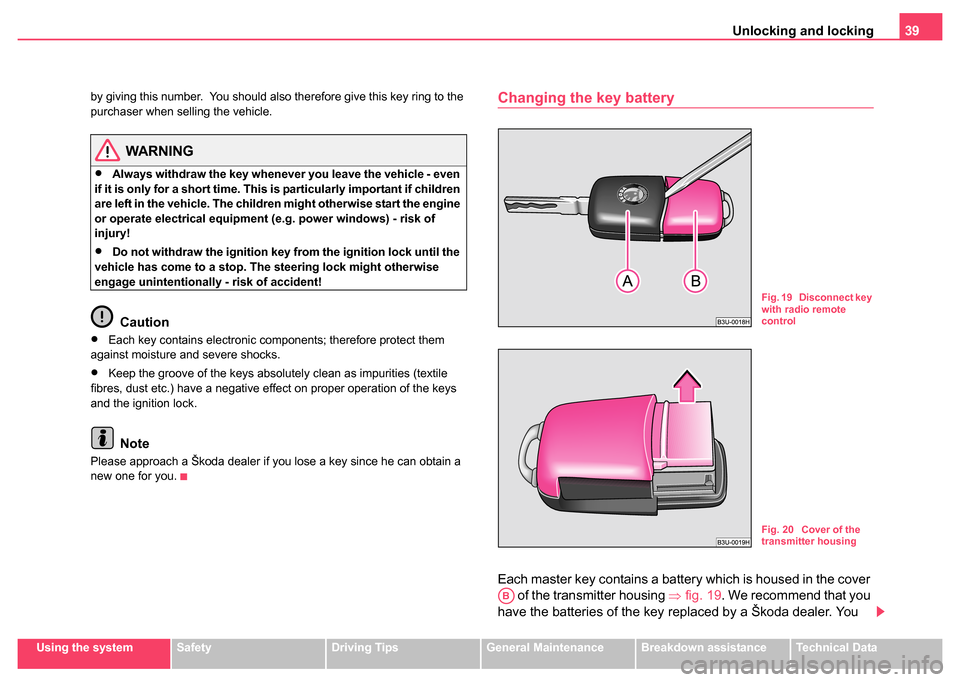
Each master key contains a battery which is housed in the cover of the transmitter housing ⇒ fig. 19. We recommend that you
have the batteries of the key replaced by a Škoda dealer. You
Fig. 19 Disconnect key
with radio remote
control
Fig. 20 Cover of the
transmitter housing
AB
Page 41 of 270
Unlocking and locking
40
should, however, proceed as follows if you wish to replace the
battery yourself:
– Fold open the key.
– Use a screwdriver to carefully lever off the front part of the key ⇒ page 39, fig. 19 from the transmitter housing .
– Take off the cover of the transmitter housing ⇒page 39,
fig. 20 in direction of arrow.
– Take the used battery out of the housing cover.
– Insert the new battery. Ensure that the “+” symbol on the battery is facing downwards. The correct polarity is also
shown on the cover of the transmitter housing.
– Insert cover with battery in place at the rear of the transmitter housing and press both parts together.
– Insert the transmitter housing into the front part of the key so that the two parts lock into each other.
For the sake of the environment
Dispose of an old battery in accordance with environmental regulations.
Note
•The replacement battery must have the same specification as the orig-
inal battery.
•If it is still not be possible to unlock or lock the vehicle with the remote
control even after replacing the battery this means that the system has to
be synchronised ⇒page 48.
Electronic immobiliser
The electronic immobiliser prevents the vehicle being
operated by an unauthorised person.
An electronic chip is integrated in the head of the key. The immobiliser is
deactivated with the aid of this chip when the key is inserted in the ignition
lock. The electronic immobiliser is automatically activated when you with-
draw the ignition key from the lock.
Note
It is only possible to start the engine of your car with a Genuine Škoda key
with the matching code ⇒page 35.
AAAB
Page 47 of 270
Unlocking and locking
46
Open boot lid
– Press on the handle ⇒ page 45, fig. 26 and at the same time
raise the boot lid.
Close the boot lid
– Pull the boot lid down and close it with a slight swing ⇒.
Permanently locking boot lid
If you turn the master key to the right ⇒ page 45, fig. 25 and withdraw
it when the lock cylinder is in the vertical position, the boot lid is no longer
incorporated in the central locking system and remains locked all the time.
It is now only possible to open the boot lid using the unlock button
of
the remote control.
After turning the lock cylinder back into the horizontal position, the boot lid
is again integrated in the central locking system.
Unlocking and opening boot lid
When you turn the master key to the left ⇒page 45, fig. 25 into the
vertical position of the lock cylinder, the boot lid jumps open. You cannot
withdraw the key in this position.
After turning the key back into the horizontal position of the lock cylinder,
the boot lid is again integrated in the central locking system, and the key
can be withdrawn.
It is recommended to always operate ⇒page 46 the boot lid using the
remote control.
WARNING
•Ensure that the lock is properly engaged after closing the boot
lid. Otherwise, the boot lid might open suddenly when driving even
if the lock is closed - risk of accident!
•Never drive with the boot lid sli ghtly ajar or even fully opened
otherwise exhaust gases may get into the interior of the vehicle -
risk of poisoning!
Note
After closing the boot lid, it is au tomatically locked within 5 seconds
and the anti-theft alarm system* is activated. This applies only if the
vehicle was locked before closing the boot lid.
Remote control
Description
You can use the remote control:
•to unlock and lock the car
•unlocking boot lid
•Opening and closing window
The transmitter with the battery is housed in the handle of the master key.
The receiver is located in the interior of the car. The operating range of the
remote control is 10 metres but this range can be reduced if the batteries
are waek.
The master key has a fold-open key bit which can be used for unlocking
and locking the car manually and also for starting the engine.
If a lost key is replaced or if the receiver unit has been repaired or a new
unit installed, it is then necessary for a Škoda Dealer to initialise the
system. Only after this is it possible to again use the remote control.
AB
AA
WARNING (continued)
Page 48 of 270
Unlocking and locking47
Using the systemSafetyDriving TipsGeneral MaintenanceBreakdown assistanceTechnical Data
Note
•The remote control is automatically deactivated when the ignition is
switched on.
•The operation of the remote control may temporarily be affected by
interference from transmitters close to the car and which operate in the
same frequency range (e.g. mobile phone, TV transmitter).
•The battery must be replaced, ideally by the Škoda dealer, if the
central locking or anti-theft alarm system does react to the remote control
at less than 3 metres away.
Unlocking and locking car
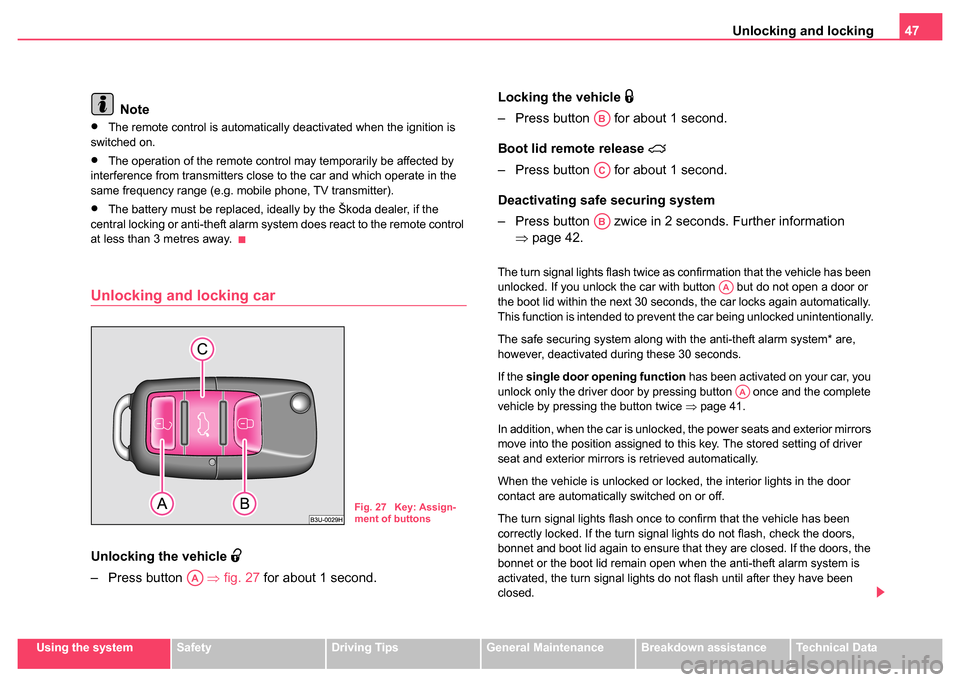
Unlocking the vehicle
– Press button ⇒fig. 27 for about 1 second. Locking the vehicle
– Press button for about 1 second.
Boot lid remote release
– Press button for about 1 second.
Deactivating safe securing system
– Press button zwice in 2 seconds. Further information
⇒page 42.
The turn signal lights flash twice as confirmation that the vehicle has been
unlocked. If you unlock the car with button but do not open a door or
the boot lid within the next 30 seconds, the car locks again automatically.
This function is intended to prevent the car being unlocked unintentionally.
The safe securing system along with the anti-theft alarm system* are,
however, deactivated during these 30 seconds.
If the single door opening function has been activated on your car, you
unlock only the driver door by pressing button once and the complete
vehicle by pressing the button twice ⇒page 41.
In addition, when the car is unlocked, the power seats and exterior mirrors
move into the position assigned to this key. The stored setting of driver
seat and exterior mirrors is retrieved automatically.
When the vehicle is unlocked or locked, the interior lights in the door
contact are automatically switched on or off.
The turn signal lights flash once to confirm that the vehicle has been
correctly locked. If the turn signal lights do not flash, check the doors,
bonnet and boot lid again to ensure that they are closed. If the doors, the
bonnet or the boot lid remain open when the anti-theft alarm system is
activated, the turn signal lights do not flash until after they have been
closed.
Fig. 27 Key: Assign-
ment of buttons
AA
AB
AC
AB
AA
AA
Page 49 of 270
Unlocking and locking
48
WARNING
If the vehicle is locked from the outside and the safe securing
system is activated, there must not be any person in the vehicle as
it is then not possible to open either a door or a window from the
inside. The locked doors make it mo re difficult for rescuers to get
into the vehicle in an emergency - hazard!
Note
•Operate the radio remote control only when the doors and boot lid are
closed and you have visual contact with the vehicle.
•Once in the car, you must not press the lock button of the master key
before inserting the key into the ignition lock in order to avoid the car being
inadvertently locked and, in addition, the anti-theft alarm system* being
switched on. Should this happen, press the unlock button
of the master
key.
Synchonisation of the remote control
If the vehicle cannot be unlocked by actuating the remote control system
then it is possible that the code in the key and the control unit in the vehicle
are no longer synchronised. This can occur when the buttons on the radio-
operated key are actuated a number of times outside of the operative
range of the equipment or the battery on the remote control was replaced.
This means it is necessary to synchronise the code as follows:
•Press any button on the remote control.
•Pressing of the button means that the door will unlock with the key
within 1 minute.
Anti-theft alarm system*
Description
The anti-theft alarm system increases the level of protection against
people seeking to break into the vehicle. The system triggers audible and
visual warning signals if an attempt is made to break into the vehicle.
How is the alarm system switched on?
The anti-theft alarm system is activated automatically when the vehicle is
locked with the key on the closed driver's door or by using the remote
control. It is activated 30 seconds after closing the door.
How is the alarm system switched off?
The anti-theft alarm system is switched off if the vehicle is unlocked by
only using the remote control. The vehicle is automatically locked again if
the vehicle is not opened within 30 seconds after reactivating the anti-theft
alarm system.
Once you unlock the vehicle by inserting the key into the driver door you
then have to insert the key into the ignition lock and switch the ignition on
within 15 seconds after opening the door in order to deactivate the anti-
theft alarm system. The alarm will be triggered if you do not switch on
the ignition within 15 seconds.
When is the alarm triggered?
The following security areas of the locked vehicle are monitored:
•Bonnet
•Boot lid
•Doors
•Ignition lock
•Vehicle interior* ⇒page 49.
•A drop in voltage of the on-board power supply
Page 50 of 270
Unlocking and locking49
Using the systemSafetyDriving TipsGeneral MaintenanceBreakdown assistanceTechnical Data
An alarm is immediately triggered if either of the two battery terminals is
disconnected while the anti-theft alarm system is activated.
If you unlock and open the boot lid with the key, the alarm is immediately
triggered.
How is the alarm switched off?
You switch the alarm off if you unlock the car with the radio remote control
in the key or if you switch the ignition on.
Indicator light (LED)
The LED in the top of the door trim on the driver door first of all flashes
rapidly after the car is locked, then slowly. This indicates that the anti-theft
alarm system
including the interior monitor* is activated.
Note
•The working life of the alarm siren is 5 years. More detailed information
is available from your Škoda dealer.
•Before leaving the car, check that all the doors, windows and the elec-
tric sliding/tilting roof* are properly closed in order to ensure that the anti-
theft alarm system is fully operational.
•Coding of the radio remote control and the receptor part precludes the
use of the radio remote control from other vehicles.
Interior monitor*
The interior monitor detects movements inside the car and
then triggers the alarm.
You can switch the interior monitor off if, for example, an animal
or other moving objects inside the car might trigger the alarm.
Switching interior monitor off
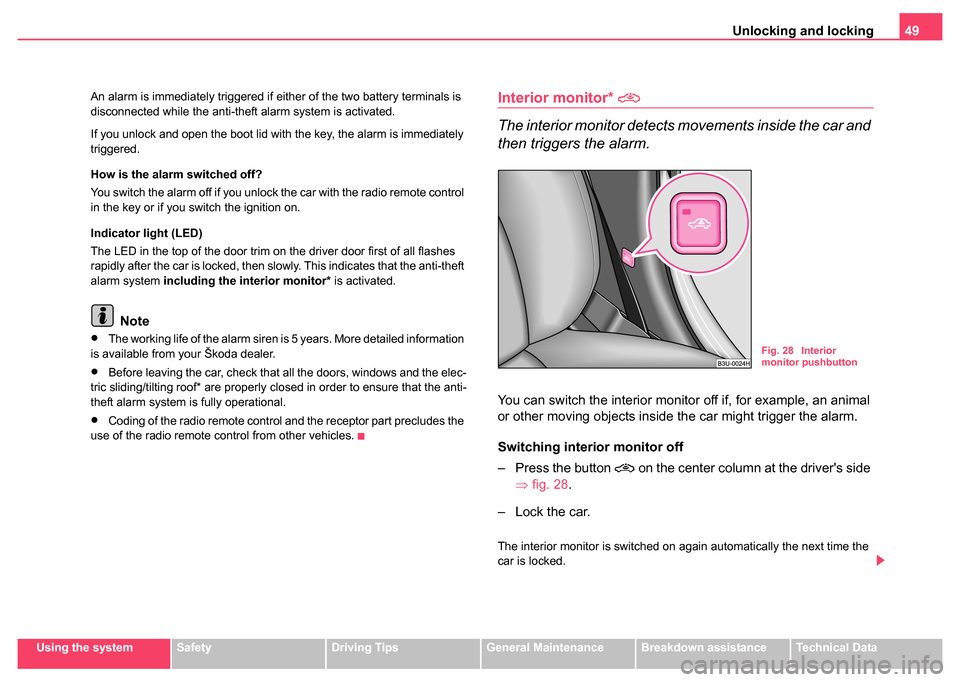
– Press the button
on the center column at the driver's side
⇒ fig. 28 .
– Lock the car.
The interior monitor is switched on again automatically the next time the
car is locked.
Fig. 28 Interior
monitor pushbutton
Page 53 of 270
Unlocking and locking
52
windows! A person may otherwise suffer severe injuries as a result
of getting an arm, for example, jammed in the window!
Note
After switching the ignition off, it is still possible to open or close the
windows for a further 10 minutes. The automatic closing and opening
functions will not operate during this time. The power windows are
switched off completely once you open the driver or front passenger
door.
Convenience operation of windows
You can open and close the electrically powered windows as
follows when unlocking and locking the vehicle (just closing of the
sliding roof).
Opening windows with the key
– Turn the key in the lock of the driver door into the opening
position or press the opening button of the remote control until
all the windows are open.
Closing windows with the key
– Turn the key in the lock of the driver door into the closing posi- tion or press the closing button of the remote control until all
the windows are closed ⇒.
You can interrupt the opening or closing operation of the windows imme-
diately by releasing the key of the button of the remote control.
WARNING
•Obstruction protection is not active during the convenience
operating feature ⇒ in “Switches in front passenger door and in
rear doors” on page 51.
•You should take particular care when closing the windows! A
person may otherwise suffer severe injuries as a result of getting
an arm, for example, jammed in the window!
Operational problems
Automatic closing or opening does not operate
If the battery of the car has been disconnected and then reconnected, the
automatic closing and opening function does not operate. The system
must be activated. Proceed as follows in order to re-establish the function:
•Turn the key in the lock of the driver door into the closing position and
hold it there until all of the windows are closed.
•Release the key.
•Insert the key again and turn it to the closing position for about 3
seconds.
Operation in winter
Ice accumulating on the surface of the windows during the winter may
result in a greater resistance when closing the windows and the window
may stop and move back several centimetres
Proceed as follows to close the window fully:
•Turn the key in the lock of the driver door into the closing position and
hold it there until all of the windows are closed.
•Repeat this operatiive cycle when the window stops.
WARNING (continued)
Page 62 of 270
Lights and Visibility61
Using the systemSafetyDriving TipsGeneral MaintenanceBreakdown assistanceTechnical Data
Switching the interior light off
– Press the switch on the symbol O.
Front reading lights
– Press on one of the switches ⇒page 60, fig. 39 in order to
switch the right or left reading light on or off.
Lighting of storage compar tment on the front passenger
side
– Open the flap of the storage compartment on the front passenger side, the lighting of the storage compartment
switches on automatically and switches off when the flap is
closed.
If the interior lighting is fitted with a delayed-off control*, the lighting of the
interior of the car remains on for a few seconds after the doors are closed.
The interior light comes on as soon as you unlock the car or open a door
or when the ignition key has been removed. The light goes out again
about 30 seconds after all the doors have been closed. The interior
lighting is switched off when you lock the car or switch the ignition on. This
only applies when the switch for the corresponding interior lights is
standing n the door contact setting.
The interior lighting goes off after about 60 minutes when a door has been
left open in order to avoid discharging the battery of the vehicle.
Two LEDs are integrated in the interior lighting, which illuminates the shift
lever and the middle of the dash panel. They are switched on automati-
cally when switching on the parking light.
In addition, the lighting of the door handle is switched on after the ignition
is switched on when the side lights are switched on.
Rear interior lighting
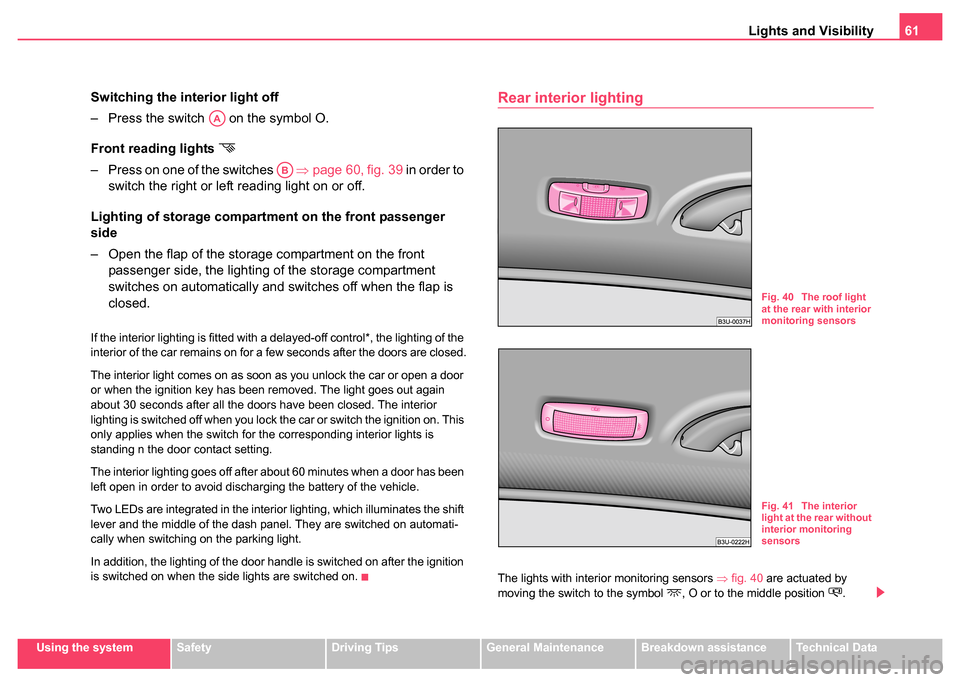
The lights with interior monitoring sensors ⇒fig. 40 are actuated by
moving the switch to the symbol , O or to the middle position .
AA
AB
Fig. 40 The roof light
at the rear with interior
monitoring sensors
Fig. 41 The interior
light at the rear without
interior monitoring
sensors
Page 96 of 270
Seats and Stowage95
Using the systemSafetyDriving TipsGeneral MaintenanceBreakdown assistanceTechnical Data
Cigarette lighters and power sockets
Cigarette lighter
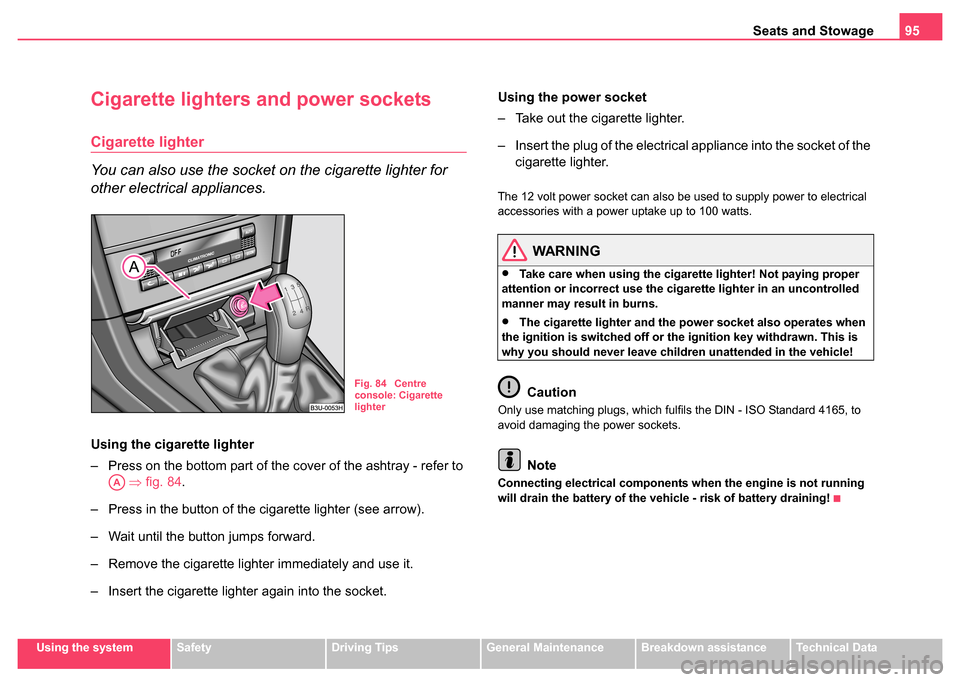
You can also use the socket on the cigarette lighter for
other electrical appliances.
Using the cigarette lighter
– Press on the bottom part of the cover of the ashtray - refer to
⇒ fig. 84.
– Press in the button of the cigarette lighter (see arrow).
– Wait until the button jumps forward.
– Remove the cigarette lighter immediately and use it.
– Insert the cigarette lighter again into the socket. Using the power socket
– Take out the cigarette lighter.
– Insert the plug of the electrical appliance into the socket of the
cigarette lighter.
The 12 volt power socket can also be used to supply power to electrical
accessories with a power uptake up to 100 watts.
WARNING
•Take care when using the cigarette lighter! Not paying proper
attention or incorrect use the cigarette lighter in an uncontrolled
manner may result in burns.
•The cigarette lighter and the power socket also operates when
the ignition is switched off or the ignition key withdrawn. This is
why you should never leave children unattended in the vehicle!
Caution
Only use matching plugs, which fulfils the DIN - ISO Standard 4165, to
avoid damaging the power sockets.
Note
Connecting electrical components when the engine is not running
will drain the battery of the vehicle - risk of battery draining!
Fig. 84 Centre
console: Cigarette
lighter
AA
Page 118 of 270

Starting-off and Driving117
Using the systemSafetyDriving TipsGeneral MaintenanceBreakdown assistanceTechnical Data
way (e.g. in the middle of the steering wheel or at the inner steering
wheel edge). In such cases, injuries to the arms, the hands and the
head can occur when the driver airbag is deployed.
Ignition lock
Petrol engines
- ignition switched off, engine off
- ignition switched on
- start engine
Diesel engines - fuel supply interrupted, ignition switched off, engine off
- heating glow plugs on, ignition switched on
•You should not switch on any major electrical components during the
heating period otherwise the vehicle battery will be drained unnecessarily.
- start engine
Applies to all models:
Position
To lock the steering , with the ignition key withdrawn, turn the steering
wheel until the steering locking pin is heard to engage. You should always
lock the steering as a general rule if you leave your vehicle. This acts as
a deterrent against possible theft of your vehicle ⇒.
Position
Move the steering wheel back and forward a little if the ignition key cannot,
or cannot easily be turned into this position, in order to release the
steering lock.
Position
The engine is started in this position. At the same time switched on low
beam or main beam or other electrical components with major power
consumption are briefly switched off. The ignition key moves back into
position when one releases the key.
The ignition key must be turned back into position each time before
starting the engine again. The starter repeat lock in the ignition lock
prevents the starter being engaged when the engine is running and thus
getting damaged.
Ignition key withdrawal lock (automatic gearbox)
You can only withdraw the ignition key after switching off the ignition if the
selector lever is in position P.
WARNING
•When driving, the ignition key must always be in the position
(ignition switched on) without the engine running. This position is
WARNING (continued)
Fig. 108 Ignition lock
positions
A1
A2
A3
A1
A2
A3
A1
A2
A3
A2
A1
A2