radiator SKODA SUPERB 2004 1.G / (B5/3U) Owner's Manual
[x] Cancel search | Manufacturer: SKODA, Model Year: 2004, Model line: SUPERB, Model: SKODA SUPERB 2004 1.G / (B5/3U)Pages: 270
Page 121 of 270
Starting-off and Driving
120
Caution
you should not switch the engine off right away at the end of your journey
after the engine has been operated for a lengthy period at high loads but
should be allowed it to run at idling speed for about 2 minutes. This
prevents any accumulation of heat when the engine is switched off.
Note
•The radiator fan may continue running for a further 10 minutes or so
after the engine and the ignition have been switched off. The coolant fan
may, however, also switch on again after some time if the coolant temper-
ature rises because of an accumulation of heat in the engine or if the
engine is warm and the engine compartment is additionally heated by
strong sunlight.
•This is why particular care is required when carrying out any work in
the engine compartment ⇒page 209.
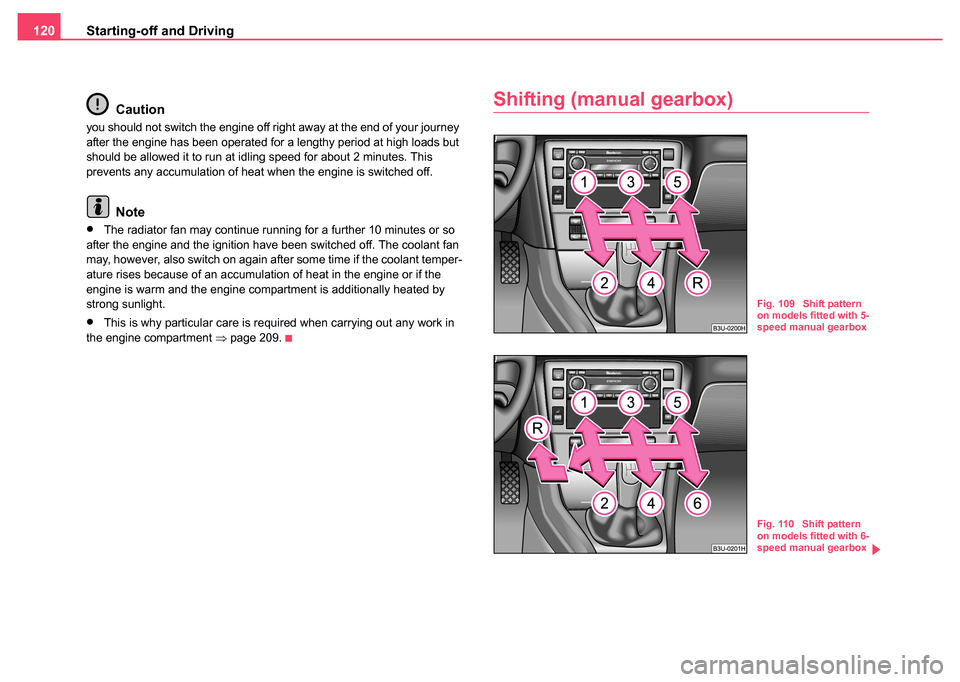
Shifting (manual gearbox)
Fig. 109 Shift pattern
on models fitted with 5-
speed manual gearbox
Fig. 110 Shift pattern
on models fitted with 6-
speed manual gearbox
Page 201 of 270

Care and cleaning
200
WARNING
One should remember when cleaning the wheels that moisture, ice
and road salt may adversely affect braking efficiency - risk of an
accident!
Note
Severe layers of dirt on the wheels can also result in wheel imbalance.
This may show itself in the form of wheel vibration which is transmitted to
the steering wheel which, in certain circumstances, can cause premature
wear of the steering. It is therefore important to clean dirty wheels.
Underbody protection
The underside of your vehicle is protected for life against chemical and
mechanical influences.
One cannot, however, completely rule out damage to the protective layer
when driving so we recommend that you inspect the protective layer on
the underside of your vehicle and on the chassis at certain intervals - this
is best done at the beginning and end of the winter - and to touch up any
damaged areas.
Škoda dealers have suitable spray products available as well as the
necessary equipment and are familiar with the instructions for its use. It is
therefore best to have such touch-up work or additional corrosion protec-
tion measures carried out by a Škoda dealer.
WARNING
Never use additional underbody protection or corrosion-protection
agents for the exhaust pipes, catalytic converters or heat shields.
Such substances might ignite when driving - risk of fire!
Protection of hollow spaces
All the cavities of your vehicle which are at risk from corrosion are
protected for life by a layer of protective wax applied in the factory.
This wax protection does not require to be inspected or re-treated. Please
remove any small amount of wax which flows out of the cavities at high
temperatures with a plastic scraper and clean the spot using petroleum
cleaner.
WARNING
Safety and environmental protection regulations should observed
when using petroleum cleaner to remove wax - a risk of fire!
Engine compartment
Good corrosion protection is very important, particularly in winter when
one often drives over its salt-strewn roads. One should therefore clean the
whole engine compartment and the radiator tank before and after the salt
spreading period and treat with preservative in order to prevent the salt
from being destructive.
Škoda dealers have the cleaning agents and preservatives recommended
by the manufacturer and also the required equipment.
WARNING
•It is necessary to observe the guidelines given in the chapter
before working on the engine compartment ⇒page 209.
•Let the engine cool down before cleaning the engine compart-
ment.
Page 209 of 270

Inspecting and Replenishing
208
Inspecting and Replenishing
Engine compartment
Bonnet remote release
Bonnet remote release
– Pull the unlocking lever below the dash panel on the driver's
side ⇒fig. 158.
The bonnet jumps out of its lock as a result of the spring force. A handle
appears at the same time in the radiator grille.
Opening and closing the bonnet.
Opening the bonnet
– Unlock the bonnet ⇒fig. 158.
– Ensure that the arms of the windscreen wipers are correctly in place against the windscreen before opening the bonnet
otherwise damage could occur to the paintwork.
– Pull the handle ⇒fig. 159 and lift the bonnet.
Closing the bonnet
– Pull the bonnet down far enough to overcome the force of the pressurized gas spring.Fig. 158 Bonnet
release lever
Fig. 159 Radiator
grille: handle
Page 210 of 270
Inspecting and Replenishing209
Using the systemSafetyDriving TipsGeneral MaintenanceBreakdown assistanceTechnical Data
– Allow the bonnet to drop from a height of about 30 cm into the
lock - bonnet do not press down on it!
The bonnet is held in the opened position by a pressurized gas spring.
WARNING
•Never open the bonnet if you see that steam or coolant is
flowing out of the engine compartmen t - risk of scalding! Wait long
enough until the steam or coolant has stopped escaping.
•For safety reasons, the bonnet must always be properly closed
when driving. One should therefore check that the lock has in fact
engaged properly after closing the bonnet.
•Stop your vehicle immediately while driving if you notice that
the lock is not properly engaged and close the bonnet properly -
risk of an accident!
Caution
•Never open the bonnet using the handle - danger of causing damage.
•Before opening the bonnet, ensure that the arms of the windscreen
wipers are correctly in place against the windscreen. Otherwise, there is
a risk of damage to the paintwork.
Working in the en gine compartment
Particular care is required when carrying out any work in
the engine compartment!
There is a risk of injuries, scalding , accidents and fire when working
in the engine compartment, e.g. inspecting and replenishing oil and
other fluids. For this reason, it is essential to comply with the warning instructions stated below and with the general applicable
rules of safety. The engine compartment of your car is a hazardous
area
⇒ .
WARNING
•Never open the bonnet if you see that steam or coolant is
flowing out of the engine compartment - risk of scalding! Wait long
enough until the steam or coolant has stopped escaping.
•Switch off the engine and pull out the ignition key.
•Apply the handbrake firmly.
•If your vehicle is fitted with a manual gearbox, move the gear-
shift lever into Neutral, or if it is fitted with automatic gearbox,
move the selector lever into position P.
•Allow the engine to cool down.
•Keep children clear of the engine compartment.
•Do not touch any hot engine parts - risk of burns!
•Never spill oil and other fluids over the hot engine. Such fluids
(e.g. the antifreeze contained in the coolant) may ignite!
•Avoid short circuits in the electrical system - particularly on the
battery.
•Never place your hand into the radiator fan as long as the
engine is still warm. The fan might suddenly start running!
•Never open the cap of the coolant expansion bottle as long as
the engine is still warm. The cooling system is pressurized!
•Cover over the cap of the coolant expansion reservoir with a
large cloth when opening it as protection for your face, hands and
arms from hot steam or hot coolant.
•Do not let objects, such as e.g cleaning cloth or tools lie in the
engine compartment.
Page 211 of 270
Inspecting and Replenishing
210
•If you wish to work under the vehicle, you must secure the
vehicle from rolling away and support it with suitable supporting
blocks: the car jack is not sufficient for this - risk of injury!
•In cases where it be necessary to carry out inspection work
when the engine is running there is an additional risk from rotating
parts (e.g. the V-ribbed belt, alternator, radiator fan) and from the
high-voltage ignition system. Pl ease observe in addition the
following:
−Never touch the electrical cables of the ignition system.
− Absolutely avoid any jewellery, loose items of clothing or
long hair from getting into the rotating parts of the engine -
Hazard! Therefore remove any jewellery beforehand, tie up your
hair and wear tight fitting clothing.
•Please also comply with the warning instructions stated below
when carrying out any essential work on the fuel system or on the
electrical system:
−Always separate the car battery from the electrical system.
− Do not smoke.
− Never carry out any work close to naked flames.
− Always keep a working fire extinguisher at hand.
Caution
When replenishing fluids in the engine, always ensure that the fluids are
on no account mixed up. This may result in major operating problems and
also vehicle damage!
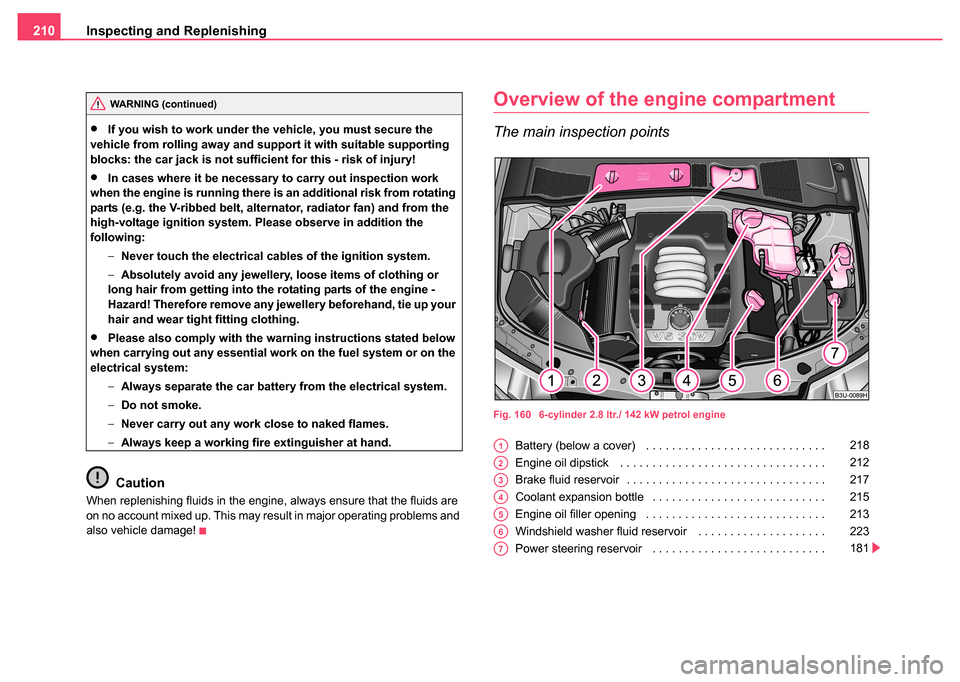
Overview of the engine compartment
The main inspection points
Fig. 160 6-cylinder 2.8 ltr./ 142 kW petrol engine
Battery (below a cover) . . . . . . . . . . . . . . . . . . . . . . . . . . . .
Engine oil dipstick . . . . . . . . . . . . . . . . . . . . . . . . . . . . . . . .
Brake fluid reservoir . . . . . . . . . . . . . . . . . . . . . . . . . . . . . . .
Coolant expansion bottle . . . . . . . . . . . . . . . . . . . . . . . . . . .
Engine oil filler opening . . . . . . . . . . . . . . . . . . . . . . . . . . . .
Windshield washer fluid reservoir . . . . . . . . . . . . . . . . . . . .
Power steering reservoir . . . . . . . . . . . . . . . . . . . . . . . . . . .
WARNING (continued)
A1218
A2212
A3217
A4215
A5213
A6223
A7181
Page 217 of 270
Inspecting and Replenishing
216
Replenishing the coolant
– Switch the engine off.
– Allow the engine to cool down.
– Place a cloth over the cap of the coolant expansion reservoir
⇒page 215, fig. 162 and unscrew the cap carefully by
turning it to the left ⇒.
– Top up the coolant.
– Screw on the cap tight until it is heard to lock.
The coolant which you use for replenishing the system, must comply with
one specific specification ⇒page 214, “Coolant”. Do not use an alterna-
tive additive if the coolant additive G12 PLUS is not available in excep-
tional cases. Just top up the system with water and as soon as possible
arrange adjustment to correct the mixing ratio of water and coolant addi-
tive again by a Škoda dealer.
Only use fresh coolant for topping up the system.
Do not fill up over the “MAX” marking! Excess coolant which is heated up
is forced out of the cooling system through the pressure relief valve in the
cap of the coolant compensation bottle.
Wait until the engine has cooled down for a system which has suffered a
major loss of coolant before pouring in coolant. This is necessary to avoid
engine damage.
Do not continue your journey if for some reason it is not possible
under the conditions prevailing to top up with coolant. Switch off the
engine and obtain professional assistance from a Škoda dealer.
WARNING
•The cooling system is pressurized! Do not open the cap of the
coolant expansion bottle if the engi ne is still hot - risk of scalding!
•The coolant additive and thus all of the coolant is harmful to
your health. Avoid contact with the coolant. Coolant vapours are
also harmful to the health. It is important, therefore, to always
safely store any coolant additive in its original container out of the
reach of children - risk of poisoning!
•If any splashes of coolant get into your eyes, rinse out your eyes
immediately with clear water and contact a doctor as soon as
possible.
•You should also consult a doctor without delay if you have inad-
vertently swallowed coolant.
For the sake of the environment
Do not re-use coolant if it is necessary to drain the coolant in the system.
It should be collected and disposed of in compliance with environmental
protection regulations.
The radiator fan
The radiator fan may switch on suddenly.
The radiator fan is driven by an electric motor and controlled by a thermo-
stat according to the coolant temperature.
The radiator fan may continue running for up to 10 minutes after the
engine has been switched off - even if the ignition is also off. It may also
switch on suddenly after a certain time, if
•the coolant temperature has risen because of an accumulation of heat
or
Page 225 of 270
Inspecting and Replenishing
224
The windshield washer reservoir contains the cleaning fluid for the wind-
screen and for the headlamp cleaning system*. The reservoir is located at
the front left of the engine compartment ⇒ page 223, fig. 168.
The reservoir has a capacity of 4 liters.
Clear water is not sufficient to intensively clean the windscreen and head-
lights. We therefore recommend using clean washing water together with
the screen cleaner from Škoda genuine accessories (in winter additionally
with antifreeze) which is capable of removing stubborn dirt. Follow the
instructions for use on the packaging when using screen cleaning prod-
ucts.
You should always add antifreeze to the cleaning water in winter even if
your vehicle is fitted with heated windscreen washer nozzles*.
It is also possible in exceptional cases to use methylated spirits when no
screen cleaner with antifreeze is available. The concentration of methyl-
ated spirits must not be more than 15 %. Please note, however, that the
antifreeze protection at this concentration is only adequate down to -5°C.
WARNING
Read and observe the warning notes ⇒page 209, “Working in the
engine compartment” before working in the engine compartment.
Caution
•On no account should you add radiator antifreeze or other additives to
the windscreen washer fluid.
•If the vehicle is fitted with headlight cleaning system, you should only
add cleaning products which do not attack the polycarbonate coating of
the headlights to the windscreen washer fluid. Please contact your Škoda
dealer, who will tell you which cleaning agent you can use.
Note
Do not take the filter out of the windscreen wash container when filling it
up again with liquid otherwise dirt can get into the liquid transportation
system and can lead to faults in operation of the windscreen wash
system.
Page 267 of 270
Index
266
Speedometer . . . . . . . . . . . . . . . . . . . . . . . . 16
Stability programme . . . . . . . . . . . . . . . . . . 175
Starting engine . . . . . . . . . . . . . . . . . . . . . . 118
Diesel engines . . . . . . . . . . . . . . . . . . . . 119
Petrol engines . . . . . . . . . . . . . . . . . . . . 119
Steering booster . . . . . . . . . . . . . . . . . . . . . 181
Storage compartment Armrest with stowage compartment . . . 102
Centre console . . . . . . . . . . . . . . . . . . . . 99
Door trim panels . . . . . . . . . . . . . . . . . . 100
Drawer compartment . . . . . . . . . . . . . . . . 98
Lighting . . . . . . . . . . . . . . . . . . . . . . . . . . 60
Spectacles . . . . . . . . . . . . . . . . . . . . . . . . 99
Umbrella . . . . . . . . . . . . . . . . . . . . . . . . 101
Storage compartments . . . . . . . . . . . . . . . . . 97
Storage drawer . . . . . . . . . . . . . . . . . . . . . . . 98
Storage facilities . . . . . . . . . . . . . . . . . . . . . . 97
Stowage compartment below steering wheel . . . 100
Sun visors . . . . . . . . . . . . . . . . . . . . . . . . . . . 63
Switch on the driver's door Power windows . . . . . . . . . . . . . . . . . . . . 50
Switching lights on and off . . . . . . . . . . . . . . 56
Switching the engine off . . . . . . . . . . . . . . . 119
Symbol explanation . . . . . . . . . . . . . . . . . . . . 8
T
Taking care of your vehicle . . . . . . . . . . . . . 195
TCS . . . . . . . . . . . . . . . . . . . . . . . . . . . . . . . 176 Warning light . . . . . . . . . . . . . . . . . . . . . . 34 Telephone . . . . . . . . . . . . . . . . . . . . . . . . . . 136
Temperature
Outside . . . . . . . . . . . . . . . . . . . . . . . . . . 20
The air conditioning system Climatronic . . . . . . . . . . . . . . . . . . . . . . . 109
The air conditioning system . . . . . . . . . . 104
The armrest at the rear . . . . . . . . . . . . . . . . 103
The automatic wiper/washer system . . . . . . . 64
The battery . . . . . . . . . . . . . . . . . . . . . . 36, 218 Changing . . . . . . . . . . . . . . . . . . . . . . . . 223
Charging . . . . . . . . . . . . . . . . . . . . . . . . . 221
Disconnecting and connecting . . . . . . . . 223
Inspecting the electrolyte level . . . . . . . 220
Operation in winter . . . . . . . . . . . . . . . . 221
The electronic immobiliser . . . . . . . . . . . 35, 40
The outside temperature . . . . . . . . . . . . . . . . 20
The radiator fan . . . . . . . . . . . . . . . . . . . . . . 216
The roof luggage rack system . . . . . . . . . . . . 90
Thickness of brake pads Warning light . . . . . . . . . . . . . . . . . . . . . . 32
Through-loading bag . . . . . . . . . . . . . . . . . . . 83
Tilting roof . . . . . . . . . . . . . . . . . . . . . . . . . . . 53
Tiptronic . . . . . . . . . . . . . . . . . . . . . . . . . . . 130
Tool . . . . . . . . . . . . . . . . . . . . . . . . . . . . . . . 236
Towing a trailer . . . . . . . . . . . . . . . . . . . . . . 190
Towing a vehicle . . . . . . . . . . . . . . . . . . . . . 247
Towing device . . . . . . . . . . . . . . . . . . . . . . . 192
Towing eye at the front . . . . . . . . . . . . . . . . . . . . . . . 248
at the rear . . . . . . . . . . . . . . . . . . . . . . . 248 Tow-starting a vehicle . . . . . . . . . . . . . . . . . 247
Traction control system (TCS) . . . . . . . . . . . 176
Warning light . . . . . . . . . . . . . . . . . . . . . . 34
Trailer . . . . . . . . . . . . . . . . . . . . . . . . . . . . . 190 General Maintenance . . . . . . . . . . . . . . . 190
Transporting children . . . . . . . . . . . . . . . . . . 164
Tread depth . . . . . . . . . . . . . . . . . . . . . . . . . 227
Turn signal lights . . . . . . . . . . . . . . . . . . . . . . 59
Turn signal system for vehicles towing a trailer Warning light . . . . . . . . . . . . . . . . . . . . . . 30
Turn signals . . . . . . . . . . . . . . . . . . . . . . . . . . 59 Warning light . . . . . . . . . . . . . . . . . . . . . . 29
Two-way radio sets . . . . . . . . . . . . . . . . . . . 138
Two-way radio systems . . . . . . . . . . . . . . . . 138
Type plate . . . . . . . . . . . . . . . . . . . . . . . . . . 259
Tyres . . . . . . . . . . . . . . . . . . . . . . . . . . . . . . 226
U
Underbody protection . . . . . . . . . . . . . . . . . 200
Unidirectional tyres . . . . . . . . . . . . . . . . . . . 231
Unlocking Remote control . . . . . . . . . . . . . . . . . . . . . 47
Unlocking . . . . . . . . . . . . . . . . . . . . . . . . . . . . 41
V
Vanity mirror . . . . . . . . . . . . . . . . . . . . . . . . . 63
Vehicle condition . . . . . . . . . . . . . . . . . . . . . . 24
Vehicle data sticker . . . . . . . . . . . . . . . . . . . 259
Vehicle identification data . . . . . . . . . . . . . . 259