towing SKODA SUPERB 2004 1.G / (B5/3U) Owner's Manual
[x] Cancel search | Manufacturer: SKODA, Model Year: 2004, Model line: SUPERB, Model: SKODA SUPERB 2004 1.G / (B5/3U)Pages: 270
Page 7 of 270
Contents
6
Driving Tips . . . . . . . . . . . . . . . . . . . . . .
Intelligent Technology . . . . . . . . . . . . . . . . . .
Electronic stability programme (ESP)* . . . . . .
Brakes . . . . . . . . . . . . . . . . . . . . . . . . . . . . . .
Brake booster . . . . . . . . . . . . . . . . . . . . . . . .
Antilock brake system (ABS) . . . . . . . . . . . . .
Brake Assist* . . . . . . . . . . . . . . . . . . . . . . . . .
Power steering . . . . . . . . . . . . . . . . . . . . . . . .
Driving and the Environment. . . . . . . . . . . .
The first 1 500 kilometres and then afterwards
Catalytic converter . . . . . . . . . . . . . . . . . . . . .
Motoring abroad . . . . . . . . . . . . . . . . . . . . . . .
Avoiding damage to your vehicle . . . . . . . . . .
Driving in an economical and environmentally
conscious manner . . . . . . . . . . . . . . . . . . . . .
Environmental compatibility . . . . . . . . . . . . . .
Towing a trailer . . . . . . . . . . . . . . . . . . . . . . . .
Towing a trailer . . . . . . . . . . . . . . . . . . . . . . . .
Detachable towing device* . . . . . . . . . . . . . .
General Maintenance . . . . . . . . . .
Care and cleaning . . . . . . . . . . . . . . . . . . . . .
General . . . . . . . . . . . . . . . . . . . . . . . . . . . . .
Care of the exterior of vehicle . . . . . . . . . . . .
Care of the interior of vehicle . . . . . . . . . . . . .
Fuel. . . . . . . . . . . . . . . . . . . . . . . . . . . . . . . . . .
Petrol . . . . . . . . . . . . . . . . . . . . . . . . . . . . . . .
Diesel . . . . . . . . . . . . . . . . . . . . . . . . . . . . . . .
Refuelling . . . . . . . . . . . . . . . . . . . . . . . . . . . .
Inspecting and Replenishing. . . . . . . . . . . .
Engine compartment . . . . . . . . . . . . . . . . . . .
Overview of the engine compartment . . . . . .
Engine oil . . . . . . . . . . . . . . . . . . . . . . . . . . . .
Cooling system . . . . . . . . . . . . . . . . . . . . . . . Brake fluid . . . . . . . . . . . . . . . . . . . . . . . . . . .
The battery . . . . . . . . . . . . . . . . . . . . . . . . . .
Windscreen Wiper and Washer System . . . .
Wheels and Tyres . . . . . . . . . . . . . . . . . . . . .
Wheels . . . . . . . . . . . . . . . . . . . . . . . . . . . . .
Accessories, changes and replacement of
parts . . . . . . . . . . . . . . . . . . . . . . . . . . . . . . . . .
Accessories and replacement parts . . . . . . .
Technical changes . . . . . . . . . . . . . . . . . . . . .
Breakdown assistance . . . . . . . .
Breakdown assistance . . . . . . . . . . . . . . . . .
First-aid box* . . . . . . . . . . . . . . . . . . . . . . . . .
Warning triangle . . . . . . . . . . . . . . . . . . . . . .
Fire extinguisher* . . . . . . . . . . . . . . . . . . . . . .
Vehicle tool kit . . . . . . . . . . . . . . . . . . . . . . . .
Spare wheel . . . . . . . . . . . . . . . . . . . . . . . . . .
Changing a wheel . . . . . . . . . . . . . . . . . . . . .
Jump-starting . . . . . . . . . . . . . . . . . . . . . . . . .
Tow-starting and towing vehicle . . . . . . . . . . .
Fuses and light bulbs . . . . . . . . . . . . . . . . . .
Electric fuses . . . . . . . . . . . . . . . . . . . . . . . . .
Bulbs . . . . . . . . . . . . . . . . . . . . . . . . . . . . . . .
Technical Data. . . . . . . . . . . . . . . . . . .
General . . . . . . . . . . . . . . . . . . . . . . . . . . . . . .
Identification data . . . . . . . . . . . . . . . . . . . . .
Index. . . . . . . . . . . . . . . . . . . . . . . . . . . . . . .
175
175
175
178
179
179
180
181
182
182
183
184
184
185
189
190
190
192
195
195
195
195
201
204
204
204
206
208
208
210
211
214 217
218
223
225
225
233
233
233
235
235
235
235
236
236
237
238
245
247
250
250
252
259
259
259
261
Page 29 of 270
Instruments and Indicator/Warning Lights
28
Warning lights
An overview
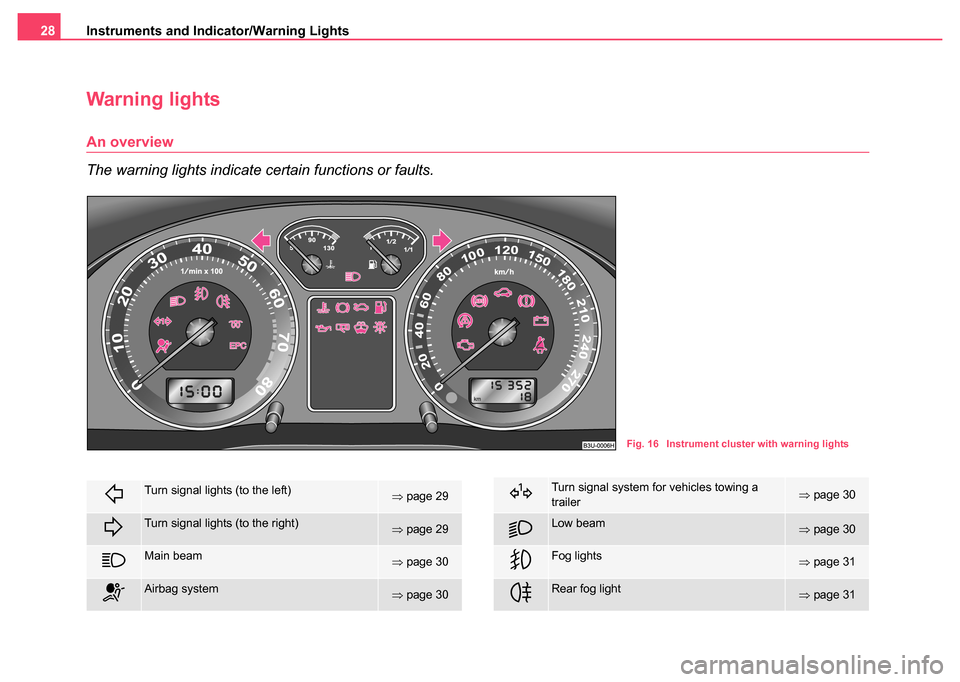
The warning lights indicate certain functions or faults.
Fig. 16 Instrument cluster with warning lights
Turn signal lights (to the left)⇒ page 29
Turn signal lights (to the right)⇒page 29
Main beam⇒page 30
Airbag system⇒page 30
Turn signal system for vehicles towing a
trailer⇒page 30
Low beam⇒page 30
Fog lights⇒page 31
Rear fog light⇒page 31
Page 30 of 270
Instruments and Indicator/Warning Lights29
Using the systemSafetyDriving TipsGeneral MaintenanceBreakdown assistanceTechnical Data
WARNING
•If you do not pay attention to the warning lights coming on and
the corresponding descriptions and warning notes, this may result
in severe body injuries or major vehicle damage.
•The engine compartment of your car is a hazardous area. There
is a risk of injuries, scalding, acci dents and fire when working in the
engine compartment, e.g. inspec ting and replenishing oil and other
fluids. It is also essential to observe all warnings ⇒page 209.
Note
•Arrangement of the indicator lights depends on the model and model
version. The symbols shown in the following functional description are to
be found as indicator lights in the instrument cluster.
•Operational faults are shown in the display of the instrument cluster as
red symbols (priority 1 - danger) or yellow symbols (priority 2 - warning).
Turn signal system
Either the left or right indicator light flashes depending on the posi-
tion of the turn signal lever.
The indicator light flashes at twice its normal rate if a turn signal light fails.
This does not apply when towing a trailer.
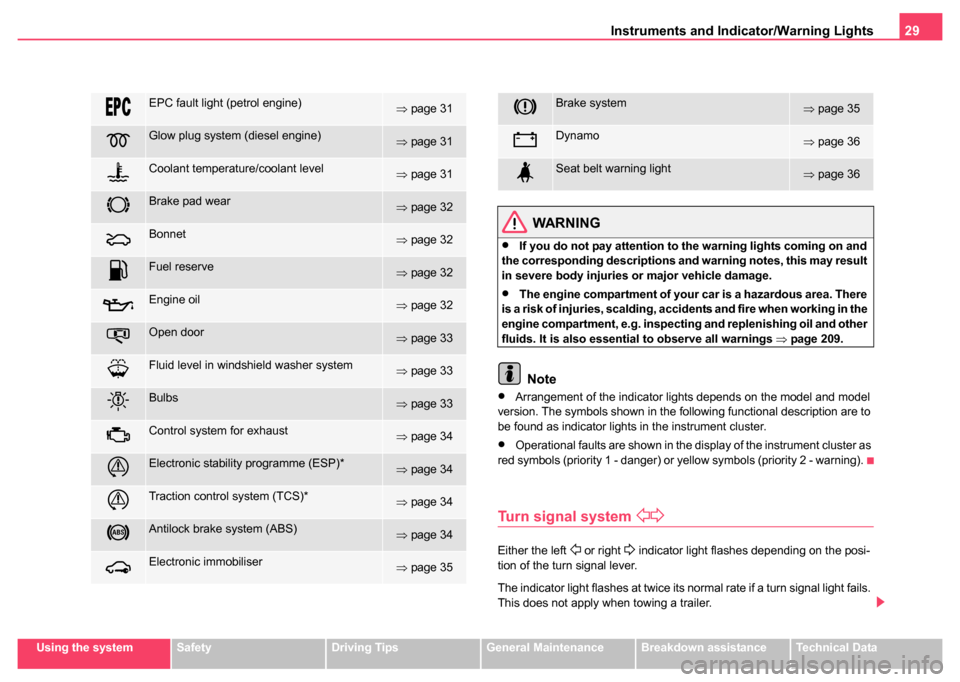
EPC fault light (petrol engine)⇒ page 31
Glow plug system (diesel engine)⇒page 31
Coolant temperature/coolant level⇒page 31
Brake pad wear⇒page 32
Bonnet⇒page 32
Fuel reserve⇒page 32
Engine oil⇒page 32
Open door⇒page 33
Fluid level in windshield washer system⇒page 33
Bulbs⇒page 33
Control system for exhaust⇒page 34
Electronic stability programme (ESP)*⇒page 34
Traction control system (TCS)*⇒page 34
Antilock brake system (ABS)⇒page 34
Electronic immobiliser⇒page 35
Brake system⇒page 35
Dynamo⇒page 36
Seat belt warning light⇒page 36
Page 31 of 270
Instruments and Indicator/Warning Lights
30
Switching off the hazard warning light system is switched on will cause all
of the turn signal lights as well as both indicator lights to flash.
Further information about the turn signal system ⇒page 59.
Main beam
The indicator light comes on when the main beam is selected or also
when the headlight flasher is operated.
Further information about the main beam ⇒page 59.
Airbag system
Monitoring the airbag system
The warning light
comes on for a few seconds when the ignition is
switched on.
There is a fault in the system if the warning light does not go out or comes
on or flashes while driving ⇒. This also applies if the warning light
does not come on when the ignition is switched on.
The following text will be displayed in the information display*:
AIRBAG FAULT
The functionality of the airbag system is also monitored electronically,
when one airbag has been switched off
Front, side or head passenger airbags which have been switched off
by a Škoda dealer using the vehicle system tester:
•The warning light lights up for 3 seconds after switching on the igni-
tion and then flashes for 12 seconds afterwards in 2 second intervals. Front, side or head passenger airbags which have been switched off
using the switch (for switching off airbags)* in the storage compart-
ment on the front passenger side:
•The warning light comes on for 3 seconds after the ignition has
been switched on.
•Switching off airbags is indicated in the middle of the dash panel by the
lighting up of the indicator light (airbag switched off)
⇒ page 162.
WARNING
Have the airbag system checked immediately by a Škoda dealer if
a fault exists. Otherwise, there is a risk of the airbag not being acti-
vated in the event of an accident!
Note
Further information about switching off airbags ⇒page 161, “Deactivating
an airbag”.
Turn signal system for vehicles towing trailer
The indicator light on vehicles towing a trailer flashes together with the
respective indicator light for the turn signal system.
The indicator light
does not flash if a turn signal light on the trailer or
on the vehicle is not operating.
Low beam
The indicator light comes on when low beam is selected ⇒page 56.
Page 58 of 270
Lights and Visibility57
Using the systemSafetyDriving TipsGeneral MaintenanceBreakdown assistanceTechnical Data
•The switching on of the described lights should only be undertaken in
accordance with the legal requirements.
Fog lights
Switching on the fog lights
– First of all turn the light switch ⇒page 56, fig. 34 into position
or .
– Pull the light switch out to the first detent .
The rear fog light warning light ⇒ page 31 lights up in the instrument
cluster when the fog light is switched off.
The rear fog light
Switching on the rear fog light
– First of all turn the light switch ⇒page 56, fig. 34 into position
or .
– Pull the light switch out to the second detent .
The rear fog light warning light ⇒ page 31 lights up in the instrument
cluster when the fog light is switched off.
Only the rear fog light of the trailer lights up automatically when you are
towing a trailer using a factory-fitted towing device which is fitted with
the rear fog light .
Caution
The rear fog light should only be switched on if visibility is particularly poor
(conform with any varying legal provisions) to avoid dazzling vehicles
behind your vehicle.
Instrument lighting
You can adjust the brightness of the instrument lighting.
– Switch on the light.
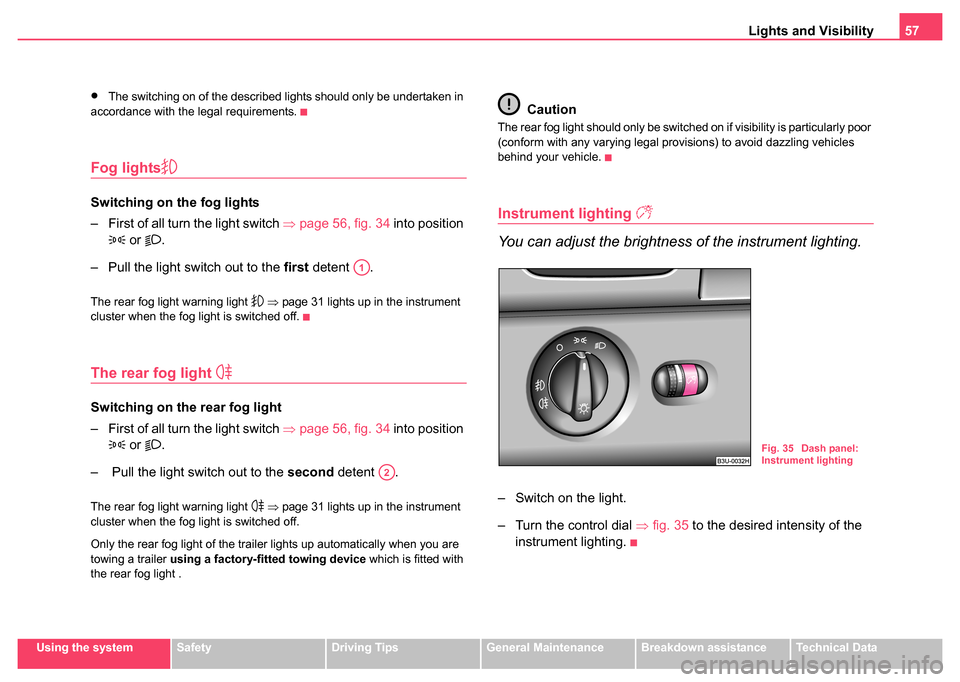
– Turn the control dial ⇒fig. 35 to the desired intensity of the
instrument lighting.
A1
A2
Fig. 35 Dash panel:
Instrument lighting
Page 85 of 270
Seats and Stowage
84
Loading
– Fold down the armrest of the rear seats to the front.
– Press the unlock button for the cover of the through-loading bag in the interior of the car and swivel it down.
– Pull the bag out and unfold it.
– Open the boot lid/luggage compartment door.
– Press the unlock button for the cover of the through-loading bag ⇒page 83, fig. 66 and swivel it down.
– Push the objects into the through-loading bag from the boot ⇒ .
Securing
– Insert the belt ⇒page 83, fig. 67 into the middle seat belt
buckle .
– Pull the seat belt tight in direction of arrow ⇒page 83,
fig. 67.
Stowing
– Close the cover for the through-loading bag in the boot.
– Carefully fold the through-loading bag together (approx. 11 cm packet).
– Close the cover in the interior of the car.
– Move the armrest back into its original position.
WARNING
After placing items into the through-loading bag, you must secure
the bag with the belt .
Note
Never fold the though-loading bag together if it is moist.
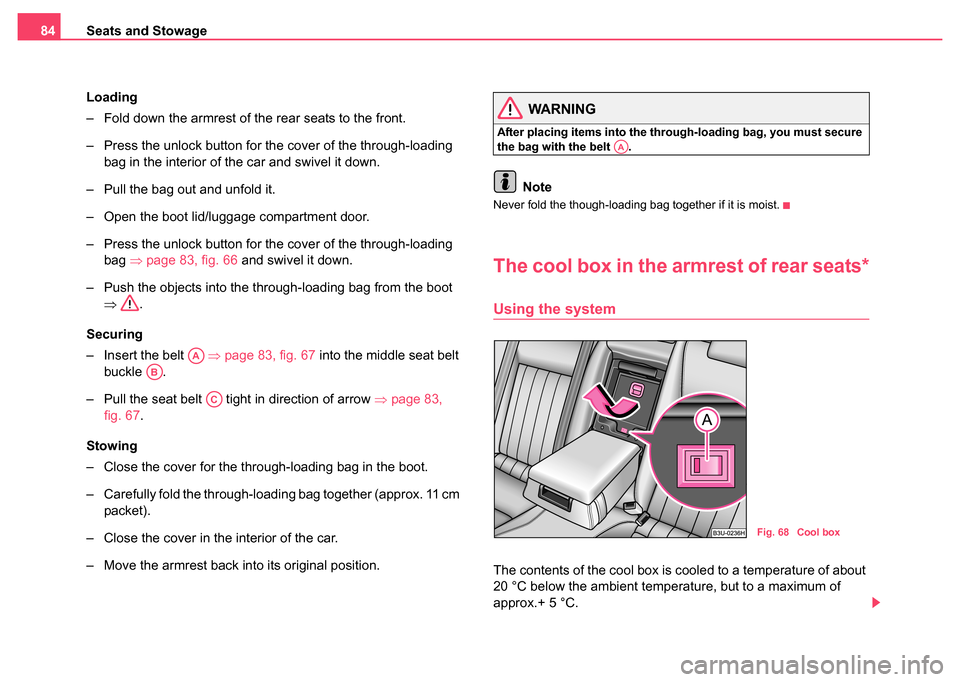
The cool box in the armrest of rear seats*
Using the system
The contents of the cool box is cooled to a temperature of about
20 °C below the ambient temperature, but to a maximum of
approx.+ 5 °C.
AA
AB
AC
AA
Fig. 68 Cool box
Page 90 of 270

Seats and Stowage89
Using the systemSafetyDriving TipsGeneral MaintenanceBreakdown assistanceTechnical Data
– Press on the bottom part of the handle and open the
compartments in the direction of arrow 3. The compartment
wall must be heard to engage in the slot in the bottom part of
the box.
Moving folding box into secured middle position
– Press on the button marked “PUSH” ⇒page 88, fig. 75
and carefully push the folding box into the secured middle
position. If correctly locked, the button marked “PUSH” is
moved back into its initial position. You can now use the space
which has become available for stowing further items of
luggage.
Caution
•The parts of the folding box can be damaged if handled roughly or in
an unprofessional way.
•The maximum weight of goods to be loaded should not exceed 25
kg.
Lowering folding box
– Press the bottom part of the handle ⇒fig. 76 and fold the
compartments in direction of arrow 1. The compartments must
be heard to engage in the lid.
AC
AD
AD
Fig. 76 Lowering
folding box
Fig. 77 Securing
folding box
AA
Page 102 of 270

Seats and Stowage101
Using the systemSafetyDriving TipsGeneral MaintenanceBreakdown assistanceTechnical Data
Stowage compartment for an umbrella*
The umbrella supplied with the car is stowed in the compartment
in the rear left door ⇒fig. 94 . Opening umbrella
– Press the knob in direction of arrow
⇒fig. 95 .
Closing umbrella
– Press the knob in direction of arrow . The umbrella first of all closes partially in direction of arrow .
– Press the umbrella together in direction of arrow in order to fold it closed completely.
There is a water drain facility in the stowage compartment for a wet
umbrella.
The stowage compartment can also be used for stowing small objects.
The compartment features a foldable partition. When the umbrella is
removed the rear part of the compartment closes - thus no object can fall
inside the door. The partition is automatically folded back in position when
the umbrella is again placed in the compartment.
Fig. 94 Left rear door:
Storage compartment
Fig. 95 Opening and
closing umbrella
A1
A2
AA
AB
Page 123 of 270
Starting-off and Driving
122
The handbrake warning is activated if you drive at a speed of more than 5
km/h for more than 3 seconds.
WARNING
•Please note that the handbrake must be fully released. A hand-
brake which is only partially released can result in the rear brakes
overheating which will have a negative effect on the operation of
the brake system - risk of accident! In addition this can result in
premature wear of the rear brake pads.
•Never leave children unattended in the vehicle. The children
might, for example, release the handbrake or take the vehicle out of
gear. The vehicle might then move off - risk of accident!
Caution
After the car has come to a stop, always first of all apply the handbrake
firmly before then additionally engaging a gear (manual gearbox) or
moving the selector lever into position P (automatic gearbox).
Parking aid*
The parking aid provides a warning of obstacles behind
the vehicle.
The audible parking aid determines the distance between the rear bumper
and an obstacle located behind the vehicle with the aid of ultrasound
sensors. The sensors are integrated in the rear bumper.
The parking aid is activated automatically when reverse gear is engaged
and the ignition is turned on. This is confirmed by a brief signal. The clearance warning begins at a distance of about 160 cm from the
obstacle. The interval between the warning signals becomes shorter as
the clearance is reduced.
A continuous tone sounds from a clearance of just 30 cm - danger area.
You should not reverse any further after this signal sounds.
WARNING
•The parking aid is not a substitute for the driver paying proper
attention. It is always the driver's responsibility to take care when
parking the vehicle or carrying out similar manoeuvres.
•You should therefore satisfy yourself, before reversing, that
there is no small obstacle, such as a rock, thin post, trailer drawbar
etc., behind your vehicle. Such an obstacle might not be within the
range detected by the sensors.
Note
•The parking aid does not operate if you are towing a trailer (applies to
models which feature a factory-fitted towing device*).
•A system fault is indicated if a warning signal sounds for about 5
seconds after switching the ignition on and engaging reverse gear and
there is no obstacle close to your vehicle. Have the fault rectified by a
Škoda dealer.
•The sensors must be kept clean and free of ice to enable the parking
aid to operate properly.
Page 129 of 270
Automatic gearbox*
128
N - Neutral
The transmission is in Neutral in this position.
The brake pedal must be depressed and the Shiftlock in the selector lever
grip must be pressed (if the selector lever is in its position for longer than
2 seconds) in order to move the selector lever out of the N position into
another position, with the ignition switched on, on a vehicle travelling at
less than 5 km/hour or on a stationary vehicle.
D - Drive, position for driving forward
When the selector lever is in this position, the forward gears are shifted up
and down automatically in line with engine load, vehicle speed and the
dynamic shift programme (DSP).
You must depress the brake pedal ⇒ if you wish to move the selector
lever into position D from N when the vehicle is travelling at less than
5 km/hour or is stationary.
In certain circumstances (e.g. when driving in mountainous regions or
when towing a trailer) it may be beneficial to select the manual shift
programme ⇒page 130 for a short time in order to adapt the gearbox
ratios manually to the driving situations.
4 - Position when driving in hilly areas
We recommend this position if driving with the selector lever in position D
would, in certain circumstances, result in the gearbox frequently shifting
between fourth and fifth gears.
The gearbox then shifts up and down automatically into the first, second,
third and fourth gears in line with engine load and vehicle speed. Fifth gear
is not engaged in this case. This makes it possible to exploit greater
engine braking power when the accelerator is released ⇒.
The Shiftlock on the selector lever grip must be pressed when moving out
of position 4 into position D.
3 - Position when driving in mountainous regions
This position of the selector lever is suitable for long sloping sections. The gearbox shifts up and down automatically into first, second and third
gear in line with engine load and vehicle speed. The fourth and fifth gears
remain locked out in order to avoid unnecessary gear changes. Enhanced
engine braking power is thus available.
The Shiftlock on the selector lever grip must not be pressed when moving
out of position
4 into position 3.
2 - Position for extreme mountainous sections
This position of selector lever is suitable for very steep downhill sections.
The gearbox shifts up and down automatically into first and second gear
in line with engine load and vehicle speed. Third, fourth and fifth gears are
not engaged. This position offers you the maximum possible engine
braking power.
The Shiftlock on the selector lever grip must be pressed when moving out
of position 3 into position 2.
The cruise control system is locked in position 2.
WARNING
•Never move the selector lever into position R or P when driving
- risk of an accident!
•When the engine is running and the vehicle is stationary, it is
necessary to hold the car with the brake pedal in all the positions
of the selector lever (except P and N) since the power transmission
is never completely interrupted, also not when the engine is idling
- the vehicle "creeps".
•You must on no account unintentionally operate the throttle
(e.g. by hand from the engine comp artment) if a drive position is
engaged when the car is stationary. The vehicle would otherwise
immediately start off - also when the handbrake is firmly applied -
risk of an accident!