change SKODA SUPERB 2006 1.G / (B5/3U) User Guide
[x] Cancel search | Manufacturer: SKODA, Model Year: 2006, Model line: SUPERB, Model: SKODA SUPERB 2006 1.G / (B5/3U)Pages: 281, PDF Size: 12.67 MB
Page 142 of 281

Communicating and Navigating141
Using the systemSafetyDriving TipsGeneral MaintenanceBreakdown assistanceTechnical Data
CD changer*
Take out and insert CD magazine
The CD changer for the radio and navigation system is located in
the left side compartment of the luggage compartment.
Take magazine out of the changer
– Open safety stop ⇒fig. 129 fully.
– Press button . The magazine is automatically ejected.
– Take out the magazine.
Insert magazine into the changer
– Insert the magazine with the arrow of the illustration upwards up to the stop ⇒page 142, fig. 130 . The tip of the arrow on the
magazine must point at the same time to the magazine box. – Slide safety stop closed.
After inserting the magazine, it is analysed how many CDs are in the
magazine.
If there is no magazine in the changer,
NO CD MAGAZINE is displayed in
the CD-mode on the display of the radio.
You can also take out the magazine when the radio is switched off.
Caution
Always close the safety cover after inserting the magazine. The safety
cover protects the CD-changer from dirt and dust particles penetrating into
the CD-changer, in order to avoid operational faults.
Note
•Described in this Owner's Manual are only the steps required for the
operation of the CD-changer.
•You will find further information for this setting menu in the Radio
Owner's Manual.
•Only Use CD-magazines from Škoda Original Accessories.
Fig. 129 The CD
changer
A1
A3A2
NKO B5 20.book Page 141 Monday, July 3, 2006 2:09 PM
Page 143 of 281

Communicating and Navigating
142
Loading magazine with CDs
–Grasp CD with the playback side to the bottom at the
middle hole and at the outer edge.
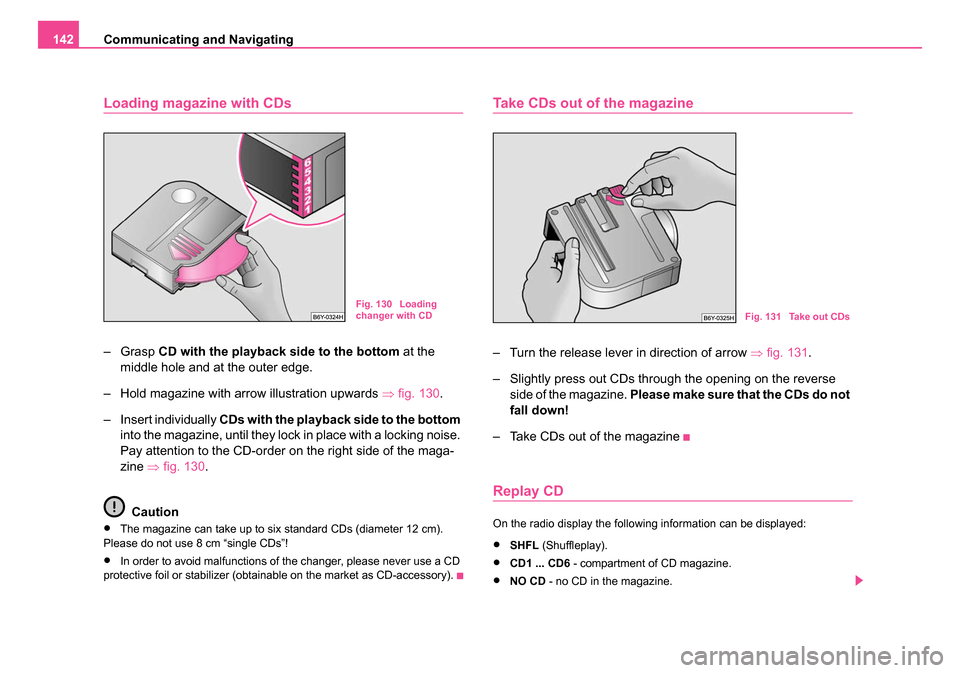
– Hold magazine with arrow illustration upwards ⇒fig. 130 .
– Insert individually CDs with the playback side to the bottom
into the magazine, until they lock in place with a locking noise.
Pay attention to the CD-order on the right side of the maga-
zine ⇒fig. 130.
Caution
•The magazine can take up to six standard CDs (diameter 12 cm).
Please do not use 8 cm “single CDs”!
•In order to avoid malfunctions of the changer, please never use a CD
protective foil or stabilizer (obtainable on the market as CD-accessory).
Take CDs out of the magazine
– Turn the release lever in direction of arrow ⇒fig. 131.
– Slightly press out CDs through the opening on the reverse side of the magazine. Please make sure that the CDs do not
fall down!
– Take CDs out of the magazine
Replay CD
On the radio display the following information can be displayed:
•SHFL (Shuffleplay).
•CD1 ... CD6 - compartment of CD magazine.
•NO CD - no CD in the magazine.
Fig. 130 Loading
changer with CDFig. 131 Take out CDs
NKO B5 20.book Page 142 Monday, July 3, 2006 2:09 PM
Page 144 of 281

Communicating and Navigating143
Using the systemSafetyDriving TipsGeneral MaintenanceBreakdown assistanceTechnical Data
•TR01, TR02 etc. - title of the selected CD.
Note
For more details see Radio Owners Manual.
Fault displays
On the radio display the following fault displays can be displayed:
•NO CD CHANGER - CD-changer is not connected to the magazine.
•NO CD MAGAZINE - no magazine in the CD-changer.
•NO CD - the selected compartment in the magazine of the CD-changer
is empty.
•SURFACE - in the selected compartment the CD with playback side is
inserted upwards.
Tips for operating the CD-changer
Please pay attention to the following notes for operating the CD-
changer.
•Only clean CDs without scratches and damages should be used, in
order to guarantee a proper, high-quality CD-playback.
•Affix no labels to the CDs.
•Always store non-used CDs in the CD-storage from the Škoda
genuine accessories provided for this as well as in the original folding box.
•Never expose CDs to direct sun rays.
•Use a soft, non-fluffy cloth to clean the CDs. Wipe the CD straight-lined
from the middle to the outside. Strong dirt must be eliminated with usual
CD-cleaner.
•Please never use liquids such as gasoline, paint thinner or disk
cleaner, otherwise the surface of the CD could get damaged.
Precaution measures for laser equipment
Laser equipment is classified according to DIN IEC 76 (CO) 6/VDE 0837
in the safety categories 1 - 4.
The Škoda CD-changer corresponds to the safety category 1.
The laser used for equipment of category 1 is to such an extent energy-
poor and/or shielded that there is no risk of danger when used in accord-
ance with the regulation.
WARNING
Please always pay full attention to the traffic situation around you!
Note
Do not remove the equipment cover. The equipment does not contain any
parts, which can be serviced by the user.
Warranty
The same guarantee conditions apply for our factory-fitted radio system
as for new vehicles.
NKO B5 20.book Page 143 Monday, July 3, 2006 2:09 PM
Page 145 of 281

Communicating and Navigating
144
Note
A damage in the sense of the warranty must not be the result from
improper handling of the system or from unprofessional repair attempts.
In addition, no external damage must be present.
CD box in luggage compartment*
Box CD boxes are located above the CD changer* in the
left side compartment of the luggage compartment.
Insert up to six standard CDs into each CD box.
Inserting CD into the CD box
– Open the side compartment ⇒page 84, “Side compartment”.
– Pull up the velcro fastener to the bottom side of the box. – Move the desired number of CDs with standard bag into the
horizontal compartments, maximum 6 CDs.
– Carefully press the velcro fastener closed so that no CD falls out while driving and a possible damage can be prevented.
Taking CD out of the CD box
– Pull up the velcro fastener to the bottom side of the box.
– Take the desired number of CDs out of the horizontal compart- ments.
– Carefully press the velcro fastener closed so that no CD falls out while driving and a possible damage can be prevented.
– Close the side compartment ⇒page 84, “Side compartment”.
Note
We recommend that both CD boxes should be located in the left side
compartment above the CD changer. This prevents undesirable noises or
movements and/or damage to the CD box while driving.
Fig. 132 CD boxes in
luggage compartment
NKO B5 20.book Page 144 Monday, July 3, 2006 2:09 PM
Page 155 of 281

Passive Safety
154
•occupy the luggage compartment.
WARNING
•If the occupant adopts an incorrect seated position, he is
exposed to life-threatening injuries, in case he is hit by a deployed
airbag.
•Before setting off, please adopt the correct seated position and
do not change this seated positi on while the car is moving. Also
advise your occupants to adopt the correct seated position and not
to change this seated position while the car is moving.
NKO B5 20.book Page 154 Monday, July 3, 2006 2:09 PM
Page 158 of 281

Seat belts157
Using the systemSafetyDriving TipsGeneral MaintenanceBreakdown assistanceTechnical Data
Important safety information regarding
the use of seat belts
The correct use of the seat belts considerably reduces the
risk of injury!
WARNING
•The belt webbing must not be jammed in-between at any point
or twisted, or chafe against any sharp edges.
•It is important that the belt webb ing is properly routed if the seat
belts are to offer their maximum protection ⇒page 158, “How are
seat belts correctly fastened?”.
•No two persons (also not children) should ever use a single seat
belt together.
•The maximum protection which seat belts can offer is only
achieved if you are correctly seated ⇒page 151, “Correct seated
position”.
•The belt webbing must not run across solid or fragile objects
(e.g. spectacles, ball-point pens, keys etc.) as this may be a cause
of injuries.
•Bulky, loose clothing (e.g. a winter coat over a jacket) does not
allow you to be correctly seated and impairs proper operation of
the seat belts.
•It is prohibited to use clamps or other objects to adjust seat
belts (e.g. for shortening the belts for smaller persons).
•The lock tongue should only be inserted into the lock which is
the correct one for your seat. Wrong use of the safety belt will
reduce its capacity to protect and the risk of injury increases.
•The backrests of the front seats must not be tilted too far to the
rear otherwise the seatbelts can lose their effectiveness.
•The belt webbing must always be kept clean. Soiled belt
webbing may impair proper operation of the inertia reel
⇒ page 213, “Seat belts”.
•The slot of the belt tongue must not be blocked by paper or
similar objects otherwise the belt tongue will not lock in place prop-
erly.
•Inspect the seat belts regularly to ensure they are in good condi-
tion. If you find seat belts which have damage to the seat belt
webbing, seat belt connections, to the inertia reels or to the lock,
the relevant safety belt must be replaced by a specialist garage.
•The seat belts must not be removed or changed in any way. Do
not make an attempt to repair the seat belts yourself.
•Damaged seat belts which have been subjected to stress in an
accident and were therefore stretched, must be replaced - this is
best done by a specialist garage. The anchorage points of the belts
must also be inspected. The anchorage points for the belts should
also be checked.
•In certain countries it is possible to use seat belts which differ
in terms of their operation from the seat belts which are described
on the pages which follow.
WARNING (continued)
NKO B5 20.book Page 157 Monday, July 3, 2006 2:09 PM
Page 167 of 281

Airbag system
166
WARNING
•Never transport children on the front seat of a vehicle without
using a proper restraint system. If airbags are deployed in the event
of an accident, the child might suff er severe or even fatal injuries!
•For the driver and front passenger it is important to maintain a
distance of at least 25 cm from the steering wheel or dash panel
⇒ page 165, fig. 148 . Not maintaining this minimum distance will
mean that the airbag sy stem will not be able to properly protect you
- hazard! The front seats and the head restraints must always also
be correctly adjusted to match the body size of the occupant.
•It is essential to always switch off ⇒page 171, “Deactivating an
airbag” the front passenger airbag when attaching a child safety
seat on the front passenger seat where the child is seated with its
back facing in direction of travel (in some countries also when the
child is facing the direction of travel). If this is not done, there is a
risk of the child suffering severe or even fatal injuries if the front
passenger airbag is deployed. In certain countries national legal
provisions also require that the side or head passenger airbags be
deactivated. When transporting a child on the front passenger seat,
please comply with the appropriate national regulations regarding
the use of child safety seats.
•There must not by any further persons, animals or objects posi-
tioned between the front seated occupants and the deployment
area of the airbag.
•The steering wheel and the surface of the airbag module in the
dash panel on the passenger side must not be stuck onto, covered
or modified in any other way. These parts should only be cleaned
with a dry cloth or a cloth moistened with water. No objects such as
cup holders, mobile phone mounts, etc. may be attached to the
covers of the airbag modules or be located within the immediate
area.
•No modifications of any kind may be made to parts of the airbag
system. Any work on the airbag system including installing and removing system components because of other repair work (e.g.
removing the steering wheel) must only be carried out by a
specialist garage.
•Never carry out changes on the front bumper or on the body.
•Never place any objects on the surface of the front passenger
airbag in the dash panel.
Side airbag
Description of side airbags
The side airbag together with the head airbag offers
enhanced occupant protection in the event of a side colli-
sion.
WARNING (continued)
Fig. 149 Installation
position of side airbag
in driver seat
NKO B5 20.book Page 166 Monday, July 3, 2006 2:09 PM
Page 171 of 281

Airbag system
170
If the head airbag is deployed, the airbag is filled with propellant gas and
extends over the entire area of the side window including the door pillars
⇒ page 169, fig. 152 .
The protection offered by the head airbags is thus available simultane-
ously both to the front occupants of the car seated on the side on which
the accident occurs, as well as to the rear occupants. Any impact of the
head against parts of the interior or objects outside of the car, is cushioned
by the inflated head airbag. The reduction in any impact to the head and
the resultant minimizing of any movements of the head additionally reduce
the risk of injuries to the neck area. The head airbag also offers additional
protection in the case of an offset impact by covering the front door pillar.
In certain accident situations both the front airbags as well as the side and
head airbags may be deployed together.
The airbags inflate in fractions of a second and at a high speed in order to
be able to offer that additional protection in the event of an accident. A
grey white, non harmful gas is released when airbag is inflated. This is
perfectly normal and is not an indication of a fire in the vehicle.
Important safety informat ion on the head airbag
Correct use of the airbag system considerably reduces the
risk of injury!
WARNING
•It is essential to always switch off ⇒page 171, “Deactivating an
airbag” the front passenger airbag when attaching a child safety
seat on the front passenger seat where the child is seated with its
back facing in direction of travel (in some countries also when the
child is facing the direction of travel). If this is not done, there is a
risk of the child suffering severe or even fatal injuries if the front
passenger airbag is deployed. In certain countries national legal provisions also require that the side or head passenger airbags be
deactivated. When transporting a child on the front passenger seat,
please comply with the appropriat
e national regulations regarding
the use of child safety seats.
•There must not be any objects in the deployment area of the
head airbags which might prevent the airbags from inflating prop-
erly.
•Only hang light items of clothing on the clothes hooks to the
vehicle. Never leave any heavy or sharp-edged objects in the
pockets of the items of clothing. In addition, it is not permitted to
use clothes hangers for hanging up items of clothing.
•There must not be any other persons (e.g. children) or animals
between the car occupant and the deployment area of the head
airbag. In addition, none of the occupants should lean their head
out of the window when driving, or extend their arms and hands out
of the window.
•The sun visors must not be swivelled to the side windows into
the deployment area of the head airbags if any objects, such as
ball-point pens etc. are attached to them. This might result in inju-
ries to the occupants if the head airbag is deployed.
•Installing impermissible accessories in the area of the head
airbags may considerably impair the protection offered by the head
airbag in the event of it being deployed. When the deployed head
airbag is inflated, parts of the accessories fitted may in certain
circumstances be thrown into the interior of the car and cause inju-
ries to the occupants ⇒page 242, “Accessories, changes and
replacement of parts”.
•Any work on the head airbag system including installing and
removing system components because of other repair work (e.g.
removing headliner) must only be carried out by a specialist
garage.
WARNING (continued)
NKO B5 20.book Page 170 Monday, July 3, 2006 2:09 PM
Page 187 of 281

Intelligent Technology
186
The ESP warning light ⇒page 34 lights up in the instrument cluster when
there is a fault on the ESP.
Switching off
You can switch the ESP off and on again as you wish, by pressing the
button ⇒page 185, fig. 164 . The ESP warning light ⇒ page 34 lights up
in the instrument cluster when the ESP is switched off.
The ESP should normally always be switched on. It may be good practice
to switch the system off only in particular exceptional situations if you
desire wheel slip.
Examples:
•when driving with snow chains,
•when driving in deep snow or on a loose surface,
•when it is necessary to rock a car free when it has become stuck.
then you should switch on the ESP again.
WARNING
It is also not possible for the E SP to overcome the physical limits
of the vehicle. Even if a vehicle fitted with ESP you should still
always adapt your style of driving to the condition of the road
surface and the traffic situation. This particularly applies when
driving on slippery and wet roads. The increased safety offered
must not tempt you to take greater risks than otherwise - risk of an
accident!
Note
•All four wheels must be fitted with the same tyres in order to achieve
problem-free operation of the ESP. Differing rolling circumferences of the
tyres can lead to an undesirable reduction in the engine output.
•Changes to vehicle (e.g. on engine, on the brakes, on chassis or other
assignment of tyres and wheels) can influence the function of the ESP
⇒ page 242.
Traction control system (TCS)*
The traction control system prevents the driven wheels
from spinning when accelerating.
General
The TCS makes it much easier, and sometimes at all possible, to start off,
accelerate and climb a steep hill when the conditions of the road surface
are unfavourable.
Operating principle
The TCS switches on automatically when the engine is started and then
conducts a self-test. The system monitors the speeds of the driven wheels
with the aid of the ABS sensors. If the wheels are spinning, the force trans-
Fig. 165 TCS switch
NKO B5 20.book Page 186 Monday, July 3, 2006 2:09 PM
Page 188 of 281

Intelligent Technology187
Using the systemSafetyDriving TipsGeneral MaintenanceBreakdown assistanceTechnical Data
mitted to the road surface is automatically adapted by reducing the engine
speed. This occurs at all speeds.
The TCS operates in combination with the ABS
⇒page 189, “Antilock
brake system (ABS)”. The TCS will not function if a fault exists in the ABS
system.
The TCS warning light ⇒page 35 lights up in the instrument cluster when
there is a fault on the TCS.
Switching off
You can switch the TCS off and on again as you wish by pressing the
button ⇒page 186, fig. 165 . The TCS warning light ⇒page 35 lights up
in the instrument cluster when the TCS is switched off.
The TCS should normally always be switched on. It may be good practice
to switch the system off only in particular exceptional situations if you
desire wheel slip.
Examples:
•when driving with snow chains,
•when driving in deep snow or on a loose surface,
•when it is necessary to rock a car free when it has become stuck.
then you should switch on the TCS again.
The EDL ⇒page 187, “Electronic Differential Lock (EDL)” is a part of the
TCS. THE EDL operates independently of the TCS (also when the TCS
has been switched off using the TCS button).
WARNING
You should always adjust your style of driving to the conditions of
the road surface and the traffic situation. The increased safety
offered must not tempt you to take greater risks than otherwise -
risk of an accident!
Note
•All four wheels must be fitted with the same tyres in order to achieve
problem-free operation of the TCS. Differing rolling circumferences of the
tyres can lead to an undesirable reduction in the engine output.
•Changes to vehicle (e.g. on engine, on the brakes, on chassis or other
assignment of tyres and wheels) can influence the function of the TCS
⇒ page 242, “Accessories, changes and replacement of parts”.
Electronic Differential Lock (EDL)
The electronic differential lock prevents an individual
wheel from slipping.
General
The EDL makes it much easier, and sometimes at all possible, to start off,
accelerate and climb a steep hill when the conditions of the road surface
are unfavourable.
Operating principle
The EDL is activated automatically, that is without any action on the part
of the driver. It monitors the speeds of the driven wheels with the aid of the
ABS sensors. Should only one drive wheel begin spinning on a slippery
surface there will be an appreciable difference in the speed of the driven
wheels. The EDL function brakes the slipping wheel and the differential
transmits a greater driving force to the other driven wheel. This control
process is also accompanied by noises.
Overheating of the brakes
The EDL switches off automatically if unusually severe stresses exist in
order to avoid excessive heat generation in the disc brake on the wheel
which is being braked. The vehicle can continue to be driven and has the
same characteristics as a vehicle not fitted with EDL.
NKO B5 20.book Page 187 Monday, July 3, 2006 2:09 PM