child lock SKODA SUPERB 2006 1.G / (B5/3U) Owner's Manual
[x] Cancel search | Manufacturer: SKODA, Model Year: 2006, Model line: SUPERB, Model: SKODA SUPERB 2006 1.G / (B5/3U)Pages: 281, PDF Size: 12.67 MB
Page 6 of 281
Contents5
Contents
Layout of this Owner's Manual
(explanations)
. . . . . . . . . . . . . . . . . . .
Using the system . . . . . . . . . . . . . . .
Cockpit . . . . . . . . . . . . . . . . . . . . . . . . . . . . . . .
General view . . . . . . . . . . . . . . . . . . . . . . . . .
Instruments and Indicator/Warning LightsGeneral view of the instrument cluster . . . . . .
Engine revolutions counter . . . . . . . . . . . . . . .
Coolant temperature gauge . . . . . . . . . . . . . .
Fuel gauge . . . . . . . . . . . . . . . . . . . . . . . . . . .
Digital clock . . . . . . . . . . . . . . . . . . . . . . . . . .
Speedometer with counter for distance driven
Service Interval Display . . . . . . . . . . . . . . . . .
Multi-functional indicator (onboard computer)
Information display* . . . . . . . . . . . . . . . . . . . .
Auto Check Control . . . . . . . . . . . . . . . . . . . .
Warning lights . . . . . . . . . . . . . . . . . . . . . . . . .
Unlocking and locking . . . . . . . . . . . . . . . . . .
Key . . . . . . . . . . . . . . . . . . . . . . . . . . . . . . . . .
Changing the key battery . . . . . . . . . . . . . . . .
Electronic immobiliser . . . . . . . . . . . . . . .
Child safety lock . . . . . . . . . . . . . . . . . . . . . . .
Central locking system . . . . . . . . . . . . . . . . . .
Remote control . . . . . . . . . . . . . . . . . . . . . . . .
Anti-theft alarm system* . . . . . . . . . . . . . . . . .
Power windows . . . . . . . . . . . . . . . . . . . . . . .
Electric sliding/tilting roof* . . . . . . . . . . . . . . .
Lights and Visibility. . . . . . . . . . . . . . . . . . . . .
Lights . . . . . . . . . . . . . . . . . . . . . . . . . . . . . . .
Interior lighting . . . . . . . . . . . . . . . . . . . . . . . . Visibility . . . . . . . . . . . . . . . . . . . . . . . . . . . . .
Windshield wiper and wash system . . . . . . . .
Rear-view mirror . . . . . . . . . . . . . . . . . . . . . .
Seats and Stowage . . . . . . . . . . . . . . . . . . . .
Front seats . . . . . . . . . . . . . . . . . . . . . . . . . . .
Adjusting front seats manually . . . . . . . . . . . .
Adjusting front seats electrically* . . . . . . . . . .
Front passenger seat with a folding central back
rest* . . . . . . . . . . . . . . . . . . . . . . . . . . . . . . . .
Footrest at the rear* . . . . . . . . . . . . . . . . . . . .
Seat heaters* . . . . . . . . . . . . . . . . . . . . . . . . .
Pedals . . . . . . . . . . . . . . . . . . . . . . . . . . . . . .
Luggage compartment . . . . . . . . . . . . . . . . . .
The cool box behind the armrest of the rear
seats* . . . . . . . . . . . . . . . . . . . . . . . . . . . . . . .
CargoFlex folding box* . . . . . . . . . . . . . . . . . .
The roof luggage rack system . . . . . . . . . . . .
Cup holder . . . . . . . . . . . . . . . . . . . . . . . . . . .
Ashtrays . . . . . . . . . . . . . . . . . . . . . . . . . . . . .
Cigarette lighters and power sockets . . . . . . .
Storage facilities . . . . . . . . . . . . . . . . . . . . . . .
Heating and air conditioning system . . . . .
Air conditioning system . . . . . . . . . . . . . . . . .
Climatronic* (automatic air conditioning) . . . .
Starting-off and Driving. . . . . . . . . . . . . . . . .
Setting steering wheel position . . . . . . . . . . .
Ignition lock . . . . . . . . . . . . . . . . . . . . . . . . . .
Starting the engine . . . . . . . . . . . . . . . . . . . . .
Switching the engine off . . . . . . . . . . . . . . . . .
Shifting (manual gearbox) . . . . . . . . . . . . . . .
Handbrake . . . . . . . . . . . . . . . . . . . . . . . . . . .
Parking aid* . . . . . . . . . . . . . . . . . . . . . . . . . . Front and rear parking aid* . . . . . . . . . . . . . .
Cruise control system (CCS)* . . . . . . . . . . . .
Automatic gearbox*. . . . . . . . . . . . . . . . . . . .
5-speed automatic gearbox . . . . . . . . . . . . . .
Communicating and Navigating . . . . . . . . .
Multifunction steering wheel* . . . . . . . . . . . . .
CD changer* . . . . . . . . . . . . . . . . . . . . . . . . .
Mobile phone, two-way radio system and
navigation system . . . . . . . . . . . . . . . . . . . . .
Safety. . . . . . . . . . . . . . . . . . . . . . . . . . . . . .
Passive Safety . . . . . . . . . . . . . . . . . . . . . . . .
Basic information . . . . . . . . . . . . . . . . . . . . . .
Correct seated position . . . . . . . . . . . . . . . . .
Seat belts. . . . . . . . . . . . . . . . . . . . . . . . . . . . .
Why seat belts? . . . . . . . . . . . . . . . . . . . . . . .
The physical principle of a frontal collision . .
Important safety information regarding the use
of seat belts . . . . . . . . . . . . . . . . . . . . . . . . . .
How are seat belts correctly fastened? . . . . .
Belt tensioners . . . . . . . . . . . . . . . . . . . . . . . .
Airbag system. . . . . . . . . . . . . . . . . . . . . . . . .
Description of the airbag system . . . . . . . . . .
Front airbag . . . . . . . . . . . . . . . . . . . . . . . . . .
Side airbag . . . . . . . . . . . . . . . . . . . . . . . . . .
Head airbags* . . . . . . . . . . . . . . . . . . . . . . . .
Deactivating an airbag . . . . . . . . . . . . . . . . . .
8
9
11
11
13
13
14
14
15
15
16
16
18
22
24
27
38
38
39
40
40
41
46
48
49
52
56
56
61 63
65
67
71
71
72
73
78
79
80
81
81
88
91
94
96
97
99
101
108
108 11 3
120
120
121
122
123
124
125
126 127
128
131
131
137
137
141
145
149
149
149
151
155
155
156
157
158
160
162
162
164
166
169
171
NKO B5 20.book Page 5 Monday, July 3, 2006 2:09 PM
Page 7 of 281
Contents
6
Transporting children safely. . . . . . . . . . . . .
What you should know about transporting
children! . . . . . . . . . . . . . . . . . . . . . . . . . . . . .
Child seat . . . . . . . . . . . . . . . . . . . . . . . . . . . .
Attaching child safety seat . . . . . . . . . . . . . . .
Driving Tips . . . . . . . . . . . . . . . . . . . . . .
Intelligent Technology . . . . . . . . . . . . . . . . . .
Electronic stability programme (ESP)* . . . . . .
Brakes . . . . . . . . . . . . . . . . . . . . . . . . . . . . . .
Brake booster . . . . . . . . . . . . . . . . . . . . . . . .
Antilock brake system (ABS) . . . . . . . . . . . . .
Brake Assist* . . . . . . . . . . . . . . . . . . . . . . . . .
Power steering . . . . . . . . . . . . . . . . . . . . . . . .
Driving and the Environment. . . . . . . . . . . .
The first 1 500 kilometres and then afterwards
Catalytic converter . . . . . . . . . . . . . . . . . . . . .
Driving in an economical and environmentally
conscious manner . . . . . . . . . . . . . . . . . . . . .
Environmental compatibility . . . . . . . . . . . . . .
Motoring abroad . . . . . . . . . . . . . . . . . . . . . . .
Avoiding damage to your vehicle . . . . . . . . . .
Towing a trailer . . . . . . . . . . . . . . . . . . . . . . . .
Towing a trailer . . . . . . . . . . . . . . . . . . . . . . . .
Detachable towing device* . . . . . . . . . . . . . .
General Maintenance . . . . . . . . . .
Taking care of your vehicle and cleaning the
vehicle. . . . . . . . . . . . . . . . . . . . . . . . . . . . . . . .
General . . . . . . . . . . . . . . . . . . . . . . . . . . . . .
Care of the exterior of vehicle . . . . . . . . . . . .
Care of the interior of vehicle . . . . . . . . . . . . .
Fuel. . . . . . . . . . . . . . . . . . . . . . . . . . . . . . . . . .
Petrol . . . . . . . . . . . . . . . . . . . . . . . . . . . . . . .
Diesel . . . . . . . . . . . . . . . . . . . . . . . . . . . . . .
Refuelling . . . . . . . . . . . . . . . . . . . . . . . . . . .
Inspecting and Replenishing. . . . . . . . . . . .
Engine compartment . . . . . . . . . . . . . . . . . . .
Overview of the engine compartment . . . . . .
Engine oil . . . . . . . . . . . . . . . . . . . . . . . . . . . .
Cooling system . . . . . . . . . . . . . . . . . . . . . . .
Brake fluid . . . . . . . . . . . . . . . . . . . . . . . . . . .
Battery . . . . . . . . . . . . . . . . . . . . . . . . . . . . . .
Windshield washer system . . . . . . . . . . . . . .
Wheels and Tyres . . . . . . . . . . . . . . . . . . . . .
Wheels . . . . . . . . . . . . . . . . . . . . . . . . . . . . .
Accessories, changes and replacement of
parts . . . . . . . . . . . . . . . . . . . . . . . . . . . . . . . . .
Accessories and replacement parts . . . . . . .
Technical changes . . . . . . . . . . . . . . . . . . . . .
Breakdown assistance . . . . . . . .
Breakdown assistance . . . . . . . . . . . . . . . . .
First-aid box* . . . . . . . . . . . . . . . . . . . . . . . . .
Warning triangle . . . . . . . . . . . . . . . . . . . . . .
Fire extinguisher* . . . . . . . . . . . . . . . . . . . . . .
Vehicle tool kit . . . . . . . . . . . . . . . . . . . . . . . .
Spare wheel . . . . . . . . . . . . . . . . . . . . . . . . . .
Changing a wheel . . . . . . . . . . . . . . . . . . . . .
Jump-starting . . . . . . . . . . . . . . . . . . . . . . . . .
Tow-starting and towing vehicle . . . . . . . . . . .
Fuses and light bulbs . . . . . . . . . . . . . . . . . .
Electric fuses . . . . . . . . . . . . . . . . . . . . . . . . .
Bulbs . . . . . . . . . . . . . . . . . . . . . . . . . . . . . . .
Te c h n i c a l D a ta . . . . . . . . . . . . . . . . . .
General . . . . . . . . . . . . . . . . . . . . . . . . . . . . . .
Identification data . . . . . . . . . . . . . . . . . . . . .
Index . . . . . . . . . . . . . . . . . . . . . . . . . . . . . .
174
174
178
181
185
185
185
188
189
189
190
191
192
192
193
194
198
199
199
200
200
202
205
205
205
205
211 214
214
214
216
218
218
220
221
224
227
228
233
235
235
242
242
242
245
245
245
245
246
246
247
248
255
257
260
260
262
269
269
269
271
NKO B5 20.book Page 6 Monday, July 3, 2006 2:09 PM
Page 39 of 281
Unlocking and locking
38
Unlocking and locking
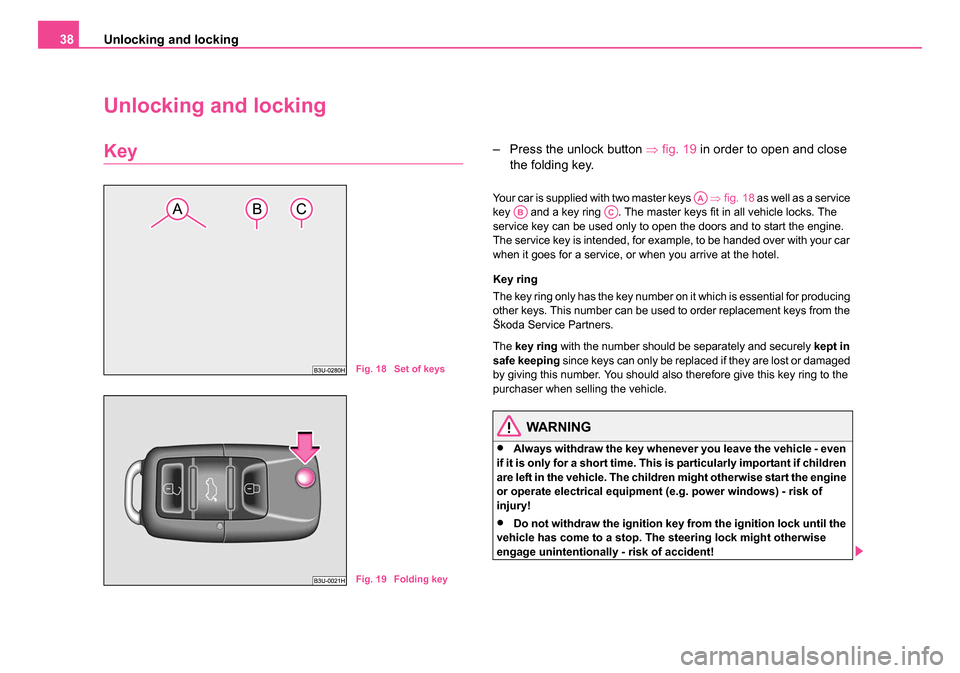
Key– Press the unlock button ⇒fig. 19 in order to open and close
the folding key.
Your car is supplied with two master keys ⇒fig. 18 as well as a service
key and a key ring . The master keys fit in all vehicle locks. The
service key can be used only to open the doors and to start the engine.
The service key is intended, for example, to be handed over with your car
when it goes for a service, or when you arrive at the hotel.
Key ring
The key ring only has the key number on it which is essential for producing
other keys. This number can be used to order replacement keys from the
Škoda Service Partners.
The key ring with the number should be separately and securely kept in
safe keeping since keys can only be replaced if they are lost or damaged
by giving this number. You should also therefore give this key ring to the
purchaser when selling the vehicle.
WARNING
•Always withdraw the key whenever you leave the vehicle - even
if it is only for a short time. This is particularly important if children
are left in the vehicle. The children might otherwise start the engine
or operate electrical equipment (e.g. power windows) - risk of
injury!
•Do not withdraw the ignition key fr om the ignition lock until the
vehicle has come to a stop. The steering lock might otherwise
engage unintentionally - risk of accident!
Fig. 18 Set of keys
Fig. 19 Folding key
AAABAC
NKO B5 20.book Page 38 Monday, July 3, 2006 2:09 PM
Page 41 of 281
Unlocking and locking
40
– Insert cover with battery in place at the rear of the transmitter housing and press both parts together.
– Insert the transmitter housing into the front part of the key so that the two parts lock into each other.
For the sake of the environment
Dispose of an old battery in accordance with environmental regulations.
Note
•The replacement battery must have the same specification as the orig-
inal battery.
•If it is still not be possible to unlock or lock the vehicle with the remote
control even after replacing the battery this means that the system has to
be synchronised ⇒page 47.
Electronic immobiliser
The electronic immobiliser prevents the vehicle being
operated by an unauthorised person.
An electronic chip is integrated in the head of the key. The immobiliser is
deactivated with the aid of this chip when the key is inserted in the ignition
lock. The electronic immobiliser is automatically activated when you with-
draw the ignition key from the lock.
Note
It is only possible to start the engine of your car with a Genuine Škoda key
with the matching code ⇒page 36.
Child safety lock
The child safety lock prevents the rear door from being
opened from the inside.
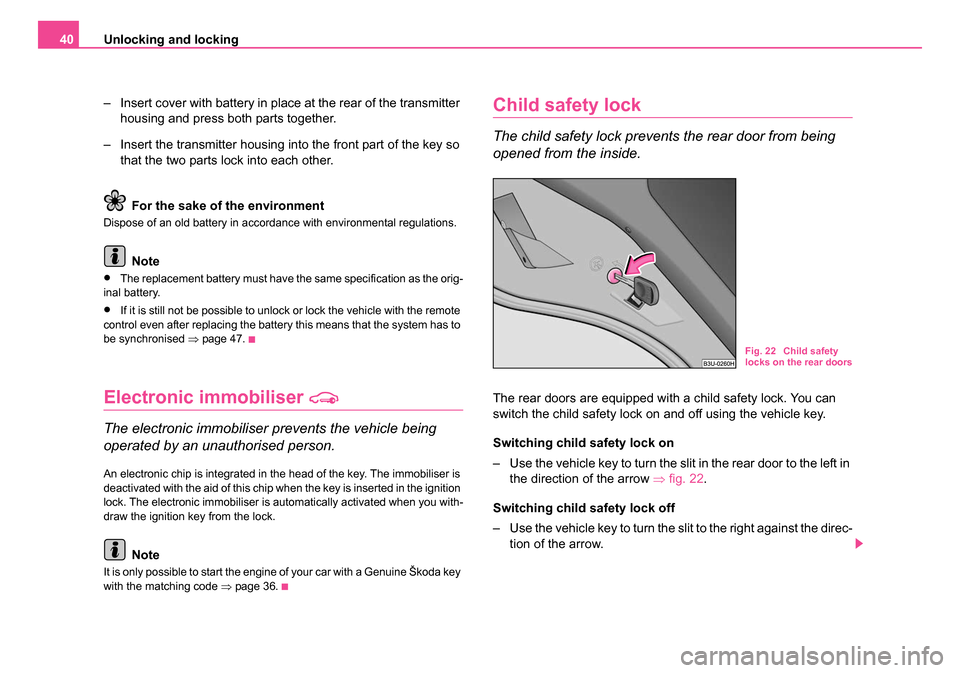
The rear doors are equipped with a child safety lock. You can
switch the child safety lock on and off using the vehicle key.
Switching child safety lock on
– Use the vehicle key to turn the slit in the rear door to the left in
the direction of the arrow ⇒fig. 22 .
Switching child safety lock off
– Use the vehicle key to turn the slit to the right against the direc- tion of the arrow.
Fig. 22 Child safety
locks on the rear doors
NKO B5 20.book Page 40 Monday, July 3, 2006 2:09 PM
Page 42 of 281
Unlocking and locking41
Using the systemSafetyDriving TipsGeneral MaintenanceBreakdown assistanceTechnical Data
So long as the child safety lock is switched on it is not possible to open the
door from the inside with the door opening lever. In this case the door can
be opened only from the outside.
Central locking system
Description
Unlocking or locking the vehicle causes
all doors to be unlocked or locked
at the same time by the central locking system. The boot lid is unlocked
when opening. It can be opened by pressing the hand grip above the
licence plate.
Operation of the central locking system is possible:
•from the outside using the vehicle key ⇒page 42
•using the buttons for the central locking system ⇒page 43
•by using the radio remote control ⇒page 46
Convenience operation of windows
One can open and close the electrically powered windows when unlocking
and locking the vehicle ⇒page 51, “Window convenience operation”. The
electric sliding/tilting roof* can only be closed by the central locking
system.
Opening a single door*
This function allows one to just unlock the driver's door. The other doors
remain locked and are only unlocked when the command is repeated. The
single door opening function can be first activated by recoding the control
unit of the central locking system. This work is undertaken by a Škoda
Service Partner can give you more information. Automatic locking*
All the doors and the boot lid are locked automatically once the car
reaches a speed of about 15 km/h.
If the ignition key is withdrawn, the car is then automatically unlocked
again. In addition, it is possible for the driver to unlock the car by pressing
the central locking button
or by pulling the door opening lever.
If you wish, your Škoda Service Partner can convert the central locking
system of your car to the automatic locking mode.
WARNING
Locking the doors prevents involuntary opening in an exceptional
situation (an accident). Locked doors prevent unwanted entry into
the vehicle from outside, for example at road crossings. Locked
doors do, however, make it more difficult for rescuers to get into
the vehicle in an emergency - danger to life!
Note
•After unlocking the vehicle see, if the securing knobs are located on all
doors at the bottom.
•In the event of an accident in which the airbags are deployed, the
locked doors are automatically unlocked in order to enable rescuers to
gain access to the vehicle.
•Should the central locking system not operate properly, you can lock
and unlock the front doors and the boot lid with the key. Emergency
unlocking of fuel filler flap ⇒page 217.
NKO B5 20.book Page 41 Monday, July 3, 2006 2:09 PM
Page 45 of 281
Unlocking and locking
44
Locking all doors and the boot lid
– Press button ⇒page 43, fig. 24 .
Unlocking all doors and the boot lid
– Press button ⇒page 43, fig. 24 . If the boot lid has been
set to the permanent locking mode, it is then not unlocked
⇒ page 45 when the button is pressed.
Unlocking fuel filler flap
– Pull the switch ⇒page 43, fig. 25 .
Unlocking the boot lid
– Pull the switch ⇒page 43, fig. 25 .
Blocking boot lid remote release button
– Turn the master key in the lock in direction of arrow ⇒page 43, fig. 25 .
– The boot lid is unlocked by turning the key in the opposite direction of the arrow.
Lock the boot lid from outside the vehicle ⇒page 45.
The following applies if you have locked your vehicle using the central
locking system ⇒page 43, fig. 24 :
•It is not possible to open the doors or the boot lid from the outside
(safety feature, e.g. when stopping at traffic lights etc.).
•You can unlock the doors individually from the inside and open them
by pulling the door opening lever.
•Once the driver door is opened it cannot be locked again (after oper-
ating the lock function in the button for the central locking switch) in order to avoid inadvertently being locked out of the vehicle. You then have to
lock a door separately after closing it.
•In the event of an accident in which the airbags are deployed, the
locked doors are automatically unlocked from the inside in order to enable
rescuers to gain access to the vehicle.
WARNING
The central locking system also operates if the ignition is switched
off. All the doors and the boot lid are locked. Children should never
be left unattended in the vehicle since it is difficult to provide
assistance from the outside when the doors are locked. Locked
doors make it difficult for rescuers to get into the vehicle in an
emergency - hazard!
Note
The door opening lever and the button for the central locking system do
not operate if the safe securing system is activated.
AA
AB
AB
AC
AD
AA
NKO B5 20.book Page 44 Monday, July 3, 2006 2:09 PM
Page 51 of 281
Unlocking and locking
50
– Pressing of the button in the driver's door down to the stop will cause the window to be opened completely, automatically.
Renewed pressing of the button causes the window to stop
immediately.
Closing a window
– A window is closed through pulling lightly on the respective button in the door. The closing process stops when one
releases the button.
– Pulling of the button in the driver's door to the stop will cause the window to be closed completey, automatically. Renewed
pulling of the button causes the window to stop immediately.
The button for the individual windows is located in the armrest of the
driver's door ⇒page 49, fig. 30 , front passenger door and in the rear
doors* ⇒page 51.
Buttons for power windows Button for power window of driver door,
Button for power window of front passenger door,
Button for power window at rear left door,
Button for power window at rear right door,
Safety pushbutton.
Safety pushbutton
You can deactivate the buttons for power windows at rear doors by
pressing the safety pushbutton ⇒page 49, fig. 30 . The buttons for
power windows at rear doors are activated again by pressing the safety
pushbutton again.
WARNING
•If you lock the car from the outside, do not leave any person in
the car as it is no longer possible to open the windows in an emer-
gency.
•The system is fitted with a force limiter. The closing process will
be stop if an obstruction is detected and the window will open
again. You should then take particular care when closing the
windows! You may otherwise suffer severe injuries as a result of
getting an arm, for example, jammed in the window!
•It is recommended to deactivate the electrically operated power
windows in the rear doors (safety pushbutton) ⇒page 49,
fig. 30 when children are being transported on the rear seats.
Note
•After switching the ignition off, it is still possible to open or close the
windows for a further 10 minutes. The automatic closing and opening
functions will not operate during this time. The power windows are
switched off completely once you open the driver or front passenger door.
•When driving always use the existing heating, air conditioning and
ventilation system for ventilating the interior of the vehicle. If the windows
are opened, dust as well as other dirt can get into the vehicle and in addi-
tion the wind noise is more at certain speeds.AA
AB
AC
AD
AS
AS
AS
AS
NKO B5 20.book Page 50 Monday, July 3, 2006 2:09 PM
Page 123 of 281
Starting-off and Driving
122
WARNING
•When driving, the ignition key must always be in the position
(ignition switched on) without the engine running. This position is
indicated by the warning lights coming on. If this is not the case, it
could result in unexpected locking of the steering wheel - risk of
accident!
•Only remove the ignition key from the ignition lock when the
vehicle has come to a standstill (put on the handbrake or select the
selector lever position P). The steering lock can engage immedi-
ately - risk of accident!
•Always withdraw the ignition key if you are going to leave the
vehicle, even for a short time. This is particularly important if chil-
dren are left in the vehicle. The children might otherwise start the
engine or operate electrical equi pment (e.g. power windows) - risk
of injury!
Starting the engine
General
You can only start the engine only using an original ignition
key.
•Place the gearshift lever into neutral (or place the selector lever to the
position P or N in the case of an automatic gearbox) and put on the hand-
brake firmly before starting the engine.
•The clutch pedal should be fully depressed when starting the engine
which means that the starter only has to crank the engine.
•Let go of the key as soon as the engine starts otherwise there may be
damage to the starter. The engine running noises may louder at first be louder for a short time
after starting the cold engine until oil pressure can be built up in the
hydraulic valve clearance compensation. This is quite normal and is not
an operating problem.
If the engine does not start ...
You can use the battery of another vehicle as a jump-start aid
⇒
page 255.
It is only possible to tow-start vehicles fitted with a manual gearbox. The
tow-starting distance must not be more than 50 metres ⇒page 257.
WARNING
•Never run the engine in non ventilated or enclosed areas. The
exhaust gases of the engine contain besides the odorless and
colourless carbon monoxide a poisonous gas - hazard! Carbon
monoxide can cause unconsciousness and death.
•Never leave your vehicle unattended with the engine running.
Caution
•The starter may only be operated (ignition key position ), if the
engine is not running. If the starter is immediately operated after switching
off the engine, the starter or the engine can be damaged.
•Avoid high engine revolutions, full throttle and high engine loads as
long as the engine has not yet reached its normal operating temperature
- risk of damaging the engine!
•Vehicles which are fitted with an exhaust gas catalytic converter
should not be tow-started over a distance of more than 50 metres.
A2
A3
NKO B5 20.book Page 122 Monday, July 3, 2006 2:09 PM
Page 126 of 281

Starting-off and Driving125
Using the systemSafetyDriving TipsGeneral MaintenanceBreakdown assistanceTechnical Data
The reversing lights will come on once reverse gear is engaged, provided
the ignition is on.
WARNING
Never engage the reverse gear when driving - risk of accident!
Note
•One should not lay the hand on the shift lever while driving the vehicle.
The pressure of the hand will be transferred to the gearshift forks in the
gearbox. This can, over a period of time, lead to early wear of the gearshift
forks.
•Depress the clutch pedal fully when changing gears, in order to avoid
unnecessary wear and damage.
Handbrake
Applying the handbrake
– Pull the handbrake lever up fully.
Releasing the handbrake
– Pull the handbrake lever up slightly and at the same time
press in the locking button ⇒fig. 118 .
– Hold the button pressed and push the handbrake lever down fully ⇒ .
The handbrake warning light lights up when the handbrake is applied,
provided the ignition is on.
A warning signal sounds and the following text appears in the display* if
you have inadvertently driven off with the handbrake applied:
"Handbrake on"
The handbrake warning is activated if you drive at a speed of more than 5
km/h for more than 3 seconds.
WARNING
•Please note that the handbrake must be fully released. A hand-
brake which is only partially released can result in the rear brakes
overheating which will have a nega tive effect on the operation of
the brake system - risk of accident! In addition this can result in
premature wear of the rear brake pads.
•Never leave children unattended in the vehicle. The children
might, for example, release the handbrake or take the vehicle out of
gear. The vehicle might then move off - risk of accident!
Fig. 118 Centre
console: Handbrake
NKO B5 20.book Page 125 Monday, July 3, 2006 2:09 PM
Page 158 of 281
Seat belts157
Using the systemSafetyDriving TipsGeneral MaintenanceBreakdown assistanceTechnical Data
Important safety information regarding
the use of seat belts
The correct use of the seat belts considerably reduces the
risk of injury!
WARNING
•The belt webbing must not be jammed in-between at any point
or twisted, or chafe against any sharp edges.
•It is important that the belt webb ing is properly routed if the seat
belts are to offer their maximum protection ⇒page 158, “How are
seat belts correctly fastened?”.
•No two persons (also not children) should ever use a single seat
belt together.
•The maximum protection which seat belts can offer is only
achieved if you are correctly seated ⇒page 151, “Correct seated
position”.
•The belt webbing must not run across solid or fragile objects
(e.g. spectacles, ball-point pens, keys etc.) as this may be a cause
of injuries.
•Bulky, loose clothing (e.g. a winter coat over a jacket) does not
allow you to be correctly seated and impairs proper operation of
the seat belts.
•It is prohibited to use clamps or other objects to adjust seat
belts (e.g. for shortening the belts for smaller persons).
•The lock tongue should only be inserted into the lock which is
the correct one for your seat. Wrong use of the safety belt will
reduce its capacity to protect and the risk of injury increases.
•The backrests of the front seats must not be tilted too far to the
rear otherwise the seatbelts can lose their effectiveness.
•The belt webbing must always be kept clean. Soiled belt
webbing may impair proper operation of the inertia reel
⇒ page 213, “Seat belts”.
•The slot of the belt tongue must not be blocked by paper or
similar objects otherwise the belt tongue will not lock in place prop-
erly.
•Inspect the seat belts regularly to ensure they are in good condi-
tion. If you find seat belts which have damage to the seat belt
webbing, seat belt connections, to the inertia reels or to the lock,
the relevant safety belt must be replaced by a specialist garage.
•The seat belts must not be removed or changed in any way. Do
not make an attempt to repair the seat belts yourself.
•Damaged seat belts which have been subjected to stress in an
accident and were therefore stretched, must be replaced - this is
best done by a specialist garage. The anchorage points of the belts
must also be inspected. The anchorage points for the belts should
also be checked.
•In certain countries it is possible to use seat belts which differ
in terms of their operation from the seat belts which are described
on the pages which follow.
WARNING (continued)
NKO B5 20.book Page 157 Monday, July 3, 2006 2:09 PM