tyre pressure SKODA SUPERB 2008 2.G / (B6/3T) User Guide
[x] Cancel search | Manufacturer: SKODA, Model Year: 2008, Model line: SUPERB, Model: SKODA SUPERB 2008 2.G / (B6/3T)Pages: 272, PDF Size: 18.25 MB
Page 193 of 272

Towing a trailer
194
Towing a trailer
To w i n g a t r a i l e r
Technical requirements
The towing device must satisfy certain technical requirements.
Your vehicle is designed primarily for tr ansporting persons and luggage. It can,
however, also be used for towing a traile r - provided certain technical equipment is
fitted.
If your vehicle has already been supplied with a factory-fitted towing device then
everything that is necessary for towing a trailer in technical terms, and in terms of
the law, has already been taken into account.
Your vehicle is fitted with a 13-pin power socket for the electrical connection
between the vehicle and trailer. If th e trailer which you wish to tow has a 7-pin
connector, you can use a suitable adapter
14) from Škoda original accessories.
This work must be carried out in accordan ce with the manufacturer's specifications
if a towing device is retrofitted.
Škoda Service Partners are familiar with de tails relating to retrofitting a towing
device and for any necessary modi fications to the cooling system.
WARNING
We recommend that you have the towing device from Škoda original acces-
sories installed by a Škoda Service Partner. He is familiar with all the relevant
details relating to retrofitting such equi pment. There is a risk of an accident
if the towing device is not properly fitted!
General Maintenance
There are a number of points to pay attention to when towing a
trailer.
Trailer load
The permissible trailer load must on no account be exceeded.
You can negotiate appropriately steeper inclines and descents if you do not make
full use of the perm issible trailer load.
The trailer loads specified only apply for altitudes up to 1 000 metres above mean
sea level. The fact that the engine power ou tput drops with increasing height due to
a lowering of air pressure and thus the abil ity to climb, means that the towed weight
must be reduced by 10% for every further increase of 1 000 metres in height above
sea level. The towed weight is the weight of the (laden) vehicle and the (laden)
trailer together. One should take this into account before driving up to higher alti-
tudes.
The trailer and drawbar load information on the type plate of the towing
device are merely test data for the tow ing device The data relating to your
vehicle, which is often less than this test data, can be found in your vehicle
registration documents.
Distribution of the load
Distribute the load in the trailer in such a way that any heavy items are located as
close as possible to the axle. Secure the items to prevent them slipping.
Tyre inflation pressure
Select the tyre inflation pressure on your vehicle for that of “fully laden”,
⇒ page 222. The inflation pressure of the tyres fitted to the trailer adjust in accord-
ance with the manufacturer's recommendation.
Exterior mirrors
You have to have additional exterior mirrors fitted if you are not able to see the
traffic behind the trailer with the standard rear-view mirrors. Both exterior mirrors
14)In some countries the adapter is supplied with the towing device.
NKO B6 20.book Page 194 Wednesday, March 26, 2008 3:15 PM
Page 221 of 272
Wheels and Tyres
222
Wheels and Tyres
Wheels
General information
•New tyres do not offer optimal grip at first and should therefore be run in for
about 500 km at a moderate speed and an appropriately cautious style of driving.
You will also profit from longer tyre life.
•The tread depth of new tyres may differ because of design features and the
configuration of the tread (d epending on the type of tyre and the manufacturer).
•Drive over curbs on the side of the road and other such obstacles slowly and,
where possible, at a right angles in order to avoid damage to tyres and wheel trims.
•Inspect your tyres from time to time for damage (punctures, cuts, splits and
bulges). Remove foreign bodi es from the tyre profile.
•Damage to tyres and wheels is frequent ly not visible. Unusual vibrations or
pulling of the vehicle to one side could be a sign of tyre damage. Please reduce
your speed immediately and stop if you suspect that a wheel is damaged.
Inspect the tyres for signs of damage (bulges, splits, etc.) If no visible damage is
present, please drive at an appropriately slow speed and carefully to the nearest
specialist garage in order to have your vehicle inspected.
•Also protect your tyres from contact with oil, grease and fuel.
•Immediately replace any dust caps of the valves which have got lost.
•Mark wheels before removing them so th at their previous direction of running
can be maintained when mounted them again.
•Always store wheels or tyres which been removed in a cool, dry and, where
possible, dark place. Tyres which are not fixed to a wheel trim should be stored
upright.
Unidirectional tyres*
The direction of rotation of the tyres is marked by arrows on the wall of the tyre. This
indicates the direction of rotation of the tyre, and it is essential that the tyres are
fitted on to run in this direction. Only then are the tyres able to provide the optimal
properties in terms of grip, low no ise, wear-and-tear and aquaplaning. Further information concerning the use of unidirectional tyres
⇒page 226.
WARNING
•New tyres during the first 500 km do not offer optimal grip and should
therefore be run appropriately - risk of accident!
•Never drive with damaged tyres - risk of accident!
Note
Please observe the various differing legal requirements regarding tyres.
Tyre life
The life of your tyres very much depends on the following points:
Tyre pressure
The working life of tyres will be shortened co nsiderably if the tyres are insufficiently
or over-inflated and this will have an advers e effect on the handling of your vehicle.
Correctly inflated tyres are of partic ular importance when travelling at high speeds .
It is therefore good to check the pressure at least once a month and also before
Fig. 195 An opened fuel filler
flap with the tyre inflation
pressure table
NKO B6 20.book Page 222 Wednesday, March 26, 2008 3:15 PM
Page 222 of 272

Wheels and Tyres223
Using the systemSafetyDriving TipsGeneral MaintenanceBreakdown assistanceTechnical Data
setting off on a long trip. Please do not
forget the spare wheel when checking the
tyres.
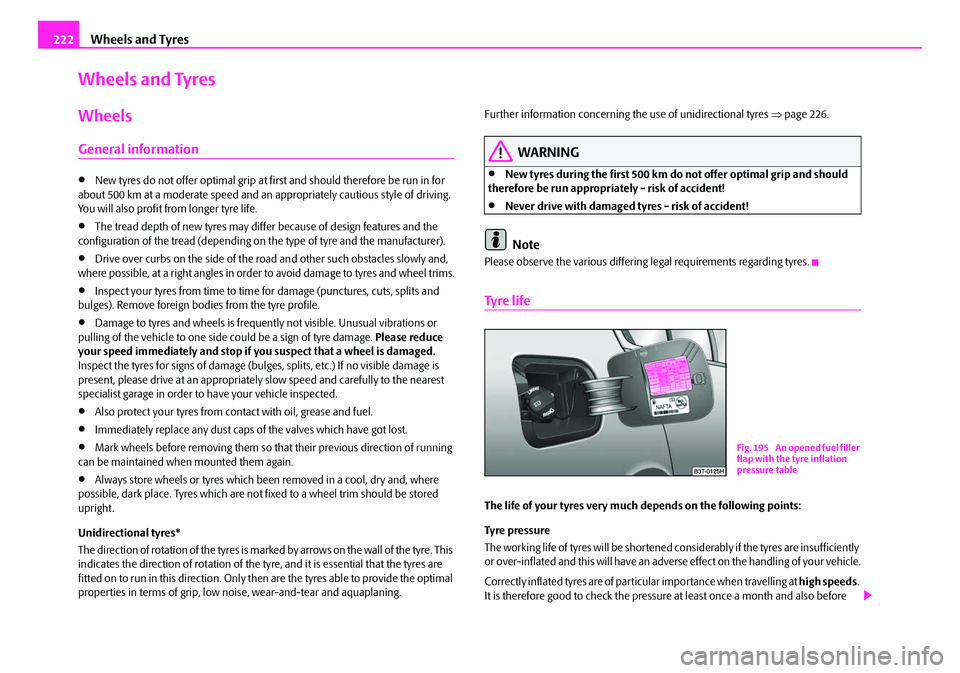
The tyre inflation pressures for summer tyres are indicated on the inside of the fuel
filler flap ⇒ page 222, fig. 195 . The inflation pressures for winter tyres are 20 kPa
(0.2 bar) higher than those for summer tyres ⇒page 226.
The tyre pressure should be at the highest pressure specified for your vehicle at all
times.
The tyre inflation pressure of the emergency spare wheel R 18 is 420 kPa (4.2 bar).
Always check the inflation pressure of ty res when cold. Do not reduce the higher
pressure of warm tyres. Adapt the inflation pressure of the tyres accordingly if your
vehicle is carrying a significantly higher payload.
Driving style
Fast cornering, sharp acceleration and braking (squealing tyres) increase wear-and-
tear on your tyres.
Balancing wheels
The wheels of a new vehicle are balanced. There are a wide range of influences
when driving which may result in an im balance and which makes themselves felt
through vibration in the steering.
You should have the wheels rebalanced since any imbalance increases wear-and-
tear on the steering, the suspension and tyres. A wheel must also be rebalanced
when a new tyre is fitted and each time a tyre is repaired.
Wheel alignment errors
Incorrect wheel alignment at the front and rear will not only increase wear-and-tear
on the tyres but will also has an adverse effect on vehicle safety. Contact your
specialist garage if you notice any unusual tyre wear.
WARNING
•If the inflation pressure is too low, the tyre must perform a greater flexing
work. At higher speeds the tyre will warm up as a result of this. This can
result in tread separation and even a tyre blowout.
•Immediately replace the damaged rims or tyres.
For the sake of the environment
Tyres which are insufficiently inflated increase your fuel consumption.
Wear indicators
The base of the tread of the original tyres has wear indicators 1.6 mm high, installed
at right angles to the direction of travel. These wear indicators are located at 6 - 8
points depending on the make and are evenly spaced around the circumference of
the tyre ⇒fig. 196 . Markings on the walls of the tyres through the letters “TWI”,
triangular symbols or other symbols identify the position of the wear indicators.
A remaining tread of just 1.6 mm, measured in the grooves of the tread next to the
wear indicators, means that your tyres have reached their legally permissible
minimum tread depth.
WARNING
•You must have your tyres replaced with new ones at the latest when the
wear indicators have been worn do wn. The legally permissible minimum
tread depth should be observed.
•Worn tyres do not provide the necessary adhesion to the road surface at
high speeds on wet roads. One could experience “aquaplaning” (uncon-
trolled movements of the vehicle - “swimming” on a wet road surface).
Fig. 196 Tyre tread with wear
indicators
NKO B6 20.book Page 223 Wednesday, March 26, 2008 3:15 PM
Page 230 of 272

Breakdown assistance231
Using the systemSafetyDriving TipsGeneral MaintenanceBreakdown assistanceTechnical Data
Spare wheel
The spare wheel lies in a well under the floor covering of the luggage compartment
and is fixed in place using special screws ⇒fig. 201 .
Before removing the spare wheel, you must take out the box with the vehicle tool
kit box ⇒page 230, fig. 200 .
One should check the inflation pressure in the spare wheel (at best when generally
checking the tyre air pressures - see sign on the fuel filler flap ⇒page 222) to
ensure that the spare wheel is always ready to use.
Temporary spare wheel
A warning label displayed on the rim of the temporary spare wheel indicates that
your vehicle is equipped with a temporary spare wheel.
Please observe the following notes when driving with a temporary spare wheel:
•After fitting on the wheel, the warning stic ker must not be concealed (e.g. by the
wheel trim).
•Do not drive with this spare wheel at more than 80 km/h - risk of accident. Avoid
accelerating at full throttle, sharp braking and fast cornering.
•The inflation pressure for this spare wheel is identical to the inflation pressure
of the standard tyres. The temporary spare wheel R 18 must have an inflation pres-
sure of 420 kPa (4.2 bar)!
•Use this spare wheel only to reach the nearest specialist garage as it is not
intended for continuous use.
•No other summer or winter tyres must be mounted on the rim of the spare
wheel R 18.
Changing a wheel
Preliminary work
The following steps should be carried out before actually changing the
wheel.
– If it is necessary to change a wheel, park the vehicle as far away as possible from the traffic flow. The place you choose should be level.
–Have all the occupants get out. While changing a wheel, the occu-
pants of the vehicle should not stan d on the road (e.g. behind a crash
barrier).
– Apply the handbrake firmly.
–Engage 1st gear or if your vehicle is fitted with an automatic gearbox,
position the selector lever into position P.
– If a trailer is coupled, uncouple it.
– Take the vehicle tool kit ⇒ page 230 and the spare wheel
⇒ page 231 out of the luggage compartment.
WARNING
•If you find yourself in flowing traffic switch on the hazard warning lights
system and place the warning triangle on the side of the road at the
prescribed distance from your vehicle while observing all national legal
provisions. In this way you are protecting not only yourself but also other
road users.
Fig. 201 Luggage compart-
ment: Spare wheel
NKO B6 20.book Page 231 Wednesday, March 26, 2008 3:15 PM
Page 231 of 272
Breakdown assistance
232
•Never start the engine with the vehicle sitting on the raised jack - danger
of suffering injury!
Caution
If you have to change a wheel on a slope first block the opposite wheel with a stone
or similar object in order to secure th e vehicle from unexpectedly rolling away.
Note
Comply with the national legal regulations.
Changing a wheel
Always change a wheel on a level surface as far as possible.
– Take off the full wheel trim* ⇒page 233 or the caps ⇒page 233.
– In the case of light alloy wheels remove the wheel trim cap ⇒page 234.
– First of all slacken the theft-de terrent wheel bolt*, afterwards the
other wheel bolts ⇒page 234.
– Jack up the vehicle until the wheel to be changed is clear of the ground
⇒ page 235.
– Unscrew the wheel bolts and place them on a clean surface (cloth, paper etc.).
– Take off the wheel.
– Fit on the spare wheel and tighten the wheel bolts slightly.
–Lower the car. – Tighten the wheel bolts firmly, al
ternately and diagonally using the
wheel wrench (crosswise) and last the theft-deterrent wheel bolt*
⇒ page 234.
– Mount the full wheel trim/w heel trim cap or the caps.
Note
•All bolts must be clean and must turn easily.
•You must never grease or oil the wheel bolts!
•When fitting on unidirectional tyres, ensure that the tyres rotate in the correct
direction ⇒page 222.
Subsequent steps
After changing the wheel, you must perform the following steps.
– Stow and attach the replaced wheel in the spare wheel well using the
special screw ⇒page 231, fig. 201 .
– Stow the vehicle tool kit in the space provided.
– Check the tyre pressure on the spare wheel just mounted as soon as
possible.
– Have the tightening torque of the wheel bolts checked with a torque
wrench as soon as possible. Steel and light alloy wheels must be tight-
ened to a tightening torque of 120 Nm.
– Have the defective tyre repaired as soon as possible.
WARNING
It is necessary to observe the guidelines given on ⇒page 224 if the vehicle is
subsequently fitted with tyres which are different to those it was fitted with
at the works.
WARNING (continued)
NKO B6 20.book Page 232 Wednesday, March 26, 2008 3:15 PM
Page 232 of 272

Breakdown assistance233
Using the systemSafetyDriving TipsGeneral MaintenanceBreakdown assistanceTechnical Data
Note
•If you find, when changing the wheel, that the wheel bolts are corroded and
difficult to turn, the bolts mu st be replaced before checking the tightening torque.
•Drive cautiously and only at a moderate speed to a workshop where the tight-
ening torque can be checked.
Full wheel trim*
Pulling off
– Hook the clamp found in the vehicle tool kit into the reinforced edge of the full wheel trim.
– Push the wheel key through the clamp, support the wheel key at the tyre and pull off the wheel trim.
Installing
– First press the full wheel trim onto the wheel at the valve opening provided. Then press the full wheel trim into the wheel in such a way
that its entire circumference locks correctly in place.
Caution
•Use the pressure of your hand, do not knock on the full wheel trim! Heavy
knocks mainly on the points where the full wheel trim has not been inserted into
the wheel, can result in damage to the guide and centering elements of the full
wheel trim.
•First check for yourself that the th eft-deterrent wheel bolt is located
⇒ page 235, “Securing wheels against being stolen*” in the hole in the area of the
valve before fitting the full wheel trim onto a steel wheel which is attached with a
theft-deterrent wheel bolt.
Wheel bolts with caps*
Pulling off
– Push the plastic clip sufficiently fa r onto the cap until the inner catches
of the clip are positioned at the collar of the cap and detach the cap
⇒ fig. 202 .
Installing
– Push the caps fully onto the wheel bolts.
The caps are located in the we ll of the luggage compartment.
Fig. 202 Removing the cap.
NKO B6 20.book Page 233 Wednesday, March 26, 2008 3:15 PM
Page 244 of 272
Fuses and light bulbs245
Using the systemSafetyDriving TipsGeneral MaintenanceBreakdown assistanceTechnical Data
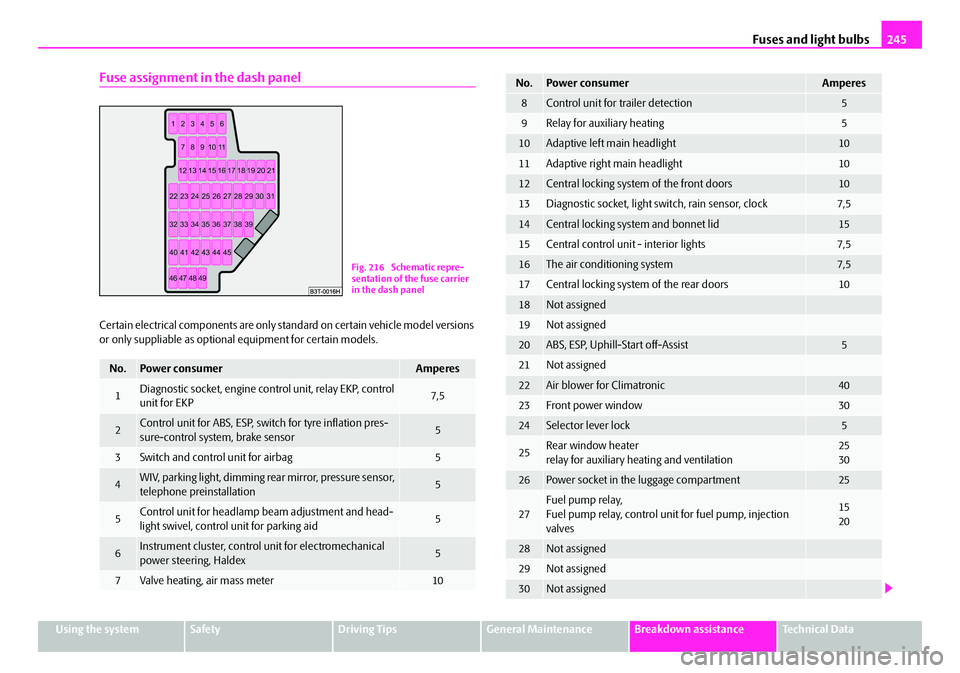
Fuse assignment in the dash panel
Certain electrical components are only standard on certain vehicle model versions
or only suppliable as optional equipment for certain models.
No.Power consumerAmperes
1Diagnostic socket, engine cont rol unit, relay EKP, control
unit for EKP7,5
2Control unit for ABS, ESP, swit ch for tyre inflation pres-
sure-control system, brake sensor5
3Switch and control unit for airbag5
4WIV, parking light, dimming rear mirror, pressure sensor,
telephone preinstallation5
5Control unit for headlamp beam adjustment and head-
light swivel, control unit for parking aid5
6Instrument cluster, control unit for electromechanical
power steering, Haldex5
7Valve heating, air mass meter10
Fig. 216 Schematic repre-
sentation of the fuse carrier
in the dash panel
8Control unit for trailer detection5
9Relay for auxiliary heating5
10Adaptive left main headlight10
11Adaptive right main headlight10
12Central locking system of the front doors10
13Diagnostic socket, light switch, rain sensor, clock7,5
14Central locking system and bonnet lid15
15Central control unit - interior lights7,5
16The air conditioning system7,5
17Central locking system of the rear doors10
18Not assigned
19Not assigned
20ABS, ESP, Uphill-Start off-Assist5
21Not assigned
22Air blower for Climatronic40
23Front power window30
24Selector lever lock5
25Rear window heater
relay for auxiliary heating and ventilation25
30
26Power socket in the luggage compartment25
27Fuel pump relay,
Fuel pump relay, control unit for fuel pump, injection
valves15
20
28Not assigned
29Not assigned
30Not assigned
No.Power consumerAmperes
NKO B6 20.book Page 245 Wednesday, March 26, 2008 3:15 PM
Page 255 of 272

Technical Data
256
Vehicle data sticker
The vehicle data sticker ⇒page 255, fig. 231 is located on the floor of the luggage
compartment and is also stated in the Service schedule.
The vehicle data sticker co ntains the following data:
Vehicle identification number (VIN).
Vehicle type.
Gearbox code, paint number, interior equipment number, engine output,
engine code.
Partial description of the vehicle.
7GG - vehicles with DPF ⇒page 186.
Vehicle identification number (VIN)
The vehicle identification num ber - VIN (vehicle body number) is stamped into the
engine compartment on the right hand shoc k absorber dome. This number is also
located on a sign on the lower left hand edge below the windscreen (together with
a VIN bar code).
Engine number
The engine number is stamped into the engine block.
Type plate (production plate)
Is located on the left midd le pillar of the bodywork.
Homologation sign
The homologation sign is located on the lo ck carrier. Vehicles for certain countries
do not have an homologation sign.
Sticker on inside of fuel filler flap
The sticker is affixed to the inside of the fuel filler flap. The sticker contains the
following data:
•The prescribed types of fuel,
•Tyre si z e,
•Tyre pressure.
Fuel consumption according to the regulations
(99/100/EU)
Depending on the range of the special equipment, style of driving, traffic situation,
weather influences and vehi cle condition, the consumption values which in prac-
tice result when using the vehicle ca n deviate from the indicated values.
Urban traffic
The consumption measurement in urban traf fic begins with starting of the cold
engine. Afterwards the normal urban traffic is simulated.
Non-urban traffic
For the consumption measurement in non-ur ban traffic the vehicle, as in daily
motoring, is accelerated and braked several times in all gears. The vehicle speed
changes within the range from 0 to 120 km/h.
Combined traffic
The consumption value in the combined traf fic consists of 37% from the value for
the urban traffic and of 63% from the value for the non-urban traffic.
Note
•Please note that the information stated in the official vehicle registration
documents always takes priority.
A1
A2
A3
A4
A5
NKO B6 20.book Page 256 Wednesday, March 26, 2008 3:15 PM
Page 269 of 272

Index
270
Towing a trailer . . . . . . . . . . . . . . . . . . . . . . . . . . . . . . 194
Towing device . . . . . . . . . . . . . . . . . . . . . . . . . . . . . . . 196
Towing protection monitoring . . . . . . . . . . . . . . . . . 46
towing vehicle . . . . . . . . . . . . . . . . . . . . . . . . . . . . . . . 237
Tow-starting . . . . . . . . . . . . . . . . . . . . . . . . . . . . . . . . 237
Tow-starting and towing vehicle
Automatic gearbox . . . . . . . . . . . . . . . . . . . . . . . 128
Traction Control System . . . . . . . . . . . . . . . . . . . . . . 181
Traction control system (TCS) Warning light . . . . . . . . . . . . . . . . . . . . . . . . . . . . . 31
Trailer . . . . . . . . . . . . . . . . . . . . . . . . . . . . . . . . . . . . . . 194 General Maintenance . . . . . . . . . . . . . . . . . . . . 194
Transporting children safely . . . . . . . . . . . . . . . . . . 171
Tread depth . . . . . . . . . . . . . . . . . . . . . . . . . . . . . . . . . 223
Turn signal lights . . . . . . . . . . . . . . . . . . . . . . . . . . . . . 60 Warning light . . . . . . . . . . . . . . . . . . . . . . . . . . . . . 27
Twindoor . . . . . . . . . . . . . . . . . . . . . . . . . . . . . . . . . . . . 41
Two-way radio systems . . . . . . . . . . . . . . . . . . . . . . 145
Tyre . . . . . . . . . . . . . . . . . . . . . . . . . . . . . . . . . . . . . . . . 222
Tyre inflation pressure Warning light . . . . . . . . . . . . . . . . . . . . . . . . . . . . . 32
Tyres Winter tyres . . . . . . . . . . . . . . . . . . . . . . . . . . . . . 226
U
Underbody protection . . . . . . . . . . . . . . . . . . . . . . . 201
Unlocking . . . . . . . . . . . . . . . . . . . . . . . . . . . . . . . . . . . . 38Remote control . . . . . . . . . . . . . . . . . . . . . . . . . . . 44
Uphill-Start off-Assist . . . . . . . . . . . . . . . . . . . . . . . . 184
V
Vanity mirror . . . . . . . . . . . . . . . . . . . . . . . . . . . . . . . . . . 64
Vehicle tool kit . . . . . . . . . . . . . . . . . . . . . . . . . . . . . . 230
Ventilation Auxiliary ventilation . . . . . . . . . . . . . . . . . . . . . . 106
Visors . . . . . . . . . . . . . . . . . . . . . . . . . . . . . . . . . . . . . . . . 64
W
Warning lights . . . . . . . . . . . . . . . . . . . . . . . . . . . . . . . . 26
Warning symbols . . . . . . . . . . . . . . . . . . . . . . . . . . . . . . 26
Warning triangle . . . . . . . . . . . . . . . . . . . . . . . . . . . . 229
Washing . . . . . . . . . . . . . . . . . . . . . . . . . . . . . . . . . . . . 198 with a high-pressure cleaner . . . . . . . . . . . . . . 198
Washing the vehicle . . . . . . . . . . . . . . . . . . . . . . . . . 197
Washing vehicle by hand . . . . . . . . . . . . . . . . . . . . 198
Wax treatment . . . . . . . . . . . . . . . . . . . . . . . . . . . . . . 199
Wheel Changing . . . . . . . . . . . . . . . . . . . . . . . . . . . . . . . 231
Spare . . . . . . . . . . . . . . . . . . . . . . . . . . . . . . . . . . . 231
Wheel bolts . . . . . . . . . . . . . . . . . . . . . . . . . . . . . . . . . 225
Wheel trim . . . . . . . . . . . . . . . . . . . . . . . . . . . . . 222, 233
Wheels . . . . . . . . . . . . . . . . . . . . . . . . . . . . . . . . . . . . . 222
Window . . . . . . . . . . . . . . . . . . . . . . . . . . . . . . . . . . . . . . 47
Windows de-icing . . . . . . . . . . . . . . . . . . . . . . . . . . . . . . . . . 200
Windscreen washer nozzles . . . . . . . . . . . . . . . . . . . . 65
Windshield washer fluid reservoir . . . . . . . . . . . . 220 Warning light . . . . . . . . . . . . . . . . . . . . . . . . . . . . . . 34
Windshield washer system . . . . . . . . . . . . . . . . . . . 220
Windshield wiper . . . . . . . . . . . . . . . . . . . . . . . . . . . . . 65 Winter tyres . . . . . . . . . . . . . . . . . . . . . . . . . . . . . . . . . 226
Wiper blades
Replacing the wiper blades . . . . . . . . . . . . . . . . . 67
X
Xenon headlights . . . . . . . . . . . . . . . . . . . . . . . . . . . . 246
NKO B6 20.book Page 270 Wednesday, March 26, 2008 3:15 PM