sensor SKODA SUPERB 2008 Owner´s Manual
[x] Cancel search | Manufacturer: SKODA, Model Year: 2008, Model line: SUPERB, Model: SKODA SUPERB 2008Pages: 252, PDF Size: 16.33 MB
Page 75 of 252
Only the rear fog light on the trailer illuminates if the vehicle has a factory fit-
ted towing device or a towing device from ŠKODA original accessories and it is
driven with a trailer.
COMING HOME / LEAVING HOME
Read and observe
on page 67 first.
COMING HOME (hereinafter referred to only as function) switches the light au-
tomatically for a short time after leaving the vehicle.
LEAVING HOME (hereinafter referred to only as function) switches the light au-
tomatically for a short time when approaching the vehicle.
The lights are switched on automatically if the following conditions are met. The light switch is in position
» Fig. 51 on page 70 .
The visibility in the vehicle environment is reduced.
The ignition is switched off.
The parking aid is activated.
The function is switched on (the driver's door is opened / the car is un-
locked with the remote control).
The function switches on the following light, depending on the equipment
fitted.
› Parking lights
› Low beam
› Entry lighting in the exterior mirrors
› Licence plate light
Poorer visibility is evaluated by sensor mounted in the holder of the interior
mirror.
COMING HOME
The light turns on automatically when you open the driver's door on (within 60
seconds of turning off the ignition).
The light turns off 10 seconds after closing all the doors and the boot lid or af-
ter the pre-set time has expired.
If a door or the boot lid remains open, the light goes out after 60 seconds.
LEAVING HOME
The light turns on automatically after the vehicle is unlocked with the remote
control.
The light turns off after 10 seconds or after a pre-set time or after the vehicle
is locked.
Activate/deactivate the function
The functions and settings of the illumination time can be activated/deactiva-
ted via the MAXI DOT display in the menu items Coming Home or Leaving
Home » page 47 .
CAUTION
■
Do not attach any stickers or similar objects in front of the light sensor on
the windscreen. This can impair its function or reliability.■
If this function is activated constantly, the battery will be heavily discharged
particularly in short-haul travel.
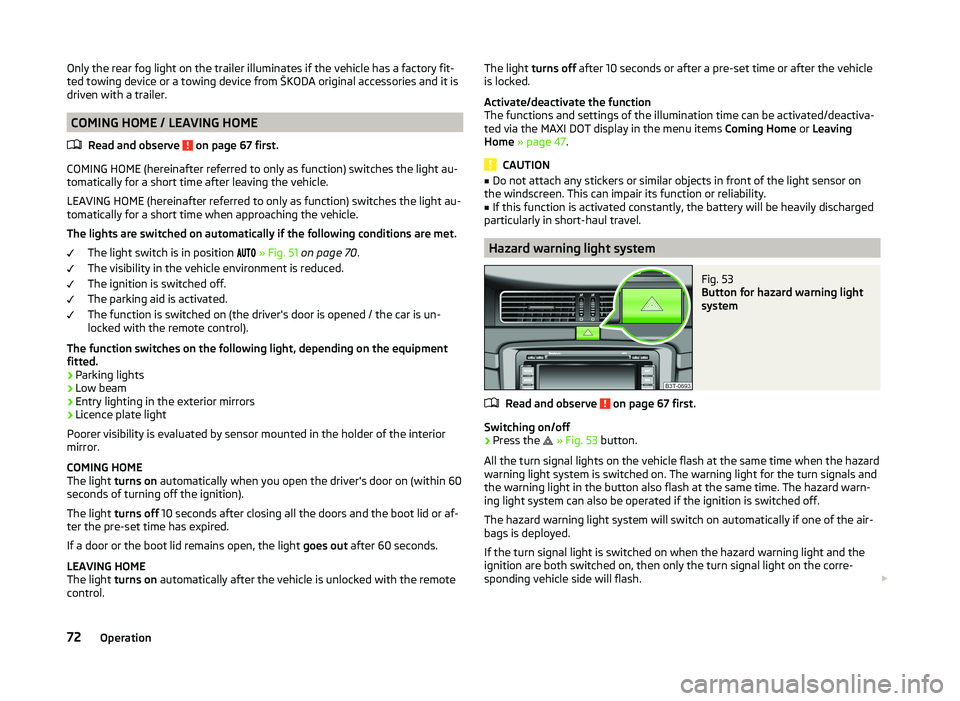
Hazard warning light system
Fig. 53
Button for hazard warning light
system
Read and observe on page 67 first.
Switching on/off
›
Press the
» Fig. 53 button.
All the turn signal lights on the vehicle flash at the same time when the hazard
warning light system is switched on. The warning light for the turn signals and
the warning light in the button also flash at the same time. The hazard warn-
ing light system can also be operated if the ignition is switched off.
The hazard warning light system will switch on automatically if one of the air-
bags is deployed.
If the turn signal light is switched on when the hazard warning light and the
ignition are both switched on, then only the turn signal light on the corre-
sponding vehicle side will flash.
72Operation
Page 82 of 252
Headlight cleaning systemRead and observe
and on page 77 first.
After the ignition is switched on, the headlights are always cleaned at the first
and after every tenth spray of the windscreen (setting
5
» Fig. 63 on
page 78 ), when the low beam or main beam is switched on.
You should remove stubborn dirt (such as insect residues) from the headlight
lenses at regular intervals, for example when refuelling. The following guide-
lines must be observed » page 179, Headlight lenses .
To ensure the proper operation of the cleaning system during the winter, any
snow should be removed from the washer nozzle fixtures and ice should be
cleared with a de-icing spray.
CAUTION
Never remove the nozzles from the headlight cleaning system by hand – there
is risk of damage.
Rear mirror
Introduction
This chapter contains information on the following subjects:
Interior mirror
79
Exterior mirrors
80WARNING■ Make sure that the mirror is not covered by ice, snow, condensation or
other objects.■
Convex (curved outward) or aspheric exterior mirrors increase the field of
vision. They do, however, make objects appear smaller in the mirror. These
mirrors are therefore only of limited use for estimating distances to the fol-
lowing vehicles.
■
Whenever possible use the interior mirror for estimating the distances to
the following vehicles.
WARNINGThe mirrors with automatic dimming contain an electrolyte liquid which can
escape if mirror glass is broken.■
The leaking electrolytic fluid can irritate the skin, eyes and respiratory
system. Immediately seek out fresh air and leave the vehicle. If this is not
possible, at least open the window.
■
If you swallow electrolytic fluid, seek medical assistance immediately.
■
If your eyes or skin come into contact with the electrolytic fluid, immedi-
ately wash the affected area for several minutes plenty of water. Then con-
sult a doctor immediately.
Interior mirror
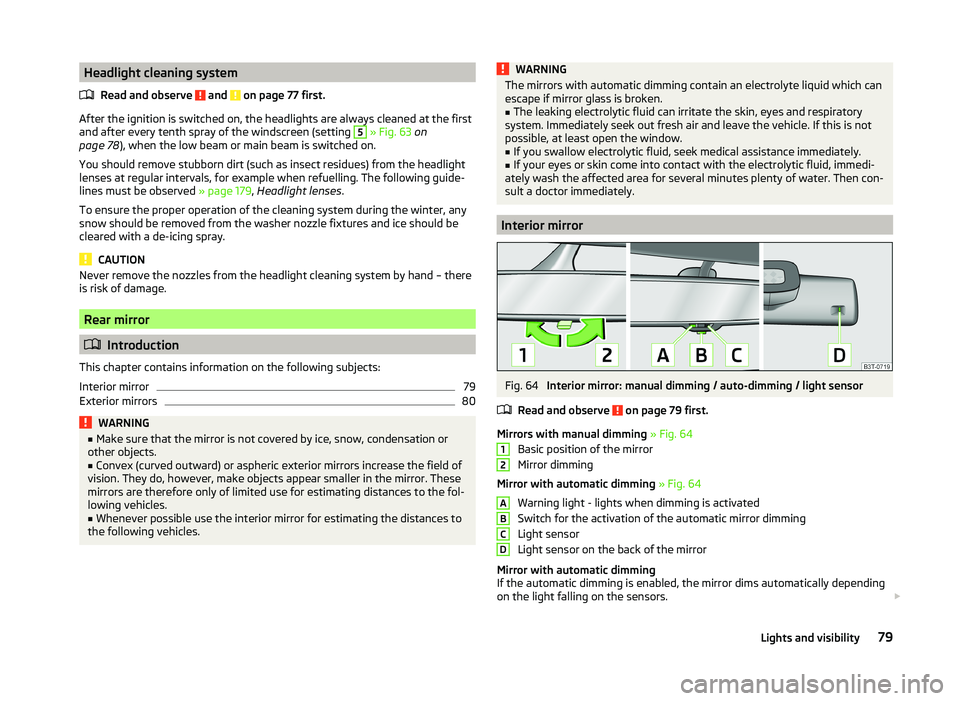
Fig. 64
Interior mirror: manual dimming / auto-dimming / light sensor
Read and observe
on page 79 first.
Mirrors with manual dimming » Fig. 64
Basic position of the mirror
Mirror dimming
Mirror with automatic dimming » Fig. 64
Warning light - lights when dimming is activated
Switch for the activation of the automatic mirror dimming
Light sensor
Light sensor on the back of the mirror
Mirror with automatic dimming
If the automatic dimming is enabled, the mirror dims automatically depending
on the light falling on the sensors.
12ABCD79Lights and visibility
Page 118 of 252
Climatronic (automatic air conditioning system)
Introduction
This chapter contains information on the following subjects:
Control elements
115
automatic mode
116
Switching the cooling system on/off
116
Setting the temperature
116
Recirculation mode - Version 1
117
Recirculation mode - Version 2
117
Controlling blower
118
Defrosting windscreen
118
The Climatronic in automatic mode ensures the best possible setting for the
temperature of the air flowing out, the blower stage and air distribution.
The system also takes sunlight into account, which eliminates the need to al-
ter the settings manually.
The cooling system operates only if the following conditions are met. The cooling system is switched on » page 112.
The engine is running.
The outside temperature is above approximately +2 °C.
The blower is switched on.
The cooling system is switched off at a high coolant temperature in order to
provide cooling at a high load of the engine.
Aeration of the vehicle when ignition is switched off
On models fitted with power sliding/tilting roof with solar cells, the fresh air
blower is automatically switched over to “solar mode” if the sun rays are suffi- cient after switching off the ignition. The solar cells on the sliding/tilting roof
deliver power for the fresh air blower. This supplies the interior of the car with
fresh air.
For an optimum ventilation, the air outlet vents 2 and 3 must be
opened » Fig. 123 on page 110 .
The ventilation functions only when the sliding/tilting roof is fully closed.
Note■ We recommend that you have Climatronic cleaned by a specialist garage
once every year.■
During operation of the Climatronic, an increase in engine idle speed can oc-
cur under certain circumstances in order to ensure adequate heating comfort.
■
On vehicles equipped with a factory fitted radio or radio navigation system,
the Climatronic information is also shown on their displays. This function can
be switched off, see » operating instructions for the radio or navigation sys-
tem .
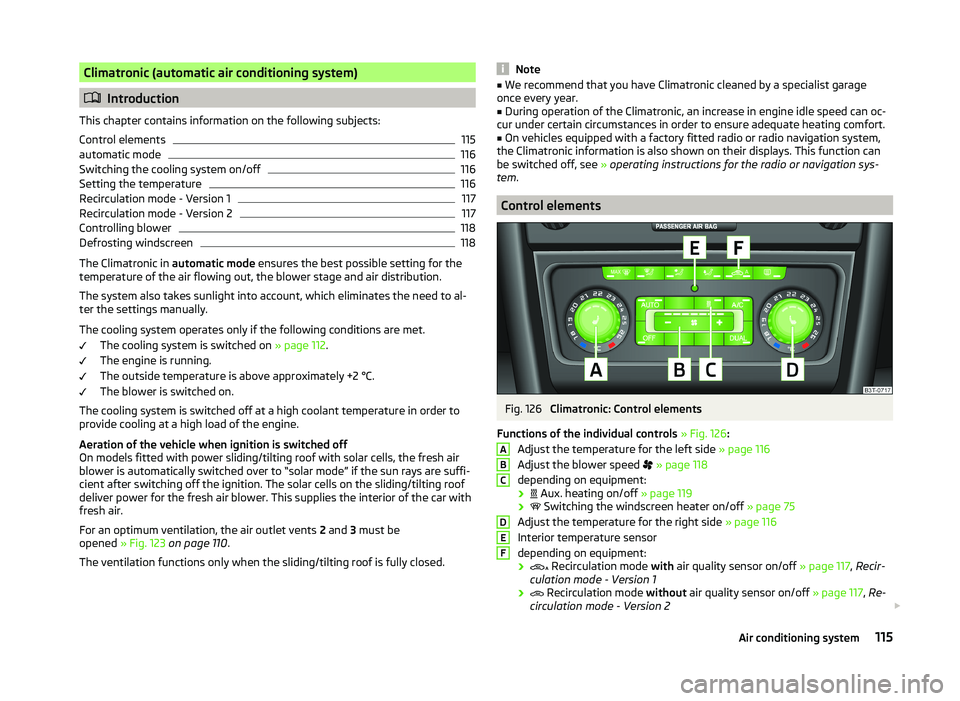
Control elements
Fig. 126
Climatronic: Control elements
Functions of the individual controls » Fig. 126 :
Adjust the temperature for the left side » page 116
Adjust the blower speed
» page 118
depending on equipment:
›
Aux. heating on/off
» page 119
›
Switching the windscreen heater on/off
» page 75
Adjust the temperature for the right side » page 116
Interior temperature sensor
depending on equipment:
›
Recirculation mode
with air quality sensor on/off » page 117, Recir-
culation mode - Version 1
›
Recirculation mode
without air quality sensor on/off » page 117, Re-
circulation mode - Version 2
ABCDEF115Air conditioning system
Page 119 of 252
Switch the intensive windscreen heater on/off
Air flow to the windows
Air flow to the upper body
Air flow in the footwell
Switching the rear window heater on/off » page 75
Control the seat heater on the front left seat » page 85
Switching automatic mode on » page 116
Switching Climatronic system off
Switch the cooling system on/off » page 116
Switch the temperature setting in Dual mode on/off » page 116
Control the seat heater on the front right seat » page 85
Note
Do not stick anything on or cover the interior temperature sensor E, other-
wise it could have an unfavourable effect on the Climatronic.
automatic mode
The automatic mode is used in order to maintain a constant temperature and
to demist the windows in the interior of the car.
Recommended setting for all periods of the year
›
Set the required temperature between +18 °C and +26 °C: we recommend 22
°C.
›
Press the button
» Fig. 126 on page 115 .
›
Set the air outlet vents 2 and 3 » Fig. 123 on page 110 so that the air flow is
directed slightly upwards.
After pressing, a warning light in the top right or left corner of the button
illuminates, depending on which mode was last selected.
If the warning light in the top right corner of the button illuminates, the
Climatronic operates in “HIGH”-mode.
The “HIGH” mode is the standard setting of the Climatronic.
Upon pressing the button again, the Climatronic switches to “LOW”-mode
and the warning light in the top left corner illuminates. The Climatronic uses
only in this mode the lower blower speed. However taking into account the
noise level, this is more comfortable, yet be aware that the effectiveness of
the air conditioning system is reduced particularly if the vehicle is fully occu-
pied.
By pressing the button
again, it is changed to “HIGH”-mode.
Automatic mode can be switched off by pressing any of the air distribution
buttons or by increasing/decreasing the blower speed.
Switching the cooling system on/off
›
Press the button
.
The warning light in the button illuminates.
›
Press button
once more.
The warning light in the button goes out.
After the cooling system is switched off, only the ventilation and heating func-
tion remains active whereby the minimum temperature that can be reached is
the outside temperature.
Setting the temperature
The interior temperature for the left and right side can be set separately or to-
gether.
For both sides
›
Turn the control dial
A
» Fig. 126 on page 115 to the left or right to increase
or decrease the temperature.
The warning light in the button does not illuminate.
For the right side
›
Turn the control dial
D
» Fig. 126 on page 115 to the left or right to increase
or decrease the temperature.
The warning light in the button illuminates.
If the warning light in the symbol button is lit, the temperature for both
sides cannot be set with the control dial
A
. This function can be restored by
pressing the symbol button . The warning light in the button goes out.
The interior temperature can be set between +18 ℃ and +26 ℃. The interior
temperature is regulated automatically within this range.
If a temperature lower than +18 °C is selected, a blue symbol illuminates at the start of the numerical scale.
If a temperature higher than +26 °C is selected, a red symbol illuminates at the
start of the numerical scale.
116Operation
Page 120 of 252
At both end positions, Climatronic functions at maximum cooling/heating out-
put and the temperature is not regulated.
CAUTION
Lengthy and uneven distribution of the air flow out of the vents (especially
around the feet) and large differences in temperature, for example, when get-
ting out of the vehicle, can cause susceptible individuals to catch a cold.
Recirculation mode - Version 1
Recirculated air mode prevents polluted air outside the vehicle from getting in-
to the vehicle, for example when driving through a tunnel or when standing in
a traffic jam.
If a considerable increase in concentration of pollutants is recognised by the air quality sensor , recirculated air mode will temporarily be switched off.
If the concentration of pollutants decreases to the normal level, the air distri-
bution control is automatically switched off so that fresh air can be guided into
the vehicle interior.
In recirculated air mode air is sucked out of the interior of the vehicle and then
fed back into the interior.
When the automatic air distribution control is switched on, an air quality sen-
sor measures the concentration of pollutants in the drawn in air.
Switching recirculated air mode on
›
Repeatedly press the button until the warning light on the
left side of
the button is illuminated.
Switch on automatic air distribution control
›
Repeatedly press the button until the warning light on the
right-hand
side of the button illuminates.
Switch off automatic air distribution control temporarily
If the air quality sensor does not switch on automatic recirculated air mode
when there is an unpleasant smell, you can switch in on manually.
›
Press the button.
The warning light illuminates in the button on the left side.
Switching recirculated air mode off
›
Press the button or press the symbol button
again until the warning
lights in the button go out.
WARNINGDo not leave recirculated air mode on over a longer period of time, as
“stale” air can cause fatigue of the driver and passengers, reduce attention
levels and also cause the windows to mist up. The risk of having an acci-
dent increases. Switch off recirculated air mode as soon as the windows
start to mist up.
Note
■ As soon as the windscreen mists up, press the symbol button . Press the
button once the windscreen has demisted.■
The automatic air distribution control operates only if the outside tempera-
ture is higher than approx. 2 °C.
Recirculation mode - Version 2
Recirculated air mode prevents polluted air outside the vehicle from getting in-
to the vehicle, for example when driving through a tunnel or when standing in
a traffic jam.
In recirculated air mode air is sucked out of the interior of the vehicle and then
fed back into the interior.
The air recirculation mode is automatically activated after the ignition is
switched if it was on before the ignition was turned off. The warning light in the button illuminates.
Switch off / on
›
Press the
button.
The warning light in the button goes out.
›
Press the
button again.
The warning light in the button illuminates.
WARNINGDo not leave recirculated air mode on over a longer period of time, as
“stale” air can cause fatigue of the driver and passengers, reduce attention
levels and also cause the windows to mist up. The risk of having an acci-
dent increases. Switch off recirculated air mode as soon as the windows
start to mist up. 117Air conditioning system
Page 159 of 252
The ABS is activated faster and more effectively with the intervention of the
HBA.
Hill Hold Control (HHC)
Read and observe
and on page 154 first.
When driving on slopes, HHC allows you to move your foot from the brake ped-al to the accelerator pedal without having to use the handbrake.
The system holds the brake pressure produced by the activation of the brake pedal for approx. 2 seconds after the brake pedal is released.
The brake pressure drops gradually the more you operate the accelerator ped-
al. If the vehicle does not start off within 2 seconds, it starts to roll back.
HHC is active on slopes of >5 % when the driver door is closed. HHC is always only active on slopes when in forward or reverse start off. When driving down-
hill, it is inactive.
Parking aid
Introduction
This chapter contains information on the following subjects:
Function
157
Activation/deactivation
157WARNING■ The parking aid is not a substitute for the driver paying proper attention
and it is always the driver's responsibility to take care when reversing the
vehicle or carrying out similar manoeuvres. Pay particular attention to small
children and animals as they may not be recognised by the system sensors.■
Before reversing, you should make sure that there are no small obstacles,
such as rocks, thin posts, trailer drawbars etc. in front or behind your vehi-
cle. Such obstacles may not be recognised by the system sensors.
■
Under certain circumstances, surfaces of certain objects and types of
clothing cannot reflect the system signals. Thus, these objects or people
who wear such clothing are not recognised by the System sensors.
■
External sound sources can have a detrimental effect on the system. Un-
der adverse conditions, this may cause objects or people to not be recog-
nised by the system.
CAUTION■ If a warning signal sounds for about 3 seconds after activating the system
and there is no obstacle close to your car, this indicates a system fault. The
fault is also indicated by the symbol
flashing in the button » Fig. 148 on
page 157 . Seek help from a specialist garage.■
The sensors must be kept clean (free of ice, etc.) to enable the system to op-
erate properly.
■
Under adverse weather conditions (heavy rain, water vapour, very low or
high temperatures etc.), the system function may be limited - “incorrect recog-
nition of obstacle”.
■
Additionally installed accessories such as e.g. bicycle carriers can impair the
system function.
Note
■ The signal tones for front obstacle recognition are factory-set to be higher
than for rear obstacle recognition.■
If not all fields around the vehicle are shown after the system is activated,
the vehicle will need to be moved a few metres forwards or in reverse.
■
The sound of the park assist can be adjusted via the MAXI DOT display in the
Assistants menu option » page 47.
■
If the system is activated and the selector lever of the automatic gearbox is
in position P (the vehicle cannot move), the warning tone is interrupted and no
obstacles are displayed.
156Driving
Page 160 of 252
FunctionFig. 148
Range of sensors / system button
Read and observe
and on page 156 first.
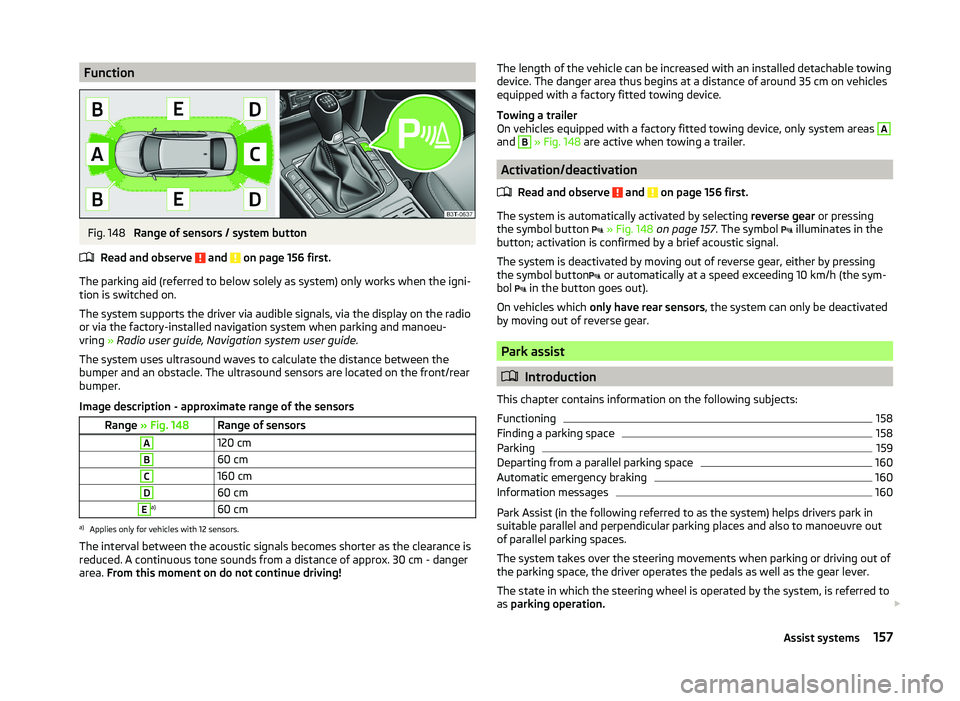
The parking aid (referred to below solely as system) only works when the igni-
tion is switched on.
The system supports the driver via audible signals, via the display on the radio
or via the factory-installed navigation system when parking and manoeu-
vring » Radio user guide, Navigation system user guide.
The system uses ultrasound waves to calculate the distance between the
bumper and an obstacle. The ultrasound sensors are located on the front/rear
bumper.
Image description - approximate range of the sensors
Range » Fig. 148Range of sensorsA120 cmB60 cmC160 cmD60 cmEa)60 cma)
Applies only for vehicles with 12 sensors.
The interval between the acoustic signals becomes shorter as the clearance is
reduced. A continuous tone sounds from a distance of approx. 30 cm - danger
area. From this moment on do not continue driving!
The length of the vehicle can be increased with an installed detachable towing
device. The danger area thus begins at a distance of around 35 cm on vehicles equipped with a factory fitted towing device.
Towing a trailer
On vehicles equipped with a factory fitted towing device, only system areas A
and
B
» Fig. 148 are active when towing a trailer.
Activation/deactivation
Read and observe
and on page 156 first.
The system is automatically activated by selecting reverse gear or pressing
the symbol button
» Fig. 148 on page 157 . The symbol
illuminates in the
button; activation is confirmed by a brief acoustic signal.
The system is deactivated by moving out of reverse gear, either by pressing the symbol button or automatically at a speed exceeding 10 km/h (the sym-
bol in the button goes out).
On vehicles which only have rear sensors , the system can only be deactivated
by moving out of reverse gear.
Park assist
Introduction
This chapter contains information on the following subjects:
Functioning
158
Finding a parking space
158
Parking
159
Departing from a parallel parking space
160
Automatic emergency braking
160
Information messages
160
Park Assist (in the following referred to as the system) helps drivers park in
suitable parallel and perpendicular parking places and also to manoeuvre out
of parallel parking spaces.
The system takes over the steering movements when parking or driving out of
the parking space, the driver operates the pedals as well as the gear lever.
The state in which the steering wheel is operated by the system, is referred to
as parking operation.
157Assist systems
Page 161 of 252
The parking aid is part of the park assist system, therefore the information
and safety guidelines » page 156 , Parking aid must also be read and ob-
served.WARNING■ The system only serves as an assistance and does not relieve the driver
of the responsibility for the vehicle operation.■
During the parking process, the system automatically performs rapid
steering movements. While it is doing so, do not place your hands between
the steering wheel spokes – risk of injury!
■
During a parking manoeuvre on loose or slippery surfaces (gravel, snow,
ice, etc.) you may stray from the calculated road because of the surface
conditions. Therefore we suggest that you do not use the system in such
situations.
■
External noise sources may affect the signals of the system sensors. Un-
der adverse conditions, this may cause objects or people to not be recog-
nised by the system.
CAUTION
■ If other vehicles are parked behind the kerb or on it, the system can also
guide your vehicle beyond the kerb or onto it. Ensure that the wheels or the
wheel rims of your vehicle are not damaged and if necessary intervene in time.■
Under certain circumstances, surfaces or structures of certain objects such
as wire mesh fences or powder snow cannot be recognised by the system.
■
Under adverse weather conditions (heavy rain, water vapour, very low or
high temperatures etc.), the system function may be limited - “incorrect recog-
nition of obstacle”.
CAUTION
The correct evaluation of the parking space and the parking procedure de-
pends on the circumference of the wheels on the vehicle.■
The system only works correctly if the vehicle is fitted with the wheel size
approved by the manufacturer.
■
Do without the use of the system if snow chains or a spare wheel is moun-
ted.
■
If wheels other than those approved by the manufacturer are mounted, the
resulting position of the vehicle in the parking space can differ slightly. This
can be avoided by readjusting the system at a specialist garage.
Note
We recommend performing the parking at a safe speed to about 5 km / h.Functioning
Read and observe
and on page 158 first.
Basic system operations
› The measurement and evaluation of the size of parking spaces when driving.
› The determination of the correct position of the vehicle for parking.
› The calculation of the line on which the vehicle drives backwards into the
parking space or forwards from the parking space.
› Automatic rotation of the front wheels during the parking.
The display of the instrument cluster (hereinafter only in the display) informa- tion and system messages are displayed.
When the system is activated, the warning light illuminates
» Fig. 149 on
page 158 -
.
The traction control system (ASR) must always be switched on when parking.
Finding a parking space
Fig. 149
System button / display
Read and observe
and on page 158 first.
Finding a parallel parking space
›
Drive past the parking space at up to 40 km/h and a distance of 0.5 – 1.5 m.
›
Press the symbol button once
» Fig. 149 .
The display shows the following » Fig. 149 -
.
Finding a perpendicular parking space
›
Drive past the parking space at up to 20 km/h and a distance of 0.5 – 1.5 m.
›
Press the symbol button twice
» Fig. 149 .
158Driving
Page 179 of 252

WARNINGThe airbag control unit operates using pressure sensors located in the front
doors. For this reason, no adjustments may be carried out to the doors or
door panels (e.g. installation of additional loudspeakers). Resulting damage
can have a negative impact on the function of the airbag system. Any work
on the front doors and door panels must be carried out by a specialist ga-
rage. The following guidelines must be observed.■
Never drive with inner door panels removed.
■
Never drive if parts of the inner door panel have been removed and the
resulting openings have not been properly sealed.
■
Never drive if the loudspeakers in the doors have been removed, unless
the loudspeaker openings have been properly sealed.
■
Always make sure that the openings are covered or filled if additional
loudspeakers or other equipment parts have been installed in the inner
door panels.
Washing vehicle
Introduction
This chapter contains information on the following subjects:
Washing by hand
176
Automatic car wash systems
177
Washing with a high-pressure cleaner
177
The best way to protect your vehicle against harmful environmental influences
is frequent washing.
How often the vehicle should be washed depends on factors such as:
› Frequency of use.
› Parking situation (garage, under trees etc.).
› Season.
› Weather conditions.
› Environmental influences.
The longer insect residues, bird droppings, tree sap, road and industrial dust,
tar, soot particles, road salt and other aggressive deposits remain adhering to
the paintwork of your vehicle, the more detrimental their destructive effect
can be. High temperatures, such as those caused by intensive sun's rays, ac-
centuate this caustic effect.
It is essential to also thoroughly clean the underside of the vehicle at the end
of the winter.WARNING■ When washing your vehicle in the winter: Water and ice in the braking
system can affect the braking efficiency – risk of accident!■
Only wash the vehicle when the ignition is switched off – risk of accident!
CAUTION
Do not wash your vehicle in bright sunlight – risk of paint damage.
For the sake of the environment
Only wash the vehicle at washing bays intended for this purpose.
Washing by hand
Read and observe
and on page 176 first.
Soak the dirt with plenty of water and rinse as well as possible.
Clean the vehicle with a soft sponge, a washing glove or a washing brush .
Work from the top to the bottom - starting with the roof.
Only use a car shampoo for stubborn dirt.
Wash out the sponge or washing glove thoroughly at short intervals.
Clean wheels, door sills and similar parts last. Use a second sponge for such
areas.
Give the vehicle a good rinse after washing it and dry it off using a chamois
leather.
CAUTION
■ When washing the car by hand, protect your hands and arms from sharp-
edged metal parts (e.g. when cleaning the underfloor, the inside of the wheel
housings or the wheel trims, etc.) - There is a risk of cuts!■
Only apply slight pressure when cleaning the vehicle's paintwork.
176General Maintenance
Page 180 of 252
Automatic car wash systemsRead and observe
and on page 176 first.
The usual precautionary measures must be taken before washing the vehicle
in an automatic car wash system (e.g. closing the windows and the sliding/tilt-
ing roof etc.).
If your vehicle is fitted with any particular attached parts, such as a spoiler,
roof rack system, two-way radio aerial etc., it is best to consult the operator of
the car wash system beforehand.
After an automatic wash with wax treatment, the lips of the wipers should be
cleaned with cleaning agents specially designed for the purpose, and then de-
greased.
WARNINGFold in the exterior mirrors to prevent damage before washing the vehicle
in an automatic car wash system. Never manually fold in electric exterior
mirrors - always use the electric controls.
Washing with a high-pressure cleaner
Read and observe
and on page 176 first.
When washing the vehicle with a high-pressure cleaner, the instructions for
use of the equipment must be observed. This applies in particular to the pres-
sure used and to the spraying distance .
Maintain a sufficiently large distance to the parking aid sensors and soft mate-
rials such as rubber hoses or insulation material.
WARNINGNever use circular spray nozzles or dirt cutters!
CAUTION
■ If washing the vehicle in the winter using a hose or high-pressure cleaner,
ensure that the jet of water is not aimed directly at the locking cylinders or the
door/panel joints – risk of freezing!■
To avoid damaging the parking aid sensors while cleaning with high-pressure
cleaners or steam jets, the sensors must only be directly sprayed for short pe-
riods while a minimum distance of 10 cm must be observed.
■ The temperature of the water used for cleaning must not exceed 60 °C – risk
of damaging the vehicle.■
See also Washing cars with decorative films using a high-pressure clean-
er » page 179 .
Taking care of your vehicle exterior
Introduction
This chapter contains information on the following subjects:
Taking care of your vehicle's paintwork
178
Plastic parts
178
Rubber seals
178
Chrome parts
178
Decorative films
179
Windows and exterior mirrors
179
Headlight lenses
179
Door lock cylinders
179
Cavity protection
180
Jack
180
Wheels
180
Towing device and mounting recess
180
Underbody protection
180
We recommend using vehicle care products from ŠKODA Original Accessories.
These are available from ŠKODA Partners. The usage instructions on the pack-
age must be observed.
WARNING■ Vehicle care products may be harmful to your health if not used according
to the instructions.■
Always keep the vehicle care products safe from people who are not com-
pletely independent, e.g. children - there is a danger of poisoning!
■
Protect your hands and arms from sharp-edged metal parts when clean-
ing the underfloor, the inside of the wheel housings or the wheel trims –
risk of cuts!
177Car care