warning lights SKODA SUPERB 2009 Owner´s Manual
[x] Cancel search | Manufacturer: SKODA, Model Year: 2009, Model line: SUPERB, Model: SKODA SUPERB 2009Pages: 252, PDF Size: 16.33 MB
Page 89 of 252
If the engine is switched off and then turned on again within 10 mins with the
rear seat heating switched, then each rear seat heating is automatically turned
on again.WARNINGIf you have a subdued pain and/or temperature sensitivity, e.g. through
medication, paralysis or because of chronic illness (e.g. diabetes), we rec-
ommend not to use the seat heating. This can lead to burns on the back,
the posterior and the legs which are difficult to heal. If the seat heating is
used, we recommend to make regular breaks in your journey when driving
long distances, so that the body can recuperate from the stress of the jour-
ney. Please consult your doctor, who can evaluate your specific condition.
CAUTION
■ Do not kneel on the seats or otherwise apply concentrated pressure to them.■The seat heater in the following cases will not turn on - there is a risk of
damaging the seat covers and seat heater. ■The seats are not occupied.
■ Items are fastened to or stored on the seats e.g. child seat, bags etc.
■ Additional seat covers or protective covers are fixed to the seats.■
Clean the seat covers » page 182, Seat covers .
Note
■
If the rear seat heating is set to the highest intensity - level 3, it is automati-
cally switched over to level 2 after 10 minutes (two warning lights are illumina-
ted on the switch).■
If the on-board voltage drops, the heater switches off automatically in order
to provide sufficient electrical power for the engine control » page 197.
Ventilated front seats
Fig. 73
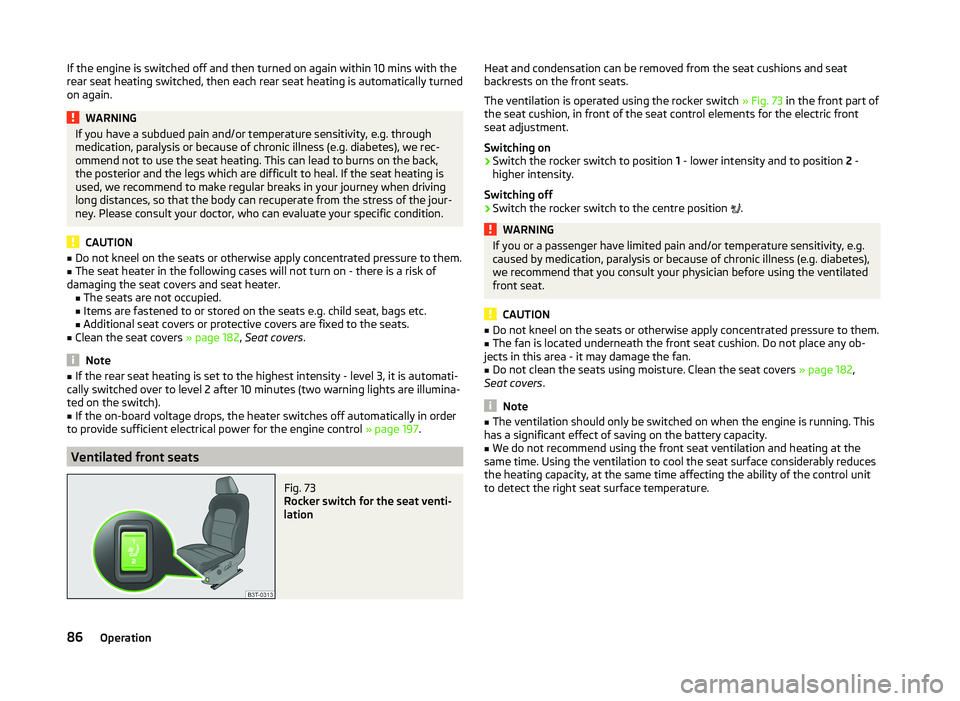
Rocker switch for the seat venti-
lation
Heat and condensation can be removed from the seat cushions and seat
backrests on the front seats.
The ventilation is operated using the rocker switch » Fig. 73 in the front part of
the seat cushion, in front of the seat control elements for the electric front
seat adjustment.
Switching on›
Switch the rocker switch to position 1 - lower intensity and to position 2 -
higher intensity.
Switching off
›
Switch the rocker switch to the centre position
.
WARNINGIf you or a passenger have limited pain and/or temperature sensitivity, e.g.
caused by medication, paralysis or because of chronic illness (e.g. diabetes),
we recommend that you consult your physician before using the ventilated
front seat.
CAUTION
■ Do not kneel on the seats or otherwise apply concentrated pressure to them.■The fan is located underneath the front seat cushion. Do not place any ob-
jects in this area - it may damage the fan.■
Do not clean the seats using moisture. Clean the seat covers » page 182,
Seat covers .
Note
■
The ventilation should only be switched on when the engine is running. This
has a significant effect of saving on the battery capacity.■
We do not recommend using the front seat ventilation and heating at the
same time. Using the ventilation to cool the seat surface considerably reduces
the heating capacity, at the same time affecting the ability of the control unit
to detect the right seat surface temperature.
86Operation
Page 120 of 252
At both end positions, Climatronic functions at maximum cooling/heating out-
put and the temperature is not regulated.
CAUTION
Lengthy and uneven distribution of the air flow out of the vents (especially
around the feet) and large differences in temperature, for example, when get-
ting out of the vehicle, can cause susceptible individuals to catch a cold.
Recirculation mode - Version 1
Recirculated air mode prevents polluted air outside the vehicle from getting in-
to the vehicle, for example when driving through a tunnel or when standing in
a traffic jam.
If a considerable increase in concentration of pollutants is recognised by the air quality sensor , recirculated air mode will temporarily be switched off.
If the concentration of pollutants decreases to the normal level, the air distri-
bution control is automatically switched off so that fresh air can be guided into
the vehicle interior.
In recirculated air mode air is sucked out of the interior of the vehicle and then
fed back into the interior.
When the automatic air distribution control is switched on, an air quality sen-
sor measures the concentration of pollutants in the drawn in air.
Switching recirculated air mode on
›
Repeatedly press the button until the warning light on the
left side of
the button is illuminated.
Switch on automatic air distribution control
›
Repeatedly press the button until the warning light on the
right-hand
side of the button illuminates.
Switch off automatic air distribution control temporarily
If the air quality sensor does not switch on automatic recirculated air mode
when there is an unpleasant smell, you can switch in on manually.
›
Press the button.
The warning light illuminates in the button on the left side.
Switching recirculated air mode off
›
Press the button or press the symbol button
again until the warning
lights in the button go out.
WARNINGDo not leave recirculated air mode on over a longer period of time, as
“stale” air can cause fatigue of the driver and passengers, reduce attention
levels and also cause the windows to mist up. The risk of having an acci-
dent increases. Switch off recirculated air mode as soon as the windows
start to mist up.
Note
■ As soon as the windscreen mists up, press the symbol button . Press the
button once the windscreen has demisted.■
The automatic air distribution control operates only if the outside tempera-
ture is higher than approx. 2 °C.
Recirculation mode - Version 2
Recirculated air mode prevents polluted air outside the vehicle from getting in-
to the vehicle, for example when driving through a tunnel or when standing in
a traffic jam.
In recirculated air mode air is sucked out of the interior of the vehicle and then
fed back into the interior.
The air recirculation mode is automatically activated after the ignition is
switched if it was on before the ignition was turned off. The warning light in the button illuminates.
Switch off / on
›
Press the
button.
The warning light in the button goes out.
›
Press the
button again.
The warning light in the button illuminates.
WARNINGDo not leave recirculated air mode on over a longer period of time, as
“stale” air can cause fatigue of the driver and passengers, reduce attention
levels and also cause the windows to mist up. The risk of having an acci-
dent increases. Switch off recirculated air mode as soon as the windows
start to mist up. 117Air conditioning system
Page 121 of 252

NoteAs soon as the windscreen mists up, press the symbol button . Press the
button once the windscreen has demisted.
Controlling blower
The Climatronic system controls the blower stages automatically in line with
the interior temperature.
However, the blower stages can be manually adapted to suit your particular
needs.
›
Repeatedly pressing the symbol button on the left or right reduces or in-
creases blower speed.
If the blower is switched off, the Climatronic system is switched off.
The set blower speed is displayed above the symbol button when the re-
spective number of warning lights illuminate.
WARNING■ “Stale air” may result in fatigue in the driver and occupants, reduce atten-
tion levels and also cause the windows to mist up. The risk of having an ac-
cident increases.■
Do not switch off the Climatronic system for longer than necessary.
■
Switch on the Climatronic system as soon as the windows mist up.
Defrosting windscreen
Switching on
›
Press the
button » Fig. 126 on page 115 .
›
Press the
button » Fig. 126 on page 115 .
Switching off
›
Press the symbol button
again or press the symbol button
.
›
Press the
button again.
More air flows out of the air outlet vents 1 » Fig. 123 on page 110 . The tempera-
ture control is controlled automatically.
Auxiliary heating (auxiliary heating and ventilation)
Introduction
This chapter contains information on the following subjects:
Switching on/off
119
Radio remote control
120
Functional requirements of the auxiliary heating (auxiliary heating and ventila-
tion)
The charge state of the vehicle battery is sufficient.
The fuel supply is adequate (the warning icon is not lit in the display of
the instrument cluster).
Auxiliary ventilation
The auxiliary ventilation enables fresh air to flow into the vehicle interior by
switching off the engine, whereby the interior temperature is effectively de-
creased (e.g. with the vehicle parked in the sun).
Additional heating (hereinafter only as a aux. heating)
The auxiliary heating can be used when both when stationary, when the en-
gine is switched off, to preheat the vehicle and also while driving (e.g. during
the heating phase of the engine).
The aux. heating functions in connection with the air conditioning system or
Climatronic.
The auxiliary heating also warms up the engine. This is not valid for vehicles
with the 3.6 l/191 kW FSI engine.
The auxiliary heating warms up the coolant by combusting fuel from the vehi-
cle tank. This warms the air flowing into the passenger compartment (if the
blower is turned on).
Depending on the environmental conditions, the automatic on or off of the
heater occurs, which causes the best possible conditions for the engine run-
ning and the interior heating.
For vehicles with petrol engines, the automatic switching on and off of the
heater can be disabled at a specialist workshop.
118Operation
Page 123 of 252
■Starting time 1 , Starting time 2 , Starting time 3 - for each pre-set time, the
day and the time (hour and minute) can be set for switching on the auxiliary
heating. An empty position can be found between Sunday and Monday when
selecting the day. If this empty position is selected, the activation is per-
formed without taking into account the day.
■ Activate - Activate pre-set mode;
■ Deactivate - Deactivate pre-set mode;
■ Factory settings - Restore factory settings
■ Back - Return to main menu
Only one programmed pre-set time can be active.
The last programmed pre-set time remains active.
After the auxiliary heating activates automatically at the set time, it is neces-
sary to pre-set a time again.
If the menu item Back is selected or no changes are made on the display for
longer than 10 seconds, the set values are stored, but the pre-set time is not
activated.
The system switches itself off at the end of the running time set under the
menu item Running time .
Note
A warning light on the button » Fig. 127 illuminates when the system is run-
ning.
Radio remote control
Fig. 128
Auxiliary heater: Radio remote
control
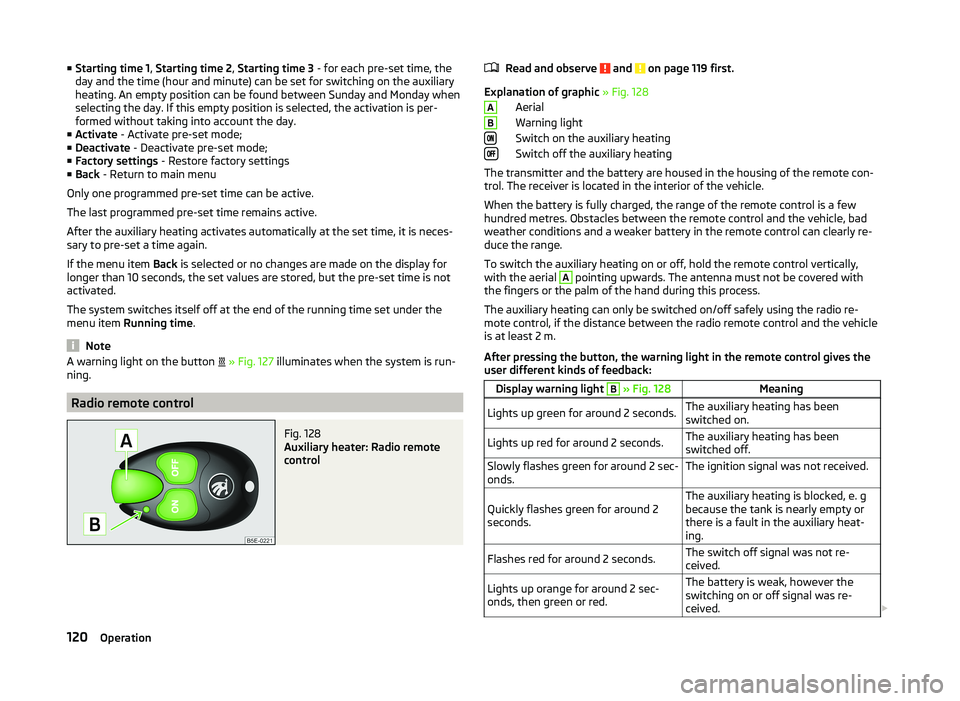
Read and observe and on page 119 first.
Explanation of graphic » Fig. 128
Aerial
Warning light
Switch on the auxiliary heating
Switch off the auxiliary heating
The transmitter and the battery are housed in the housing of the remote con- trol. The receiver is located in the interior of the vehicle.
When the battery is fully charged, the range of the remote control is a few
hundred metres. Obstacles between the remote control and the vehicle, bad
weather conditions and a weaker battery in the remote control can clearly re-
duce the range.
To switch the auxiliary heating on or off, hold the remote control vertically,
with the aerial
A
pointing upwards. The antenna must not be covered with
the fingers or the palm of the hand during this process.
The auxiliary heating can only be switched on/off safely using the radio re-
mote control, if the distance between the radio remote control and the vehicle
is at least 2 m.
After pressing the button, the warning light in the remote control gives the
user different kinds of feedback:
Display warning light B » Fig. 128MeaningLights up green for around 2 seconds.The auxiliary heating has been
switched on.Lights up red for around 2 seconds.The auxiliary heating has been
switched off.Slowly flashes green for around 2 sec-
onds.The ignition signal was not received.Quickly flashes green for around 2
seconds.The auxiliary heating is blocked, e. g
because the tank is nearly empty or
there is a fault in the auxiliary heat-
ing.Flashes red for around 2 seconds.The switch off signal was not re-
ceived.Lights up orange for around 2 sec-
onds, then green or red.The battery is weak, however the
switching on or off signal was re-
ceived. AB120Operation
Page 124 of 252
Display warning light B » Fig. 128MeaningLights up orange for around 2 sec-
onds, then flashes green or red.The battery is weak, however the
switching on or off signal was not re-
ceived.Flashes orange for around 5 seconds.The battery is discharged, however
the switching on or off signal was not
received.
Replace the battery » page 216.
CAUTION
The radio remote control comprises electronic components and must therefore
be protected against water, severe impacts and direct sunlight.Communication and multimedia
General information
Introduction
This chapter contains information on the following subjects:
Mobile phones and two-way radio systems
121
Universal telephone preinstallation (hands-free)
122
Operating the phone on the multifunction steering wheel
122
Symbols in the MAXI DOT display
123
Phone Phonebook
124
Mobile phones and two-way radio systems
ŠKODA permits the operation of mobile phones and two-way radio systems
with a professionally installed external aerial and a maximum transmission
power of up to 10 watts.
Please ask at a specialist workshop about installing and operating mobile
phones and two-way radio systems that have a transmission power of more
than 10 W.
Operating mobile phones or two-way radio systems may interfere with the
functionality of the electronic systems in your vehicle.
This could be for the following reasons.
› no external aerial.
› external aerial incorrectly installed.
› transmission power greater than 10 watts.
WARNING■
If a mobile phone or a two-way radio system is operated in a vehicle with-
out an external aerial or an external aerial which has been installed incor-
rectly, this can increase the strength of the electromagnetic field inside the
vehicle.■
Two-way radio systems, mobile phones or mounts must not be installed
on airbag covers or within the immediate deployment range of the airbags.
121Communication and multimedia
Page 125 of 252
WARNING (Continued)■Never leave a mobile phone on a seat, on the dash panel or in any area
where it can become a projectile during a sudden braking manoeuvre, an
accident or a collision — risk of injury.■
Before transport of the vehicle by air, the Bluetooth ®
function must be
switched off by a specialist company.
Universal telephone preinstallation (hands-free)
The universal telephone preinstallation (hands-free system) includes a con-
venience mode for the mobile phone via voice control, the multifunction steer-
ing wheel and the radio or navigation system.
WARNING■ Concentrate fully at all times on your driving! As the driver, you are fully
responsible for the operation of your vehicle.■
Only use the device in such a way that you are in full control of your vehi-
cle in every traffic situation – there is the risk of accidents!
■
The national regulations for using a mobile phone in a vehicle must be
observed.
Note■ We recommend that mobile phones and two-way radio systems be installed
in the vehicle by a specialist workshop.■
Not all mobile phones that enable Bluetooth ®
communication are compatible
with the universal telephone preinstallation GSM II or GSM III. Ask a ŠKODA
Partner whether your phone is compatible with the universal telephone prepa-
ration GSM II or GSM III.
■
The range of the Bluetooth ®
connection to the hands-free system is restric-
ted to the vehicle interior. The range is dependent on local factors, e.g. obsta-
cles between the devices and mutual interferences with other devices. If your
mobile phone is in a jacket pocket, for example, this can lead to difficulties
when establishing a connection with the hands-free-system or transferring
data.
Operating the phone on the multifunction steering wheel
Fig. 129
Multifunction steering wheel: Control buttons for the telephone
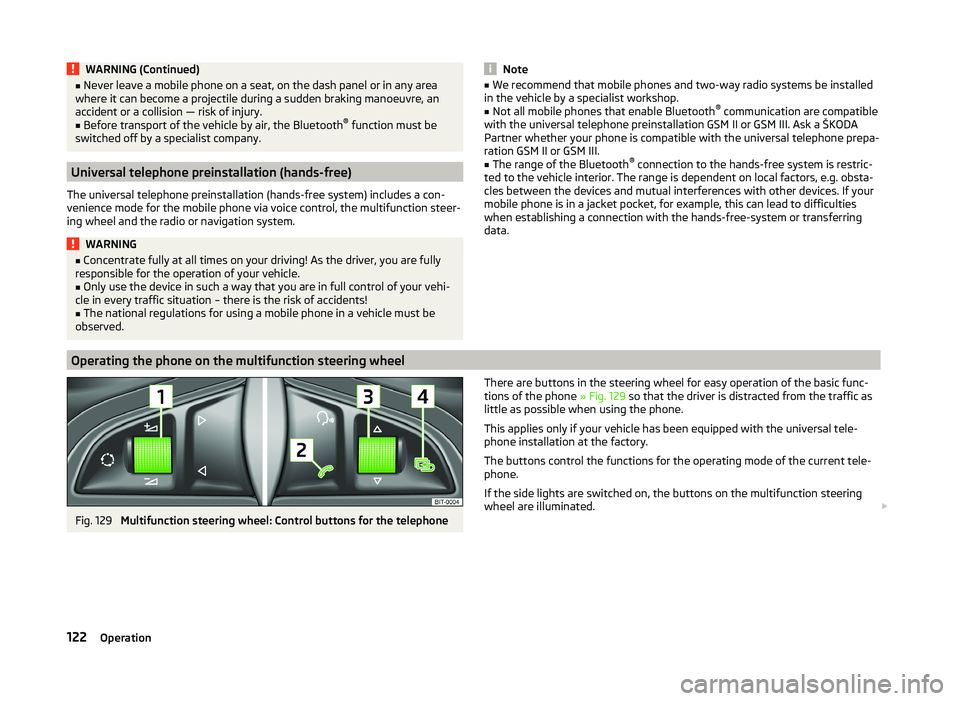
There are buttons in the steering wheel for easy operation of the basic func-
tions of the phone » Fig. 129 so that the driver is distracted from the traffic as
little as possible when using the phone.
This applies only if your vehicle has been equipped with the universal tele-
phone installation at the factory.
The buttons control the functions for the operating mode of the current tele-
phone.
If the side lights are switched on, the buttons on the multifunction steering
wheel are illuminated. 122Operation
Page 139 of 252
CD changerFig. 132
The CD changer
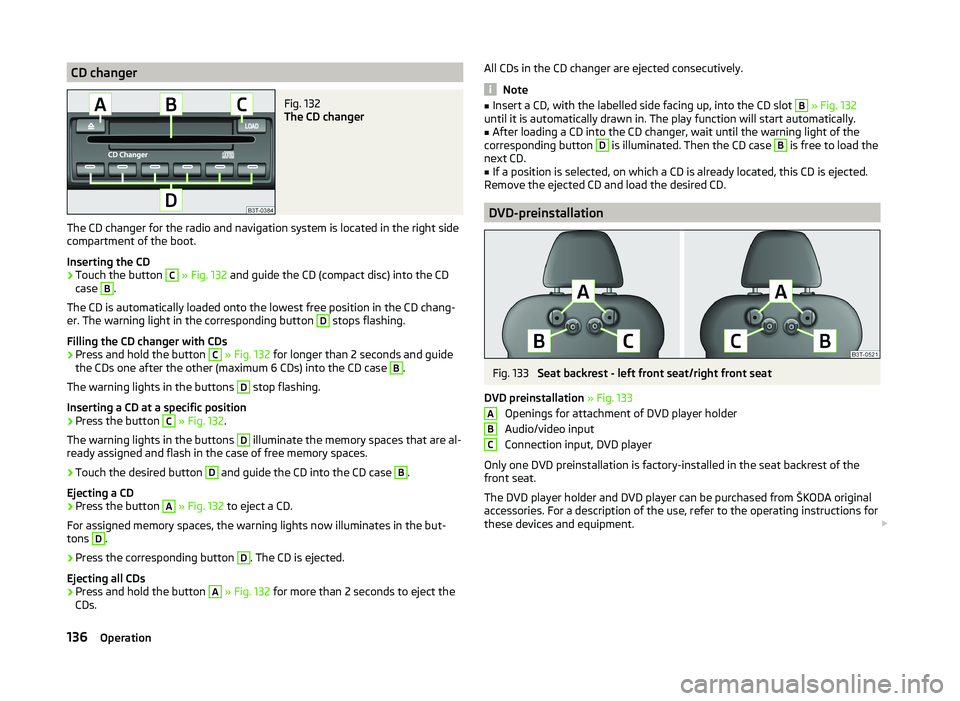
The CD changer for the radio and navigation system is located in the right side
compartment of the boot.
Inserting the CD
›
Touch the button
C
» Fig. 132 and guide the CD (compact disc) into the CD
case
B
.
The CD is automatically loaded onto the lowest free position in the CD chang-
er. The warning light in the corresponding button
D
stops flashing.
Filling the CD changer with CDs
›
Press and hold the button
C
» Fig. 132 for longer than 2 seconds and guide
the CDs one after the other (maximum 6 CDs) into the CD case
B
.
The warning lights in the buttons
D
stop flashing.
Inserting a CD at a specific position
›
Press the button
C
» Fig. 132 .
The warning lights in the buttons
D
illuminate the memory spaces that are al-
ready assigned and flash in the case of free memory spaces.
›
Touch the desired button
D
and guide the CD into the CD case
B
.
Ejecting a CD
›
Press the button
A
» Fig. 132 to eject a CD.
For assigned memory spaces, the warning lights now illuminates in the but-
tons
D
.
›
Press the corresponding button
D
. The CD is ejected.
Ejecting all CDs
›
Press and hold the button
A
» Fig. 132 for more than 2 seconds to eject the
CDs.
All CDs in the CD changer are ejected consecutively.
Note
■ Insert a CD, with the labelled side facing up, into the CD slot B » Fig. 132
until it is automatically drawn in. The play function will start automatically.■
After loading a CD into the CD changer, wait until the warning light of the
corresponding button
D
is illuminated. Then the CD case
B
is free to load the
next CD.
■
If a position is selected, on which a CD is already located, this CD is ejected.
Remove the ejected CD and load the desired CD.
DVD-preinstallation
Fig. 133
Seat backrest - left front seat/right front seat
DVD preinstallation » Fig. 133
Openings for attachment of DVD player holder
Audio/video input
Connection input, DVD player
Only one DVD preinstallation is factory-installed in the seat backrest of the
front seat.
The DVD player holder and DVD player can be purchased from ŠKODA original
accessories. For a description of the use, refer to the operating instructions for
these devices and equipment.
ABC136Operation
Page 148 of 252
Only engage reverse gear when the vehicle is stationary. Depress the clutch
pedal and hold it fully depressed. Wait a moment before reverse gear is engag-
ed to avoid any shift noises.
The reversing lights will come on once reverse gear is engaged, provided the
ignition is on.WARNINGNever engage reverse gear when driving – risk of accident!
CAUTION
If not in the process of changing gear, do not leave your hand on the gearshift
lever while driving. The pressure from the hand can cause the gearshift mech-
anism to wear excessively.
Pedals
The operation of the pedals must not be hindered under any circumstances!
In the driver's footwell, only a footmat, which is attached to the two corre-
sponding attachment points, may be used.
Only use footmats from the range of ŠKODA Original Accessories, which are fit-
ted to two attachment points.
WARNINGNo objects are allowed in the driver's footwell – risk of obstruction or limi-
tation in operating the pedals!
Automatic transmission
Introduction
This chapter contains information on the following subjects:
Modes and use of selector lever
145
Manual gear shifting (Tiptronic)
146
Starting off and driving
147
Malfunction
148WARNING■ Do not depress the accelerator if the forward driving mode is changed
when the vehicle is halted and the engine is running – there is a risk of an
accident.■
Never shift the selector lever to R or P modes when driving – there is a
risk of an accident.
■
The vehicle must be held on the brake pedal in D, S or R modes if the ve-
hicle is halted and the engine is running. Even when the engine is idling,
power transmission is never completely interrupted – the vehicle will creep.
CAUTION
■ If the selector lever is shifted to N while the vehicle is being driven you must
lift off the accelerator pedal and you will need to wait until the engine has
reached its idling speed before shifting the selector lever to a forward driving
mode again.■
At temperatures below -10 °C, the engine can only be started in selector lev-
er position P.
■
Never try to hold the vehicle using the accelerator pedal when stopping on a
hill – this may lead to transmission damage.
Note
After the ignition is switched off, the ignition key can only be withdrawn when
the selector lever is in position P.
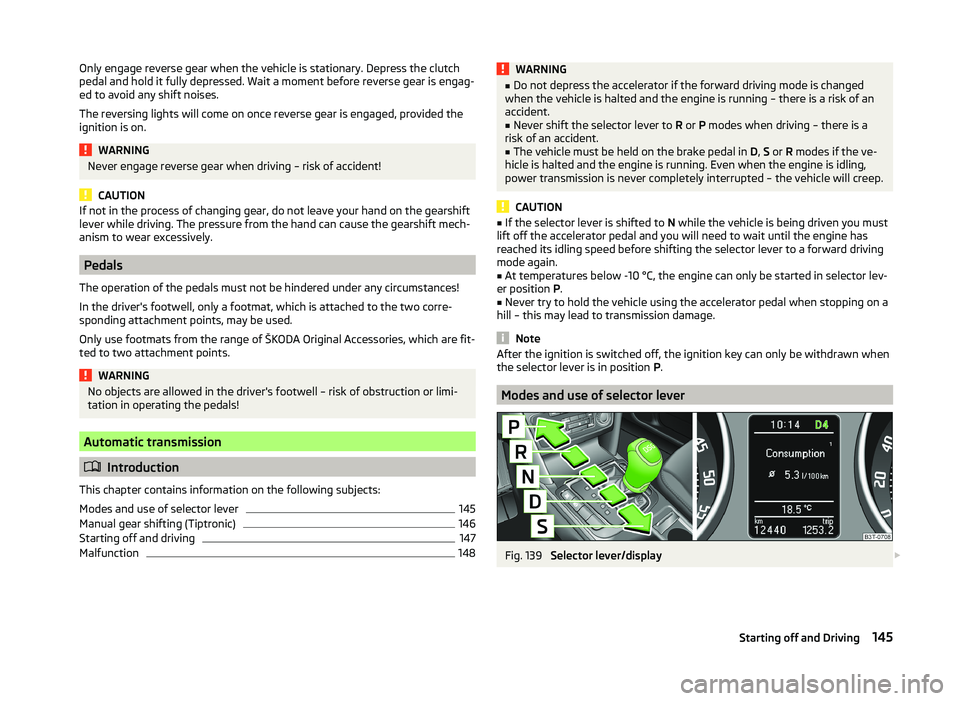
Modes and use of selector lever
Fig. 139
Selector lever/display
145Starting off and Driving
Page 156 of 252
WARNING■Driving through water, mud, sludge etc. can impair the braking power and
extend the braking distance – risk of accident!■
Avoid abrupt and sudden braking immediately after water crossings.
■
After driving through bodies of water, the brakes must be cleaned and
dried as soon as possible by intermittent braking. Only apply the brakes for
the purpose of drying and cleaning the brake discs if the traffic conditions
permit this. Do not place any other road users in jeopardy.
CAUTION
■ Should water penetrate into the intake system of the engine, there is a
threat of serious damage being incurred by the engine parts!■
When driving through water, some vehicle parts such as chassis, electrics or
transmissions can be severely damaged.
■
Oncoming vehicles can generate water waves which can exceed the permis-
sible water level for your vehicle.
■
Potholes, mud or rocks can be hidden under the water, making it difficult or
impossible to drive through water.
■
Do not drive through salt water, as the salt can cause corrosion. A vehicle
coming into contact with salt water is to be thoroughly rinsed with fresh wa-
ter.
Note
After driving through water, we recommend having the vehicle checked by a
specialist garage.
Driving abroad
Introduction
This chapter contains information on the following subjects:
Unleaded petrol
153
Headlights
153
In certain countries, it may be possible that the ŠKODA Partner network is limi-
ted or has not been established. This is the reason why procuring certain spare
parts may be somewhat complicated and specialist garages may only be able
to make limited repairs.
Unleaded petrol
A vehicle fitted with a petrol engine must always be refuelled with unleaded
petrol » page 184 , Unleaded petrol . Information regarding the locations of fill-
ing stations that offer unleaded petrol is, for example, provided by the auto-
mobile associations.
Headlights
The low beam of your headlights is set asymmetrically. It illuminates the side
of the road on which the vehicle is being driven to a greater extent.
When driving in countries in which the traffic drives on the other side of the
road than in your home country, the asymmetrical low beam may dazzle on-
coming drivers. In order to avoid this, the headlights must be adjusted at a
specialist garage.
Headlights with Xenon lights can be adjusted in the menu of the MAXI DOT
display » page 71 .
Note
You can find out more information on adjusting the headlights at a specialist
garage.153Starting off and Driving
Page 165 of 252
Storing and maintaining speedRead and observe
and on page 161 first.
›
Activate the cruise control system » page 161.
›
Drive at the desired speed.
›
Push the rocker button
B
into the SET/- » Fig. 151 on page 161 position.
After you have released the rocker button
B
from the SET/- position, the
speed you have just stored is kept constant without having to depress the ac-
celerator.
Changing the stored speed
Read and observe
and on page 161 first.
Increasing the speed with the rocker button
B›
Push the rocker button
B
into the RES/+ » Fig. 151 on page 161 position.
If the rocker button is held in the RES/+ position, the speed will increase con-
tinuously. Release the rocker button once the desired speed is reached. The
set speed is then stored in the memory.
Decreasing the speed using the rocker button
B
The stored speed can be reduced by pushing the rocker switch
B
into the
SET/- » Fig. 151 on page 161 position.
If the rocker button is pressed and held in the SET/- position, the speed will
decrease continuously. Release the rocker button once the desired speed is
reached. The set speed is then stored in the memory.
If the rocker button is released at a speed of less than approx. 25 km/h, the
speed is not stored and the memory is erased. Once the speed of the vehicle
has increased to more than approx. 25 km/h, the speed must then be stored
again by pushing the rocker button
B
into the SET/- position.
Increasing the speed with the accelerator
›
Depress the accelerator pedal.
Releasing the accelerator pedal will cause the speed to drop again to the set
speed.
Decreasing the speed with the brake pedal
The speed can also be reduced by depressing the brake pedal, which tempora-
rily deactivates the system » page 162.
Switching off temporarily
Read and observe
and on page 161 first.
The cruise control system can be temporarily deactivated by pushing the
switch
A
» Fig. 151 on page 161 into the spring-mounted CANCEL position or
by depressing the brake or clutch pedal.
The set speed remains stored in the memory.
Briefly push the rocker button
B
into the RES/+ position in order to resume
the stored speed after the clutch or brake pedal is released.
START STOP
Introduction
This chapter contains information on the following subjects:
Operating conditions for the system
163
Operation in vehicles with manual gearbox
163
Operation in vehicles with automatic gearbox
163
System related automatic start-up
164
Manually deactivating/activating the system
164
Information messages
164
The START STOP system (hereinafter referred to as the system) saves fuel and
reduces polluting emissions and CO 2 emissions by turning the engine off, e.g.
when stopping at traffic lights, and starting the engine again when moving off.
WARNING■ Never let the vehicle roll with the engine switched off.■The brake servo unit and power steering only operate if the engine is run-
ning.162Driving