service interval SKODA SUPERB 2009 Owner´s Manual
[x] Cancel search | Manufacturer: SKODA, Model Year: 2009, Model line: SUPERB, Model: SKODA SUPERB 2009Pages: 252, PDF Size: 16.33 MB
Page 5 of 252
Table of Contents
Board literature4
Notes
5
Structure and more information about the
Operating Instructions
6
Abbreviations
Safety
Passive Safety
8
General information
8
Correct and safe seated position
9
Seat belts
12
Using seat belts
12
Inertia reels and belt tensioners
15
Airbag system
16
Description of the airbag system
16
Airbag overview
17
Deactivating airbags
20
Transporting children safely
22
Child seat
22
Fastening systems
25
Operation
Cockpit
29
Overview
28
Instruments and Indicator Lights
30
Instrument cluster
30
Warning lights
34
Information system
42
Driver information system
42
Multifunction display (MFD)
44MAXI DOT display46Service interval display48
Unlocking and opening
50
Unlocking and locking
50
Anti-theft alarm system
55
Luggage compartment lid
57
Electric boot lid (Superb Combi)
59
Electrical power windows
61
Electric sliding/tilting roof
64
Panoramic sliding/tilting roof (Superb Estate)
65
Lights and visibility
67
Lights
67
Interior lights
73
Visibility
75
Windscreen wipers and washers
77
Rear mirror
79
Seats and practical features
81
Adjusting the seats
81
Seat features
85
Practical features
88
Luggage compartment
97
Removable light (Superb Combi)
103
Variable loading floor in the luggage
compartment (Estate)
104
Extending variable loading floor with
integrated aluminium rails and fastening
elements (Superb Combi)
105
Net partition (Superb Combi)
107
Roof rack
108
Air conditioning system
110
Heating, ventilation, cooling
110
Air conditioning system (manual air
conditioning system)
112Climatronic (automatic air conditioning
system)115
Auxiliary heating (auxiliary heating and
ventilation)
118
Communication and multimedia
121
General information
121
Universal telephone preinstallation GSM II
124
Universal telephone preinstallation GSM IIl
126
Wi-Fi
130
Voice control
131
Multimedia
134
Driving
Starting off and Driving
138
Starting and stopping the engine using the
key
138
Starting and stopping the engine - KESSY
140
Brakes
143
Manual gear changing and pedals
144
Automatic transmission
145
Running in
148
Economical driving and environmental
sustainability
149
Avoiding damage to your vehicle
152
Driving abroad
153
Assist systems
154
Brake assist systems
154
Parking aid
156
Park assist
157
Cruise Control System
161
START STOP
162
Fatigue detection (break recommendation)
165
Tyre pressure monitoring
165
Hitch and trailer
166
Hitch
166
Trailer
1702Table of Contents
Page 33 of 252
Instruments and Indicator Lights
Instrument cluster
Introduction
This chapter contains information on the following subjects:
Overview
30
Revolution counter
31
Speedometer
31
Coolant temperature gauge
31
Display
31
Fuel gauge
32
Counter for distance driven
32
32
Display of the second speed
33
Display in rear centre console
33
Auto Check Control
33
Fault display
The Error message will appear in the display if there is a fault in the instru-
ment cluster. Ensure that the fault is rectified as soon as possible by a special-
ist workshop.
WARNING■ Concentrate fully at all times on your driving! As the driver you are fully
responsible for road safety.■
Never operate the controls in the instrument cluster while driving - risk of
accident. Operate the controls only when the vehicle is at a standstill.
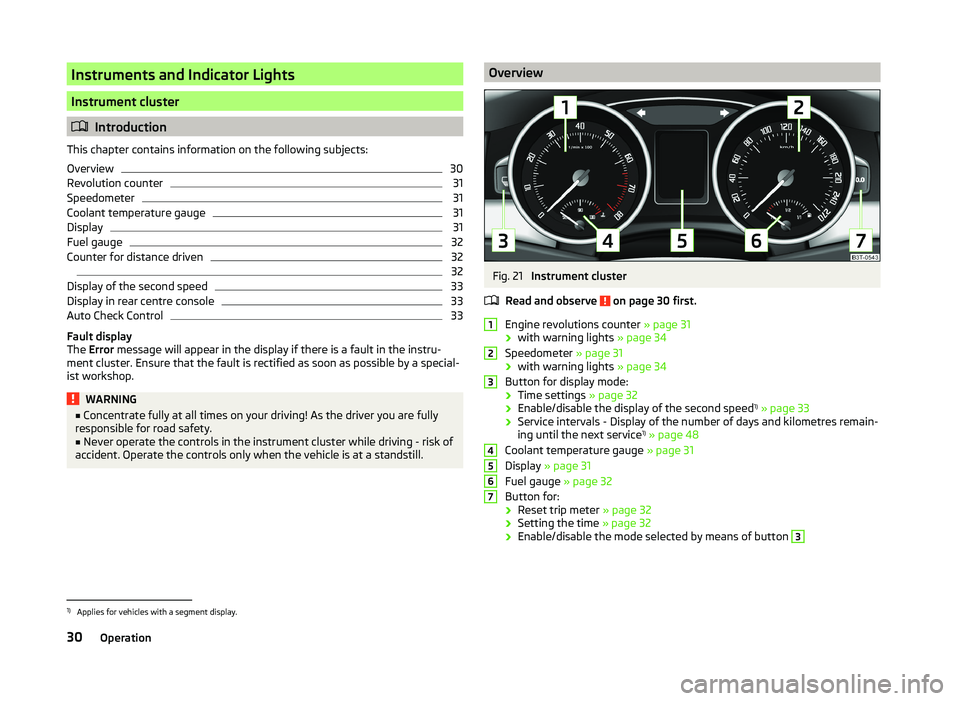
OverviewFig. 21
Instrument cluster
Read and observe
on page 30 first.
Engine revolutions counter » page 31
› with warning lights
» page 34
Speedometer » page 31
› with warning lights
» page 34
Button for display mode:
› Time settings
» page 32
› Enable/disable the display of the second speed 1)
» page 33
› Service intervals - Display of the number of days and kilometres remain-
ing until the next service 1)
» page 48
Coolant temperature gauge » page 31
Display » page 31
Fuel gauge » page 32
Button for: › Reset trip meter
» page 32
› Setting the time
» page 32
› Enable/disable the mode selected by means of button
312345671)
Applies for vehicles with a segment display.
30Operation
Page 34 of 252
Revolution counterRead and observe
on page 30 first.
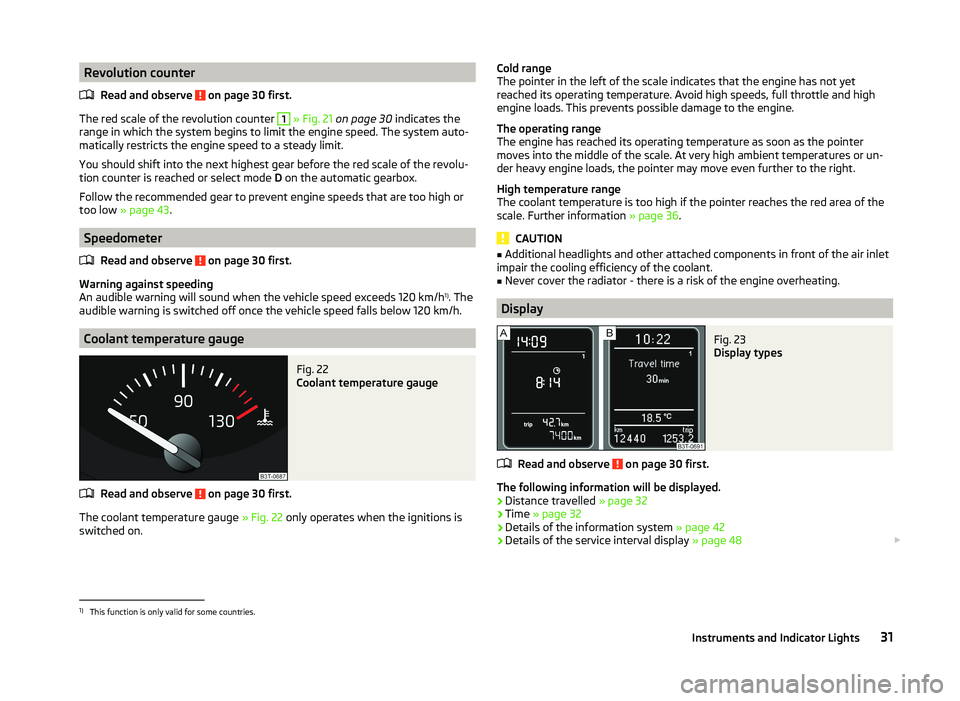
The red scale of the revolution counter
1
» Fig. 21 on page 30 indicates the
range in which the system begins to limit the engine speed. The system auto-
matically restricts the engine speed to a steady limit.
You should shift into the next highest gear before the red scale of the revolu-
tion counter is reached or select mode D on the automatic gearbox.
Follow the recommended gear to prevent engine speeds that are too high or
too low » page 43 .
Speedometer
Read and observe
on page 30 first.
Warning against speeding
An audible warning will sound when the vehicle speed exceeds 120 km/h 1)
. The
audible warning is switched off once the vehicle speed falls below 120 km/h.
Coolant temperature gauge
Fig. 22
Coolant temperature gauge
Read and observe on page 30 first.
The coolant temperature gauge » Fig. 22 only operates when the ignitions is
switched on.
Cold range
The pointer in the left of the scale indicates that the engine has not yet
reached its operating temperature. Avoid high speeds, full throttle and high
engine loads. This prevents possible damage to the engine.
The operating range
The engine has reached its operating temperature as soon as the pointer
moves into the middle of the scale. At very high ambient temperatures or un-
der heavy engine loads, the pointer may move even further to the right.
High temperature range
The coolant temperature is too high if the pointer reaches the red area of the
scale. Further information » page 36.
CAUTION
■
Additional headlights and other attached components in front of the air inlet
impair the cooling efficiency of the coolant.■
Never cover the radiator - there is a risk of the engine overheating.
Display
Fig. 23
Display types
Read and observe on page 30 first.
The following information will be displayed.
› Distance travelled
» page 32
› Time
» page 32
› Details of the information system
» page 42
› Details of the service interval display
» page 48
1)
This function is only valid for some countries.
31Instruments and Indicator Lights
Page 45 of 252
Information system
Driver information system
Introduction
This chapter contains information on the following subjects:
Using the information system
42
Display a low temperature
43
Gear recommendation
43
Door, boot or engine compartment warning
44
The information system provides the driver with alerts and messages about in-
dividual vehicle systems.
This information and advice is shown in the instrument cluster display or indi-
cated by the illumination of the corresponding warning light in the instrument
cluster.
The information system provides the following information and instructions
(depending on vehicle equipment).
› Data relating to the multi function display (MFD)
» page 44.
› Data relating to the MAXI DOT display
» page 46.
› Service interval display
» page 48.
› Auto Check Control
» page 33.
› Selector lever positions for an automatic transmission
» page 145.
WARNINGConcentrate fully at all times on your driving! As the driver, you are fully re-
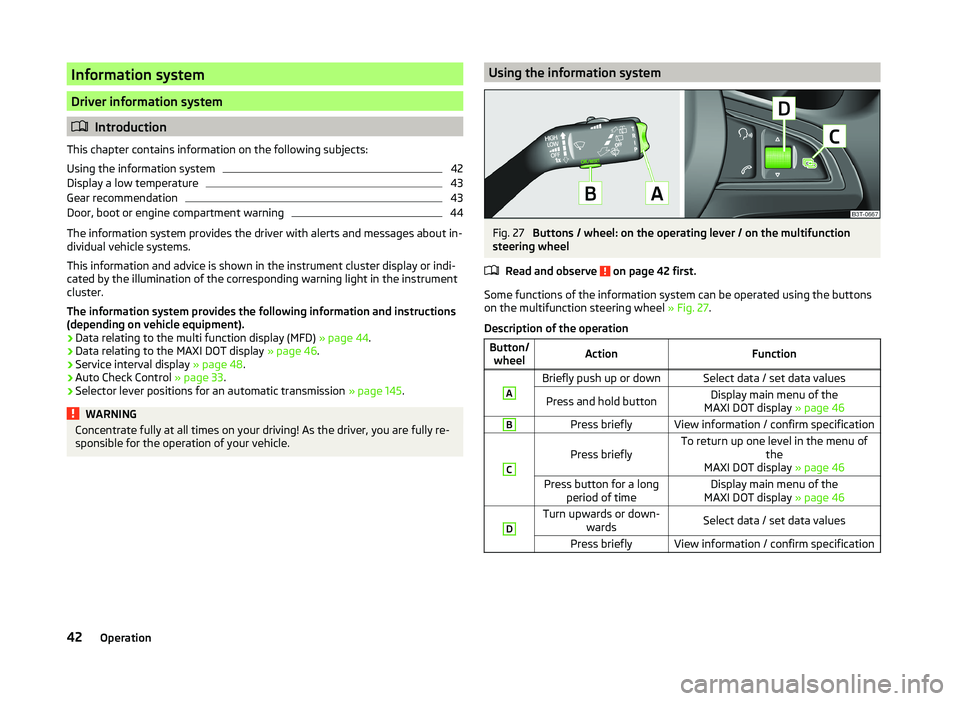
sponsible for the operation of your vehicle.Using the information systemFig. 27
Buttons / wheel: on the operating lever / on the multifunction
steering wheel
Read and observe
on page 42 first.
Some functions of the information system can be operated using the buttons
on the multifunction steering wheel » Fig. 27.
Description of the operation
Button/ wheelActionFunctionABriefly push up or downSelect data / set data valuesPress and hold buttonDisplay main menu of the
MAXI DOT display » page 46BPress brieflyView information / confirm specificationC
Press brieflyTo return up one level in the menu of
the
MAXI DOT display » page 46Press button for a long
period of timeDisplay main menu of the
MAXI DOT display » page 46DTurn upwards or down-
wardsSelect data / set data valuesPress brieflyView information / confirm specification42Operation
Page 51 of 252
Lights and visibility
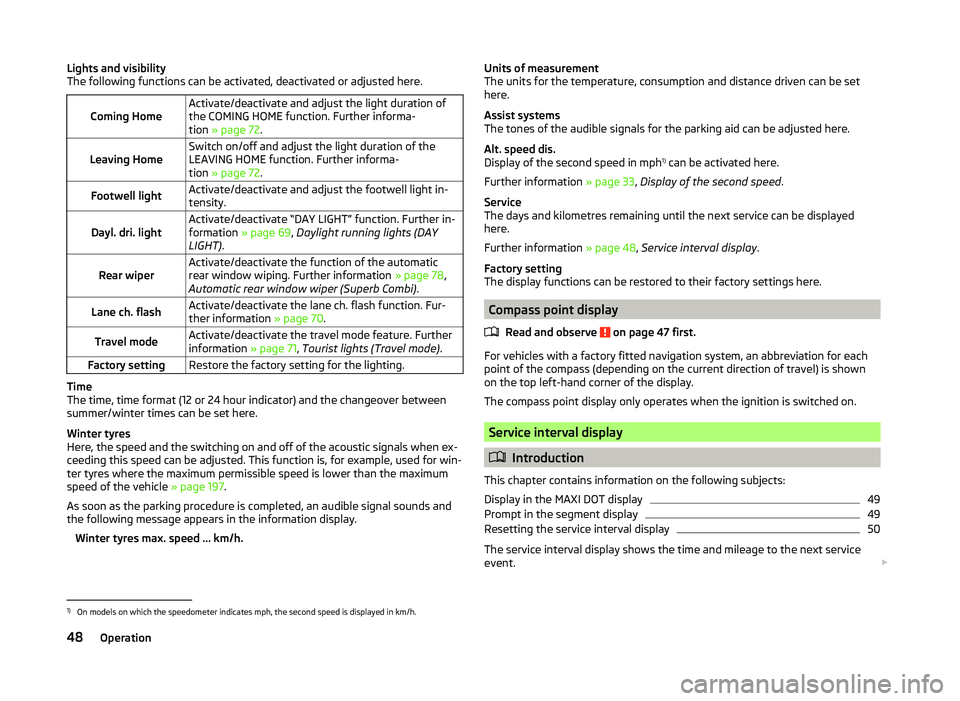
The following functions can be activated, deactivated or adjusted here.
Coming HomeActivate/deactivate and adjust the light duration of
the COMING HOME function. Further informa-
tion » page 72 .Leaving HomeSwitch on/off and adjust the light duration of the
LEAVING HOME function. Further informa-
tion » page 72 .Footwell lightActivate/deactivate and adjust the footwell light in-
tensity.Dayl. dri. lightActivate/deactivate “DAY LIGHT” function. Further in-
formation » page 69, Daylight running lights (DAY
LIGHT) .Rear wiperActivate/deactivate the function of the automatic
rear window wiping. Further information » page 78,
Automatic rear window wiper (Superb Combi) .Lane ch. flashActivate/deactivate the lane ch. flash function. Fur-
ther information » page 70.Travel modeActivate/deactivate the travel mode feature. Further
information » page 71, Tourist lights (Travel mode) .Factory settingRestore the factory setting for the lighting.
Time
The time, time format (12 or 24 hour indicator) and the changeover between
summer/winter times can be set here.
Winter tyres
Here, the speed and the switching on and off of the acoustic signals when ex-
ceeding this speed can be adjusted. This function is, for example, used for win-
ter tyres where the maximum permissible speed is lower than the maximum
speed of the vehicle » page 197.
As soon as the parking procedure is completed, an audible signal sounds and
the following message appears in the information display.
Winter tyres max. speed ... km/h.
Units of measurement
The units for the temperature, consumption and distance driven can be set
here.
Assist systems
The tones of the audible signals for the parking aid can be adjusted here.
Alt. speed dis.
Display of the second speed in mph 1)
can be activated here.
Further information » page 33, Display of the second speed .
Service
The days and kilometres remaining until the next service can be displayed
here.
Further information » page 48, Service interval display .
Factory setting
The display functions can be restored to their factory settings here.
Compass point display
Read and observe
on page 47 first.
For vehicles with a factory fitted navigation system, an abbreviation for each
point of the compass (depending on the current direction of travel) is shown
on the top left-hand corner of the display.
The compass point display only operates when the ignition is switched on.
Service interval display
Introduction
This chapter contains information on the following subjects:
Display in the MAXI DOT display
49
Prompt in the segment display
49
Resetting the service interval display
50
The service interval display shows the time and mileage to the next service
event.
1)
On models on which the speedometer indicates mph, the second speed is displayed in km/h.
48Operation
Page 52 of 252
The service due date is automatically displayed on the display and this infor-
mation can be displayed manually if necessary.
The kilometre indicator or the days indicator reduces in steps of 100 km or
days until the service due date is reached.
The information regarding the service intervals can be found in the service
schedule.
Note
Information is retained in the Service Interval Display even after the vehicle
battery is disconnected.
Display in the MAXI DOT display
Oil change service
If an oil change service is due, the following message appears: Oil change in ...
km or ... days.
As soon as the service interval date has been reached, the message Oil
change now! appears once the ignition has been switched on.
Inspection
If an inspection is due, the following message appears: Inspection in ... km
or ... days.
As soon as the service interval date has been reached, the message Inspec-
tion now! appears once the ignition has been switched on.
Displaying the distance and days until the next service interval
You can view the remaining distance and days until the next service appoint- ment at any time when the ignition is switched on by going to the Service
menu item » page 47, Settings or from the Vehicle status in the main menu of
the MAXI DOTdisplay. » page 47, Main menu .
The following message is displayed for 10 seconds. Oil change ... km / ... days
Inspection ... km / ... days
Prompt in the segment displayFig. 30
Segment display: Example of a
message
Explanation of graphic » Fig. 30
Service due
Differentiating between types of service
Days remaining until the next service interval
Kilometres remaining until the next service interval 1)
Differentiating between types of service
The service type is determined by the number in position
A
» Fig. 30 .
Oil change service
Inspection
Service due
If a service becomes due, then the following information is displayed for about
10 seconds » Fig. 30.
› The number
1 or 2 is displayed in position
A
.
› The symbol
and the number of days remaining until the next service inter-
val are displayed in position
B
.
› The symbol
and the number of kilometres remaining until the next service
interval are displayed in position
C
.
As soon as the due date for the service has been reached, the flashing icon
and the message OIL CHNG or INSPEC_ appear in the display for about 20 sec-
onds after the ignition has been switched on.
Display the days and distance until the next service
You can press button
3
» Fig. 21 on page 30 repeatedly to display the remain-
ing distance and time to until the next service whenever the ignition is switch-
ed on.
ABC1)
The kilometres remaining until the next service are displayed instead of the odometer.
49Information system
Page 53 of 252
Information on the oil change service is displayed at first, followed by informa-
tion on the inspection when button 3 is pressed again.
› The number
1 or 2 is displayed in position A
.
› The symbol
and the number of days remaining until the next service inter-
val are displayed in position
B
.
› The symbol
and the number of kilometres remaining until the next service
interval are displayed in position
C
.
Resetting the service interval display
We recommend that the display reset is completed by a specialist garage.
We recommend that you do not reset the service interval display yourself. In-
correctly setting the service interval display could cause problems to the vehi-
cle.
Variable service interval
For vehicles with variable service intervals, after resetting the oil change serv-
ice display, the values of a new service interval are displayed, which are based
on the previous operating conditions of the vehicle.
These values are then continuously matched according to the actual operating
conditions of the vehicle.
Unlocking and opening
Unlocking and locking
Introduction
This chapter contains information on the following subjects:
Vehicle key
51
Unlocking/locking with the remote control key
52
Opening/closing a door
52
Unlocking / locking - KESSY
53
Information messages KESSY
53
Safe securing
54
Individual settings
54
Locking/unlocking the vehicle from the inside
55
Child safety lock
55
Your car is equipped with a central locking system.
The central locking system allows you to lock and unlock all doors, the fuel fill-
er flap and luggage compartment lid at the same time based on the current
setting 1)
.
The safe securing system » page 54 is integrated in the central locking sys-
tem. Once the car is locked from the outside, the door locks 2)
are automatically
blocked by the safe securing system »
.
The following is true after unlocking 1)
› The doors, the boot lid and the fuel filler flap are unlocked.
› The interior light, which is switched by the door contact, illuminates.
› The safe securing system is switched off 2)
.
› The warning icon in the driver door stops flashing.
› The anti-theft alarm system is deactivated.
The following is true after locking 1)
› The doors, the boot lid and the fuel filler flap are locked.
› The interior light switched by the door contact goes off.
› The safe securing system is switched on 2)
.
1)
Depending on the individual setting
» page 54.
2)
This function applies only to vehicles with specific equipment or for some countries.
50Operation
Page 81 of 252

Windscreen wipers and washersFig. 63
Operating lever: Windscreen
wipers and washer settings
Read and observe and on page 77 first.
Lever positions
0Wipers off1Periodic windscreen wiping / automatic wiping in rain2Slow windscreen wiping3Rapid windscreen wiping4 Flick windscreen wiping, service position of the wiper
arms » page 219 , (spring-loaded position)5Automatic wipe/wash for windscreen (spring-loaded position)6Wiping the rear window (the windscreen wiper wipes at regular in-
tervals after a few seconds)7Automatic wipe/wash for the rear window (spring-loaded position)ASwitches for setting: the desired pause between the individual wip-
er strokes / the speed of the wiping in rain (operating lever in the
position 1
)
Interval windscreen wiping
The wiping intervals are also speed-dependent regulated.
Automatic windscreen wiping in rain
The wiping intervals are controlled depending on the rain intensity.
Automatic wipe/wash for windscreen
The wash system operates immediately, the windscreen wipers wipe some-
what later. The wash system and the windscreen wiper operate simultaneous-
ly at a speed of more than 120 km/h.
Letting go of the operating lever will cause the windscreen wash system to
stop and the wipers to continue for another 3 - 4 wiper strokes (depending on
the spraying duration).
At a speed of more than 2 km/h, the wiper wipes once again 5 seconds after
the last wiper stroke in order to wipe the last drops from the windscreen. This
function can be activated/deactivated by a specialist garage.
Automatic wipe/wash for the rear window
(Superb Combi)
The wash system operates immediately, the wiper wipes somewhat later.
Letting go of the operating lever will cause the windscreen wash system to
stop and the wiper to continue for another 2 to 3 wiper strokes (depending on
the spraying duration). The operating lever remains in position » Fig. 63 6
.
Automatic rear window wiper (Superb Combi)
If the lever is in position
2
» Fig. 63 or
3
the rear window is wiped every
30 or 10 seconds if the vehicle's speed exceeds 5 km/h.
If automatic windscreen wiping in rain is activated (the operating lever is in the position
1
) the function is only active if the windscreen wipers operate in
continuous mode (no break between each wiping process).
Automatic rear window wiping can be activated/deactivated via the MAXI DOT
display in the menu item Rear wiper » page 47 .
Winter setting of the windscreen wiper
If the windscreen wipers are in rest position, they cannot be folded out from
the windscreen. For this reason we recommend adjusting the windscreen wip-
ers in winter so that they can be folded out from the windscreen easily.
› Switch on the windscreen wipers.
› Switch off the ignition.
The windscreen wipers remain in the position in which they were when
switching off the ignition.
The service position can also be used as a winter position » page 219.
Note
■
If the operating lever is in the position 2 or 3 and the speed of the vehicle
drops below 4 km/h, the wiping speed is switched to a lower wiping level. The
original setting is restored step by step when the speed of the vehicle exceeds
8 km/h.■
The rear window is wiped once automatically if the windscreen wipers are on
when reverse gear is selected.
78Operation
Page 154 of 252
Always ensure the tyre inflation pressure is correct » page 198. If the pressure
is too low, the tyres will have to overcome a higher rolling resistance. This will
not only increase fuel consumption but also tyre wear and the driving behav-
iour will worsen.
Always check the tyre inflation pressure when the tyres are cold.
Avoiding unnecessary ballast
Read and observe
on page 149 first.
Transporting ballast costs fuel.
Each kilogramme of weight increases the fuel consumption. Therefore we rec-
ommend carrying no unnecessary weight.
It is particularly in town traffic, when one is accelerating quite often, that the
vehicle weight will have a significant effect upon the fuel consumption. A rule
of thumb here is that an increase in weight of 100 kilograms will cause an in-
crease in fuel consumption of about 1 litre/100 kilometres.
At a speed of 100 - 120 km/h, a vehicle fitted with a roof rack cross member
without a load will use about 10 % more fuel than normal due to the increased
aerodynamic drag.
Regular maintenance
Read and observe
on page 149 first.
A poorly tuned engine uses an unnecessarily high amount of fuel.
By having your vehicle regularly maintained by a specialist garage, you create
the conditions needed for economical driving. The maintenance state of your
vehicle has a positive effect on traffic safety and value retention
A poorly tuned engine can result in a fuel consumption which is 10 % higher than normal.
Check the oil level at regular intervals, e.g. when filling up. Oil consumption is
dependent to a considerable extent on the load and speed of the engine. Oil
consumption could be as high as 0.5 litres/1 000 km depending on your style
of driving.
It is quite normal that a new engine has higher oil consumption at first, and
reaches its lowest level only after a certain running in time. The oil consump-
tion of a new vehicle can therefore only be correctly assessed after driving
about 5,000 km.
For the sake of the environment■ Additional improvements to the fuel economy can be made by using synthet-
ic low viscosity oils.■
Regularly check the ground under the vehicle. Have your vehicle inspected by
a specialist garage if you find any stains caused by oil or other fluids on the
ground.
Note
We recommend that your vehicle be serviced on a regular basis by a ŠKODA
service partner.
Saving electrical energy
Read and observe
on page 149 first.
When the engine is running, the alternator generates and supplies electricalpower. If more electrical components of the electrical system are switched on,
more fuel is needed to operate the alternator. We therefore recommend
switching off electrical components if these are no longer required.
Environmental compatibility
Read and observe
on page 149 first.
Environmental protection has played a major role in the design, material selec-
tion and production of your new ŠKODA. Particular emphasis has been placed
on the following points.
Design measures › Joints designed to be easily detached.
› Simplified disassembly due to the modular structure system.
› Improved purity of different classes of materials.
› Identification of all plastic parts in accordance with VDA Recommendation
260.
› Reduced fuel consumption and exhaust emission CO
2.
› Minimum fuel leakage during accidents.
› Reduced noise.
Choice of materials
› Extensive use of recyclable material.
› Air conditioning filled with CFC-free refrigerant.
› No cadmium.
151Starting off and Driving
Page 175 of 252
Engine overheating
The speed must be reduced immediately if the needle for the coolant tempera-
ture gauge moves into the right-hand area or the red area of the scale.
Stop and switch off the engine if the warning light
in the instrument cluster
illuminates.
The following guidelines must be observed » page 36,
Coolant .
The coolant temperature can be reduced by switching on the heating.WARNING■ Always drive particularly carefully with the trailer.■Adapt your speed to the conditions of the road surface and to the traffic
situation.
CAUTION
If you tow a trailer frequently, you should also have your vehicle inspected be-
tween service intervals.
Trailer stabilisation (TSA)
The trailer stabilisation is an extension of the stabilisation control that works
in conjunction with the counter-steering assistance to reduce the amount the
trailer "sways".
After turning on the ignition, the ESC warning light
in the instrument cluster
illuminates for about 2 seconds longer than the ABS warning light.
Function requirements for trailer stabilisation. The trailer was shipped from the factory or purchased from the ŠKODA
genuine accessories.
The ESC is active. (Warning lights
or
do not illuminate in the instru-
ment cluster).
The trailer is electrically connected to the towing vehicle by means of the
trailer socket.
The speed is higher than approx. 60 km/h.
The trailer has a rigid drawbar.
WARNING■ The increased safety offered by the trailer stabilisation must not tempt
you to take greater risks than otherwise.■
Avoid abrupt and sudden driving and braking manoeuvres - there is a risk
of accidents.
CAUTION
■ The trailer stabilisation need not be able to correctly detect all of driving sit-
uations.■
Light trailers that sway are not always detected and therefore stabilised ac-
cordingly by the trailer stabilisation.
■
Release the pressure on the accelerator pedal if the system is being regula-
ted.
Note
The trailer stabilisation works for both braked and unbraked trailers.
Anti-theft alarm system
When the vehicle is locked, the alarm is activated when the electrical connec-
tion to the trailer is interrupted.
Always switch off the anti-theft alarm system before a trailer is coupled or un-
coupled » page 55 .
Conditions for including a trailer in the anti-theft alarm system. The vehicle is factory fitted with an anti-theft alarm system and towing
equipment.
The trailer is electrically connected to the towing vehicle by means of the
trailer socket.
The electrical system of the vehicle and trailer is functional.
The vehicle is locked with the vehicle key and the anti-theft alarm system
is activated.
CAUTION
For technical reasons, trailers with rear LED lights cannot be connected to the
anti-theft alarm system.172Driving