heating SKODA SUPERB 2010 2.G / (B6/3T) User Guide
[x] Cancel search | Manufacturer: SKODA, Model Year: 2010, Model line: SUPERB, Model: SKODA SUPERB 2010 2.G / (B6/3T)Pages: 287, PDF Size: 16.59 MB
Page 87 of 287
Seats and Stowage
86
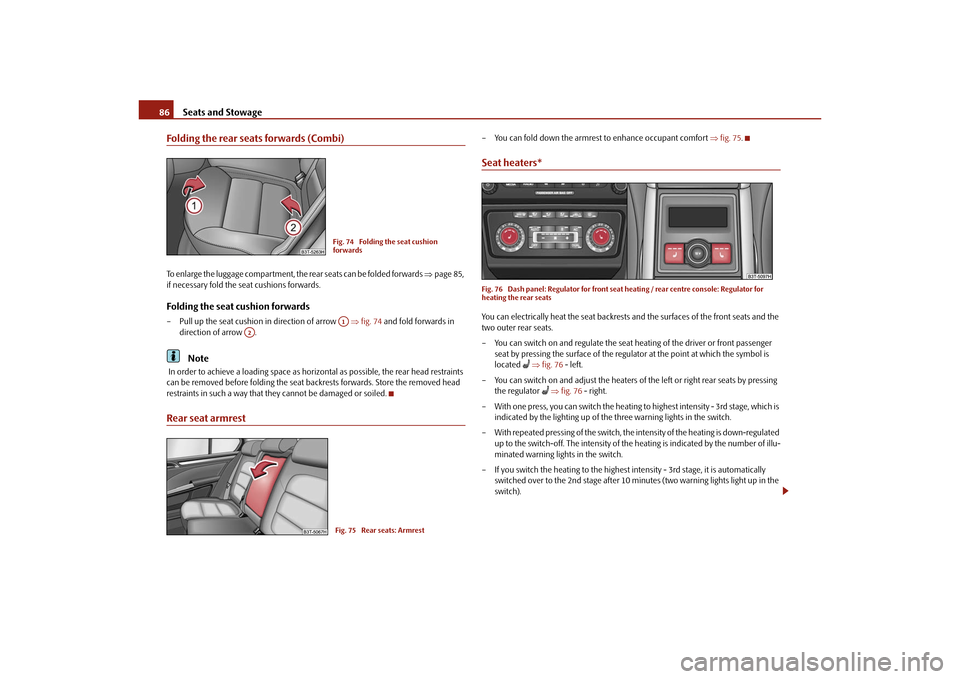
Folding the rear seats forwards (Combi)To enlarge the luggage compartment, the rear seats can be folded forwards page 85,
if necessary fold the seat cushions forwards.Folding the seat cushion forwards– Pull up the seat cushion in direction of arrow fig. 74 and fold forwards in
direction of arrow .
Note
In order to achieve a loading space as horizo ntal as possible, the rear head restraints
can be removed before folding the seat backrests forwards. Store the removed head
restraints in such a way that th ey cannot be damaged or soiled.Rear seat armrest
– You can fold down the armrest to enhance occupant comfort fig. 75 .Seat heaters*Fig. 76 Dash panel: Regulator for front seat heating / rear centre console: Regulator for
heating the rear seatsYou can electrically heat the seat backrests and the surfaces of the front seats and the
two outer rear seats.
– You can switch on and regulate the seat heating of the driver or front passenger
seat by pressing the surface of the regulator at the point at which the symbol is
located
fig. 76 - left.
– You can switch on and adjust the heaters of the left or right rear seats by pressing the regulator
fig. 76 - right.
– With one press, you can switch the heating to highest intensity - 3rd stage, which is
indicated by the lighting up of the three warning lights in the switch.
– With repeated pressing of the switch, the intensity of the heating is down-regulated up to the switch-off. The intensity of the heating is indicated by the number of illu-
minated warning lights in the switch.
– If you switch the heating to the highest intensity - 3rd stage, it is automatically switched over to the 2nd stage after 10 mi nutes (two warning lights light up in the
switch).
Fig. 74 Folding the seat cushion
forwardsA1
A2
Fig. 75 Rear seats: Armrest
s3fg.2.book Page 86 Friday, April 30, 2010 12:17 PM
Page 88 of 287
Seats and Stowage87
Using the system
Safety
Driving Tips
General Maintenance
Breakdown assistance
Technical Data
WARNING
If, as an occupant, you have a subdued pain and/or temp erature sensitivity, e.g.
through medication, paralysis or because of chronic illness (e.g. diabetes), we
recommend not to use the seat heating. Th is can lead to burns on the back, the
posterior and the legs which are difficult to heal. If the seat heating is used, we
recommend to make regular breaks in your journey when driving long
distances, so that in specific cases as mentioned above the body can recuperate
from the stress of the journey. Please consult your doctor, who can evaluate
your specific condition.
Caution
You should not kneel on the seats or otherwise apply pressure at specific points in
order to avoid damaging the heating elements of the seat heaters.
Do not use the seat heating if the seats are not occupied by persons or if objects
are fastened or stored on them, for example a child seat, a bag etc. A fault of the heating
elements in the seat heating can occur.
Do not clean the seats moist page 209.Note
The seat heating should only be switched on when the engine is running. This has
a significant effect of saving on the battery capacity.
If the on-board voltage drops, the seat heating is switched off automatically, in
order to provide sufficient electrical energy for the engine control.
PedalsConcerning a secure depressing of the peda l, you should use only footmats from the
Škoda genuine accessories.
Operation of the pedals must not be hindered!
WARNING
Greater pedal distances may be needed when there is a fault in the brake
system.
Do not place any footmats or other additional floor coverings in the area of
the pedals in order to ensure that all the pedals can be fully depressed and are
able to return unobstructed to their initial position - risk of accident!
There must be no objects on the floor which could roll under the pedals. You
would then no longer be able to apply the brakes, operate the clutch or acceler-
ator - risk of accident!
luggage compartmentLoading the luggage compartmentPlease observe the following in the interest of having good handling characteristics of
your vehicle:
– Distribute the items of luggage as evenly as possible.
– Place heavy objects as far forward as possible.
– Attach the items of luggage to the lashing eyes or the fixing net* page 88.
In the event of an accident, there is such a high kinetic energy which is produced by
small and light objects that they can cause severe injuries. The magnitude of the kinetic
energy depends on the speed at which the vehicle is travelling and on the weight of the
object. The speed at which the vehicle is trave lling is in this case the more significant
factor.
Example: In the event of a frontal collision at a speed of 50 km/h, an unsecured object
with a weight of 4.5 kg produces an en ergy, which corresponds to 20 times its own
weight. This means that it results in a weight of approx. 90 kg. You can imagine the inju-
ries that can occur, if this “bullet” is flying through the interior compartment and hits
an occupant.
WARNING
Stow the objects in the luggage compartment and attach them to the
lashing eyes.WARNING (continued)
s3fg.2.book Page 87 Friday, April 30, 2010 12:17 PM
Page 89 of 287

Seats and Stowage
88
Loose objects in the passenger compartment can be thrown forward during
a sudden manoeuvre or in case of an accident and can injure the occupants or
other oncoming traffic. This risk is still increased, if the objects which are flying
around are hit by a deployed airbag. In this case, the objects which are thrown
back can injure the occupants - hazard.
Please note that the handling properties of your vehicle may be affected
when transporting heavy objects as a result of the displacement of the centre of
gravity. The speed and style of driv ing must be adjusted accordingly.
The items carried in the luggage compar tment should be stowed in such a
way that no objects are able to slip fo rward if there are any sudden driving or
braking manoeuvres undertaken - risk of injury!
Never drive with the boot lid fully open ed or slightly ajar otherwise exhaust
gases may get into the interior of the vehicle - risk of poisoning!
On no account exceed the permissible axle loads and the permissible gross
weight of the vehicle - risk of accident!
Never transport occupants in the luggage compartment!Caution
Make sure that transported objects with sharp edges do not damage the following:
heating elements in the rear window,
elements of the aerial integrated in the rear window (Superb),
elements of the aerial integrated in the rear side windows (Combi).Note
Tyre pressure must be adjusted to the load page 228, fig. 189.Vehicles of category N1On vehicles of the category N1, which are not fitted with a protective grille, a lashing
set which complies with the standard EN 12195 (1 - 4) must be used for fastening the
load.
Lashing eyesEyes are located on the sides of the luggage compartment for lashing the goods to be
loaded.
You can also attach a floor fixing net* to these eyes for holding small objects.
WARNING
The load to be transported must be fixed in place in such a way that it cannot
move during the journey and when braking.
If the items of luggage or objects are attached to the lashing eyes with
unsuitable or damaged lashing straps, inju ries can occur in the event of braking
manoeuvres or accidents. In order to prevent the items of luggage being thrown
forward, always use suitable lashing st raps which are firmly attached to the
lashing eyes.
WARNING (continued)
Fig. 77 Luggage compartment: Lashing
eyes
s3fg.2.book Page 88 Friday, April 30, 2010 12:17 PM
Page 92 of 287

Seats and Stowage91
Using the system
Safety
Driving Tips
General Maintenance
Breakdown assistance
Technical Data
Caution
Please ensure that the heating elements of the rear window heater are not damaged
as a result of objects placed in this area.
Note
Opening the tailgate also lifts up the luggage compartment cover.Foldable luggage compartment cover (Combi)Fig. 84 Luggage compartment: foldable lugga ge compartment cover / removing foldable
luggage compartment coverPulling out– Pull the foldable luggage compartment cover as far as the stop into the secured
position fig. 84 .Folding– Press the cover in the handle area in direction of arrow fig. 84 , the cover rolls
up automatically into position . The cove r is fully rolled up by pressing once
again.Removing– The fully folded luggage compartment cover can be removed to transport bulky goods by pressing on the side of the cross rod in direction of arrow fig. 84
and taking it out by moving it in direction of arrow .
WARNING
No objects should be placed on the luggage compartment cover.Automatic foldable luggage compartment cover* (Combi)
The automatic rolling up of the fo ldable luggage compartment cover
enables an easier entry in to the luggage compartment.– Open the boot lid. The foldable luggage compartment cover rolls up automatically
in the position page 91, fig. 84 .
– The cover rolls up fully by pressing the cover in the handle area in direction of
arrow .
When the boot lid is opened quickly, the automatic rolling up of the foldable luggage
compartment cover is blocked for a delay time of approx. 2 seconds.
The function of the automatic rolling up of the foldable luggage compartment cover
can be activated/deactivated in the information display* in the menu:
SETUP
Autom. blindWARNING
No objects should be placed on the luggage compartment cover.
A2
A3
A1
A4
A5
A1
A3
s3fg.2.book Page 91 Friday, April 30, 2010 12:17 PM
Page 103 of 287
Seats and Stowage
102
Cooling of storage compartment on front passenger side
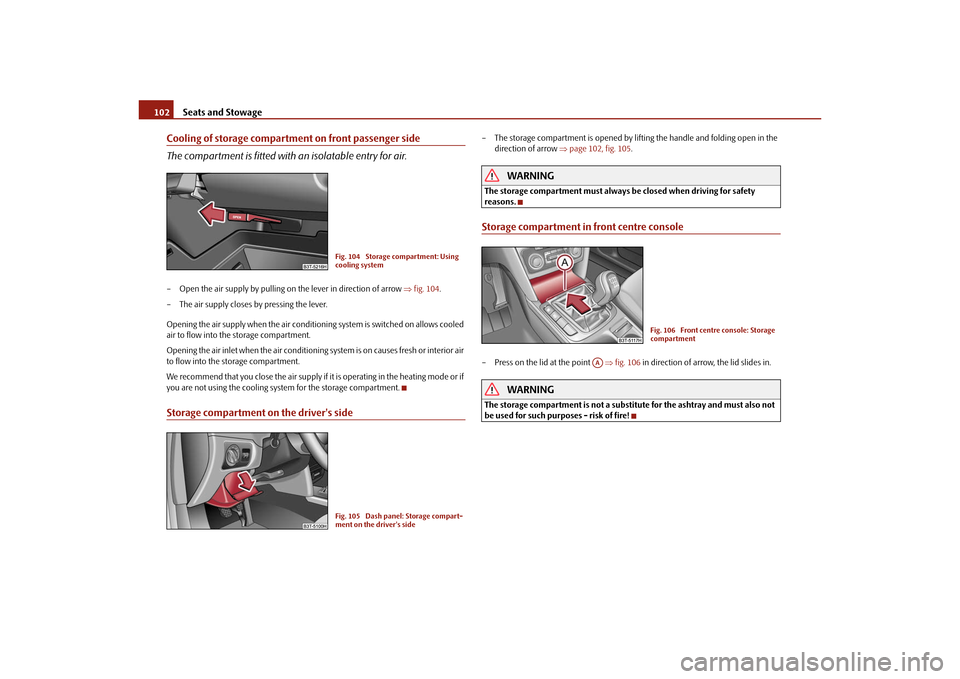
The compartment is fitted with an isolatable entry for air.– Open the air supply by pulling on the lever in direction of arrow fig. 104 .
– The air supply closes by pressing the lever.
Opening the air supply when the air conditioni ng system is switched on allows cooled
air to flow into the storage compartment.
Opening the air inlet when the air conditioning system is on causes fresh or interior air
to flow into the storage compartment.
We recommend that you close the air supply if it is operating in the heating mode or if
you are not using the cooling system for the storage compartment.Storage compartment on the driver's side
– The storage compartment is opened by li fting the handle and folding open in the
direction of arrow page 102, fig. 105 .
WARNING
The storage compartment must always be closed when driving for safety
reasons.Storage compartment in front centre console– Press on the lid at the point fig. 106 in direction of arrow, the lid slides in.
WARNING
The storage compartment is not a substitute for the ashtray and must also not
be used for such purposes - risk of fire!
Fig. 104 Storage compartment: Using
cooling systemFig. 105 Dash panel: Storage compart-
ment on the driver's side
Fig. 106 Front centre console: Storage
compartment
AA
s3fg.2.book Page 102 Friday, April 30, 2010 12:17 PM
Page 110 of 287
Air conditioning system109
Using the system
Safety
Driving Tips
General Maintenance
Breakdown assistance
Technical Data
Air conditioning systemIntroductionDescription and informationIf the cooling system is switched on, the temperature and air humidity drops in the
vehicle. The wellbeing of the occupants of the car is enhanced as a result of this partic-
ularly at high outside temperatures and a high air humidity. The system prevents the
windows misting up during th e cold season of the year.
The heating effect is dependent upon the c oolant temperature, thus full heat output
only occurs when the engine has reached its operating temperature.
It is possible to briefly activate recirculat ed air mode in order to enhance the cooling
effect - Climatic page 113, Climatronic page 116.
The air inlet in front of the windscreen must be free of ice, snow or leaves in order to
ensure that the heating and cooling systems operate properly.
After switching on the cooling Condensation from the evaporator of the air condi-
tioning may drip down and form a puddle be low the vehicle. This is quite normal and
not an indication of a leak!
WARNING
For your own safety and that of other road users, ensure that all the
windows are free of ice, snow and mistin g. Please familiarize yourself about
how to correctly operate th e heating and ventilation systems, how to demist
and defrost the windows, as well as with the cooling mode.
You should not leave recirculated air mode on over a longer period of time,
as “stale” air may result in fatigue in the driver and occupants, divert your
attention and also cause the windows to mist up. The risk of having an accident
increases. Switch recirculated air mode off as soon as the windows begin
misting up.
Note
The used air streams out through the air removal openings in the luggage compart-
ment.
If the cooling system has not been switched on for a lengthy period, odours may
be produced at the evaporator because of deposits. Switch the cooling system on at
least once a month for approximately 5 minu tes at the highest blower stage - also
during the cold season of the year - in order to avoid such odours. Also open a window
for a short time.
We recommend that you do not smoke in the vehicle when the recirculating air
mode is operating since the smoke which is drawn at the evaporator from the interior
of the vehicle forms deposits in the evapor ator of the air conditioning system. This
produces a permanent odour when the air conditioning system is operating which can
only be eliminated through considerable effort and expense (replacement of
compressor).
Please refer to the information regarding the recirculated air mode for Climatic
page 113 or for Climatronic page 116.
Using the air conditioning system economicallyThe compressor on the air conditioning syst em uses power from the engine when in
cooling mode which will effect the fuel consumption.
It recommended to open the windows or the doors of a vehicle for which the interior
has been strongly heated through the effect of direct sunlight in order to allow the
heated air to escape.
The cooling system should not be switched on while travelling when the window is
open.
The desired interior temperature can also be achieved without switching in the cooling
system just by switching to fresh air mode.
For the sake of the environment
When you economize on fuel, you also reduce pollutant emissions.
s3fg.2.book Page 109 Friday, April 30, 2010 12:17 PM
Page 112 of 287
Air conditioning system111
Using the system
Safety
Driving Tips
General Maintenance
Breakdown assistance
Technical Data
Climatic (semi-automatic air conditioning system)Description
The Climatic is a combined coolin g and heating system. It makes it
possible to optimally control the air temperature at any season of the
year.Description of the Climatic
It is important for your safety and for your driving comfort that the Climatic is operating
properly.
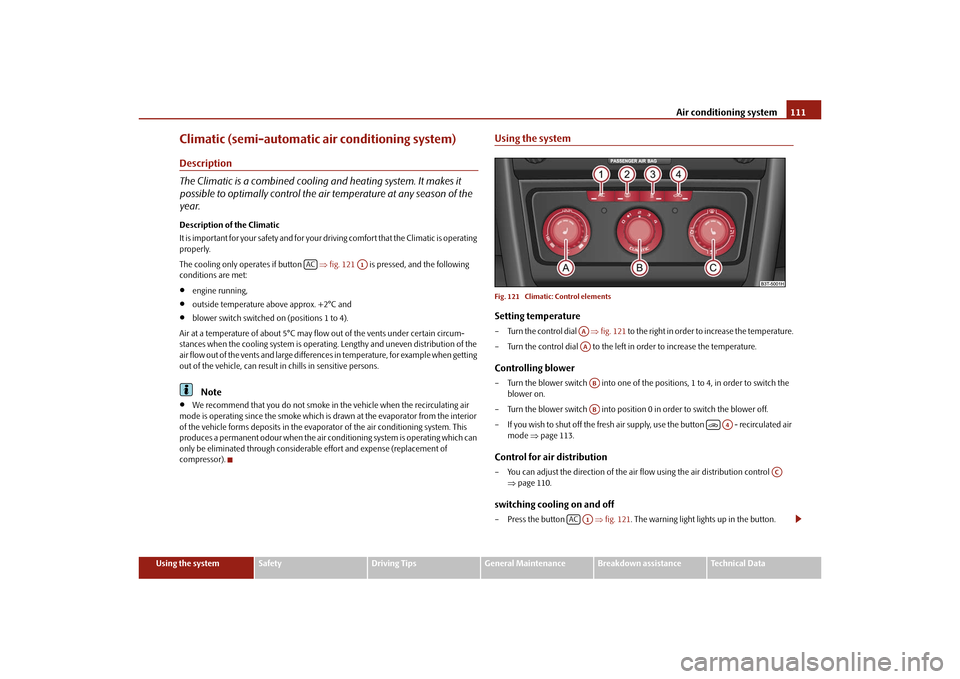
The cooling only operates if button fig. 121 is pressed, and the following
conditions are met:
engine running,
outside temperature above approx. +2°C and
blower switch switched on (positions 1 to 4).
Air at a temperature of about 5°C may flow out of the vents under certain circum-
stances when the cooling system is operatin g. Lengthy and uneven distribution of the
air flow out of the vents and large differences in temperature, for example when getting
out of the vehicle, can result in chills in sensitive persons.Note
We recommend that you do not smoke in the vehicle when the recirculating air
mode is operating since the smoke which is drawn at the evaporator from the interior
of the vehicle forms deposits in the evapor ator of the air conditioning system. This
produces a permanent odour when the air co nditioning system is operating which can
only be eliminated through considerable effort and expense (replacement of
compressor).
Using the systemFig. 121 Climatic: Control elementsSetting temperature– Turn the control dial fig. 121 to the right in order to increase the temperature.
– Turn the control dial to the left in order to increase the temperature.Controlling blower– Turn the blower switch into one of the po sitions, 1 to 4, in order to switch the
blower on.
– Turn the blower switch into position 0 in order to switch the blower off.
– If you wish to shut off the fresh air supply, use the button - recirculated air mode page 113.Control for air distribution– You can adjust the direction of the air flow using the air distribution control
page 110.switching cooling on and off– Press the button fig. 121 . The warning light lights up in the button.
AC
A1
AAAAABAB
A4
AC
AC
A1
s3fg.2.book Page 111 Friday, April 30, 2010 12:17 PM
Page 113 of 287
Air conditioning system
112
– When you again press the switch , the cooling system is switched off. The
warning light in the button goes out.Rear window heater– Press button . Further information page 71.Auxiliary heating (auxiliary heating)– Press the button in order to directly switch on/off the auxiliary heating
(auxiliary heating and ventil ation. Further information page 117.
The set temperature will be automatically maintained other than when the
control dial is on the extreme right or extreme left position:
Extreme right position - full heating,
Extreme left position - full cooling,
The blower should aways be on to prevent the windows from misting up.Note
The whole heat output will be needed to unfrost the windscreen and side windows.
No warm air will be fed to the footwell. Th is can lead to restriction of the heating
comfort.
The used air streams out through the air removal openings in the luggage compart-
ment.
If the cooling system has not been switched on for a lengthy period, odours may
be produced at the evaporator because of deposits. Switch the cooling system on at
least once a month for approximately 5 minutes at the highest blower stage - also
during the cold season of the year - in order to avoid such odours. Also open a window
for a short time.
Please refer to the information regarding recirculated air mode page 113.
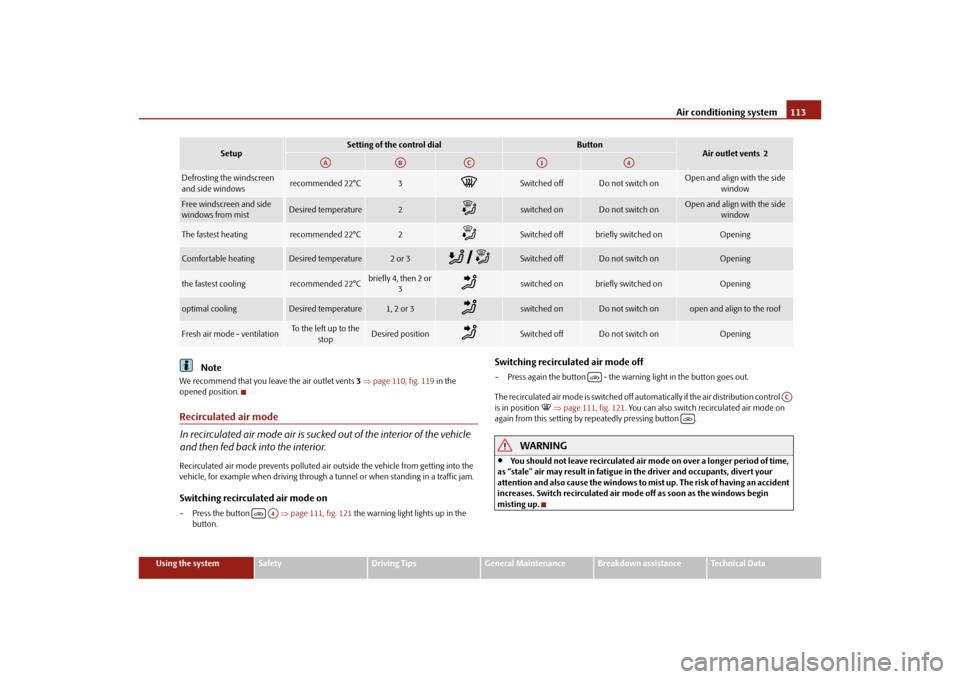
Set ClimaticRecommended settings of Climatic contro ls for the respective operating modes:
AC
A2A3
s3fg.2.book Page 112 Friday, April 30, 2010 12:17 PM
Page 114 of 287
Air conditioning system113
Using the system
Safety
Driving Tips
General Maintenance
Breakdown assistance
Technical Data
Note
We recommend that you leave the air outlet vents 3 page 110, fig. 119 in the
opened position.Recirculated air mode
In recirculated air mode air is sucked out of the interior of the vehicle
and then fed back into the interior.Recirculated air mode prevents polluted air outside the vehicle from getting into the
vehicle, for example when driving through a tunnel or when standi ng in a traffic jam.Switching recirculated air mode on– Press the button page 111, fig. 121 the warning light lights up in the
button.
Switching recirculated air mode off– Press again the button - the wa rning light in the button goes out.
The recirculated air mode is switched off automatically if the air distribution control
is in position
page 111, fig. 121 . You can also switch recirculated air mode on
again from this setting by repeatedly pressing button .
WARNING
You should not leave recirculated air mode on over a longer period of time,
as “stale” air may result in fatigue in the driver and occupants, divert your
attention and also cause the windows to mist up. The risk of having an accident
increases. Switch recirculated air mo de off as soon as the windows begin
misting up.
Setup
Setting of the control dial
Button
Air outlet vents 2
Defrosting the windscreen
and side windows
recommended 22°C
3
Switched off
Do not switch on
Open and align with the side window
Free windscreen and side
windows from mist
Desired temperature
2
switched on
Do not switch on
Open and align with the side window
The fastest heating
recommended 22°C
2
Switched off
briefly switched on
Opening
Comfortable heating
Desired temperature
2 or 3
Switched off
Do not switch on
Opening
the fastest cooling
recommended 22°C
briefly4, then 2or
3
switched on
briefly switched on
Opening
optimal cooling
Desired temperature
1, 2 or 3
switched on
Do not switch on
open and align to the roof
Fresh air mode - ventilation
To the left up to the stop
Desired position
Switched off
Do not switch on
Opening
AA
AB
AC
A1
A4
A4
AC
s3fg.2.book Page 113 Friday, April 30, 2010 12:17 PM
Page 115 of 287
Air conditioning system
114
Climatronic* (automatic air conditioning)Description
The Climatronic system is a combination of an automatic heating, fresh
air and cooling system which provides optimal comfort for the occu-
pants of the car.The Climatronic maintains fu lly automatically a convenience temperature. This is
achieved by automatically varying the temper ature of the outflowing air, the blower
stages and the air distribution. The system also takes into account sunlight which elim-
inates the need to alter the settings manually. The automatic mode page 115
ensures maximum wellbeing of the occupants at all times of the year.
Description of Climatronic system
The cooling operates only if the following conditions are met:
engine running,
outside temperature above approx. +2°C,
switched on.
The AC compressor is switched off at a hi gh coolant temperature in order to provide
cooling at a high load of the engine.
Recommended setting for all periods of the year:
Set the desired temperature, we recommend 22°C.
Press the button fig. 122 .
Move the air outlet vents 2 and 3 so that the air flow is directed slightly upwards.
Aeration of the vehicle when ignition is switched off*
On vehicles fitted with power sliding/tilting roof with solar cells* the fresh air blower is
automatically switched over to “solar mo de” if the sun rays are sufficient after
switching off the ignition. The solar cells on the sliding/tilting roof deliver power for the
fresh air blower. This supplies the interior of the car with fresh air.
For an optimum ventilation, the air outlet vents 2 and 3 page 110, fig. 119 must be
opened.
The ventilation functions only when the sliding/tilting roof is closed.
Note
On vehicles equipped with a factory-fitted radio* or navigation*, the information of
the Climatronic is also shown on the display. This function can be switched off, see
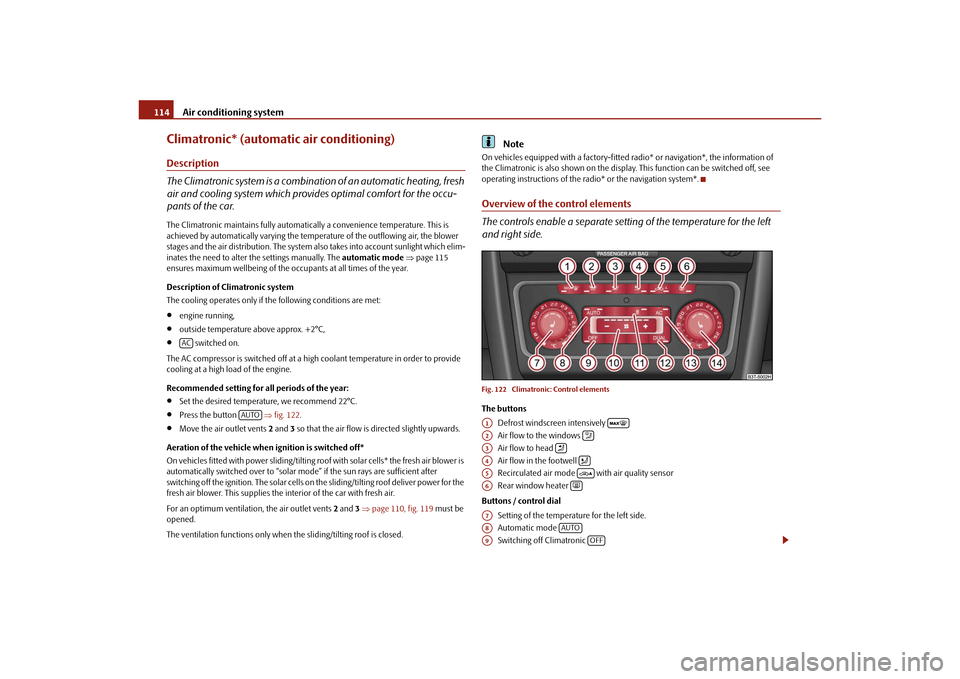
operating instructions of the radio* or the navigation system*.Overview of the control elements
The controls enable a separate setting of the temperature for the left
and right side.Fig. 122 Climatronic: Control elementsThe buttons
Defrost windscreen intensively
Air flow to the windows
Air flow to head
Air flow in the footwell
Recirculated air mode with air quality sensor
Rear window heater
Buttons / control dial Setting of the temperature for the left side.
Automatic mode
Switching off Climatronic
AC
AUTO
A1
A2
A3
A4
A5
A6
A7A8
AUTO
A9
OFF
s3fg.2.book Page 114 Friday, April 30, 2010 12:17 PM