open bonnet SKODA SUPERB 2010 2.G / (B6/3T) User Guide
[x] Cancel search | Manufacturer: SKODA, Model Year: 2010, Model line: SUPERB, Model: SKODA SUPERB 2010 2.G / (B6/3T)Pages: 287, PDF Size: 16.59 MB
Page 139 of 287
Automatic gearbox DSG*
138WARNING
Never move the selector lever into position R or P when driving - risk of an
accident!
When the engine is running and the vehicle is stationary, it is necessary to
hold the car with the brake pedal in all the positions of the selector lever (except
P and N) since the power transmission is never completely interrupted, also not
when the engine is idling - the vehicle creeps.
You must on no account unintentionally operate the throttle (e.g. by hand
from the engine compartment) if a driv e position is engaged when the car is
stationary. The vehicle would otherwise immediately start off - also when the
handbrake is firmly applied - risk of an accident!
You must move the selector lever into position P and firmly apply the hand-
brake first before you or any other person opens the bonnet and starts working
on the engine when it is running - risk of accident! It is also essential to observe
all warnings page 216.
Selector lever lockAutomatic selector lever lock
With the ignition on, the selector lever is locked when it is in the positions P and N . You
must first of all depress the brake pedal in or der to move the selector lever out of this
position. The warning light
page 27 lights up in the instrument cluster as a
reminder for the driver when the selector lever is in the positions P and N.
A time delay element ensures that the selector lever is not blocked when rapidly
switching over the position N (e.g. from R to D). This does, for example, allow one to
seesaw out a stuck vehicle. The selector lever lo ck will click into place if the lever is in
the N position for more than 2 seconds without the brake pedal being pressed.
The selector lever lock is only active if the vehicle is stationary or moving at speed of
less than 5 km/hour. The lock is swit ched off automatically into position N when the
car is travelling at a higher speed.
Shiftlock button
The Shiftlock button in the hand le of selector lever prevents certain selector lever posi-
tions being engaged inadvertently. The select or lever lock is cancelled when you press
the Shiftlock button. Keylock - Ignition key withdrawal lock
You can only withdraw the ignition key after
switching off the ignition if the selector
lever is in position P. If the ignition key is withdrawn, the selector lever is blocked in
position P.
Kickdown function
The kickdown function provides you with maximum acceleration
power.Fully depressing the accelerato r pedal allows the kickdown function to be activated in
the desired driving program. This function has precedence over the driving
programme and serves for maximum accelerati on of the vehicle when exploiting the
maximum power potential of the engine wi thout taking into account the current
selector lever position ( D, S or Tiptronic). The gearbox shifts down to one or several
gears in line with the driving state and the vehicle accelerates. The gearbox does not
shift up into the highest gear until the en gine has reached its maximum revolutions for
this gear range.
WARNING
Please note that using the kickdown function can result in the driven wheels
spinning on a smooth or slippery road surface - risk of skidding!Dynamic shift programmeThe automatic gearbox of your vehicle is controlled electronically. Shifting up and
down through the gears is performed automati cally on the basis of pre-defined driving
programmes.
Adopting a moderate style of driving will cause the gearbox to select the most
economical driving programme. Shifting up into a higher gear as soon as possible and
shifting down as late as po ssible will have a favourable effect on your fuel consump-
tion.
Adopting a sporty style of driving with rapid movements of the accelerator pedal
combined with sharp acceleration and frequent changes in speed, exploiting the top
speed of the car or depressing the accele rator pedal (kickdown function), will cause
s3fg.2.book Page 138 Friday, April 30, 2010 12:17 PM
Page 209 of 287
Taking care of your vehicle and cleaning the vehicle
208
Do not use window leathers which you have us ed to polish the vehicle body to dry off
the windows. Residues of preservatives in the window leather can dirty the window
and reduce visibility.
Do not affix any stickers over the inside of the rear window to avoid damage to the
heating elements of the rear window heater .
We recommend using a preserva tive from Škoda genuine accessories offered by your
Škoda dealer.
Caution
Never remove snow or ice from the glass parts with warm or hot water - risk of forma-
tion of cracks in the glass.The headlight lensesPlease do not use any aggressi ve cleaning or chemical solvent products for cleaning
the front headlights - risk of damage to the plastic lenses. Please use soap and clean
warm water.
Caution
Never wipe the headlights dry and do not use any sharp objects for cleaning the plastic
lenses, this may result in damage to the protective paintwork and consequently in
formation of cracks on the headlight lenses, e.g through effect of chemical products.Door and window sealsThe rubber seals on the doors, boot lid, bonnet and windows remain supple and last
longer if you treat them from time to time with a rubber care product (e.g. with a spray
with silicone-free oil). You also avoid premature wear of the seals and prevent leakages
in this way. It is also easier to open the doors. Rubber seals which are well cared for also
do not stick together in cold winter weather.Locking cylinderWe recommend that you use the spray from Škoda original accessories with regreasing
and anticorrosive effect for de-icing locking cylinders.
Note
When washing your vehicle, ensure that as little water as possible gets into the locking
cylinders.WheelsSteel wheels
You should also thoroughly wash the wheels and wheel trims when giving your vehicle
its regular wash. This prevents any brake dust, dirt and road salt from sticking to the
wheel hubs. You can remove stubborn brake abrasion adhering to the wheels with an
industrial cleaner. Touch up any damage to the paintwork on the wheels before rust is
able to form.
Light alloy wheels
Regular care of light alloy wh eels is necessary in order to retain their decorative
appearance over long periods. It is particul arly important to remove any road salt and
brake abrasion from light alloy wheels every two weeks, otherwise the light metal will
suffer. Wash thoroughly and then treat the wheels with a protective product for light
alloy wheels which does not contain any acidic componen ts. You should provide the
wheel hubs with a hard wax layer every thre e months. You must not use any products
which cause abrasion when treating the wheel hubs. Any damage to the paint layer on
the wheel hubs must be touched up immediately.
We recommend using a preservative from Šk oda genuine accessories offered by your
Škoda dealer.
WARNING
One should remember when cleaning th e wheels that moisture, ice and road
salt may adversely affect braking ef ficiency - risk of an accident!
Note
Severe layers of dirt on the wheels can also result in wheel imbalance. This may show
itself in the form of a wheel vibration which is transmitted to the steering wheel which,
in certain circumstances, can cause premature wear of the steering. This means it is
necessary to remove the dirt.
s3fg.2.book Page 208 Friday, April 30, 2010 12:17 PM
Page 216 of 287

Inspecting and replenishing215
Using the system
Safety
Driving Tips
General Maintenance
Breakdown assistance
Technical Data
Inspecting and replenishingEngine compartmentBonnet remote releaseBonnet remote release– Pull the unlocking lever below the dash panel on the driver's side fig. 180 .
The bonnet jumps out of its lock as a result of the spring force.Opening and closing the bonnet.Opening the bonnet– Unlock the bonnet fig. 180 . – Ensure that the arms of the windscreen wipers are correctly in place against the
windscreen before opening the bonnet otherwise damage could occur to the
paintwork.
– Pull on the locking lever fig. 181 , the bonnet is then unlocked.
– Grasp the bonnet at the bottom part of the radiator grille and lift it towards the top
so that it is held opened by the gas pressure support.
Closing the bonnet– You can overcome the force of the gas pressure support by pulling the bonnet
towards the bottom.
– Allow the bonnet to drop from a height of about 30 cm into the lock - bonnet do
not press down on it !
WARNING
Never open the bonnet if you see that steam or coolant is flowing out of the
engine compartment - risk of scalding! Wait long enough until the steam or
coolant has stopped escaping.
For safety reasons, the bonnet must always be properly closed when
driving. One should therefore check that the lock has in fact engaged properly
after closing the bonnet.
Stop your vehicle immediately while driving if you notice that the lock is not
properly engaged and close the bonnet properly - risk of an accident!Caution
Ensure that the arms of the windscreen wipers are correctly in place against the wind-
screen before opening the bonnet otherwise damage could occur to the paintwork.
Fig. 180 Bonnet release leverFig. 181 Radiator grille: Locking lever
s3fg.2.book Page 215 Friday, April 30, 2010 12:17 PM
Page 217 of 287

Inspecting and replenishing
216
Working in the engine compartment
Particular care is required when carrying out any work in the engine
compartment!There is a risk of injuries, scalding, acci dents and fire when working in the engine
compartment, e.g. inspecting and replenishing oil and other fluids. For this
reason, it is essential to comply with the warning instructions stated below and
with the general applicable rules of safe ty. The engine compartment of your car
is a hazardous area .
WARNING
Never open the bonnet if you see that steam or coolant is flowing out of the
engine compartment - risk of scalding! Wait long enough until the steam or
coolant has stopped escaping.
Switch off the engine and pull out the ignition key.
Apply the handbrake firmly.
If your vehicle is fitted with a manual gearbox, move the gearshift lever into
Neutral, or if it is fitted with automatic gearbox, move the selector lever into
position P.
Allow the engine to cool down.
Keep children clear of the engine compartment.
Never spill oil and other fluids over the hot engine. Such fluids (e.g. the anti-
freeze contained in the coolant) may ignite!
Avoid short circuits in the electrical system - particularly on the battery.
Never place your hand into the radiator fan as long as the engine is still
warm. The fan might suddenly start running!
Never open the cap of the coolant expans ion bottle as long as the engine is
still warm. The cooling system is pressurized!
Cover over the cap of the coolant expansion reservoir with a large cloth
when opening it as protection for your face, hands and arms from hot steam or
hot coolant.
Do not let objects, such as e.g cleaning cloth or tools lie in the engine
compartment.
If you wish to work under the vehicl e, you must secure the vehicle from
rolling away and support it with suitable supporting blocks: the car jack is not
sufficient for this - risk of injury!
In cases where it be necessary to carry out inspection work when the engine
is running there is an additional risk fr om rotating parts (e.g. the V-ribbed belt,
alternator, radiator fan) and from the high-voltage ignition system. Please
observe in addition the following.
Never touch the electrical cabl es of the ignition system.
Absolutely avoid any jewellery, loose it ems of clothing or long hair from
getting into the rotating parts of the engine - Hazard! Therefore remove any
jewellery beforehand, tie up your hair and wear tight fitting clothing.
Please also comply with the warnin g instructions stated below when
carrying out any essential work on the fu el system or on the electrical system.
Always separate the car battery from the electrical system.
Do not smoke.
Never carry out any work close to naked flames.
Always keep a working fire extinguisher at hand.Caution
When replenishing fluids in the engine, always ensure that the fluids are on no account
mixed up. This may result in major oper ating problems and also vehicle damage!
WARNING (continued)
s3fg.2.book Page 216 Friday, April 30, 2010 12:17 PM
Page 218 of 287
Inspecting and replenishing217
Using the system
Safety
Driving Tips
General Maintenance
Breakdown assistance
Technical Data
Overview of the engine compartment
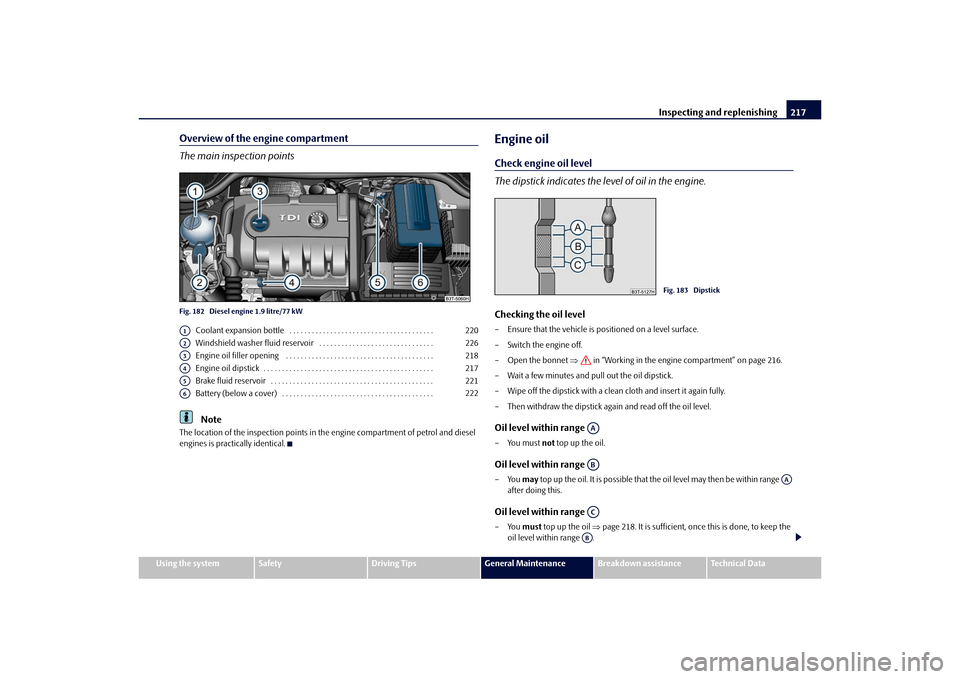
The main inspection pointsFig. 182 Diesel engine 1.9 litre/77 kW
Coolant expansion bottle . . . . . . . . . . . . . . . . . . . . . . . . . . . . . . . . . . . . . . .
Windshield washer fluid reservoir . . . . . . . . . . . . . . . . . . . . . . . . . . . . . . .
Engine oil filler opening . . . . . . . . . . . . . . . . . . . . . . . . . . . . . . . . . . . . . . . .
Engine oil dipstick . . . . . . . . . . . . . . . . . . . . . . . . . . . . . . . . . . . . . . . . . . . . . .
Brake fluid reservoir . . . . . . . . . . . . . . . . . . . . . . . . . . . . . . . . . . . . . . . . . . . .
Battery (below a cover) . . . . . . . . . . . . . . . . . . . . . . . . . . . . . . . . . . . . . . . . .Note
The location of the inspection points in th e engine compartment of petrol and diesel
engines is practically identical.
Engine oilCheck engine oil level
The dipstick indicates the le vel of oil in the engine.Checking the oil level– Ensure that the vehicle is po sitioned on a level surface.
– Switch the engine off.
– Open the bonnet in “Working in the engine compartment” on page 216.
– Wait a few minutes and pull out the oil dipstick.
– Wipe off the dipstick with a clea n cloth and insert it again fully.
– Then withdraw the dipstick again and read off the oil level.Oil level within range –You must not top up the oil.Oil level within range –You may top up the oil. It is possible that the oil level may then be within range
after doing this.Oil level within range –You must top up the oil page 218. It is sufficient, once this is done, to keep the
oil level within range .
A1
220
A2
226
A3
218
A4
217
A5
221
A6
222
Fig. 183 Dipstick
AAAB
AA
ACAB
s3fg.2.book Page 217 Friday, April 30, 2010 12:17 PM
Page 221 of 287
Inspecting and replenishing
220
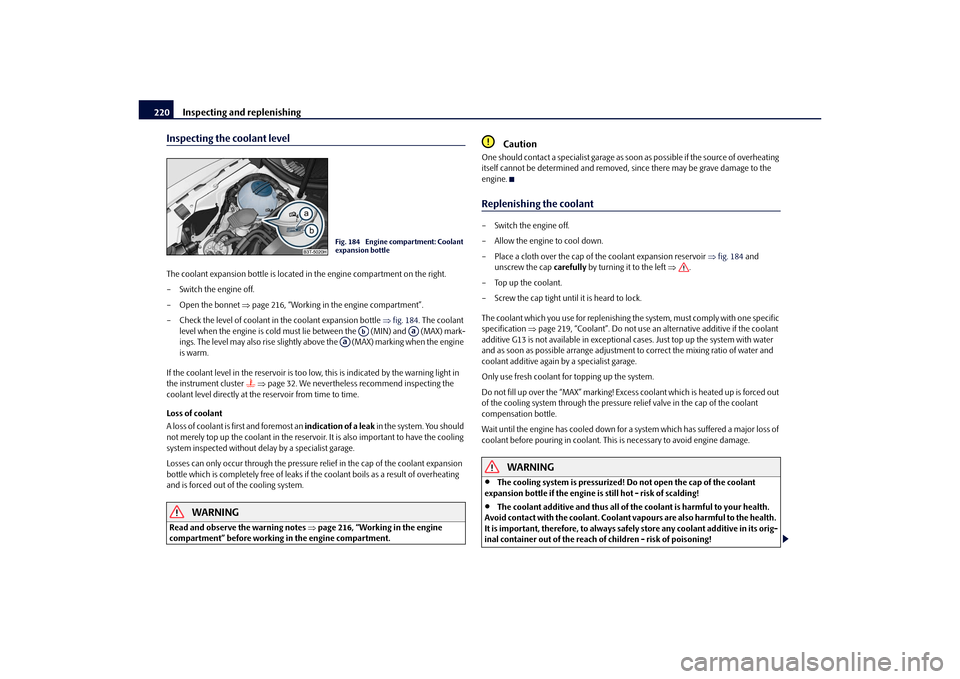
Inspecting the coolant levelThe coolant expansion bottle is located in the engine compartment on the right.
– Switch the engine off.
– Open the bonnet page 216, “Working in the engine compartment”.
– Check the level of coolant in the coolant expansion bottle fig. 184 . The coolant
level when the engine is cold must lie between the (MIN) and (MAX) mark-
ings. The level may also rise slightly ab ove the (MAX) marking when the engine
is warm.
If the coolant level in the reservoir is too lo w, this is indicated by the warning light in
the instrument cluster
page 32. We nevertheless recommend inspecting the
coolant level directly at the reservoir from time to time.
Loss of coolant
A loss of coolant is first and foremost an indication of a leak in the system. You should
not merely top up the coolant in the reservoir. It is also important to have the cooling
system inspected without delay by a specialist garage.
Losses can only occur through the pressure relief in the cap of the coolant expansion
bottle which is completely free of leaks if the coolant boils as a result of overheating
and is forced out of the cooling system.
WARNING
Read and observe the warning notes page 216, “Working in the engine
compartment” before working in the engine compartment.
Caution
One should contact a specialist garage as s oon as possible if the source of overheating
itself cannot be determined and removed, since there may be grave damage to the
engine.Replenishing the coolant– Switch the engine off.
– Allow the engine to cool down.
– Place a cloth over the cap of the coolant expansion reservoir fig. 184 and
unscrew the cap carefully by turning it to the left .
–Top up the coolant.
– Screw the cap tight until it is heard to lock.
The coolant which you use for replenishing the system, must comply with one specific
specification page 219, “Coolant”. Do not use an al ternative additive if the coolant
additive G13 is not available in exceptional cases. Just top up the system with water
and as soon as possible arrange adjustment to correct the mixing ratio of water and
coolant additive again by a specialist garage.
Only use fresh coolant for topping up the system.
Do not fill up over the “MAX” marking! Excess coolant which is heated up is forced out
of the cooling system through the pressure relief valve in the cap of the coolant
compensation bottle.
Wait until the engine has cooled down for a system which has suffered a major loss of
coolant before pouring in coolant. This is necessary to avoid engine damage.
WARNING
The cooling system is pressurized! Do not open the cap of the coolant
expansion bottle if the engine is still hot - risk of scalding!
The coolant additive and thus all of the coolant is harmful to your health.
Avoid contact with the coolant. Coolant vapours are also harmful to the health.
It is important, therefore, to always safely store any coolant additive in its orig-
inal container out of the reach of children - risk of poisoning!
Fig. 184 Engine compartment: Coolant
expansion bottle
Ab
Aa
Aa
s3fg.2.book Page 220 Friday, April 30, 2010 12:17 PM
Page 222 of 287
Inspecting and replenishing221
Using the system
Safety
Driving Tips
General Maintenance
Breakdown assistance
Technical Data
If any splashes of coolant get into yo ur eyes, rinse out your eyes immedi-
ately with clear water and contact a doctor as soon as possible.
You should also consult a doctor without delay if you have inadvertently
swallowed coolant.Caution
Do not continue your journey if for some reason it is not possible under the
conditions prevailing to top up with coolant. Switch the engine off and obtain
professional assistance from a specialist garage, otherwise it could lead to severe
engine damage.
For the sake of the environment
Do not re-use coolant if it is necessary to drain the coolant in the system. It should be
collected and disposed of in compliance with environmental protection regulations.Radiator fan
The radiator fan may switch on suddenly.The radiator fan is driven by an electric motor and controlled according to the coolant
temperature.
The radiator fan may continue running for up to 10 minutes after the engine has been
switched off - even if the igni tion is also off. It may also switch on suddenly after a
certain time, if.
the coolant temperature has risen beca use of an accumulation of heat or
the warm engine compartment is heated up additionally by strong sunlight.
WARNING
You must therefore be aware when workin g in the engine compartment that the
fan may switch on suddenly - risk of injury!
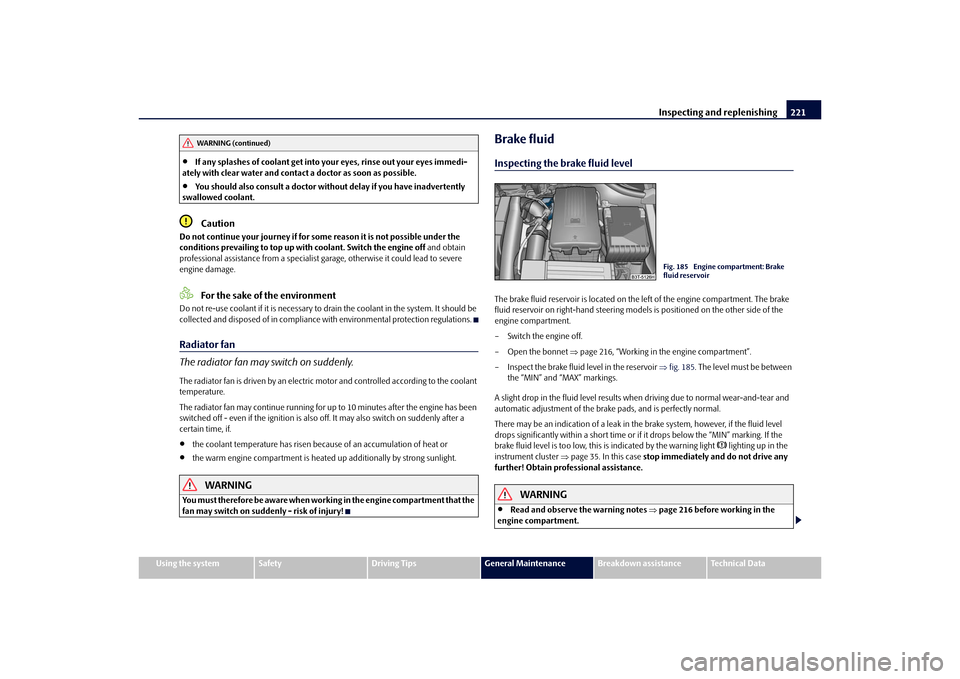
Brake fluidInspecting the brake fluid levelThe brake fluid reservoir is located on the left of the engine compartment. The brake
fluid reservoir on right-hand steering models is positioned on the other side of the
engine compartment.
– Switch the engine off.
– Open the bonnet page 216, “Working in the engine compartment”.
– Inspect the brake fluid level in the reservoir fig. 185 . The level must be between
the “MIN” and “MAX” markings.
A slight drop in the fluid level results when driving due to normal wear-and-tear and
automatic adjustment of the brak e pads, and is perfectly normal.
There may be an indication of a leak in the brake system, however, if the fluid level
drops significantly within a short time or if it drops below the “MIN” marking. If the
brake fluid level is too low, this is indicated by the warning light
lighting up in the
instrument cluster page 35. In this case stop immediately and do not drive any
further! Obtain professional assistance.
WARNING
Read and observe the warning notes page 216 before working in the
engine compartment.
WARNING (continued)
Fig. 185 Engine compartment: Brake
fluid reservoir
s3fg.2.book Page 221 Friday, April 30, 2010 12:17 PM
Page 253 of 287
Fuses and light bulbs
252WARNING
Bulbs H7 and H3 are pressurised and may burst when changing the bulb -
risk of injury!
It is recommended to wear gloves and safety glasses when changing a bulb.
Gas discharge bulbs* (xenon bulbs) operate with a high voltage, profes-
sional knowledge is required - danger to life!Caution
Do not take hold of the glass bulb with naked fingers (even the smallest amount of dirt
reduces the working life of the light bulb). Use a clean cloth, serviette or something
similar.
Note
This Owner's Manual only describes the replacement of bulbs where it is assumed that
no major complications will arise. Other light bulbs should be replaced by your
specialist garage.
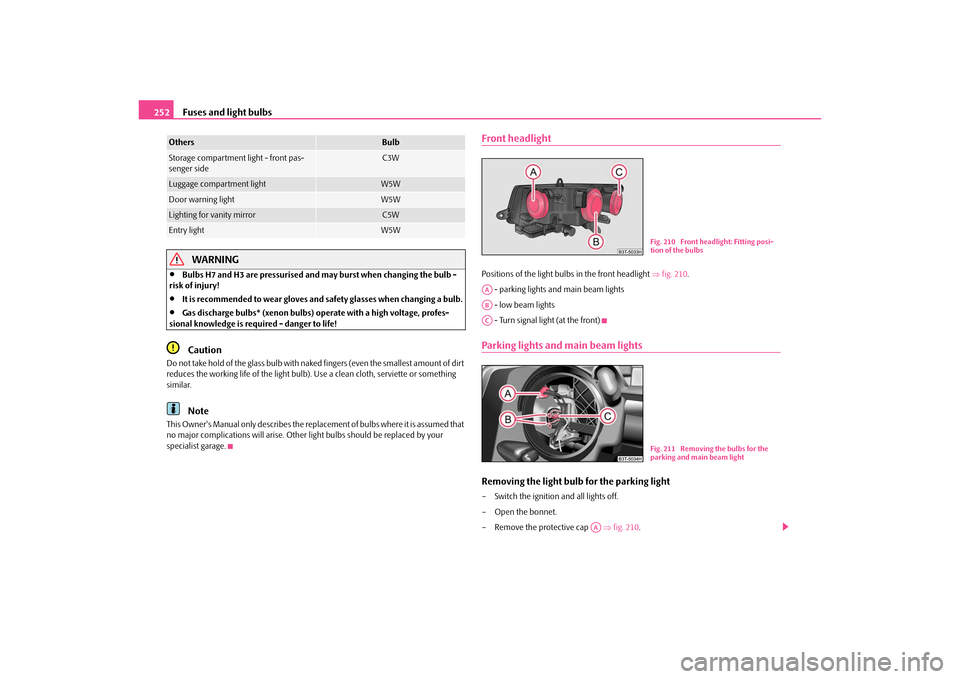
Front headlightPositions of the light bulbs in the front headlight fig. 210 .
- parking lights and main beam lights
- low beam lights
- Turn signal light (at the front)Parking lights and main beam lightsRemoving the light bulb for the parking light– Switch the ignition and all lights off.
– Open the bonnet.
– Remove the protective cap fig. 210.
Storage compartment light - front pas-
senger side
C3W
Luggage compartment light
W5W
Door warning light
W5W
Lighting for vanity mirror
C5W
Entry light
W5W
Others
Bulb
Fig. 210 Front headlight: Fitting posi-
tion of the bulbs
AAABAC
Fig. 211 Removing the bulbs for the
parking and main beam light
AA
s3fg.2.book Page 252 Friday, April 30, 2010 12:17 PM
Page 254 of 287
Fuses and light bulbs253
Using the system
Safety
Driving Tips
General Maintenance
Breakdown assistance
Technical Data
– Remove the socket
page 252, fig. 211.
– Take the faulty bulb out of the fixture and insert a new one.
Removing the light bulb for the main beam light– Switch the ignition and all lights off.
– Open the bonnet.
– Remove the protective cap page 252, fig. 210 .
– Press the sprung wire clamps page 252, fig. 211 together and hang them to
the side.
– Remove the socket page 252, fig. 211.
– Take the faulty bulb out of the fixture and insert a new one.
Installation takes place in the reverse order.
Note
We recommend that you have the headlight setting checked by a Skoda Service
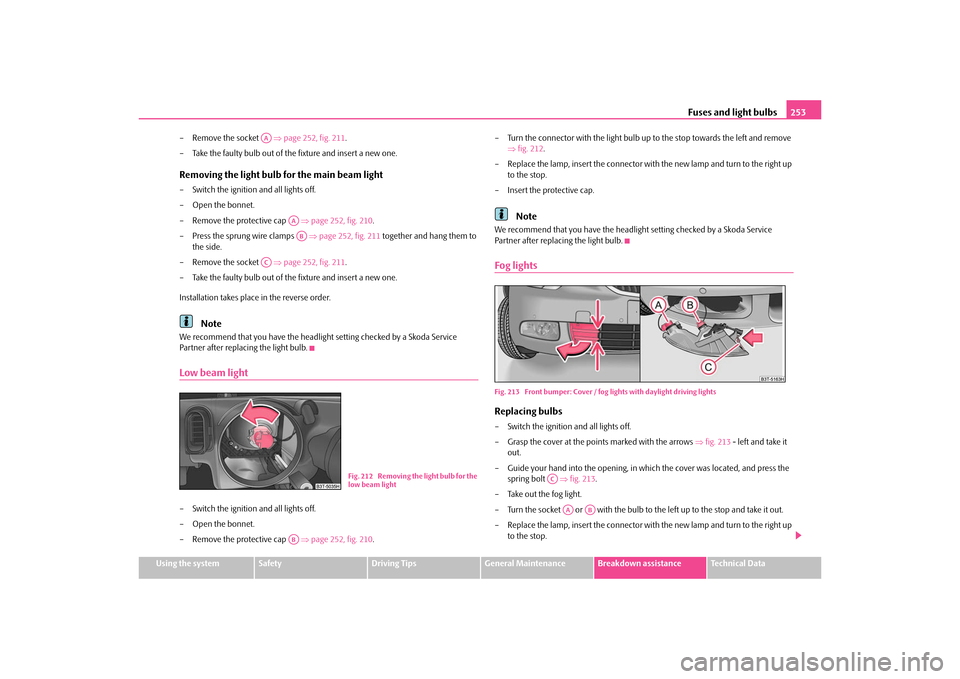
Partner after replacing the light bulb.Low beam light– Switch the ignition and all lights off.
– Open the bonnet.
– Remove the protective cap page 252, fig. 210 . – Turn the connector with the light bulb up
to the stop towards the left and remove
fig. 212 .
– Replace the lamp, insert the connector with the new lamp and turn to the right up to the stop.
– Insert the protective cap.
Note
We recommend that you have the headli ght setting checked by a Skoda Service
Partner after replacing the light bulb.Fog lightsFig. 213 Front bumper: Cover / fog lights with daylight driving lightsReplacing bulbs– Switch the ignition and all lights off.
– Grasp the cover at the points marked with the arrows fig. 213 - left and take it
out.
– Guide your hand into the opening, in which the cover was located, and press the
spring bolt fig. 213 .
– Take out the fog light.
– Turn the socket or with the bulb to the left up to the stop and take it out.
– Replace the lamp, insert the connector with the new lamp and turn to the right up to the stop.
AA
AAAB
AC
Fig. 212 Removing the light bulb for the
low beam light
AB
AC
AA
AB
s3fg.2.book Page 253 Friday, April 30, 2010 12:17 PM
Page 255 of 287
Fuses and light bulbs
254
– For the installation, first of all insert the fog light with the interlock to the side far
away from the marking of the vehicle.
– Press into place the headlight onto the si de facing the marking. The spring bolt
must engage firmly.
– In order to reinstall the cover, first of all insert one part of the cover starting on the side facing the fog light. Then press the cover closed on the side facing the marking.
The cover must engage firmly.
- bulb for daylight driving lights*.
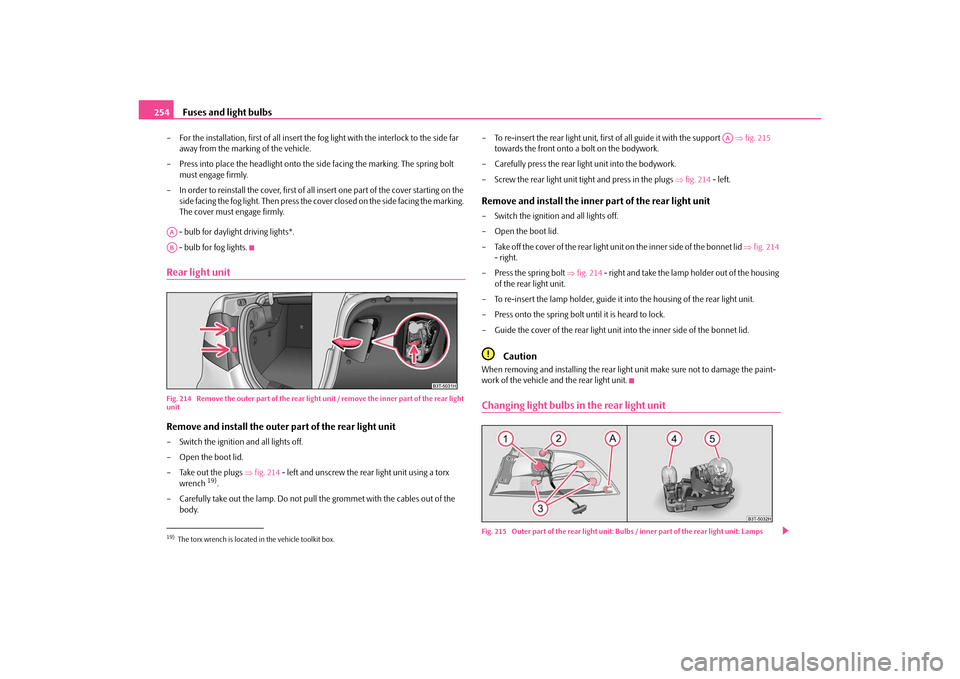
- bulb for fog lights.Rear light unitFig. 214 Remove the outer part of the rear light unit / remove the inner part of the rear light
unitRemove and install the outer part of the rear light unit– Switch the ignition and all lights off.
– Open the boot lid.
– Take out the plugs fig. 214 - left and unscrew the rear light unit using a torx
wrench
19).
– Carefully take out the lamp. Do not pull the grommet with the cables out of the
body. – To re-insert the rear light unit, first of all guide it with the support
fig. 215
towards the front onto a bolt on the bodywork.
– Carefully press the rear li ght unit into the bodywork.
– Screw the rear light unit tight and press in the plugs fig. 214 - left.
Remove and install the inner part of the rear light unit– Switch the ignition and all lights off.
– Open the boot lid.
– Take off the cover of the rear light unit on the inner side of the bonnet lid fig. 214
- right.
– Press the spring bolt fig. 214 - right and take the lamp holder out of the housing
of the rear light unit.
– To re-insert the lamp holder, guide it into the housing of the rear light unit.
– Press onto the spring bolt until it is heard to lock.
– Guide the cover of the rear light unit into the inner side of the bonnet lid.
Caution
When removing and installing the rear ligh t unit make sure not to damage the paint-
work of the vehicle and the rear light unit.Changing light bulbs in the rear light unitFig. 215 Outer part of the rear light unit: Bulbs / inner part of the rear light unit: Lamps
19)The torx wrench is located in the vehicle toolkit box.AAAB
AA
s3fg.2.book Page 254 Friday, April 30, 2010 12:17 PM