ESP SKODA SUPERB 2010 Owner´s Manual
[x] Cancel search | Manufacturer: SKODA, Model Year: 2010, Model line: SUPERB, Model: SKODA SUPERB 2010Pages: 252, PDF Size: 16.33 MB
Page 7 of 252
Board literature
You always find these Operating Instructions and the Service Plan in the on-
board literature for your vehicle.
Depending on the equipment, the on-board literature can also contain The ra-
dio instruction manual or Manual of the navigation system and in some coun-
tries also the brochure On the road.
Owner's Manual
These operating instructions apply to all body variants of the vehicle and all
related model versions as well as all equipment levels .
This owner's manual describes all possible equipment variants without identi-
fying them as special equipment, model variants or market-dependent equip-
ment. Consequently, this vehicle does not contain all of the equipment com-
ponents described in this Owner's Manual.
The scope of equipment on your vehicle depends on your purchase contract
for the vehicle. For questions regarding the scope of equipment, please con-
tact a ŠKODA Partner, if required.
The Pictures in this manual are for illustrative purposes only. The illustrations
can differ in minor details from your vehicle; they are only intended to provide
general information.
ŠKODA AUTO a.s. pursues a policy of constant product and model develop-
ment. Changes in terms of supply scope are possible at any time with regard to
design, equipment and technology. The information listed in this operating
manual corresponds to the information available at the time of going to press.
It is therefore not possible for legal claims to be made based on the technical
data, illustrations and information contained in this Owner's Manual.
Service schedule
The service plan includes the documentation of the vehicle handover informa-
tion with regard to warranty and service events.
The radio instruction manual
The instruction manual of the radio contains a description of the operation of
the radio, and possibly also some functions and vehicle systems.
Manual of the navigation system
The manual of the navigation system includes a description of the operation of
the navigation system, and possibly also some functions and vehicle systems.Move Brochure
The Move brochure contains phone numbers of importers and service offices in
individual countries, together with emergency numbers.4Board literature
Page 11 of 252
Safety
Passive Safety
General information
Introduction
This chapter contains information on the following subjects:
Before setting off
8
Driving safety
8
Safety equipment
8
In this section you will find important information, tips and notes on the sub-
ject of passive safety in your vehicle.
We have combined everything here which you should be familiar with, for ex-
ample, regarding seat belts, airbags, child seats and safety of children.
WARNING■ This chapter contains important information on how to use the vehicle for
the driver and his occupants.■
You can find further information on safety concerning you and those trav-
elling with you in the following chapters of this owner's manual.
■
The complete on-board literature should always be in the vehicle. This
applies in particular, if you rent out or sell the vehicle.
Before setting off
Read and observe
on page 8 first.
For your own safety and the safety of the people travelling with you, please
pay attention to the following points before setting off.
Ensure that the lighting and the turn signal system are functioning proper-
ly.
Ensure that the function of the wiper and the condition of the wiper
blades are free of any defects.
Ensure that all of the windows offer good visibility to the outside.
Adjust the rear-view mirror so that vision to the rear is guaranteed.
Ensure that the mirrors are not covered.
Check the tyre inflation pressure.
Check the engine oil, brake fluid and coolant level.
Secure all items of luggage.
Do not exceed the permissible axle loads and permissible gross weight of
the vehicle.
Close all doors as well as the bonnet and boot lid.
Ensure that no objects can obstruct the pedals.
Protect children in suitable child seats with correctly fastened seat
belts » page 22 , Transporting children safely .
Adopt the correct seated position » page 9, Correct and safe seated
position . Tell your passengers to assume the correct seated position.
Driving safety
Read and observe
on page 8 first.
The driver is fully responsible for himself and his occupants. If your driving
safety is affected, you place yourself and the oncoming traffic at risk.
The following guidelines must therefore be observed. Do not become distracted from concentrating on the traffic situation, e.g.
by your passengers or mobile phone calls.
Never drive when your driving ability is impaired, e.g. due to medication, al-
cohol or drugs.
Keep to the traffic regulations and the permissible speed limit.
Always adjust the driving speed to the road, traffic and weather condi-
tions.
Take regular breaks on long journeys – at least every two hours.
Safety equipment
Read and observe
on page 8 first.
The following list contains only part of the safety equipment in your vehicle.
› Three-point seat belts for all the seats.
› Belt force limiter for front and outer rear seats.
› Belt tensioner for front and outer rear seats.
› Seat belt height adjusters for the front seats.
› Front airbag for the driver and the front passenger.
› Driver’s knee airbag.
8Safety
Page 14 of 252
Correct seated position for the passengers in the rear seatsRead and observe
on page 9 first.
To reduce the risk of injury in the event of a sudden braking manoeuvre or anaccident, the occupants on the rear seats must observe the following.
Adjust the head restraint so that the top edge of the head restraint is at
the same level as the upper part of the head
C
» Fig. 1 on page 9 .
Correctly fasten the seat belt » page 12.
Use a suitable child restraint system if transporting children in the vehi-
cle » page 22 , Transporting children safely .
Adjust the seats and head restraints » page 81.
Examples of incorrect seated positions
Read and observe
on page 9 first.
Maximum seat belt protection is only achieved if seat belts are fastened cor-
rectly.
Incorrect seated positions considerably reduce the protective functions of the
seat belts and therefore increase the risk of injury due to an incorrect routing
of the seat belt.
The driver is fully responsible for himself and passengers, especially children.
Never allow a passenger to adopt an incorrect seated position when the car is
moving.
The following list contains instructions which, if not observed, may cause seri-
ous injuries or death. This list is not complete, however we would like you to
familiarise yourself with this subject.
Observe the following instructions while driving. Do not stand up.
Do not stand on the seats.
Do not kneel on the seats.
Do not tilt the seat backrest too far back.
Do not lean against the dash panel.
Do not lie on the rear seats.
Do not sit only on the front part of the seat.
Do not sit facing to the side.
Do not lean out of the window.
Do not put your feet out of the window.
Do not put your feet on the dash panel.
Do not put your feet on the seat cushion.
Do not allow anybody to travel in the footwell.
Do not drive without fastening your seat belt.
Do not delay in the luggage compartment.11Passive Safety
Page 24 of 252
Deactivating airbags
Deactivating an airbag should be considered in cases such as the ones below. › If using a rear-facing child seat on the front passenger seat (due to different
legal regulations, the airbag must be deactivated if using a forwards-facing
child seat in some countries) » page 22, Transporting children safely .
› If it is not possible to maintain a distance of at least 25 cm between the mid-
dle of the steering wheel and chest, despite the driver's seat being correctly
adjusted.
› If special attachments are required in the area of the steering wheel because
of a physical disability.
› If different seats have been fitted (e.g. orthopaedic seats without side air-
bags).
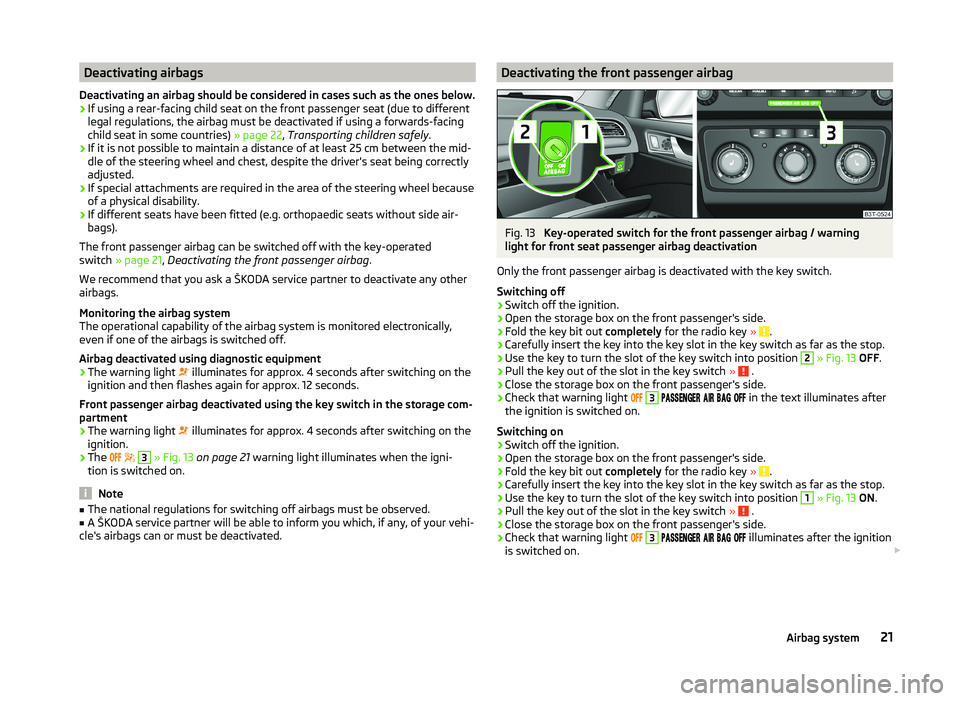
The front passenger airbag can be switched off with the key-operated
switch » page 21 , Deactivating the front passenger airbag .
We recommend that you ask a ŠKODA service partner to deactivate any other airbags.
Monitoring the airbag system
The operational capability of the airbag system is monitored electronically,
even if one of the airbags is switched off.
Airbag deactivated using diagnostic equipment › The warning light
illuminates for approx. 4 seconds after switching on the
ignition and then flashes again for approx. 12 seconds.
Front passenger airbag deactivated using the key switch in the storage com-
partment
› The warning light
illuminates for approx. 4 seconds after switching on the
ignition.
› The
3
» Fig. 13 on page 21 warning light illuminates when the igni-
tion is switched on.
Note
■ The national regulations for switching off airbags must be observed.■A ŠKODA service partner will be able to inform you which, if any, of your vehi-
cle's airbags can or must be deactivated.Deactivating the front passenger airbagFig. 13
Key-operated switch for the front passenger airbag / warning
light for front seat passenger airbag deactivation
Only the front passenger airbag is deactivated with the key switch.
Switching off
›
Switch off the ignition.
›
Open the storage box on the front passenger's side.
›
Fold the key bit out completely for the radio key » .
›
Carefully insert the key into the key slot in the key switch as far as the stop.
›
Use the key to turn the slot of the key switch into position
2
» Fig. 13 OFF .
›
Pull the key out of the slot in the key switch » .
›
Close the storage box on the front passenger's side.
›
Check that warning light
3
in the text illuminates after
the ignition is switched on.
Switching on
›
Switch off the ignition.
›
Open the storage box on the front passenger's side.
›
Fold the key bit out completely for the radio key » .
›
Carefully insert the key into the key slot in the key switch as far as the stop.
›
Use the key to turn the slot of the key switch into position
1
» Fig. 13 ON .
›
Pull the key out of the slot in the key switch » .
›
Close the storage box on the front passenger's side.
›
Check that warning light
3
illuminates after the ignition
is switched on.
21Airbag system
Page 25 of 252
WARNING■The driver is responsible for whether the airbag is switched on or switch-
ed off.■
Only switch off the airbag when the ignition is switched off! Otherwise a
fault can occur in the system for deactivating the airbag.
■
If the warning light
is flashing, the front passenger airbag will not be
deployed in an accident. Have the airbag system checked by a specialist ga-
rage immediately.
■
The key cannot be inserted in the key switch while driving. ■ Shocks can cause the key to turn in the slot and trigger the airbag!
■ The airbag could be triggered unexpectedly in an accident - it may result
in injury or death!
CAUTION
An insufficiently folded out key bit can damage the key switch!Transporting children safely
Child seat
Introduction
This chapter contains information on the following subjects:
Use of a child seat on the front passenger seat
23
Use of the child seat in the front passenger seat
24
Child safety and side airbag
24
Classification of child seats
25
Use of child seats fastened with a seat belt
25
Children are generally safer on the rear seats than on the front passenger
seat.
In contrast to adults, the muscles and bone structure of children are not yet
fully developed. Thus children are exposed to increased risk of injury.
Children should be transported in accordance with the relevant statutory pro-
visions.
Child seats that comply with the ECE-R 44 standard must be used. The ECE-R
standard stands for: Economic Commission for Europe - Regulation.
Child seats that comply with the ECE-R 44 standard are identified with a test
mark that cannot be removed: a capital E in a circle and the certification num-
ber below
WARNING■ The national legal requirements must be observed when using child
seats.■
One should never carry children, and also not babies! - on one's lap.
■
Never leave children unattended in the vehicle. Certain outside climatic
conditions can cause life-threatening temperatures in the vehicle.
■
The child must be secured in the vehicle during the entire journey! Other-
wise, the child would be thrown through the vehicle in the event of an acci-
dent, causing fatal injuries to both the child and other occupants.
22Safety
Page 33 of 252
Instruments and Indicator Lights
Instrument cluster
Introduction
This chapter contains information on the following subjects:
Overview
30
Revolution counter
31
Speedometer
31
Coolant temperature gauge
31
Display
31
Fuel gauge
32
Counter for distance driven
32
32
Display of the second speed
33
Display in rear centre console
33
Auto Check Control
33
Fault display
The Error message will appear in the display if there is a fault in the instru-
ment cluster. Ensure that the fault is rectified as soon as possible by a special-
ist workshop.
WARNING■ Concentrate fully at all times on your driving! As the driver you are fully
responsible for road safety.■
Never operate the controls in the instrument cluster while driving - risk of
accident. Operate the controls only when the vehicle is at a standstill.
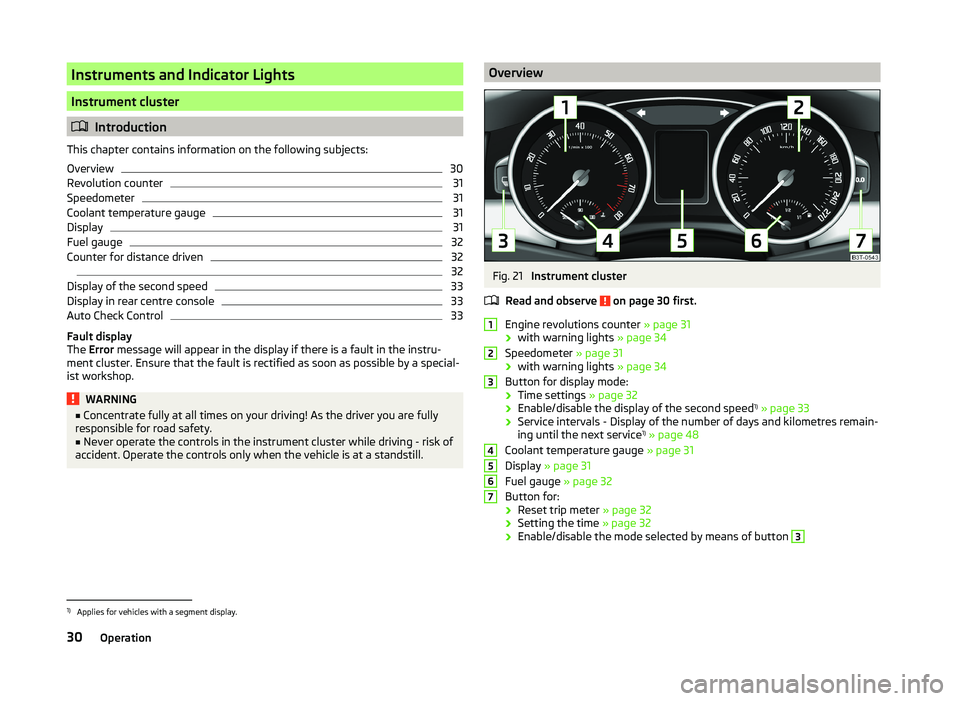
OverviewFig. 21
Instrument cluster
Read and observe
on page 30 first.
Engine revolutions counter » page 31
› with warning lights
» page 34
Speedometer » page 31
› with warning lights
» page 34
Button for display mode:
› Time settings
» page 32
› Enable/disable the display of the second speed 1)
» page 33
› Service intervals - Display of the number of days and kilometres remain-
ing until the next service 1)
» page 48
Coolant temperature gauge » page 31
Display » page 31
Fuel gauge » page 32
Button for: › Reset trip meter
» page 32
› Setting the time
» page 32
› Enable/disable the mode selected by means of button
312345671)
Applies for vehicles with a segment display.
30Operation
Page 37 of 252
The following message is shown in the MAXI DOT display.Gearbox overheated. Stop! Owner's manual!
do not continue to drive! Stop the vehicle, switch off the engine, and wait
until the
icon goes out – risk of gearbox damage! You can continue your
journey as soon as the icon disappears.WARNINGIf you have to stop for technical reasons, then park the vehicle at a safe
distance from the traffic, switch off the engine and activate the hazard
warning light system » page 72. The warning triangle must be set up at
the prescribed distance - observe the national legal provisions when doing
so.
Note
■ If the MAXI DOT display shows warning messages, these messages must be
confirmed in order to access the main menu » page 42 .■
As long as the operational faults are not rectified, the symbols are always in-
dicated again. After they are displayed for the first time, the symbols continue
to be indicated without any extra messages for the driver.
Warning lights
Introduction
This chapter contains information on the following subjects:
Handbrake
35
Brake system
35
Seat belt warning light
35
Generator
35
Door open
36
Engine oil pressure
36
Coolant
36
Bonnet
36
Boot lid
36
Power steering / steering lock (system KESSY)
36
Engine oil level
37
Traction Control System (ASR)
37
Electronic Stability Control (ESC)
37 Anti lock brake system (ABS)38 Rear fog light38
Lamp failure
38
Adaptive headlights (AHL)
38
Exhaust inspection system
38
Glow plug system (diesel engine)
38
Engine performance check (petrol engine)
39
Diesel particulate filter (diesel engine)
39
Fuel reserve
39
Airbag system
40
Tyre inflation pressure
40
Windscreen washer fluid level
40
Brake linings
41
Turn signal system
41
Low beam
41
Fog lights
41
Cruise control system
41
Selector lever lock / starter (system KESSY)
41
Main beam
41
The warning lights indicate certain functions or faults.
Some warning lights can be accompanied by acoustic signals and messages in
the display of the instrument cluster.
After switching on the ignition, some warning lights light up briefly as a func-
tion test.
If the tested systems are OK, the corresponding warning lights go out a few
seconds after switching on the ignition or after starting the engine.
34Operation
Page 38 of 252
WARNING■Ignoring illuminated warning lights and related messages or instructions
in the instrument cluster display may lead to serious personal injury or
damage to the vehicle.■
If you have to stop for technical reasons, then park the vehicle at a safe
distance from the traffic, switch off the engine and activate the hazard
warning light system » page 72. The warning triangle must be set up at
the prescribed distance - observe the national legal provisions when doing
so.
■
The engine compartment of your car is a hazardous area. The following
warning instructions must be followed at all times when working in the en-
gine compartment » page 186, Engine compartment .
Handbrake
Read and observe
on page 35 first.
The warning light
illuminates if the handbrake is applied.
An acoustic signal will sound if you drive the vehicle above 6 km/h for at least
3 seconds while the handbrake is applied.
The following message is shown in the MAXI DOT display. Release parking brake!
Brake system
Read and observe
on page 35 first.
The warning light
illuminates if the brake fluid level in the braking system is
too low or there is a fault in the ABS.
The following message is shown in the MAXI DOT display. Brake fluid: Owner's manual!
›
Stop the vehicle, switch off the engine, and check the level of the brake flu-
id » page 193 » .
WARNING■
If the warning light together with the warning light » page 38 ,
Anti lock brake system (ABS) illuminates, do not continue to drive! Seek
help from a specialist garage.■
A fault to the ABS system or the braking system can increase the vehi-
cle's braking distance – there is a risk of accident.
■
The following guidelines should be observed when opening the bonnet
and checking the brake fluid level » page 186, Engine compartment .
Seat belt warning light
Read and observe
on page 35 first.
The warning light
is illuminated as a reminder for the driver and front pas-
senger to fasten their seat belts.
The warning light
goes out , after the respective seat belt has been fas-
tened.
If the driver or front passenger has not fastened their seat belt and the vehicle
speed is more than 20 km/h, the warning light
flashes and you will hear an
acoustic warning signal.
The warning signal is switched off and the warning light
remains perma-
nently illuminated if the driver and front passenger have not fastened their
seat belts within the next 90 seconds.
Generator
Read and observe
on page 35 first.
If the warning light
is illuminated , when the engine is running, the vehicle
battery is not being charged.
Seek assistance from a specialist garage immediately. The electrical system re-
quires checking.
CAUTION
Do not continue driving if the warning light (coolant system fault) illumi-
nates in addition to the warning light while you are driving. Stop the engine
- there is a risk of engine damage. Seek help from a specialist garage.35Instruments and Indicator Lights
Page 45 of 252
Information system
Driver information system
Introduction
This chapter contains information on the following subjects:
Using the information system
42
Display a low temperature
43
Gear recommendation
43
Door, boot or engine compartment warning
44
The information system provides the driver with alerts and messages about in-
dividual vehicle systems.
This information and advice is shown in the instrument cluster display or indi-
cated by the illumination of the corresponding warning light in the instrument
cluster.
The information system provides the following information and instructions
(depending on vehicle equipment).
› Data relating to the multi function display (MFD)
» page 44.
› Data relating to the MAXI DOT display
» page 46.
› Service interval display
» page 48.
› Auto Check Control
» page 33.
› Selector lever positions for an automatic transmission
» page 145.
WARNINGConcentrate fully at all times on your driving! As the driver, you are fully re-
sponsible for the operation of your vehicle.Using the information systemFig. 27
Buttons / wheel: on the operating lever / on the multifunction
steering wheel
Read and observe
on page 42 first.
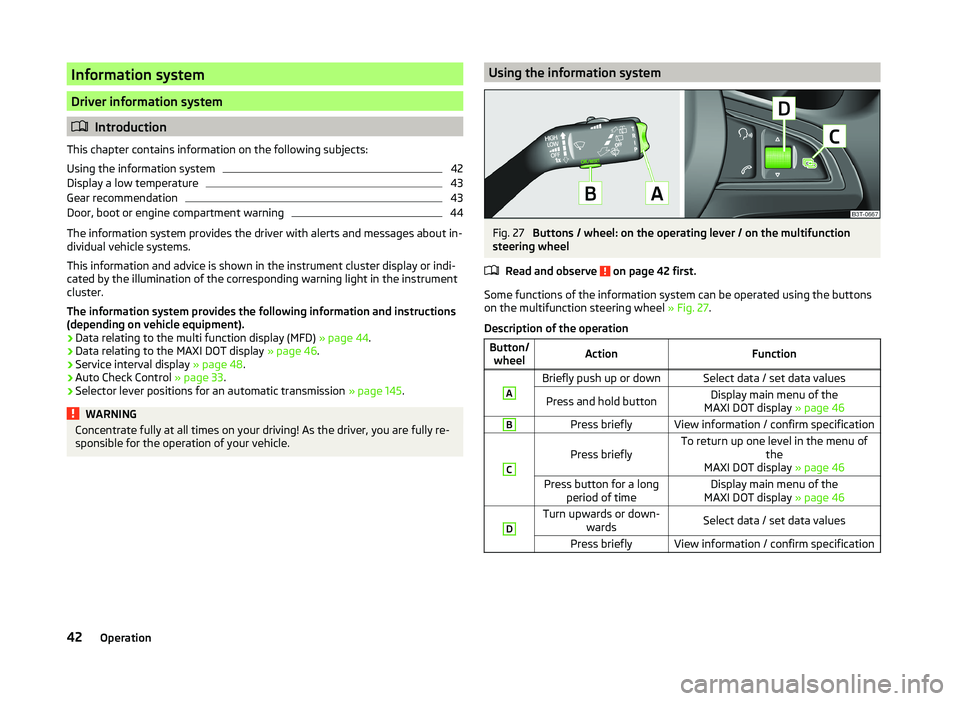
Some functions of the information system can be operated using the buttons
on the multifunction steering wheel » Fig. 27.
Description of the operation
Button/ wheelActionFunctionABriefly push up or downSelect data / set data valuesPress and hold buttonDisplay main menu of the
MAXI DOT display » page 46BPress brieflyView information / confirm specificationC
Press brieflyTo return up one level in the menu of
the
MAXI DOT display » page 46Press button for a long
period of timeDisplay main menu of the
MAXI DOT display » page 46DTurn upwards or down-
wardsSelect data / set data valuesPress brieflyView information / confirm specification42Operation
Page 46 of 252
Display a low temperatureRead and observe
on page 42 first.
Display in the MAXI DOT display
If the outside temperature while driving drops to below +4°C, the following
icon appears on the display in front of the temperature display
. An audible
signal is emitted.
If the outside temperature is already below +4°C when turning the ignition on,
the
icon appears immediately.
Prompt in the segment display
If the outside temperature while driving drops to below +4°C, the temperature
display will show up with the following icon before this occurs . An audible
signal is emitted.
If the outside temperature is already below +4°C when turning the ignition on,
the temperature display and the icon appear immediately.
After pressing button
A
» Fig. 27 on page 42 , the most recently displayed data
is shown.
WARNINGEven at temperatures of around +4 °C, there may still be black ice on the
road surface. You should therefore not rely solely on the outside tempera-
ture display for accurate information as to whether there is ice on the road.
Gear recommendation
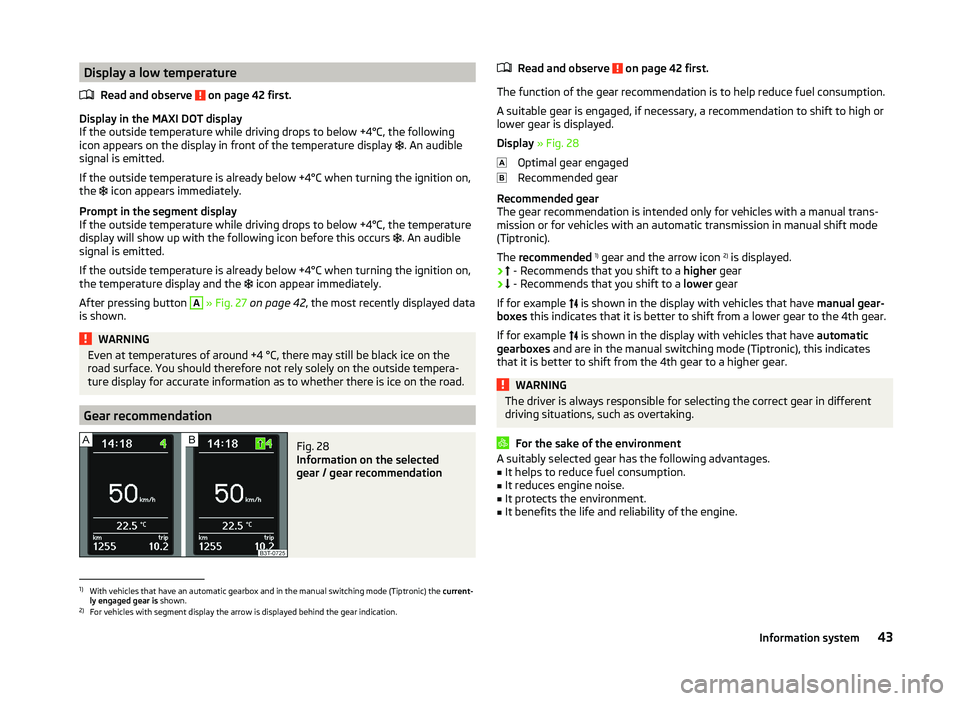
Fig. 28
Information on the selected
gear / gear recommendation
Read and observe on page 42 first.
The function of the gear recommendation is to help reduce fuel consumption.
A suitable gear is engaged, if necessary, a recommendation to shift to high or
lower gear is displayed.
Display » Fig. 28
Optimal gear engaged
Recommended gear
Recommended gear
The gear recommendation is intended only for vehicles with a manual trans- mission or for vehicles with an automatic transmission in manual shift mode
(Tiptronic).
The recommended 1)
gear and the arrow icon 2)
is displayed.
›
- Recommends that you shift to a
higher gear
›
- Recommends that you shift to a
lower gear
If for example is shown in the display with vehicles that have
manual gear-
boxes this indicates that it is better to shift from a lower gear to the 4th gear.
If for example is shown in the display with vehicles that have
automatic
gearboxes and are in the manual switching mode (Tiptronic), this indicates
that it is better to shift from the 4th gear to a higher gear.
WARNINGThe driver is always responsible for selecting the correct gear in different
driving situations, such as overtaking.
For the sake of the environment
A suitably selected gear has the following advantages.■It helps to reduce fuel consumption.■
It reduces engine noise.
■
It protects the environment.
■
It benefits the life and reliability of the engine.
1)
With vehicles that have an automatic gearbox and in the manual switching mode (Tiptronic) the current-
ly engaged gear is shown.
2)
For vehicles with segment display the arrow is displayed behind the gear indication.
43Information system