AUX SKODA SUPERB 2012 2.G / (B6/3T) Columbus Navigation System Manual
[x] Cancel search | Manufacturer: SKODA, Model Year: 2012, Model line: SUPERB, Model: SKODA SUPERB 2012 2.G / (B6/3T)Pages: 44, PDF Size: 1.42 MB
Page 11 of 44

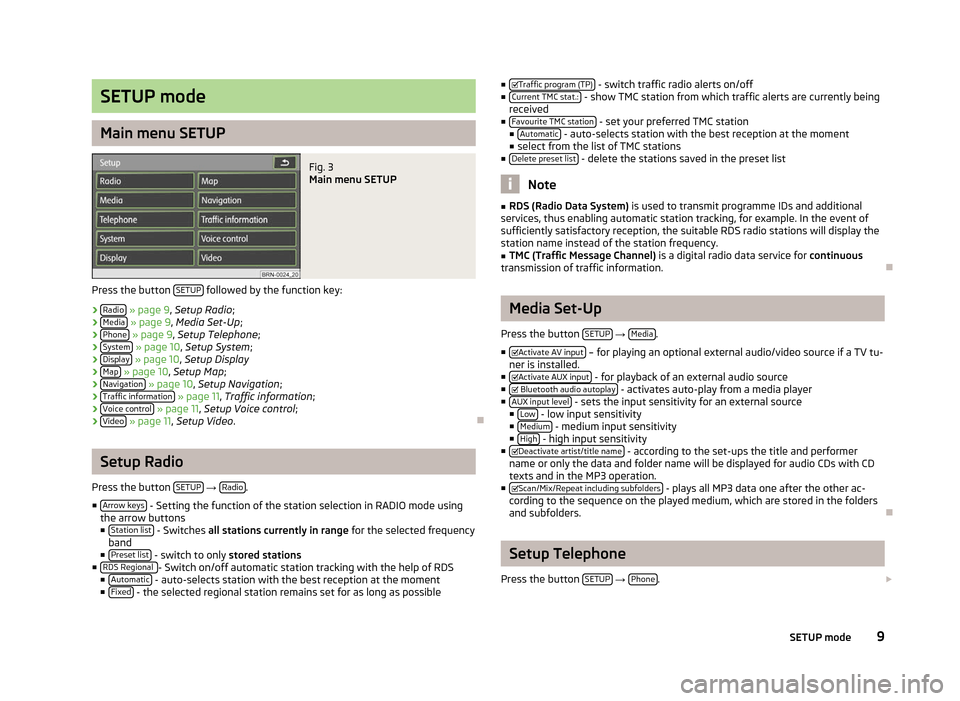
SETUP mode
Main menu SETUP
Fig. 3
Main menu SETUP
Press the button SETUP followed by the function key:
› Radio » page 9, Setup Radio;
› Media » page 9, Media Set-Up;
› Phone » page 9
, Setup Telephone ;
› System » page 10, Setup System
;
› Display » page 10, Setup Display
› Map » page 10,
Setup Map;
› Navigation » page 10, Setup Navigation
;
› Traffic information » page 11, Traffic information
;
› Voice control » page 11,
Setup Voice control ;
› Video » page 11,
Setup Video . ÐSetup Radio
Press the button SETUP →
Radio .
■ Arrow keys - Setting the function of the station selection in RADIO mode using
the arrow buttons
■ Station list - Switches
all stations currently in range for the selected frequency
band
■ Preset list - switch to only
stored stations
■ RDS Regional - Switch on/off automatic station tracking with the help of RDS
■ Automatic - auto-selects station with the best reception at the moment
■ Fixed - the selected regional station remains set for as long as possible ■
Traffic program (TP) - switch traffic radio alerts on/off
■ Current TMC stat.: - show TMC station from which traffic alerts are currently being
received
■ Favourite TMC station - set your preferred TMC station
■ Automatic - auto-selects station with the best reception at the moment
■ select from the list of TMC stations
■ Delete preset list - delete the stations saved in the preset list
Note
■ RDS (Radio Data System) is used to transmit programme IDs and additional
services, thus enabling automatic station tracking, for example. In the event of
sufficiently satisfactory reception, the suitable RDS radio stations will display the
station name instead of the station frequency. ■ TMC (Traffic Message Channel) is a digital radio data service for continuous
transmission of traffic information. Ð Media Set-Up
Press the button SETUP →
Media .
■ Activate AV input – for playing an optional external audio/video source if a TV tu-
ner is installed.
■ Activate AUX input - for playback of an external audio source
■ Bluetooth audio autoplay - activates auto-play from a media player
■ AUX input level - sets the input sensitivity for an external source
■ Low - low input sensitivity
■ Medium - medium input sensitivity
■ High - high input sensitivity
■ Deactivate artist/title name - according to the set-ups the title and performer
name or only the data and folder name will be displayed for audio CDs with CD
texts and in the MP3 operation.
■ Scan/Mix/Repeat including subfolders - plays all MP3 data one after the other ac-
cording to the sequence on the played medium, which are stored in the folders
and subfolders. Ð Setup Telephone
Press the button SETUP →
Phone .
9
SETUP mode
Page 16 of 44

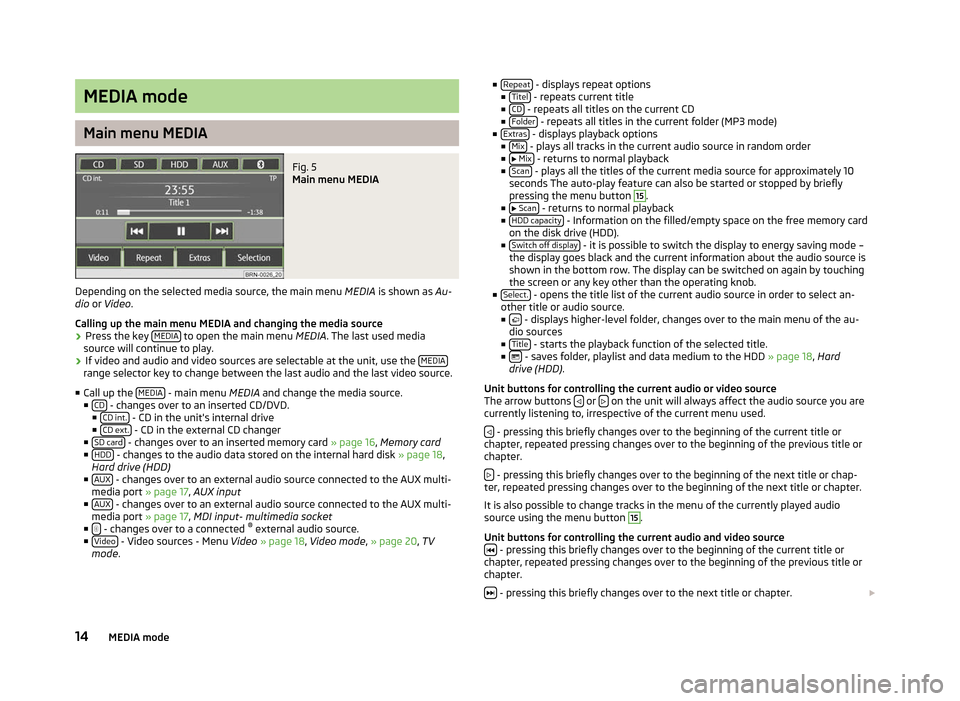
MEDIA mode
Main menu MEDIA
Fig. 5
Main menu MEDIA
Depending on the selected media source, the main menu MEDIA is shown as Au-
dio or Video .
Calling up the main menu MEDIA and changing the media source
› Press the key
MEDIA to open the main menu
MEDIA. The last used media
source will continue to play.
› If video and audio and video sources are selectable at the unit, use the
MEDIArange selector key to change between the last audio and the last video source.
■ Call up the MEDIA - main menu MEDIA and change the media source.
■ CD - changes over to an inserted CD/DVD.
■ CD int. - CD in the unit's internal drive
■ CD ext. - CD in the external CD changer
■ SD card - changes over to an inserted memory card
» page 16, Memory card
■ HDD - changes to the audio data stored on the internal hard disk
» page 18,
Hard drive (HDD)
■ AUX - changes over to an external audio source connected to the AUX multi-
media port » page 17 , AUX input
■ AUX - changes over to an external audio source connected to the AUX multi-
media port » page 17 , MDI input- multimedia socket
■ - changes over to a connected
®
external audio source.
■ Video - Video sources - Menu
Video » page 18, Video mode , » page 20, TV
mode . ■
Repeat - displays repeat options
■ Titel - repeats current title
■ CD - repeats all titles on the current CD
■ Folder - repeats all titles in the current folder (MP3 mode)
■ Extras - displays playback options
■ Mix - plays all tracks in the current audio source in random order
■ Mix - returns to normal playback
■ Scan - plays all the titles of the current media source for approximately 10
seconds The auto-play feature can also be started or stopped by briefly
pressing the menu button 15
.
■ Scan - returns to normal playback
■ HDD capacity - Information on the filled/empty space on the free memory card
on the disk drive (HDD).
■ Switch off display - it is possible to switch the display to energy saving mode –
the display goes black and the current information about the audio source is
shown in the bottom row. The display can be switched on again by touching
the screen or any key other than the operating knob.
■ Select. - opens the title list of the current audio source in order to select an-
other title or audio source.
■ - displays higher-level folder, changes over to the main menu of the au-
dio sources
■ Title - starts the playback function of the selected title.
■ - saves folder, playlist and data medium to the HDD
» page 18, Hard
drive (HDD) .
Unit buttons for controlling the current audio or video source
The arrow buttons or
on the unit will always affect the audio source you are
currently listening to, irrespective of the current menu used.
- pressing this briefly changes over to the beginning of the current title or
chapter, repeated pressing changes over to the beginning of the previous title or
chapter.
- pressing this briefly changes over to the beginning of the next title or chap-
ter, repeated pressing changes over to the beginning of the next title or chapter.
It is also possible to change tracks in the menu of the currently played audio
source using the menu button 15
.
Unit buttons for controlling the current audio and video source - pressing this briefly changes over to the beginning of the current title or
chapter, repeated pressing changes over to the beginning of the previous title or
chapter.
- pressing this briefly changes over to the next title or chapter.
14 MEDIA mode
Page 19 of 44

External sources
AUX and MDI input
AUX input
Press the button MEDIA →
AUX .
External audio sources connected to the AUX socket cannot be operated via the
radio navigation system. Only the volume can be controlled from the radio naviga-
tion system.
Use the standard jack plug 3.5
mm for the AUX jack. If the external audio source
does not have this jack plug, you must use an adapter .
MDI input- multimedia socket
Press the button MEDIA →
MDI .
Audio files in MP3, WMA, OGG Vorbis and AAC format from the external data stick-
ers, connected to the multimedia socket, can be played via the radio navigation
system.
External audio sources connected to the MDI socket can
be operated via the radio
navigation system.
You can select another audio source on the radio at any time. As long as the ex-
ternal audio source is not switched off, it remains always active in the back-
ground.
See the owner's manual of the specific manufacturer for operating the external
audio source.
To connect external audio sources via the MDI input, a special adapter is to be
used.
iPod
If an iPod is connected to the MDI input, a menu opens in which you can select
the folders of the iPod (playlists, artists, albums, titles, etc.).
Adjust the play volume of the external audio source
The play volume of the external audio source can be adjusted via the volume con-
trol on the radio navigation system 1
.
Depending on the connected audio source, the output volume on the external au-
dio source can be changed. You can also change the input sensitivity of the external audio source, in order to
adapt the play volume of the external audio source to that of the other audio
sources or to avoid distortions
» page 9, Media Set-Up.
Conditions for proper connection › Only USB devices with the specification 2.0 can be connected.
› The version of the file allocation table FAT (File Allocation Table) of the connec-
ted device must be FAT16 ( <2
GB) or FAT32 (> 2 GB).
› In order to replay from a unit with a hard disk (HDD) which includes a large data
volume, it can lead to a time delay when reading in the overview of the music
data.
› In order to replay from a unit, which includes a complicated folder structure, it
can lead to a time delay when scanning the audio files.
› The folder structure in the connected unit must not exceed a depth of 8 levels.
One folder must not contain more than 1000°data.
› A USB extension cable or USB distributor (HUB) must not be used to connect
the unit. WARNING
■ On no account place an external audio source on the dash panel. It could be
thrown into the passenger compartment during sudden driving manoeuvres,
injuring the occupants.
■ On no account place an external audio source close to the airbags. It could
be thrown into the passenger compartment when the airbags are deployed,
injuring the occupants.
■ Never hold the external audio source in your hand or on your knees while
driving. You could make sudden manoeuvres in the passenger compartment
and injure the occupants.
■ Always route the connection cable of the external audio source such that is
does not restrict you when driving. CAUTION
The AUX socket must only be used for audio sources! Note
■ The external audio source, which is connected via AUX-IN, can only be used if
no other unit is connected via MDI at the same time. ■ If an external audio source is connected via AUX, which is equipped with an
adapter for external power supply, it can occur that the audio signal is interrup-
ted. This depends on the quality of the adapter which is used. Ð
17
MEDIA mode
Page 40 of 44

Index
A
Acoustic feedback 10
Address 31, 32
Edit 11
Adjustment Volume 5
Alternative route 11
AM 13
Arrival time Display 11
Audio 14
AUX 14
, 17 B
Block Permanent 35
Blocked road Temporary 35
Blocked route section 35
Bluetooth 14
Brightness 10
C
Calculate 11
CD 14
CD/DVD insert 15
remove 15
CD/DVD mode CD/DVD not legible 15
Centering the map 26
Choose saved destinations 33
Code 3Control
Audio/Video 14
D
Delete destination memory 34
Delete saved destination 33
Demo mode 11
Destination 32
Choose saved destinations 33
Delete saved destination 33
Destination memory 33
Display information 10
Edit saved destination 33
Enter a stopover 34
Favourites 33
Home address 32
Last destinations 32
Memory card 33
New stopover 34
Save 33
SD card 33
via coordinates 32
Destination display 10
Destination guidance symbols 10
Display Destination guidance symbols 10
Remaining driving time 11
switch off 10, 14
Switch off 26
Display off 13
DTMF key tones 23
Dynamic route guidance 36
Dynamische Route 31 E
Edit Destinations memory 34
Saved destination 33
Saved tour 34
Enter Address 31
Entry Address 32
Destination via coordinates 32
Point as destination 31, 32
Point of interest 31
Point of Interest 32
Tour 34
EPG - Program guide 21
External input AUX 14, 17
MDI 17
External sources 17
F
Factory settings 10
Favourites 31, 33
Destinations 31
FM 13
Frequency band 13
G
General information 3
H
hard disk 14
Hard drive 18
HDD 14, 18
HDD capacity 14
Help display 8
38 Index