warning SKODA SUPERB 2012 2.G / (B6/3T) Columbus Navigation System Manual
[x] Cancel search | Manufacturer: SKODA, Model Year: 2012, Model line: SUPERB, Model: SKODA SUPERB 2012 2.G / (B6/3T)Pages: 44, PDF Size: 1.42 MB
Page 5 of 44
General information
Operating instructions
These operating instructions describe all possible equipment variants without
identifying them as special equipment, model variants or market-dependent
equipment.
Consequently, this vehicle does not need to contain all of the equipment compo-
nents described in these operating instructions.
The scope of equipment for your vehicle is described in the sales documentation
you were given when purchasing the car. For more information, contact your local
ŠKODA retailer. ÐExplanation of symbols
Ð End of a section.
The section is continued on the next page.
→ Transition to next button. ÐImportant information
Safety instructions
WARNING
■ Concentrate fully at all times on your driving! As the driver you are fully re-
sponsible for road safety. Only use the system so that you are in full control of
your vehicle in every traffic situation - risk of accident! ■ Adjust the volume to ensure that acoustic signals from outside, e.g. sirens
from vehicles which have the right of way, such as police, ambulance and fire
brigade vehicles, can be heard at all time. ■ High volumes can cause hearing damage. Ð Warranty
The equipment warranty terms and conditions apply to this unit just like to new
vehicles - see the service schedule. Ð Screen
CAUTION
■ Do not use solvents such as benzine or turpentine, which may damage the
screen surface.
■ Treat the screen with care, as finger pressure or contact with sharp objects may
cause dents and scratches on the surface. Note
The screen can be cleaned with a soft cloth and alcohol if necessary. Ð Signal receipt
Car parks, tunnels, tall buildings or mountains can disrupt the radio and GPS sig-
nal even causing it to fail completely. Ð Anti-theft protection
The anti-theft coding of your radio navigation system prevents an operation of
the system after a voltage interruption, e.g. during a vehicle repair or after theft.
After disconnecting the battery, disconnecting the radio navigation system from
the on-board voltage of the vehicle or after a fuse failure, the code must be en-
tered before the system can be used again. The code number can only be called
up
“online” via the ŠKODA system, as this guarantees even more effective anti-
theft protection. Please contact your authorised ŠKODA Service Partner, if neces-
sary.
Enter code
If a keypad appears after switching on with the command to enter the code, the
unit must be unlocked by entering the correct four-digit code.
› Enter the four-digit code using the function keys
0 to
9 . The digit is accepted
in the entry line.
3
General information
Page 17 of 44
- Pause: the play function is stopped in the current position and the symbol
changes to - after pressing, the play function will continue in this position.
Note
If the volume is reduced to 0 during playback from a CD, the hard drive or another
audio source, the symbol changes to
and playback is interrupted.
ÐIntroductory information about CD/DVD mode
Insert CD/DVD
› Insert a CD/DVD, with the labelled side facing up, into the CD/DVD slot 11
until
it is automatically drawn in. The play function will start automatically.
Remove CD/DVD
› Press the button
– die CD/DVD is ejected.
If the ejected CD /DVD is not taken out within 10 seconds, it will be retracted
again for safety reasons.
CD not legible
If you insert a CD/DVD which cannot be read by the unit, a pop-up window is dis-
played with a note. The CD/DVD is moved to the eject position again after a few
seconds.
If the CD/DVD is not taken out within 10 seconds, it is drawn in again for safety
reasons.
CD to jump
Uneven road surfaces and strong vibrations may cause the CD to jump.
Formation of condensation
When it is cold and after rain showers, moisture can deposit in the CD/DVD drive
(condensation). This can effect the CD jump or impair the play function. In such
cases, wait until the moisture has dissipated.
Notes for the care of the CD/DVDs
If a CD/DVD is soiled, never clean it in a circular motion but rather from inside to
outside with a soft lint-free cloth. In case of severe layers of dirt we recommend
to clean the CD/DVD with a commercially available CD/DVD cleaner. Also in this
case, do not clean the CD/DVD in a circular motion but rather from inside to out-
side, and then let it dry. MP3 and WMA Data (Windows Media Audio)
Playable MP3 and WMA data can also be stored on the hard disk of the
unit
» page 18, Hard drive (HDD) .
The copyright of audio data compressed by Windows Media Audio, can also be
protected by the DRM procedure ( Digital Rights Management). Such WMA data is
not supported by the unit. WARNING
The CD/DVD player is a 1st class laser product. There is a risk of injury from in-
visible laser beams if you open the CD/DVD player. CAUTION
■ Audio-CDs (CD-A) and Audio-DVDs, MP3-CDs and MP3-DVDs as well as Video-
DVDs can be played in the internal CD/DVD drive.
■ Never insert CDs with the designation “Do not insert in drives without a drawer”
or Eco Disc into the internal drive.
■ Inserting a second CD/DVD while a CD/DVD is being ejected can damage the
CD/DVD drive in the unit. After pressing the Eject button , there is a delay of a
few seconds before the CD is ejected. During this time the lock in front of the CD/
DVD case is open. It is essential that you wait until the CD/DVD has been fully
ejected before you try to insert a new CD/DVD. ■ If the CD/DVD drive becomes mechanically defective or a CD/DVD has been in-
serted incorrectly or not fully, “CD fault will be displayed. Please check CD. ” and
then the “DVD drive fault ” indicated on the touch-screen. Check the CD/DVD
check and insert it again correctly and completely into the drive. If a “CD/DVD
drive fault ” is indicated again, please contact your ŠKODA Service Partner.
■ If the inside temperature of the unit is too high, no CDs/DVDs will be accepted.
The unit switches into the last active operating mode.
■ Never use liquids such as benzine, paint thinner or record cleaner, otherwise
the surface of the CD/DVD may be damaged!
■ Never expose the CD/DVD to direct sun light!
■ Only write on the CD/DVD with appropriate writing tools.
■ Do not affix anything to the CD/DVD! Note
■ If the function key CD is inactive, no new Audio CD/DVD has been inserted or an
inserted Audio CD/DVD is not readable. ■ It is possible that CDs/DVDs protected by copyright and non-original CD-R, CD-
RW and DVD-RWs are not returned at all or only in certain circumstances.
15
MEDIA mode
Page 19 of 44
External sources
AUX and MDI input
AUX input
Press the button MEDIA →
AUX .
External audio sources connected to the AUX socket cannot be operated via the
radio navigation system. Only the volume can be controlled from the radio naviga-
tion system.
Use the standard jack plug 3.5
mm for the AUX jack. If the external audio source
does not have this jack plug, you must use an adapter .
MDI input- multimedia socket
Press the button MEDIA →
MDI .
Audio files in MP3, WMA, OGG Vorbis and AAC format from the external data stick-
ers, connected to the multimedia socket, can be played via the radio navigation
system.
External audio sources connected to the MDI socket can
be operated via the radio
navigation system.
You can select another audio source on the radio at any time. As long as the ex-
ternal audio source is not switched off, it remains always active in the back-
ground.
See the owner's manual of the specific manufacturer for operating the external
audio source.
To connect external audio sources via the MDI input, a special adapter is to be
used.
iPod
If an iPod is connected to the MDI input, a menu opens in which you can select
the folders of the iPod (playlists, artists, albums, titles, etc.).
Adjust the play volume of the external audio source
The play volume of the external audio source can be adjusted via the volume con-
trol on the radio navigation system 1
.
Depending on the connected audio source, the output volume on the external au-
dio source can be changed. You can also change the input sensitivity of the external audio source, in order to
adapt the play volume of the external audio source to that of the other audio
sources or to avoid distortions
» page 9, Media Set-Up.
Conditions for proper connection › Only USB devices with the specification 2.0 can be connected.
› The version of the file allocation table FAT (File Allocation Table) of the connec-
ted device must be FAT16 ( <2
GB) or FAT32 (> 2 GB).
› In order to replay from a unit with a hard disk (HDD) which includes a large data
volume, it can lead to a time delay when reading in the overview of the music
data.
› In order to replay from a unit, which includes a complicated folder structure, it
can lead to a time delay when scanning the audio files.
› The folder structure in the connected unit must not exceed a depth of 8 levels.
One folder must not contain more than 1000°data.
› A USB extension cable or USB distributor (HUB) must not be used to connect
the unit. WARNING
■ On no account place an external audio source on the dash panel. It could be
thrown into the passenger compartment during sudden driving manoeuvres,
injuring the occupants.
■ On no account place an external audio source close to the airbags. It could
be thrown into the passenger compartment when the airbags are deployed,
injuring the occupants.
■ Never hold the external audio source in your hand or on your knees while
driving. You could make sudden manoeuvres in the passenger compartment
and injure the occupants.
■ Always route the connection cable of the external audio source such that is
does not restrict you when driving. CAUTION
The AUX socket must only be used for audio sources! Note
■ The external audio source, which is connected via AUX-IN, can only be used if
no other unit is connected via MDI at the same time. ■ If an external audio source is connected via AUX, which is equipped with an
adapter for external power supply, it can occur that the audio signal is interrup-
ted. This depends on the quality of the adapter which is used. Ð
17
MEDIA mode
Page 24 of 44
PHONE mode
Main menu TELEPHONE
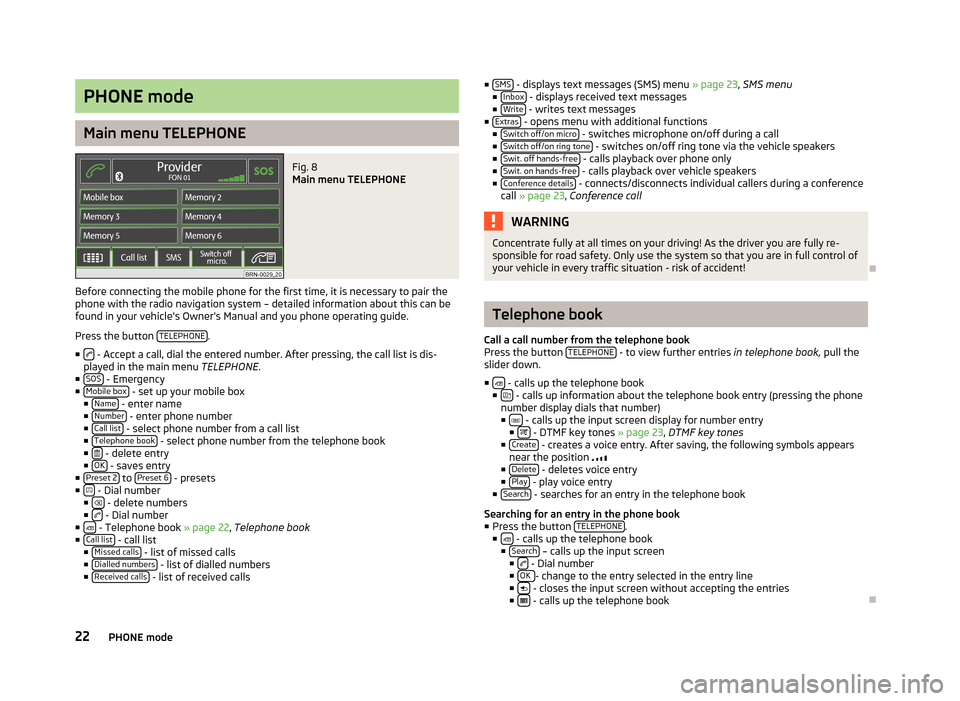
Fig. 8
Main menu TELEPHONE
Before connecting the mobile phone for the first time, it is necessary to pair the
phone with the radio navigation system – detailed information about this can be
found in your vehicle's Owner's Manual and you phone operating guide.
Press the button TELEPHONE .
■ - Accept a call, dial the entered number. After pressing, the call list is dis-
played in the main menu TELEPHONE.
■ SOS - Emergency
■ Mobile box - set up your mobile box
■ Name - enter name
■ Number - enter phone number
■ Call list - select phone number from a call list
■ Telephone book - select phone number from the telephone book
■ - delete entry
■ OK - saves entry
■ Preset 2 to
Preset 6 - presets
■ - Dial number
■ - delete numbers
■ - Dial number
■ - Telephone book » page 22, Telephone book
■ Call list - call list
■ Missed calls - list of missed calls
■ Dialled numbers - list of dialled numbers
■ Received calls - list of received calls ■
SMS - displays text messages (SMS) menu
» page 23, SMS menu
■ Inbox - displays received text messages
■ Write - writes text messages
■ Extras - opens menu with additional functions
■ Switch off/on micro - switches microphone on/off during a call
■ Switch off/on ring tone - switches on/off ring tone via the vehicle speakers
■ Swit. off hands-free - calls playback over phone only
■ Swit. on hands-free - calls playback over vehicle speakers
■ Conference details - connects/disconnects individual callers during a conference
call » page 23, Conference call WARNING
Concentrate fully at all times on your driving! As the driver you are fully re-
sponsible for road safety. Only use the system so that you are in full control of
your vehicle in every traffic situation - risk of accident! Ð Telephone book
Call a call number from the telephone book
Press the button TELEPHONE - to view further entries
in telephone book,
pull the
slider down.
■ - calls up the telephone book
■ - calls up information about the telephone book entry (pressing the phone
number display dials that number)
■ - calls up the input screen display for number entry
■ - DTMF key tones » page 23
, DTMF key tones
■ Create - creates a voice entry. After saving, the following symbols appears
near the position
■ Delete - deletes voice entry
■ Play - play voice entry
■ Search - searches for an entry in the telephone book
Searching for an entry in the phone book
■ Press the button TELEPHONE .
■ - calls up the telephone book
■ Search – calls up the input screen
■ - Dial number
■ OK - change to the entry selected in the entry line
■ - closes the input screen without accepting the entries
■ - calls up the telephone book
Ð
22 PHONE mode
Page 31 of 44
NAV mode (Navigation)
Introductory information
The route is recalculated each time if you ignore driving recommendations or
change the route. This process takes only a few seconds. Driving recommenda-
tions can only then be re-transmitted.
In regions that are not or only partially digitalised and stored on the navigation
DVD, the radio navigation system will continue to try to provide guidance to the
destination. Please note that under these circumstances the guidance to the des-
tination may not be completely correct if, for example, one-way streets and road
categories (motorway, country road, etc.) are not or only partially included in the
navigation data used.
When entering an address (city, street), only those letters or symbols which make
up a logical entry will be presented. A list of possible names will be shown. Do not
forget to enter the blank space in names made up of more than one word, such
as High Wycombe.
The last voice output can be repeated by pressing the button or the menu button 15
. The volume of a navigation recommendation can be changed whilst it is being
made.
The GPS satellites will not be able to reach the aerial once you are in a tunnel or
underground garage. In these cases, the unit uses only the vehicle's sensors and
an internal gyroscope for navigation. WARNING
■ Please concentrate fully at all times on your driving! Driver inattention can
lead to accidents and injuries. As the driver you are fully responsible for road
safety. Only use the functions of the radio navigation system in such a way
that you are always in full control of your vehicle in all traffic situations!
■ The following must always have priority over the driving recommendations:
■ the road traffic legislation, even if the driving recommendations contradict
the StVO,
■ the actual acknowledgement of traffic signs, light signals or signs placed
by the police at the relevant location,
■ the facts and circumstances prevailing at the relevant location. WARNING (Continued)
■ Please observe the respective traffic regulations when driving.
■ Traffic signs and traffic regulations always have priority over the driving rec-
ommendations provided by the navigation system.
■ Route guidance is subject to constant changes, particularly to information
relating to one-way streets, pedestrian zones etc. stored in the navigation da-
ta. Information on traffic lights, stop and right of way signs, parking and stop-
ping restrictions as well as lane constrictions and speed restrictions is not in-
cluded in the radio navigation system. ■ Adjust your speed to suit weather, road and traffic conditions. Do not allow,
for example, the radio navigation system to make you drive faster in fog - risk
of accident!
■ Only if the traffic situation allows it should you operate the radio navigation
system with its wide range of possibilities.
■ The driving recommendations provided may vary from current situations,
e.g. due to road works or out of date navigation data. In such a case, always
observe the traffic regulations and ignore the driving recommendations. ■ Adjust the volume to ensure that acoustic signals from outside, e.g. sirens
from vehicles which have the right of way, such as police, ambulance and fire
brigade vehicles, can be heard at all time. Note
■ It is not necessary to enter the destinations (country, city, road, point of interest
names) including all country-specific (or language-specific for points of interest)
special characters. ■ Depending on the country, some functions of the radio navigation system can
no longer be selected on the screen at certain speeds. This is not a malfunction,
but corresponds to the legal requirements of the particular country. Ð Navigation data and the navigation DVD
The navigation data are already available after the memory of the radio naviga-
tion system is switched on first and can be used directly for route guidance.
Storing the updated navigation data can take up to one hour. Route guidance will
start via the navigation DVD while the navigation data is being stored. Please
note that route guidance will be interrupted if the navigation DVD is removed.
Route guidance must then be restarted with details supplied from the navigation
system memory of the unit.
29
NAV mode (Navigation)