sensor SKODA SUPERB 2012 2.G / (B6/3T) Owner's Guide
[x] Cancel search | Manufacturer: SKODA, Model Year: 2012, Model line: SUPERB, Model: SKODA SUPERB 2012 2.G / (B6/3T)Pages: 235, PDF Size: 5.86 MB
Page 101 of 235

switched on, the air distribution control will temporarily be switched off. If the
concentration of pollutants decreases to the normal level, the air distribution con-
trol is automatically switched off so that fresh air can be guided into the vehicle
interior. In recirculated air mode air is sucked out of the interior of the vehicle and
then fed back into the interior. When the automatic air distribution control is
switched on, an air quality sensor measures the concentration of pollutants in the
drawn in air.
Switching recirculated air mode on
› Repeatedly press the button
5
» Fig. 109
on page 97 until the indicator
light on the left side of the button is illuminated.
Switch on automatic air distribution control
› Repeatedly press the button
until the indicator light on the right side of
the button is illuminated.
Switch off automatic air distribution control temporarily › If the air quality sensor does not automatically switch on the air distribution
control in the event of an unpleasant odour, you can switch it on yourself by
pressing the button . The indicator light lights up in the button on the left
side.
Switching recirculated air mode off › Press the button
AUTO or repeatedly press the button
until the indicator
lights in the button go out. WARNING
Do not leave recirculated air mode on over a longer period of time, as “stale”
air can cause fatigue of the driver and passengers, reduce attention levels and
also cause the windows to mist up. The risk of having an accident increases.
Switch off recirculated air mode as soon as the windows start to mist up. Note
■ If the windscreen mists up, press the button 1
» Fig. 109 on page 97.
Press the button AUTO when the windscreen is demisted.
■ The automatic air distribution control operates only if the outside temperature
is higher than approx. 2 °C. Ð Controlling blower
The Climatronic system controls the blower stages automatically in line with the
interior temperature. However, the blower stages can be manually adapted to
suit your particular needs.
› Repeatedly press the button
10
» Fig. 109
on page 97 on the left side (re-
duce blower speed) or on the right side (increase blower speed).
If the blower is switched off, the Climatronic system is switched off.
The set blower speed is displayed above the button when the respective num-
ber of indicator lights come on. WARNING
■ “Stale air”
may result in fatigue in the driver and occupants, reduce attention
levels and also cause the windows to mist up. The risk of having an accident
increases.
■ Do not switch off the Climatronic system for longer than necessary.
■ Switch on the Climatronic system as soon as the windows mist up. Ð Defrosting windscreen
Switching on › Press the button
1
» Fig. 109
on page 97.
› Press the button
11
» Fig. 109
on page 97.
Switching off
› Once again press the button
or the button
AUTO .
› Once again press the button
.
The temperature control is controlled automatically. More air flows out of the air
outlet vents 1 » page 94. Ð
99
The air conditioning system
Page 114 of 235

Shifting (manual gearbox)
Fig. 119
Gearshift pattern of 5 gear or
6 gear manual gearbox
Always depress the clutch pedal fully when changing gear, to prevent excessive
wear of the clutch.
The gearshift indicator must be observed when changing gear » page 11.
Only engage reverse gear when the vehicle is stationary. Depress the clutch pedal
and hold it fully depressed. Wait a moment before reverse gear is engaged to
avoid any shift noises.
The reversing lights will come on once reverse gear is engaged, provided the igni-
tion is on. WARNING
Never engage reverse gear when driving - risk of accident! Note
If not in the process of changing gear, do not leave your hand on the gearshift
lever while driving. The pressure from the hand can cause the gearshift mecha-
nism to wear excessively. ÐPedals
The operation of the pedals must not be hindered under any circumstances!
In the driver's footwell, only a footmat, which is attached to the two correspond-
ing attachment points, may be used. Only use footmats from the range of ŠKODA Original Accessories, which are fitted
to two attachment points. WARNING
No objects are allowed in the driver's footwell – risk of obstruction or limita-
tion in operating the pedal! Ð Parking aid
Fig. 120
Parking aid: Range of the sensors/activating the parking aid
The parking aid determines the distance between the front or rear bumper and
an obstacle with the aid of ultrasound sensors. The sensors are integrated in the
front/rear bumper.
The signal tones for the front parking aid sound higher than for the rear parking
aid. The tones of the parking aid can be adapted in the menu of the Information
display » page 16.
Range of sensors
The distance warning begins at a distance of about 160°cm from the obstacle at
the rear of the vehicle and about 120
cm from the obstacle in front of the vehicle A
» Fig. 120. The interval between the warning signals becomes shorter as the
clearance is reduced.
A continuous tone sounds from a distance of approx. 30
cm B
» Fig. 120 - danger
area. From this moment on do not continue driving!
On vehicles with a factory-fitted radio or navigation system, the distance to the
obstacle is simultaneously graphically illustrated on the display, refer to the oper-
ating instructions for the radio or navigation system. £
112 Using the system
Page 115 of 235

On vehicles with a factory-fitted towing device, the border of the danger area
starts (continuous tone) 5
cm further away from the vehicle. The length of the ve-
hicle can be increased with an installed detachable towing device.
On vehicles with a factory-fitted towing device, the rear sensors are deactivated
when towing a trailer.
Activating/deactivating the rear parking aid
The parking aid is activated automatically when reverse gear is engaged and the
ignition is turned on. This is confirmed by a brief audible signal.
The parking aid is deactivated by removing the reverse gear.
Activating/deactivating the front and rear parking aid
The parking aid is activated when the ignition is turned on and reverse gear is en-
gaged and or by pressing the button » Fig. 120 - the symbol
lights up in the
button. This is confirmed by a brief audible signal.
The parking aid is deactivated by pressing the button or at a speed of more
than 10 km/h (the symbol in the button is no longer illuminated). WARNING
■ The parking aid is not a substitute for the driver paying proper attention and
it is always the driver's responsibility to take care when reversing the vehicle
or carrying out similar manoeuvres. Pay particular attention to small children
and animals as they are not recognised by the parking aid sensors.
■ Before reversing or parking, check that there is no small obstacle, such as a
rock, thin post, trailer drawbar etc., in front of or behind the vehicle. Such ob-
stacles may not be recognised by the parking aid sensors.
■ Under certain circumstances, surfaces of certain objects and types of cloth-
ing cannot reflect the signals from the parking aid. Thus, these objects or peo-
ple who wear such clothing are not recognised by the parking aid sensors.
■ External sound sources can have a detrimental effect on the parking aid.
Under unfavourable conditions, objects or people may not be recognised. Note
■ If a warning signal sounds for about 3
seconds after activating the system and
there is no obstacle close to your car, this indicates a system fault. The fault is
confirmed additionally when the symbol flashes in the button . Have the
fault rectified by a
ŠKODA specialist garage.
■ The sensors must be kept clean (free of ice, etc.) to enable the parking aid to
operate properly.
■ If the parking aid is activated and the selector lever of the automatic gearbox is
in the position P, the warning signal is interrupted (the vehicle cannot move). Ð Park assist
ä
Introduction
This chapter contains information on the following subjects:
Park assist display on the information display 114
Parking with the help of the park assist system and completing the parking
procedure 115
Messages in the information display 116
The parking aid is part of the park assist system, therefore the information and
safety guidelines » page 112, Parking aid must be read and observed.
The park assist system helps you to park in a suitable parallel parking space be-
tween two vehicles or behind a vehicle.
After switching on the ignition and when driving at a speed of up to 30
km/h, the
park assist system automatically searches for suitable parking spaces on the driv-
er's and passenger's side of the vehicle.
During the parking procedure the park assist only takes over the steering move-
ments, the pedals continue to be operated by the driver.
If the park assist system is switched on, a yellow indicator light illuminates up in
the button » Fig. 121 on page 114.
The function of the system is based on:
› the measurement and evaluation of the size of parking spaces when driving,
› the determination of the correct position of the vehicle for parking,
› the calculation of the line on which the vehicle drives backwards into the park-
ing space,
› the automatic turning of the front wheels when parking.
£
113
Starting-off and Driving
Page 116 of 235
WARNING
■ The park assist does not take away the responsibility from the driver when
parking.
■ External sound sources can have a detrimental effect on the park assist sys-
tem and parking aid. Under unfavourable conditions, objects or people may
not be recognised. CAUTION
■ If other vehicles are parked behind or on the kerb, the park assist guides your
vehicle beyond the kerb or onto it. Ensure that the wheels or the wheel rims of
your vehicle are not damaged and if necessary intervene in time.
■ Under certain circumstances, surfaces or structures of certain objects, such as
wire mesh fences, powder snow etc., cannot be recognised by the system.
■ The evaluation of the parking space and the parking procedure depends on the
circumference of the wheels. The system only works correctly if the vehicle is fit-
ted with the wheel size approved by the manufacturer. If wheels other than
those approved by the manufacturer are mounted, the resulting position of the
vehicle in the parking space can differ slightly. This can be avoided by readjusting
the system at a ŠKODA
specialist garage. Under certain circumstances, the sys-
tem may not function correctly, for example, if the vehicle is fitted with snow
chains or a temporary spare wheel. Note
■ The traction control system (TCS) must always be switched on when parking.
■ Only the front parking aid operates if you are towing a trailer (applies only to ve-
hicles with a factory-fitted towing device). This is why it is not possible to reverse
into a parking space with the help of the park assist system when towing a trailer.
■ If the sensors find a suitable parking space, they store its parameters until an-
other suitable parking space has been found or until a distance of 10
m had been
driven after finding the parking space. This is why it is possible to switch on the
park assist after driving past the parking space and the information on whether
this parking space is suitable for parking appears in the information display. Ð Park assist display on the information display
Fig. 121
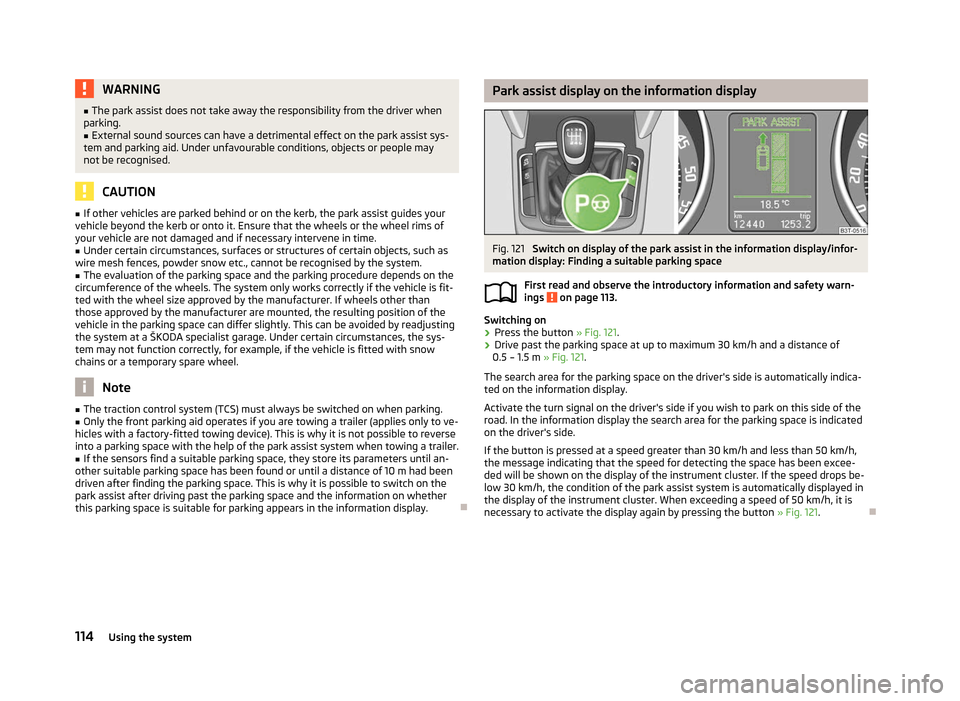
Switch on display of the park assist in the information display/infor-
mation display: Finding a suitable parking space
First read and observe the introductory information and safety warn-
ings on page 113.
Switching on
›
Press the button
» Fig. 121.
› Drive past the parking space at up to maximum 30 km/h and a distance of
0.5
– 1.5 m » Fig. 121.
The search area for the parking space on the driver's side is automatically indica-
ted on the information display.
Activate the turn signal on the driver's side if you wish to park on this side of the
road. In the information display the search area for the parking space is indicated
on the driver's side.
If the button is pressed at a speed greater than 30 km/h and less than 50 km/h,
the message indicating that the speed for detecting the space has been excee-
ded will be shown on the display of the instrument cluster. If the speed drops be-
low 30 km/h, the condition of the park assist system is automatically displayed in
the display of the instrument cluster. When exceeding a speed of 50 km/h, it is
necessary to activate the display again by pressing the button » Fig. 121.Ð
ä
114 Using the system
Page 153 of 235
Side airbags
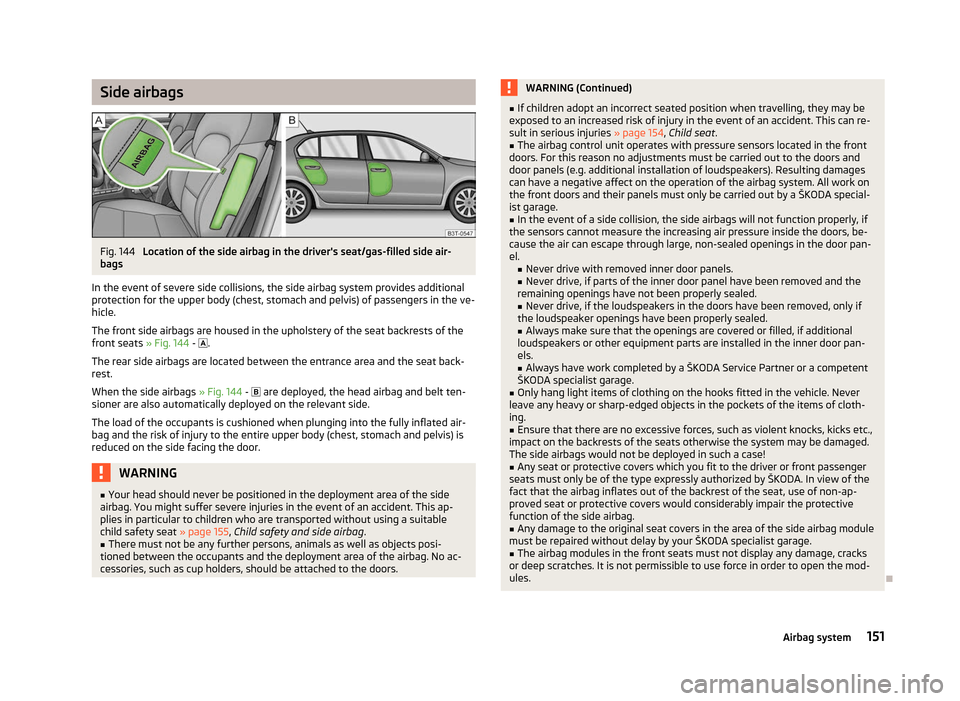
Fig. 144
Location of the side airbag in the driver's seat/gas-filled side air-
bags
In the event of severe side collisions, the side airbag system provides additional
protection for the upper body (chest, stomach and pelvis) of passengers in the ve-
hicle.
The front side airbags are housed in the upholstery of the seat backrests of the
front seats » Fig. 144 - .
The rear side airbags are located between the entrance area and the seat back-
rest.
When the side airbags » Fig. 144 - are deployed, the head airbag and belt ten-
sioner are also automatically deployed on the relevant side.
The load of the occupants is cushioned when plunging into the fully inflated air-
bag and the risk of injury to the entire upper body (chest, stomach and pelvis) is
reduced on the side facing the door. WARNING
■ Your head should never be positioned in the deployment area of the side
airbag. You might suffer severe injuries in the event of an accident. This ap-
plies in particular to children who are transported without using a suitable
child safety seat » page 155, Child safety and side airbag .
■ There must not be any further persons, animals as well as objects posi-
tioned between the occupants and the deployment area of the airbag. No ac-
cessories, such as cup holders, should be attached to the doors. WARNING (Continued)
■ If children adopt an incorrect seated position when travelling, they may be
exposed to an increased risk of injury in the event of an accident. This can re-
sult in serious injuries » page 154, Child seat.
■ The airbag control unit operates with pressure sensors located in the front
doors. For this reason no adjustments must be carried out to the doors and
door panels (e.g. additional installation of loudspeakers). Resulting damages
can have a negative affect on the operation of the airbag system. All work on
the front doors and their panels must only be carried out by a
ŠKODA special-
ist garage.
■ In the event of a side collision, the side airbags will not function properly, if
the sensors cannot measure the increasing air pressure inside the doors, be-
cause the air can escape through large, non-sealed openings in the door pan-
el. ■ Never drive with removed inner door panels.
■ Never drive, if parts of the inner door panel have been removed and the
remaining openings have not been properly sealed.
■ Never drive, if the loudspeakers in the doors have been removed, only if
the loudspeaker openings have been properly sealed.
■ Always make sure that the openings are covered or filled, if additional
loudspeakers or other equipment parts are installed in the inner door pan-
els.
■ Always have work completed by a
ŠKODA Service Partner or a competent
ŠKODA specialist garage.
■ Only hang light items of clothing on the hooks fitted in the vehicle. Never
leave any heavy or sharp-edged objects in the pockets of the items of cloth-
ing.
■ Ensure that there are no excessive forces, such as violent knocks, kicks etc.,
impact on the backrests of the seats otherwise the system may be damaged.
The side airbags would not be deployed in such a case!
■ Any seat or protective covers which you fit to the driver or front passenger
seats must only be of the type expressly authorized by
ŠKODA. In view of the
fact that the airbag inflates out of the backrest of the seat, use of non-ap-
proved seat or protective covers would considerably impair the protective
function of the side airbag. ■ Any damage to the original seat covers in the area of the side airbag module
must be repaired without delay by your
ŠKODA specialist garage.
■ The airbag modules in the front seats must not display any damage, cracks
or deep scratches. It is not permissible to use force in order to open the mod-
ules. Ð
151
Airbag system
Page 154 of 235
Head airbags
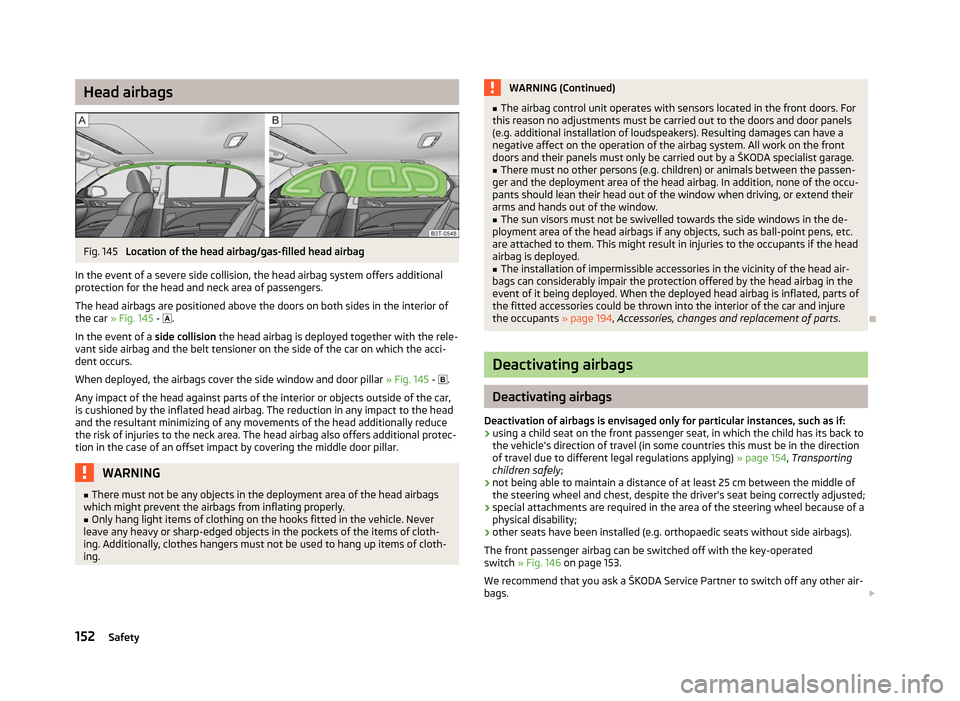
Fig. 145
Location of the head airbag/gas-filled head airbag
In the event of a severe side collision, the head airbag system offers additional
protection for the head and neck area of passengers.
The head airbags are positioned above the doors on both sides in the interior of
the car » Fig. 145 - .
In the event of a side collision the head airbag is deployed together with the rele-
vant side airbag and the belt tensioner on the side of the car on which the acci-
dent occurs.
When deployed, the airbags cover the side window and door pillar »
Fig. 145 - .
Any impact of the head against parts of the interior or objects outside of the car,
is cushioned by the inflated head airbag. The reduction in any impact to the head
and the resultant minimizing of any movements of the head additionally reduce
the risk of injuries to the neck area. The head airbag also offers additional protec-
tion in the case of an offset impact by covering the middle door pillar. WARNING
■ There must not be any objects in the deployment area of the head airbags
which might prevent the airbags from inflating properly.
■ Only hang light items of clothing on the hooks fitted in the vehicle. Never
leave any heavy or sharp-edged objects in the pockets of the items of cloth-
ing. Additionally, clothes hangers must not be used to hang up items of cloth-
ing. WARNING (Continued)
■ The airbag control unit operates with sensors located in the front doors. For
this reason no adjustments must be carried out to the doors and door panels
(e.g. additional installation of loudspeakers). Resulting damages can have a
negative affect on the operation of the airbag system. All work on the front
doors and their panels must only be carried out by a
ŠKODA specialist garage.
■ There must no other persons (e.g. children) or animals between the passen-
ger and the deployment area of the head airbag. In addition, none of the occu-
pants should lean their head out of the window when driving, or extend their
arms and hands out of the window.
■ The sun visors must not be swivelled towards the side windows in the de-
ployment area of the head airbags if any objects, such as ball-point pens, etc.
are attached to them. This might result in injuries to the occupants if the head
airbag is deployed.
■ The installation of impermissible accessories in the vicinity of the head air-
bags can considerably impair the protection offered by the head airbag in the
event of it being deployed. When the deployed head airbag is inflated, parts of
the fitted accessories could be thrown into the interior of the car and injure
the occupants » page 194, Accessories, changes and replacement of parts .Ð Deactivating airbags
Deactivating airbags
Deactivation of airbags is envisaged only for particular instances, such as if:
› using a child seat on the front passenger seat, in which the child has its back to
the vehicle's direction of travel (in some countries this must be in the direction
of travel due to different legal regulations applying) » page 154, Transporting
children safely ;
› not being able to maintain a distance of at least 25 cm between the middle of
the steering wheel and chest, despite the driver's seat being correctly adjusted;
› special attachments are required in the area of the steering wheel because of a
physical disability;
› other seats have been installed (e.g. orthopaedic seats without side airbags).
The front passenger airbag can be switched off with the key-operated
switch » Fig. 146 on page 153.
We recommend that you ask a
ŠKODA Service Partner to switch off any other air-
bags. £
152 Safety
Page 169 of 235
General Maintenance
Taking care of and cleaning the vehicle
Taking care of your vehicle
ä
Introduction
This chapter contains information on the following subjects:
Washing the vehicle 168
Automatic car wash systems 168
Washing by hand 168
Washing with a high-pressure cleaner 168
Preserving and polishing the vehicle paintwork 169
Chrome parts 169
Paint damage 169
Plastic parts 169
De-icing windows and exterior mirrors 170
Radio reception and aerial 170
Headlight lenses 170
Rubber seals 170
Door lock cylinders 170
Wheels 171
Underbody protection 171
Protection of hollow spaces 171
Artificial leather and materials 172
Fabric covers on electrically heated seats 172
Natural leather 172
Seat belts 173
Regular and proper care help to retain the efficiency and value of your vehicle. It
may also be one of the requirements for the acceptance of warranty claims relat-
ing to corrosion damage and paint defects on the bodywork.
We recommend using care products from
ŠKODA Original Accessories that are
available from ŠKODA Service Partners. The instructions for use on the package
must be observed. WARNING
■ Care products may be harmful to your health if not used according to the in-
structions.
■ Always store care products in a safe place, out of the reach of children - risk
of poisoning! ■ When washing your vehicle in the winter: Water and ice in the brake system
can affect the braking efficiency - risk of accident! ■ Only wash the vehicle when the ignition is switched off - risk of accident!
■ Protect your hands and arms from sharp-edged metal parts when cleaning
the underfloor, the inside of the wheel housings or the wheel trims - risk of
cuts!
■ Air fresheners and scents can be hazardous to heath when the temperature
inside the vehicle is high. CAUTION
■ Be sure to check clothing for colourfastness to avoid any damage or visible
stains on the material (leather), panels and textiles.
■ Cleaners containing solvents can damage the material being cleaned.
■ Do not wash your vehicle in bright sunlight - risk of paint damage.
■ If washing the vehicle in the winter using a hose or high-pressure cleaner, en-
sure that the jet of water is not aimed directly at the locking cylinders or the
door/panel joints - risk of freezing!
■ Do not use any insect sponges, rough kitchen sponges or similar cleaning prod-
ucts - risk of damaging the surface of paintwork.
■ Do not stick any stickers on the inside of the rear windows, the rear side win-
dows and in the vicinity of the heating elements on the windscreen or near the
window aerial. These may get damaged. With regard to the antenna, they may in-
terfere with the radio or navigation system.
■ Do not clean the inside of the windows with sharp-edged objects or corrosive
and acidic cleaning agents - risk of damaging the heating elements or window
aerial.
■ Do not attach scents and air fresheners to the dashboard - risk of damage to
the dashboard.
■ To avoid damaging the parking aid sensors while cleaning with high-pressure
cleaners or steam jets, the sensors must only be directly sprayed for short periods
while a minimum distance of 10
cm must be observed.
■ Do not clean the roof trim with a brush - risk of damage to the trim surface. £
167
Taking care of and cleaning the vehicle
Page 170 of 235
For the sake of the environment
■ Used cans of vehicle care products represent a special type of hazardous waste.
These must be disposed of in accordance with national legal regulations. ■ Only wash the vehicle at washing bays intended for this purpose. Note
■ Remove fresh stains such as those from ball-point pens, ink, lipstick, shoe pol-
ish, etc., from the material (leather), panels and textiles as quickly as possible. ■ Due to possible issues with the cleaning and care of the interior of your vehicle,
the special tools and knowledge required, we recommend that this is completed
by a
ŠKODA Service Partner. ÐWashing the vehicle
First read and observe the introductory information and safety warn-
ings on page 167.
The best protection for your vehicle against harmful environmental influences is
frequent washing and wax treatment. How often the vehicle should be washed
depends on a wide range of factors, such as:
› Frequency of use;
› The parking situation (garage, below trees etc.);
› Season of the year;
› Weather conditions;
› Environmental influences.
The longer insect residues, bird droppings, tree sap, road and industrial dust, tar,
soot particles, road salt and other aggressive deposits remain adhering to the
paintwork of your vehicle, the more detrimental their destructive effect can be.
High temperatures, such as those caused by intensive sun's rays, accentuate this
caustic effect.
It is essential to also thoroughly clean the underside of the vehicle at the end of
the winter. ÐAutomatic car wash systems
First read and observe the introductory information and safety warn-
ings on page 167.ä
ä Your vehicle can be washed in automatic car wash systems.
The usual precautionary measures must be taken before washing the vehicle in
an automatic car wash system (closing the windows including the sliding/tilting
roof, etc.).
If your vehicle is fitted with any particular attached parts, such as a spoiler, roof
luggage rack, two-way radio aerial - it is best to consult the operator of the car
wash system beforehand.
It is important to degrease the lips of the windscreen wiper rubbers after passing
through the automatic vehicle wash system. Ð Washing by hand
First read and observe the introductory information and safety warn-
ings on page 167.
When washing by hand, first soften the dirt with plenty of water and rinse off as
much as possible.
Clean the vehicle with a soft sponge, a washing glove or a washing brush. Work
from the top to the bottom - starting with the roof. Only apply slight pressure
when cleaning the vehicle's paintwork. Only use a car shampoo for stubborn dirt.
Wash out the sponge or washing glove thoroughly at short intervals.
Clean wheels, door sills and similar parts last. Use a second sponge for such
areas.
Give the vehicle a good rinse after washing it and dry it off using a chamois leath-
er. Ð Washing with a high-pressure cleaner
First read and observe the introductory information and safety warn-
ings on page 167.
When washing the vehicle with a high-pressure cleaner, the instructions for use
of the equipment must be observed. This applies in particular to the pressure
used and to the spraying distance. Maintain a sufficiently large distance to the
parking aid sensors and soft materials such as rubber hoses or insulation materi-
al. £
ä
ä
168 General Maintenance
Page 194 of 235

Tyre control display
Fig. 169
Button for setting the tyre infla-
tion pressure control value
First read and observe the introductory information and safety warn-
ings on page 187.
The tyre control display compares the speed and thus the rolling circumference of
the individual wheels with the help of the ABS sensors. If the rolling circumfer-
ence of a wheel is changed, the indicator light
in the instrument clus-
ter » page 25, Tyre control display and an audible signal sounds.
The rolling circumference of the tyre can change if: › the tyre inflation pressure is too low;
› the structure of the tyre is damaged;
› the vehicle is loaded on one side;
› the wheels of an axle are loaded heavily (e.g. when towing a trailer or when
driving uphill or downhill);
› snow chains are mounted;
› the temporary spare wheel is mounted;
› one wheel per axle was changed.
Basic setting of the system
After changing the tyre inflation pressure, after changing one or several wheels,
the position of a wheel on the vehicle (e.g. exchanging the wheels between the
axles) or when the indicator light lights up while driving, a basic setting of the
system must be carried out as follows: › Inflate all of the tyres to the specified inflation pressure
» page 188, Service life
of tyres.
› Switch on the ignition.
ä
›
Press and hold the button
» Fig. 169
for longer than 2 seconds. While
pressing the button, the indicator light illuminates. At the same time the sys-
tem memory is erased and the new calibration is started, which is confirmed
with an audible signal and then the indicator light goes out.
› If the indicator light
does not go out after the basic setting, this indicates a
system fault. Seek help from a ŠKODA specialist garage.
The indicator light is lit
If the tyre inflation pressure of at least one wheel is insufficiently inflated in com-
parison to the stored basic value, the indicator light » lights up.
The indicator light flashes
If the indicator light flashes, there is a system fault. Seek help from a
ŠKODA spe-
cialist garage to correct the fault. WARNING
■ When the indicator light illuminates, immediately reduce the speed and
avoid sudden steering and brake manoeuvres. Stop the vehicle as soon as
possible and inspect the tyres and their inflation pressure.
■ Under certain circumstances (e.g. sporty style of driving, wintry or unpaved
roads) the indicator light can be delayed or does not light up at all.
■ The tyre control display does not absolve the driver of the responsibility to
ensure the correct tyre inflation pressure. For this reason, the tyre inflation
pressure must be checked regularly. Note
■ The tyre control display does therefore not replace the regular tyre inflation
pressure control, as the system cannot detect an even loss of pressure. ■ The tyre control display cannot provide a warning in the event of very rapid tyre
inflation pressure loss, e.g. in the case of sudden tyre damage. In this case care-
fully bring the vehicle to a standstill without sudden steering movements or
sharp braking.
■ To ensure a proper functioning of the tyre control display, it is necessary to re-
peat the basic setting every 10 000 km or once a year. Ð
192 General Maintenance
Page 210 of 235
Fuses in the dash panel
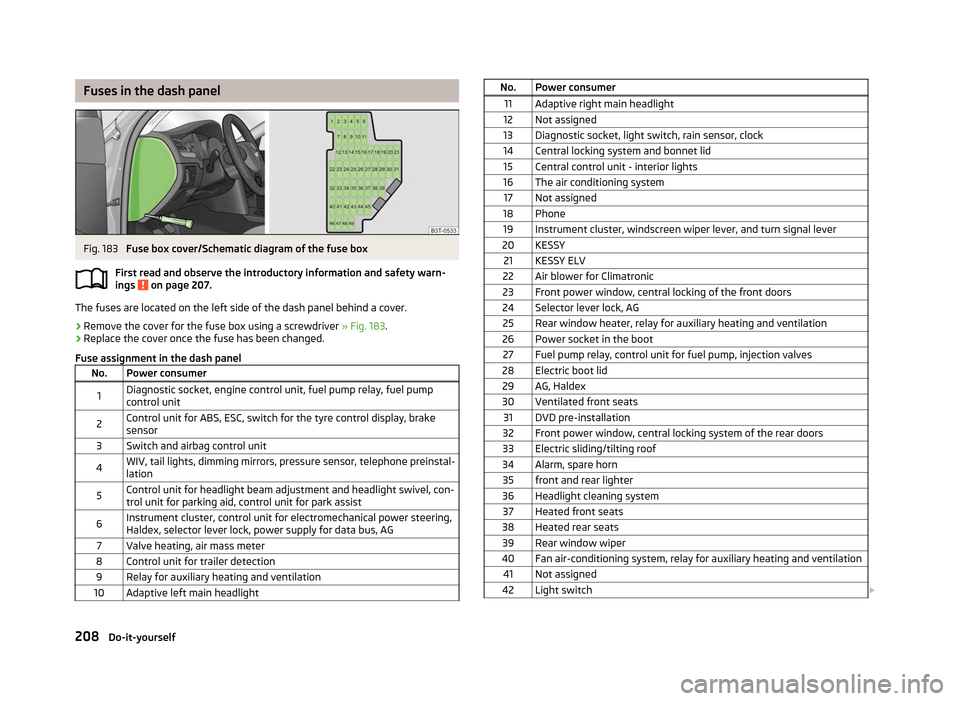
Fig. 183
Fuse box cover/Schematic diagram of the fuse box
First read and observe the introductory information and safety warn-
ings on page 207.
The fuses are located on the left side of the dash panel behind a cover.
›
Remove the cover for the fuse box using a screwdriver
» Fig. 183.
› Replace the cover once the fuse has been changed.
Fuse assignment in the dash panel No. Power consumer
1 Diagnostic socket, engine control unit, fuel pump relay, fuel pump
control unit
2 Control unit for ABS, ESC, switch for the tyre control display, brake
sensor
3 Switch and airbag control unit
4 WIV, tail lights, dimming mirrors, pressure sensor, telephone preinstal-
lation
5 Control unit for headlight beam adjustment and headlight swivel, con-
trol unit for parking aid, control unit for park assist
6 Instrument cluster, control unit for electromechanical power steering,
Haldex, selector lever lock, power supply for data bus, AG
7 Valve heating, air mass meter
8 Control unit for trailer detection 9 Relay for auxiliary heating and ventilation
10 Adaptive left main headlight ä
No. Power consumer
11 Adaptive right main headlight
12 Not assigned
13 Diagnostic socket, light switch, rain sensor, clock
14 Central locking system and bonnet lid 15 Central control unit - interior lights
16 The air conditioning system 17 Not assigned
18 Phone 19 Instrument cluster, windscreen wiper lever, and turn signal lever
20 KESSY 21 KESSY ELV
22 Air blower for Climatronic
23 Front power window, central locking of the front doors
24 Selector lever lock, AG 25 Rear window heater, relay for auxiliary heating and ventilation
26 Power socket in the boot 27 Fuel pump relay, control unit for fuel pump, injection valves
28 Electric boot lid 29 AG, Haldex
30 Ventilated front seats 31 DVD pre-installation
32 Front power window, central locking system of the rear doors
33 Electric sliding/tilting roof
34 Alarm, spare horn 35 front and rear lighter
36 Headlight cleaning system 37 Heated front seats
38 Heated rear seats 39 Rear window wiper
40 Fan air-conditioning system, relay for auxiliary heating and ventilation 41 Not assigned
42 Light switch £208
Do-it-yourself