child seat SKODA SUPERB 2012 2.G / (B6/3T) Owner's Manual
[x] Cancel search | Manufacturer: SKODA, Model Year: 2012, Model line: SUPERB, Model: SKODA SUPERB 2012 2.G / (B6/3T)Pages: 235, PDF Size: 5.86 MB
Page 5 of 235
Table of Contents
Abbreviations
Using the system
Cockpit 7
Overview 6
Instruments and Indicator Lights 8
Instrument Cluster 8
Multifunction display (onboard computer) 12
MAXI DOT (information display) 15
Indicator lights 18
Unlocking and locking 27
Vehicle key 27
Child safety lock 28
Central locking system 28
Remote control 30
KESSY system 32
Anti-theft alarm system 33
Emergency unlocking and locking 35
Boot lid 35
Electric boot lid 38
Electric power windows 40
Electric sliding/tilting roof 43
Panoramic sliding roof (Combi) 45
Lights and visibility 48
Lights 48
Interior light 54
Boot light (Combi) 57
Visibility 58
Windscreen wipers and washers 59
Rear window 63Seats and Stowage 66
Front seats 66
Seat heaters 69
Ventilated front seats 69
Head restraints 70
Rear seats 71
Boot 72
Variable loading floor in the boot 76
Extendable variable loading floor with
integrated aluminium strips and fastening
elements (Combi) 77
Net partition (Combi) 79
Roof rack system 81
Cup holder 82
Ashtray 83
Cigarette lighter, 12-volt power socket 84
Storage compartments 85
Clothes hooks 91
Parking ticket holder 91
The air conditioning system 93
Air conditioning system 93
Air outlet vents 94
Air conditioning system (manual air conditioning
system) 94
Climatronic (automatic air conditioning
system) 97
Auxiliary heating (auxiliary heating and
ventilation) 100
Starting-off and Driving 103
Starting and stopping the engine 103
KESSY system 105
Brakes and brake assist systems 108
Shifting (manual gearbox) 112
Pedals 112
Parking aid 112
Park assist 113
Cruise control system (CCS) 116START/STOP 118
Fatigue detection system (break
recommendation) 119
Automatic gearbox 121
Automatic gearbox 121
Communication 126
Mobile phones and two-way radio systems 126
Operating the phone on the multifunction
steering wheel 127
Symbols in the information display 128
Phone Phonebook 128
Universal telephone preinstallation GSM II 128
Universal telephone preinstallation GSM IIl 131
Voice control 135
Multimedia 137
Safety
Passive Safety 140
General information 140
Correct seated position 141
Seat belts 144
Seat belts 144
Airbag system 148
Description of the airbag system 148
Front airbags 149
Driver’s knee airbag 150
Side airbags 151
Head airbags 152
Deactivating airbags 152
Transporting children safely 154
Child seat 154
3
Table of Contents
Page 42 of 235

Adjusting the top position of the lid
First read and observe the introductory information given on page 38.If the space for opening the lid is restricted (e.g. height of garage) or for more
convenient operation (e.g. according to a person's height), it is possible to adjust
the top position of the boot lid.
Adjusting
› Stop the lid in the desired position (electrically or manually).
› Press the inner button B
» Fig. 21 on page 38 and press and hold it for approx.
3 seconds. Storing the position in the memory of the control unit is confirmed
with an audible signal.
Deleting the adjusted position
› Carefully lift up the lid manually to the maximum opening position.
› Press and hold the inner button B
» Fig. 21 on page 38 for approx. 3
seconds.
An audible signal sounds and the height which was originally set is deleted from
the memory of the control unit, while the basic position of the top lid position is
again set. Note
■ The lid always opens at the height which was last stored in the memory of the
control unit. ■ The top position which is reached when the lid opens automatically, is always
lower than the maximum top position which can be reached when the lid is
opened manually. ÐOperational problems
First read and observe the introductory information given on page
38.If the battery is disconnected and reconnected while the boot lid is open, it is
necessary to activate the electric boot lid system. Activation refers to the initiali-
sation of the control unit by manually closing the lid. Thus, the end position of the
lid is stored under fully closed in secured lock.
Possible malfunctions of the electric boot lid:
ä
ä Examples of operational malfunctions
Description of the malfunc-
tion Possible solutions
The lid cannot be lifted out of
the lock. Emergency unlocking of the lid
» page 37
The lid does not react to an
opening signal Remove the possible obstacle (e.g. snow), open
the lid again » page 39
Press the handle on the lower edge of the boot
lid and pull the lid upwards
The lid remains in the top po-
sition Manually close the lid (slowly and without sud-
den movements) Ð
Electric power windows
ä
Introduction
This chapter contains information on the following subjects:
Window open/close 41
Window in the front passenger door and the rear doors open/close 42
Force limiter of the power windows 42
Window convenience operation 42
Operational faults 43
WARNING
■ If the vehicle is locked from the outside, do not leave anybody in the vehicle
as it is not possible to open the windows from the inside in the event of an
emergency.
■ The system is fitted with a force limiter » page 42. If there is an obstacle,
the closing process is stopped and the window goes down by several centi-
metres. The windows should nevertheless be closed carefully! Otherwise
these can cause severe crushing injuries!
■ It is recommended to deactivate the electrically operated power windows in
the rear doors (safety pushbutton) S
» Fig. 23
on page 41 when children
are being transported on the rear seats. £
40 Using the system
Page 68 of 235
Seats and Stowage
Front seats
ä
Introduction
This chapter contains information on the following subjects:
Manually adjusting the front seats 67
Adjusting front seats electrically 67
Memory function of the power seat 68
Memory function of the remote control key 68
The driver's seat should be adjusted in such a way that the pedals can be fully
pressed to the floor with slightly bent legs.
The seat backrest on the driver's seat should be adjusted in such a way that the
upper point of the steering wheel can be easily reached with slightly bent arms.
Correct adjustment of the seats is particularly important for:
› safely and quickly reaching the controls;
› a relaxed, fatigue-free body position;
› achieving the maximum protection offered by the seat belts and the airbag
system. WARNING
■ Only adjust the driver's seat when the vehicle is stationary - risk of accident!
■ Caution when adjusting the seat! You may suffer injuries or bruises as a re-
sult of adjusting the seat without paying proper attention. ■ As the electric front seats can also be adjusted when the ignition is switch-
ed off (even when the ignition key is withdrawn), never leave children unat-
tended in the car. ■ The seat backrests must not be angled too far back when driving otherwise
this will affect proper operation of the seat belts and of the airbag system -
risk of injury! ■ Never carry more people than the number of seats in the vehicle. WARNING (Continued)
■ Each occupant must correctly fasten the seat belt belonging to the seat.
Children must be fastened » page 154, Transporting children safely with a
suitable restraint system.
■ The front seats and the head restraints must always be adjusted to match
the body size of the seat occupant as well as the seat belts must always be
correctly fastened in order to provide an optimal protection for you and your
occupants.
■ Always keep your feet in the footwell when the car is being driven - never
place your feet on the instrument panel, out of the window or on the surfaces
of the seats. This is particularly important for the front seat passenger. You
will be exposed to increased risk of injury if it becomes necessary to apply the
brake or in the event of an accident. If an airbag is deployed, you may suffer
fatal injuries when adopting an incorrect seated position!
■ It is important for the driver and front passenger to maintain a distance of at
least 25 cm from the steering wheel or dash panel. Not maintaining this mini-
mum distance will mean that the airbag system will not be able to properly
protect you - hazard!
■ Ensure that there are no objects in the footwell as they may get caught be-
hind the pedals when driving or applying the braking. You would then no lon-
ger be able to operate the clutch, brake or accelerate.
■ Do not transport any objects on the front passenger seat except objects
(e.g. child safety seat) provided for this purpose - risk of accident! Note
■ After a certain time, play can develop within the adjustment mechanism of the
backrest angle. ■ For safety reasons, it is not possible to store the seated position in the seat
memory and remote control key memory if the inclination angle of the seat back-
rest is more than 102° in relation to the seat cushion.
■ When saving the driver's seat and exterior mirror settings, any previous settings
will be deleted. Ð
66 Using the system
Page 71 of 235
Seat heaters
Fig. 56
Regulator for heating the front seats/rear seats
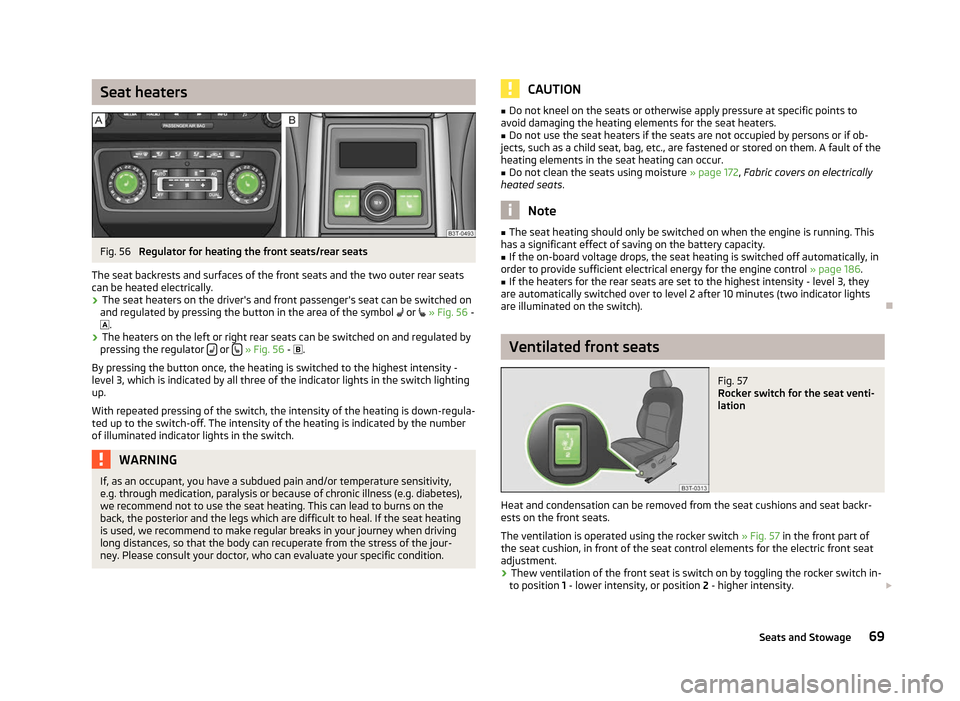
The seat backrests and surfaces of the front seats and the two outer rear seats
can be heated electrically.
› The seat heaters on the driver's and front passenger's seat can be switched on
and regulated by pressing the button in the area of the symbol or »
Fig. 56 -
.
› The heaters on the left or right rear seats can be switched on and regulated by
pressing the regulator or
» Fig. 56 -
.
By pressing the button once, the heating is switched to the highest intensity -
level 3, which is indicated by all three of the indicator lights in the switch lighting
up.
With repeated pressing of the switch, the intensity of the heating is down-regula-
ted up to the switch-off. The intensity of the heating is indicated by the number
of illuminated indicator lights in the switch. WARNING
If, as an occupant, you have a subdued pain and/or temperature sensitivity,
e.g. through medication, paralysis or because of chronic illness (e.g. diabetes),
we recommend not to use the seat heating. This can lead to burns on the
back, the posterior and the legs which are difficult to heal. If the seat heating
is used, we recommend to make regular breaks in your journey when driving
long distances, so that the body can recuperate from the stress of the jour-
ney. Please consult your doctor, who can evaluate your specific condition. CAUTION
■ Do not kneel on the seats or otherwise apply pressure at specific points to
avoid damaging the heating elements for the seat heaters.
■ Do not use the seat heaters if the seats are not occupied by persons or if ob-
jects, such as a child seat, bag, etc., are fastened or stored on them. A fault of the
heating elements in the seat heating can occur.
■ Do not clean the seats using moisture » page 172, Fabric covers on electrically
heated seats. Note
■ The seat heating should only be switched on when the engine is running. This
has a significant effect of saving on the battery capacity. ■ If the on-board voltage drops, the seat heating is switched off automatically, in
order to provide sufficient electrical energy for the engine control » page 186.
■ If the heaters for the rear seats are set to the highest intensity - level 3, they
are automatically switched over to level 2 after 10 minutes (two indicator lights
are illuminated on the switch). Ð Ventilated front seats
Fig. 57
Rocker switch for the seat venti-
lation
Heat and condensation can be removed from the seat cushions and seat backr-
ests on the front seats.
The ventilation is operated using the rocker switch » Fig. 57 in the front part of
the seat cushion, in front of the seat control elements for the electric front seat
adjustment.
› Thew ventilation of the front seat is switch on by toggling the rocker switch in-
to position 1 - lower intensity, or position 2 - higher intensity.£
69
Seats and Stowage
Page 142 of 235

Safety
Passive Safety
General information
ä
Introduction
This chapter contains information on the following subjects:
Safety equipment 140
Before setting off 140
What influences the driving safety? 141
In this section you will find important information, tips and notes on the subject
of passive safety in your vehicle. We have combined everything here which you
should be familiar with, for example, regarding seat belts, airbags, child seats and
safety of children. It is therefore important, in particular, to comply with the notes
and warnings in this section for your own interest and in the interest of those
travelling with you. WARNING
■ This chapter contains important information on how to use the vehicle for
the driver and his occupants. You will find further information on safety, which
concerns you and those travelling with you, in the following chapters of this
Owner's Manual.
■ The complete on-board literature should always be in the vehicle. This ap-
plies in particular, if you rent out or sell the vehicle. ÐSafety equipment
First read and observe the introductory information and safety warn-
ings on page 140.
The following list contains part of the safety equipment in your vehicle:
› three-point seat belts for all the seats;
› belt force limiter for front and outer rear seats;
ä ›
belt tensioner for front and outer rear seats;
› seat belt height adjusters for front seats;
› Front airbag for the driver and the front seat passenger;
› driver’s knee airbag;
› front side airbags;
› rear side airbags;
› head airbags;
› anchoring points for child seat using the
ISOFIX system;
› anchoring points for child seat using the TOP TETHER system;
› head restraints adjustable for height;
› adjustable steering column.
The specified safety equipment works together, in order to optimally protect you
and those travelling with you in accident situations. The safety equipment does
not protect you or the people travelling with you, if you or your occupants adopt
an incorrect seated position or the equipment is not correctly adjusted or used. Ð Before setting off
First read and observe the introductory information and safety warn-
ings on page 140.
For your own safety and the safety of the people travelling with you, please pay
attention to the following points before setting off.
›
Ensure that the lighting and the turn signal system are functioning properly.
› Check the tyre inflation pressure.
› Ensure that all of the windows offer good visibility to the outside.
› Secure all items of luggage
» page 72, Boot.
› Ensure that no objects can obstruct the pedals.
› Adjust the mirrors, the front seat and head restraint to your body size.
› Advise your passengers to adjust the head restraints to their body size.
› Protect children in suitable child seats with correctly fastened seat
belts
» page 154, Transporting children safely .
› Adopt the correct seated position
» page 141, Correct seated position . Tell your
passengers to assume the correct seated position.
› Correctly fasten the seat belt. Also inform passengers to fasten the seat belt
correctly » page 144. Ð
ä
140 Safety
Page 144 of 235
Correct seated position for the driver
Fig. 135
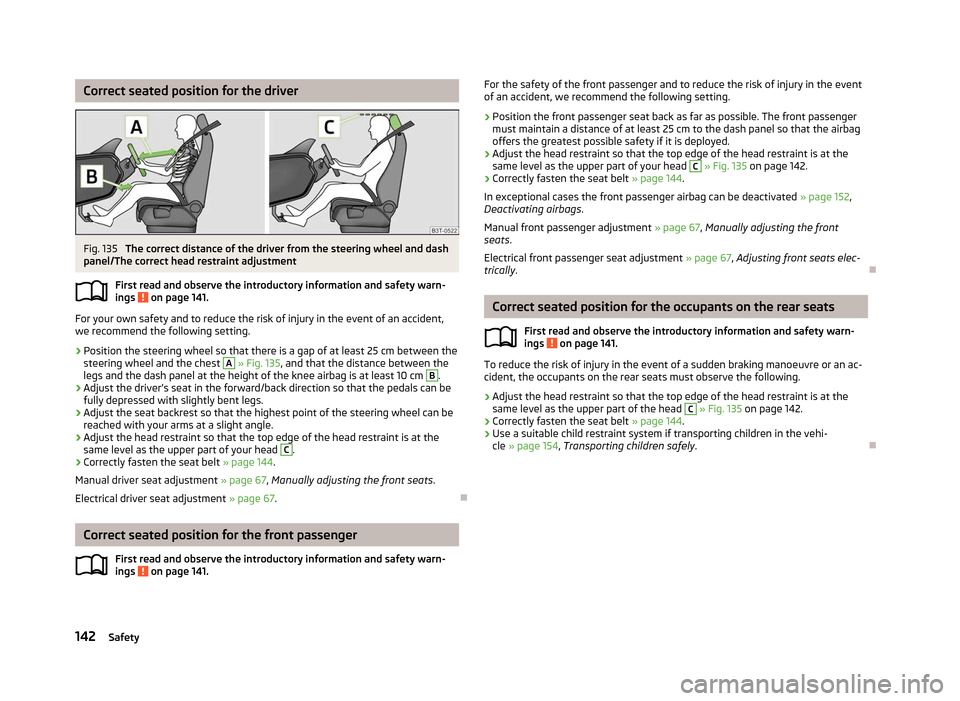
The correct distance of the driver from the steering wheel and dash
panel/The correct head restraint adjustment
First read and observe the introductory information and safety warn-
ings on page 141.
For your own safety and to reduce the risk of injury in the event of an accident,
we recommend the following setting.
› Position the steering wheel so that there is a gap of at least 25
cm between the
steering wheel and the chest A
» Fig. 135, and that the distance between the
legs and the dash panel at the height of the knee airbag is at least 10
cm B
.
› Adjust the driver’s seat in the forward/back direction so that the pedals can be
fully depressed with slightly bent legs.
› Adjust the seat backrest so that the highest point of the steering wheel can be
reached with your arms at a slight angle.
› Adjust the head restraint so that the top edge of the head restraint is at the
same level as the upper part of your head C
.
› Correctly fasten the seat belt
» page 144.
Manual driver seat adjustment » page 67, Manually adjusting the front seats .
Electrical driver seat adjustment » page 67. ÐCorrect seated position for the front passenger
First read and observe the introductory information and safety warn-
ings on page 141.ä
ä For the safety of the front passenger and to reduce the risk of injury in the event
of an accident, we recommend the following setting.
› Position the front passenger seat back as far as possible. The front passenger
must maintain a distance of at least 25 cm to the dash panel so that the airbag
offers the greatest possible safety if it is deployed.
› Adjust the head restraint so that the top edge of the head restraint is at the
same level as the upper part of your head C
» Fig. 135 on page 142.
› Correctly fasten the seat belt
» page 144.
In exceptional cases the front passenger airbag can be deactivated »
page 152,
Deactivating airbags .
Manual front passenger adjustment » page 67, Manually adjusting the front
seats .
Electrical front passenger seat adjustment » page 67, Adjusting front seats elec-
trically. Ð Correct seated position for the occupants on the rear seats
First read and observe the introductory information and safety warn-
ings on page 141.
To reduce the risk of injury in the event of a sudden braking manoeuvre or an ac-
cident, the occupants on the rear seats must observe the following.
› Adjust the head restraint so that the top edge of the head restraint is at the
same level as the upper part of the head C
» Fig. 135 on page 142.
› Correctly fasten the seat belt
» page 144.
› Use a suitable child restraint system if transporting children in the vehi-
cle » page 154, Transporting children safely .Ð
ä
142 Safety
Page 145 of 235

Examples of an incorrect seated position
First read and observe the introductory information and safety warn-
ings on page 141.
Seat belts offer their optimum protection only if the webbing of the seat belts is
properly routed. Incorrect seated positions considerably reduce the protective
functions of the seat belts and therefore increase the risk of injury due to an in-
correct routing of the seat belt. The driver is fully responsible for himself and pas-
sengers, especially children. Never allow a passenger to adopt an incorrect seated
position when the car is moving.
The following list contains examples of which seated positions can cause serious
injuries or death. This list is not complete, however we would like you to familiar-
ise yourself with this subject.
Therefore, while the car is moving never:
› stand up in the vehicle;
› stand up on the seats;
› kneel on the seats;
› tilt the seat backrest fully to the back;
› lean against the dash panel;
› lie on the rear seat bench;
› only sit on the front area of the seat;
› sit to the side;
› lean out of the window;
› put the feet out of the window;
› put the feet on the dash panel;
› put the feet on the seat upholstery;
› transport somebody in the footwell;
› have the seat belt not fastened when driving;
› be in the boot. Ðä
143
Passive Safety
Page 146 of 235

Seat belts
Seat belts
ä
Introduction Fig. 136
Driver wearing seat belt
This chapter contains information on the following subjects:
The physical principle of a frontal collision 145
Fastening and unfastening seat belts 146
Seat belt height adjuster on the front seats 147
Belt tensioners 147
Seat belts that are fastened correctly offer good protection in the event of an ac-
cident. They reduce the risk of an injury and increase the chance of survival in the
event of a major accident.
Correctly fastened seat belts hold occupants of the car in the correct seated posi-
tion » Fig. 136.
The seat belts reduce the kinetic energy (energy of motion) to a considerable ex-
tent. They also prevent uncontrolled movements which, in turn, may well result in
severe injuries.
The occupants of a vehicle who have fastened and correctly adjusted their seat
belt, profit to a major extent from the fact that the kinetic energy is optimally ab-
sorbed by the belts. The structure of the front end of the vehicle and other pas-
sive safety measures, such as the airbag system, also contribute to reducing the
kinetic energy. The energy produced is thus absorbed and there is less risk of in-
jury. Particular safety aspects must be observed when transporting children in the ve-
hicle
» page 154, Transporting children safely . WARNING
■ Fasten your seat belt before each journey - even when driving in town! This
also applies to the people seated at the rear - risk of injury! ■ Expectant women must also always wear a seat belt. This is the only way of
ensuring optimal protection for the unborn child » page 146, Fastening and
unfastening seat belts. ■ Adjust the height of the belt in such a way that the shoulder part of the belt
is roughly positioned across the middle of your shoulder - on no account
across your neck. ■ Always ensure that the webbing of the seat belts is properly routed. Seat
belts which are not correctly adjusted can themselves cause injuries even in
minor accidents. ■ The maximum protection which seat belts can offer is only achieved if you
are correctly seated » page 141, Correct seated position .
■ The seat backrests of the front seats must not be tilted too far to the rear
otherwise the seatbelts can lose their effectiveness.
■ The belt webbing must not be jammed in-between at any point or twisted,
or chafe against any sharp edges.
■ A seat belt which is hanging too loose can result in injuries as your body is
moved forward by the kinetic energy produced in an accident and is then sud-
denly held firm by the belt. ■ The belt webbing must not run across solid or fragile objects (e.g. specta-
cles, ball-point pens, keys etc.) as this may be a cause of injuries. ■ No two persons (also not children) should ever use a single seat belt togeth-
er.
■ The lock tongue should only be inserted into the lock which is the correct
one for your seat. Wrong use of the safety belt will reduce its capacity to pro-
tect and the risk of injury increases. ■ The slot of the belt tongue must not be blocked by paper or similar objects
otherwise the belt tongue will not lock in place properly.
■ Many layers of clothing and loose clothing (e. g. a winter coat over a jacket)
do not allow you to be correctly seated and impairs proper operation of the
seat belts. ■ It is prohibited to use clamps or other objects to adjust seat belts (e. g. for
shortening the belts for smaller persons). £
144 Safety
Page 148 of 235

Fastening and unfastening seat belts
Fig. 138
Fastening/unfastening the seat beltFig. 139
Routing of belt webbing over the shoulders and the lap belt/Rout-
ing of belt webbing for an expectant mother
First read and observe the introductory information and safety warn-
ings on page 144.
Fasten
›
Correctly adjust the front seat and head restraint before fastening the seat
belt » page 70 .
› Use the lock tongue to slowly pull the webbing over your chest and pelvis.
› Insert the lock tongue into the belt buckle
» Fig. 138 - that is part of the seat
until it clicks into place.
› Pull on the belt to check that it has engaged correctly in the lock.
A plastic knob in the belt webbing holds the belt tongue in a position which is
easy to get hold of.
ä It is important that the belt webbing is properly routed to ensure seat belts offer
the maximum protection. The shoulder part of the seat belt must never run
across the neck but must roughly run over the middle of the shoulder and fit
snugly against the chest. The lap part of the belt must run across the pelvis, must
not be positioned across the stomach and must always fit snugly
» Fig. 139 - .
Expectant women must also always wear a seat belt. This is the only way of en-
suring optimal protection for the unborn child. On expectant mothers, the lap part
of the belt must be positioned as low as possible on the pelvis to avoid exerting
any pressure on the lower abdomen » Fig. 139 - .
Release
Release the seat belt only when the vehicle is stationary.
› Press the red button in the belt buckle
» Fig. 138 - , the lock tongue pops out.
› Manually guide the belt back so that it is easier to fully roll up the webbing, the
seat belt does not twist.
Belt inertia reel
Each seat belt is equipped with an inertia reel. This inertia reel offers you com-
plete freedom of movement if the belt is unreeled slowly. If the brakes are ap-
plied suddenly, the inertia reel will block. The belts also block when the car accel-
erates, when driving downhill and when cornering. CAUTION
When releasing the seatbelt ensure that the tongue of the lock does not damage
the door trim or other parts of the interior. Ð
146 Safety
Page 152 of 235
The airbag allows the gas to flow out of the inflated airbag in a controlled manner
(depending on the load of the particular car occupant) in order to cushion head
and chest areas. The airbag then deflates subsequently to such an extent, after
an accident, to again provide a clear view forward.
WARNING
■ For the driver and front passenger, it is important to maintain a distance of
at least 25 cm to the steering wheel or dashboard A
» Fig. 142. Not maintain-
ing this minimum distance will mean that the airbag system will not be able to
properly protect you - hazard! The front seats and the head restraints must
always also be correctly adjusted to match the body size of the occupant.
■ The airbag develops enormous forces when triggered, which can lead to in-
juries if the sitting position or seated position is not correct.
■ There must not by any further persons, animals or objects positioned be-
tween the front seated occupants and the deployment area of the airbag. ■ Never transport children on the front seat of a vehicle without using a prop-
er restraint system. If airbags are deployed in the event of an accident, the
child might suffer severe or even fatal injuries!
■ It is essential to always switch off the front passenger airbag when attach-
ing a child safety seat to the front passenger seat where the child is seated
with its back facing in direction of travel » page 152, Deactivating airbags. If
this is not done, there is a risk of the child suffering severe or even fatal inju-
ries if the front passenger airbag is deployed. When transporting a child on
the front passenger seat, pay attention to any relevant national regulations
regarding the use of child safety seats.
■ The steering wheel and the surface of the airbag module in the dash panel
on the passenger side must not have stickers attached, be covered or modi-
fied in any other way. These parts should only be cleaned with a cloth that is
dry or has been moistened with water. No objects such as cup holders, mobile
phone mounts, etc. must be attached to the covers of the airbag modules or
be located within their immediate vicinity.
■ Never place objects on the surface of the front passenger airbag module in
the dash panel. Ð Driver’s knee airbag
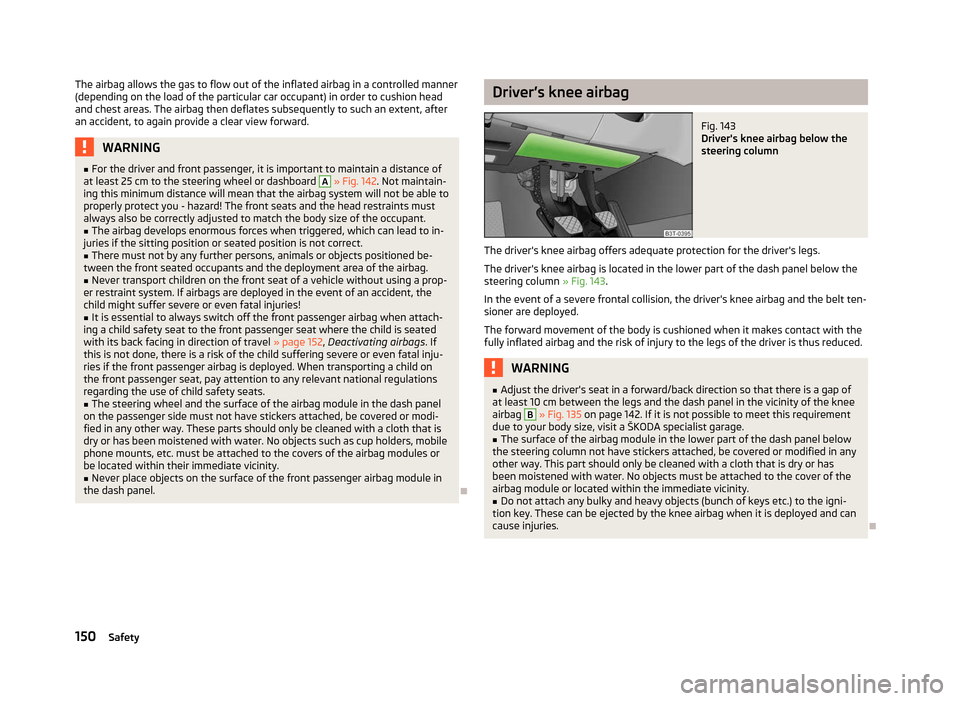
Fig. 143
Driver's knee airbag below the
steering column
The driver's knee airbag offers adequate protection for the driver's legs.
The driver's knee airbag is located in the lower part of the dash panel below the
steering column » Fig. 143.
In the event of a severe frontal collision, the driver's knee airbag and the belt ten-
sioner are deployed.
The forward movement of the body is cushioned when it makes contact with the
fully inflated airbag and the risk of injury to the legs of the driver is thus reduced. WARNING
■ Adjust the driver's seat in a forward/back direction so that there is a gap of
at least 10 cm between the legs and the dash panel in the vicinity of the knee
airbag B
» Fig. 135 on page 142. If it is not possible to meet this requirement
due to your body size, visit a ŠKODA specialist garage.
■ The surface of the airbag module in the lower part of the dash panel below
the steering column not have stickers attached, be covered or modified in any
other way. This part should only be cleaned with a cloth that is dry or has
been moistened with water. No objects must be attached to the cover of the
airbag module or located within the immediate vicinity. ■ Do not attach any bulky and heavy objects (bunch of keys etc.) to the igni-
tion key. These can be ejected by the knee airbag when it is deployed and can
cause injuries. Ð
150 Safety