fuel consumption SKODA SUPERB 2012 2.G / (B6/3T) Owner's Manual
[x] Cancel search | Manufacturer: SKODA, Model Year: 2012, Model line: SUPERB, Model: SKODA SUPERB 2012 2.G / (B6/3T)Pages: 235, PDF Size: 5.86 MB
Page 11 of 235
Engine revolutions counter
First read and observe the introductory information and safety warn-
ings on page 8.
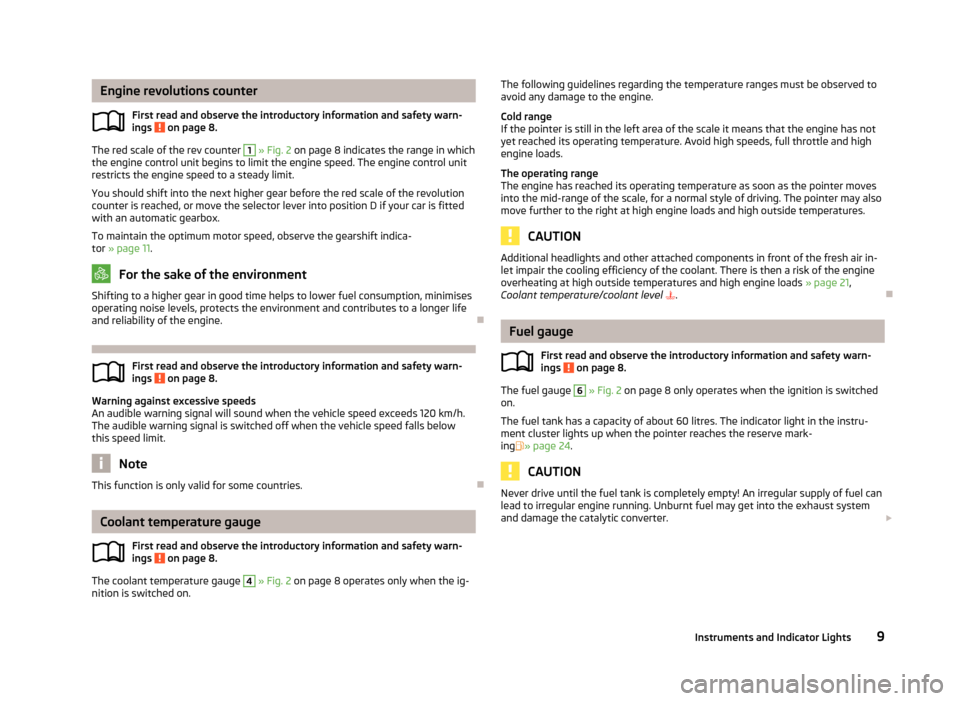
The red scale of the rev counter 1
» Fig. 2 on page 8 indicates the range in which
the engine control unit begins to limit the engine speed. The engine control unit
restricts the engine speed to a steady limit.
You should shift into the next higher gear before the red scale of the revolution
counter is reached, or move the selector lever into position D if your car is fitted
with an automatic gearbox.
To maintain the optimum motor speed, observe the gearshift indica-
tor » page 11. For the sake of the environment
Shifting to a higher gear in good time helps to lower fuel consumption, minimises
operating noise levels, protects the environment and contributes to a longer life
and reliability of the engine. ÐFirst read and observe the introductory information and safety warn-
ings
on page 8.
Warning against excessive speeds
An audible warning signal will sound when the vehicle speed exceeds 120 km/h.
The audible warning signal is switched off when the vehicle speed falls below
this speed limit.
Note
This function is only valid for some countries. ÐCoolant temperature gauge
First read and observe the introductory information and safety warn-
ings on page 8.
The coolant temperature gauge 4
» Fig. 2 on page 8 operates only when the ig-
nition is switched on. ä
ä
ä The following guidelines regarding the temperature ranges must be observed to
avoid any damage to the engine.
Cold range
If the pointer is still in the left area of the scale it means that the engine has not
yet reached its operating temperature. Avoid high speeds, full throttle and high
engine loads.
The operating range
The engine has reached its operating temperature as soon as the pointer moves
into the mid-range of the scale, for a normal style of driving. The pointer may also
move further to the right at high engine loads and high outside temperatures. CAUTION
Additional headlights and other attached components in front of the fresh air in-
let impair the cooling efficiency of the coolant. There is then a risk of the engine
overheating at high outside temperatures and high engine loads »
page 21,
Coolant temperature/coolant level . Ð Fuel gauge
First read and observe the introductory information and safety warn-
ings on page 8.
The fuel gauge 6
» Fig. 2 on page 8 only operates when the ignition is switched
on.
The fuel tank has a capacity of about 60 litres. The indicator light in the instru-
ment cluster lights up when the pointer reaches the reserve mark-
ing » page 24. CAUTION
Never drive until the fuel tank is completely empty! An irregular supply of fuel can
lead to irregular engine running. Unburnt fuel may get into the exhaust system
and damage the catalytic converter. £
ä
9
Instruments and Indicator Lights
Page 13 of 235
CAUTION
We recommend that you do not reset the Service Interval Display yourself as this
can result in the incorrect setting of the Service Interval Display, which can also
cause possible problems with the operation of your vehicle. Note
■ Never reset the display between service intervals, as this will result in the incor-
rect display. ■ Information is retained in the Service Interval Display even after the vehicle bat-
tery is disconnected.
■ If the instrument cluster is exchanged after a repair, the correct values must be
entered in the counter for the Service Interval Display. This work is carried out by
a ŠKODA specialist garage. ■ After resetting the display with flexible service intervals, the displayed data is
the same as that for a vehicle with fixed service intervals. We therefore recom-
mend that the Service Interval Display is only reset by a
ŠKODA Service Partner,
who will reset the display with a vehicle system tester. ■ For more information on the service intervals » Service Plan. ÐDigital clock
First read and observe the introductory information and safety warn-
ings on page 8.
The clock is set with the buttons 3
and 7
» Fig. 2 on page 8.
Select the display that you wish to change with the button 3
and carry out the
change with the button 7
.
On vehicles that are fitted with the information display, it is also possible to set
the clock in the menu Time » page 16. Ð
ä Recommended gear
Fig. 3
Recommended gear
First read and observe the introductory information and safety warn-
ings on page 8.
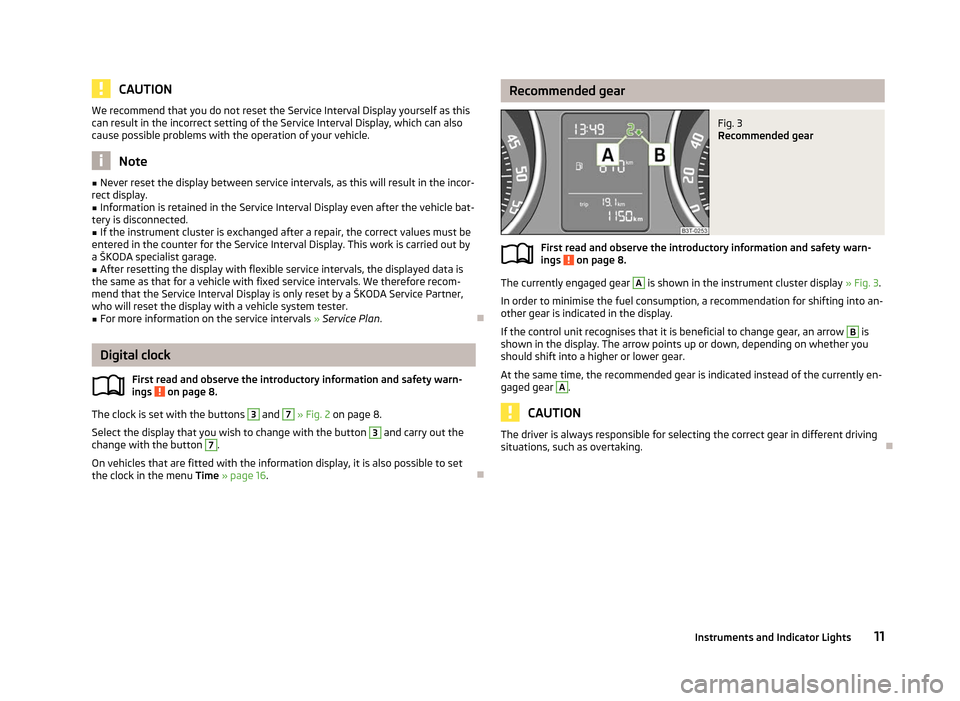
The currently engaged gear A
is shown in the instrument cluster display
» Fig. 3.
In order to minimise the fuel consumption, a recommendation for shifting into an-
other gear is indicated in the display.
If the control unit recognises that it is beneficial to change gear, an arrow B
is
shown in the display. The arrow points up or down, depending on whether you
should shift into a higher or lower gear.
At the same time, the recommended gear is indicated instead of the currently en-
gaged gear A
.
CAUTION
The driver is always responsible for selecting the correct gear in different driving
situations, such as overtaking. Ð
ä
11
Instruments and Indicator Lights
Page 15 of 235

Switching over the memory using the button B
» Fig. 6 on page 13 on the wind-
screen wiper lever or using the adjustment wheel D
on the multifunction steer-
ing wheel.
Single-trip memory (memory 1)
The single-trip memory collates the driving information from the moment the ig-
nition is switched on until it is switched off. New data will also flow into the cal-
culation of the current driving information if the trip is continued within 2 hours
after switching off the ignition. If the trip is interrupted for more than 2 hours,
the memory is automatically erased.
Total-trip memory (memory 2)
The total-trip memory gathers data from any number of individual journeys up to
a total of 19
hours and 59 minutes driving or 1 999 kilometres driven, and on vehi-
cles which are fitted with an information display up to a total of 99 hours and
59 minutes driving or 9 999 kilometres driven. The memory is deleted when ei-
ther of these limits is reached and the calculation starts all over again.
Unlike the single-trip memory, the total-trip memory is not deleted after a period
of interruption of driving of 2 hours. Note
All information in the memory 1 and 2 is erased if the battery of the vehicle is dis-
connected. ÐOperation
Fig. 6
Multifunction display: Control elements on the windscreen wiper lev-
er/control elements on the multifunction steering wheel First read and observe the introductory information and safety warn-
ings on page 12.
The rocker switch A
» Fig. 6
and the button B
are located on the windscreen
wiper lever. Switching over and resetting is performed with the adjustment wheel D
on the multifunction steering wheel.
Select memory
› Press the button B
» Fig. 6 or D
.
Selecting functions using the windscreen wiper lever
› Briefly press the rocker switch A
» Fig. 6
up or down. This opens the individual
functions of the multifunction display one after the other.
Selecting functions using the multifunction steering wheel
› Press the button C
» Fig. 6 to open the menu of the multifunction display.
› Turn the adjustment wheel D
upwards or downwards. This opens the individu-
al functions of the multifunction display one after the other.
Reseting
› Select the desired memory.
› Press and hold the button B
» Fig. 6 or D
for a short while.
The following readouts of the selected memory will be set to zero with the but-
ton B
or D
:
› Average fuel consumption
› Distance driven
› Average speed
› Driving time Ð Multifunction display details
First read and observe the introductory information and safety warn-
ings on page 12.
Outside temperature
The current outside temperature is shown in the display.
If the outside temperature drops below +4
°C, a snow flake symbol (warning sig-
nal for ice on the road) appears before the temperature indicator and an audible
signal will sound. After pressing the rocker switch A
» Fig. 6 on page 13 at the
windscreen wiper lever or the button C
at the multifunction steering wheel, the
function shown last is indicated. £
ä
ä
13
Instruments and Indicator Lights
Page 16 of 235
Driving time
The driving time which has elapsed since the memory was last erased, appears in
the display. If you wish to measure the driving time from a particular point in time,
you must set the memory to zero at this point in time by pressing the button
B
» Fig. 6 on page 13 on the windscreen wiper lever or the adjustment wheel D
on the multifunction steering wheel.
The maximum time indicated in both memories is 19 hours and 59
minutes and on
vehicles which are fitted with an information display, it is 99 hours and 59 mi-
nutes. The indicator is set back to zero if this period is exceeded.
Current fuel consumption
The current fuel consumption level is shown in the display in litres/100 km 1)
. You
can use this information to adapt your driving style to the desired fuel consump-
tion.
The display appears in litres/hour if the vehicle is stationary or driving at a low
speed 2)
.
Average fuel consumption
The average fuel consumption since the memory was last erased is shown in the
display in litres/100 km 1)
» page 12.
If you wish to determine the average fuel consumption over a certain period of
time, you must set the memory to zero at the start of the measurement using the
button B
» Fig. 6
on page 13
on the windscreen wiper lever or the adjustment
wheel D
on the multifunction steering wheel. After erasing the memory, no val-
ue appears in the display until you have driven approx. 300 m.
The display is updated regularly while you are driving.
Range
The estimated range in kilometres is shown on the display. It indicates the dis-
tance you can still drive with your vehicle based on the level of fuel in the tank
and the same style of driving.
The display is shown in steps of 10 km. After lighting up of the indicator light
the display is shown in steps of 5 km.
The fuel consumption over the last 50 km is used to calculate the range. The
range will increase if you drive in a more economical manner. If the memory is set to zero (after disconnecting the battery), the fuel consump-
tion of 10 ltr./100 km is calculated for the range; afterwards the value is adapted
accordingly to the style of driving.
Distance travelled
The distance driven since the memory was last erased appears in the dis-
play » page 12. If you wish to measure the distance driven from a particular time,
you must set the memory to zero at this point in time by pressing the button B
» Fig. 6 on page 13 on the windscreen wiper lever or the adjustment wheel D
on the multifunction steering wheel.
The maximum distance indicated in both memories is 1
999 km or 9 999 km on
vehicles with an information display. The indicator is set back to zero if this period
is exceeded.
Average speed
The average speed since the memory was last erased is shown in the display in
km/hour » page 12 . If you wish to determine the average speed over a certain pe-
riod of time, you must set the memory to zero at the start of the measurement
using the button B
» Fig. 6 on page 13 on the windscreen wiper lever or the ad-
justment wheel D
on the multifunction steering wheel.
After erasing the memory, no value appears in the display until you have driven
approx. 300 m.
The display is updated regularly while you are driving.
Current speed
The current speed which is identical to the display of the speedometer 2
»
Fig. 2
on page 8 is indicated on the display.
Oil temperature
If the oil temperature is lower than 50 °C or if a fault in the system for checking
the oil temperature is present, only - -.- is displayed instead of the oil tempera-
ture. Ð1)
On some models in certain countries, the display appears in kilometres/litre.
2) On some models in certain countries, - -.- km/ltr. is displayed when the vehicle is stationary.
14 Using the system
Page 26 of 235

Glow plug system
(diesel engine)
The indicator light comes on after the ignition has been switched on. The en-
gine can be started immediately after the pre-glow indicator light goes out.
There is a fault in the glow plug system if the indicator light does not come on
at all or lights up continuously .
If the indicator light begins to flash while driving, a fault exists in the engine
control. The engine control unit allows the vehicle to run in emergency mode.
Seek help from a
ŠKODA specialist garage. ÐEPC
fault light (petrol engine)
If the indicator light lights up, there is a fault in the engine control. The engine
control unit allows the vehicle to run in emergency mode.
Seek help from a
ŠKODA specialist garage. ÐDiesel particulate filter
(diesel engine)
The diesel particulate filter separates the soot particles from the exhaust. The
soot particles collect in the diesel particulate filter where they are burnt on a reg-
ular basis.
If the indicator light
lights up, soot has accumulated in the diesel particulate
filter.
To clean the diesel particle filter, the vehicle should be driven at an even speed of
at least 60 km/h » at engine speeds of 1 800 - 2 500 rpm for at least 15 mi-
nutes or until the indicator light goes out with the 4th or 5th
gear engaged (auto-
matic gearbox: position S) when the traffic situation permits it.
The indicator light only goes out after the diesel particulate filter has been
successfully cleaned.
If the filter is not properly cleaned, the indicator light does not go out and the
indicator light begins to flash.
The following is displayed in the information display: Diesel particulate filter Owner's manual! The engine control unit allows the vehicle to run in emergency mode. After
switching the ignition off and on again the indicator light, the indicator light
also lights up.
Seek help from a
ŠKODA specialist garage. WARNING
■ The diesel particle filter achieves very high temperatures. Therefore do not
park in areas where the hot filter can come into direct contact with dry grass
or other combustible materials - risk of fire!
■ Always adjust your speed to suit weather, road, region and traffic condi-
tions. The recommendations indicated by the indicator light must not tempt
you to disregard the national regulations for road traffic. CAUTION
As long as the indicator light lights up, one must take into account an in-
creased fuel consumption and in certain circumstances a power reduction of the
engine. Note
■ To assist the combustion process of the soot particles, we recommend that reg-
ularly driving over short distances should be avoided. ■ Using diesel fuel with an increased sulphur content can considerably reduce the
life of the diesel particle filter. A
ŠKODA specialist garage will be able to tell you
which countries use only diesel fuel with high sulphur content. Ð Fuel reserve
The indicator light will come on if the fuel level is less than 9 litres.
The following is displayed in the information display: Please refuel! Range ... km Note
The text in the information display goes out only after refuelling and driving a
short distance. Ð
24 Using the system
Page 43 of 235
CAUTION
■ Keep the windows clean to ensure the correct functionality of the electric win-
dows. ■ In the event that the windows are frozen, first of all eliminate the
ice » page 170 , De-icing windows and exterior mirrors and only then operate the
power windows otherwise the power window mechanism could be damaged. ■ When leaving the locked vehicle make sure that the windows are closed at all
times. Note
■ After switching the ignition off, it is still possible to open or close the windows
for approx. 10
minutes. The power windows are only switched off completely
once the driver or front passenger door are opened. ■ When driving always use the existing heating, air conditioning and ventilation
system for ventilating the interior of the vehicle. If the windows are opened, dust
as well as other dirt can get into the vehicle and in addition the wind noise is
more at certain speeds.
■ At high speeds, you should keep the windows closed to prevent unnecessarily
high fuel consumption.
■ The convenience opening of the windows by means of the key in the driver's
lock is only possible within 45
seconds of deactivating or activating the alarm sys-
tem. ÐWindow open/close
Fig. 23
Buttons on the driver's door
First read and observe the introductory information and safety warn-
ings on page 40.
The power windows operate only when ignition is switched on.
ä Opening
› A window is opened by pressing lightly on the respective button in the door.
The opening process stops when one releases the button.
› Additionally, the window can be opened automatically (fully open) by pressing
the button to the stop. Renewed pressing of the button causes the window to
stop immediately.
Closing
› A window is closed through pulling lightly on the respective button in the door.
The closing process stops when one releases the button.
› Additionally, the window can be closed automatically (fully closed) by pulling
the button to the stop. Renewed pulling of the button causes the window to
stop immediately.
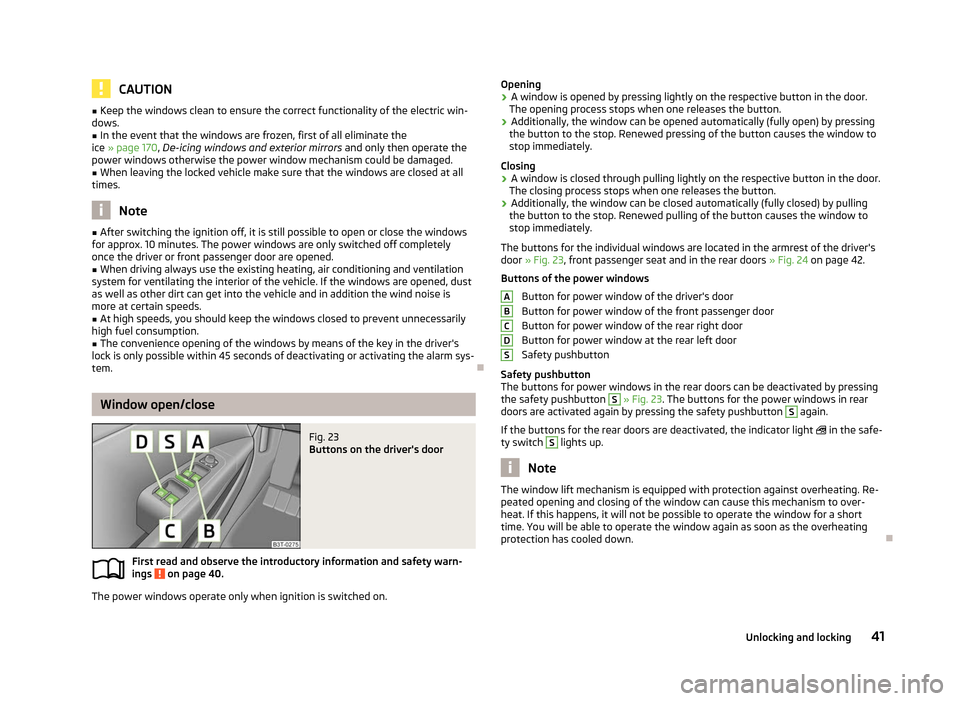
The buttons for the individual windows are located in the armrest of the driver's
door » Fig. 23, front passenger seat and in the rear doors »
Fig. 24 on page 42.
Buttons of the power windows Button for power window of the driver's door
Button for power window of the front passenger door
Button for power window of the rear right door
Button for power window at the rear left door
Safety pushbutton
Safety pushbutton
The buttons for power windows in the rear doors can be deactivated by pressing
the safety pushbutton S
» Fig. 23. The buttons for the power windows in rear
doors are activated again by pressing the safety pushbutton S
again.
If the buttons for the rear doors are deactivated, the indicator light in the safe-
ty switch S
lights up.
Note
The window lift mechanism is equipped with protection against overheating. Re-
peated opening and closing of the window can cause this mechanism to over-
heat. If this happens, it will not be possible to operate the window for a short
time. You will be able to operate the window again as soon as the overheating
protection has cooled down. Ð A
B
C
D
S
41
Unlocking and locking
Page 60 of 235
For the sake of the environment
Dispose of the faulty rechargeable batteries in accordance with environmental
regulations. Note
■ Pay attention to the correct polarity when changing the rechargeable batteries.
■ The replacement rechargeable batteries must have the same specification as
the original rechargeable batteries. If other types of rechargeable batteries are
used, the power output can be reduced or it can lead to a malfunction of the
lamp. ÐVisibility
Windscreen and rear window heater
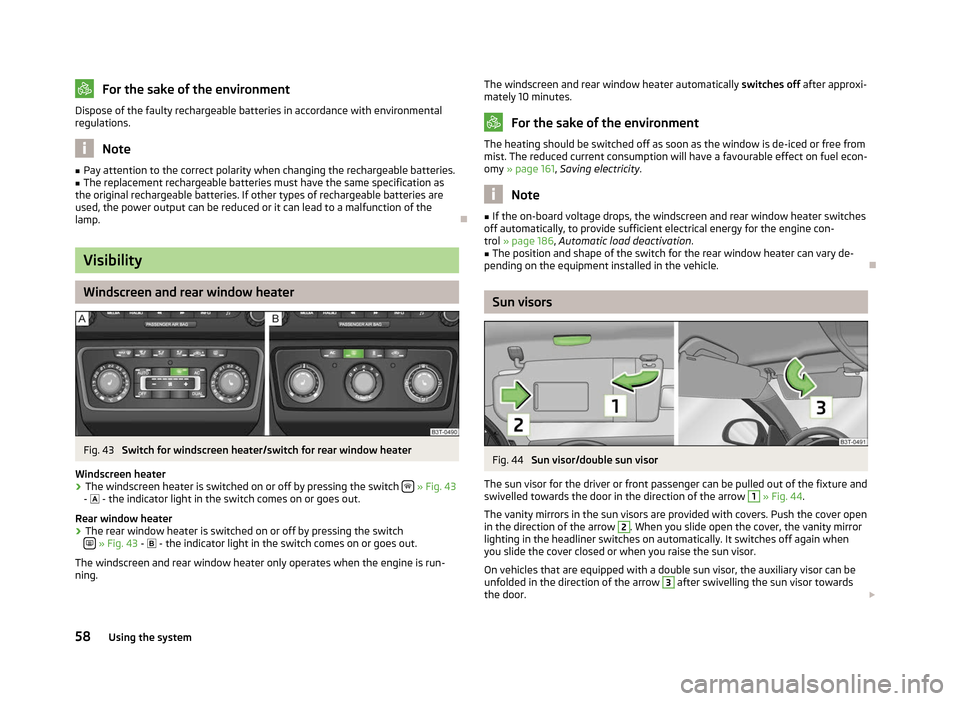
Fig. 43
Switch for windscreen heater/switch for rear window heater
Windscreen heater › The windscreen heater is switched on or off by pressing the switch
» Fig. 43
- - the indicator light in the switch comes on or goes out.
Rear window heater
› The rear window heater is switched on or off by pressing the switch
» Fig. 43 -
- the indicator light in the switch comes on or goes out.
The windscreen and rear window heater only operates when the engine is run-
ning. The windscreen and rear window heater automatically
switches off after approxi-
mately 10 minutes. For the sake of the environment
The heating should be switched off as soon as the window is de-iced or free from
mist. The reduced current consumption will have a favourable effect on fuel econ-
omy »
page 161 , Saving electricity . Note
■ If the on-board voltage drops, the windscreen and rear window heater switches
off automatically, to provide sufficient electrical energy for the engine con-
trol » page 186, Automatic load deactivation .
■ The position and shape of the switch for the rear window heater can vary de-
pending on the equipment installed in the vehicle. Ð Sun visors
Fig. 44
Sun visor/double sun visor
The sun visor for the driver or front passenger can be pulled out of the fixture and
swivelled towards the door in the direction of the arrow 1
» Fig. 44.
The vanity mirrors in the sun visors are provided with covers. Push the cover open
in the direction of the arrow 2
. When you slide open the cover, the vanity mirror
lighting in the headliner switches on automatically. It switches off again when
you slide the cover closed or when you raise the sun visor.
On vehicles that are equipped with a double sun visor, the auxiliary visor can be
unfolded in the direction of the arrow 3
after swivelling the sun visor towards
the door. £
58 Using the system
Page 83 of 235
Removing and installing net partition housing
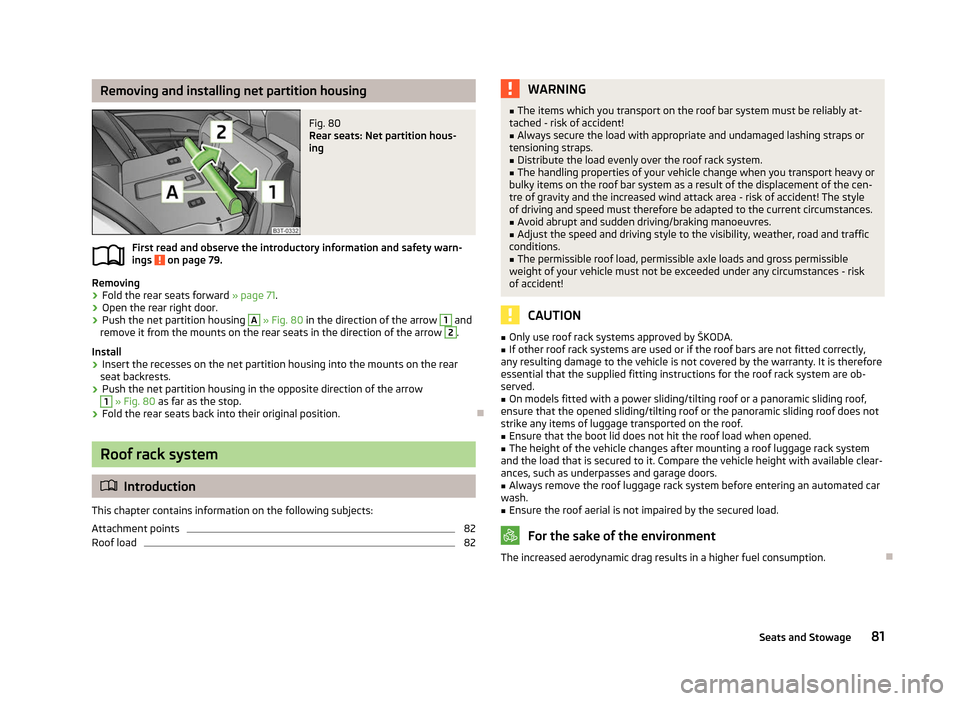
Fig. 80
Rear seats: Net partition hous-
ing
First read and observe the introductory information and safety warn-
ings on page 79.
Removing
›
Fold the rear seats forward
» page 71.
› Open the rear right door.
› Push the net partition housing A
» Fig. 80 in the direction of the arrow 1
and
remove it from the mounts on the rear seats in the direction of the arrow 2
.
Install
› Insert the recesses on the net partition housing into the mounts on the rear
seat backrests.
› Push the net partition housing in the opposite direction of the arrow 1
» Fig. 80
as far as the stop.
› Fold the rear seats back into their original position. ÐRoof rack system
ä
Introduction
This chapter contains information on the following subjects:
Attachment points 82
Roof load 82
ä WARNING
■ The items which you transport on the roof bar system must be reliably at-
tached - risk of accident!
■ Always secure the load with appropriate and undamaged lashing straps or
tensioning straps. ■ Distribute the load evenly over the roof rack system.
■ The handling properties of your vehicle change when you transport heavy or
bulky items on the roof bar system as a result of the displacement of the cen-
tre of gravity and the increased wind attack area - risk of accident! The style
of driving and speed must therefore be adapted to the current circumstances. ■ Avoid abrupt and sudden driving/braking manoeuvres.
■ Adjust the speed and driving style to the visibility, weather, road and traffic
conditions. ■ The permissible roof load, permissible axle loads and gross permissible
weight of your vehicle must not be exceeded under any circumstances - risk
of accident! CAUTION
■ Only use roof rack systems approved by
ŠKODA.
■ If other roof rack systems are used or if the roof bars are not fitted correctly,
any resulting damage to the vehicle is not covered by the warranty. It is therefore
essential that the supplied fitting instructions for the roof rack system are ob-
served.
■ On models fitted with a power sliding/tilting roof or a panoramic sliding roof,
ensure that the opened sliding/tilting roof or the panoramic sliding roof does not
strike any items of luggage transported on the roof.
■ Ensure that the boot lid does not hit the roof load when opened.
■ The height of the vehicle changes after mounting a roof luggage rack system
and the load that is secured to it. Compare the vehicle height with available clear-
ances, such as underpasses and garage doors. ■ Always remove the roof luggage rack system before entering an automated car
wash.
■ Ensure the roof aerial is not impaired by the secured load. For the sake of the environment
The increased aerodynamic drag results in a higher fuel consumption. Ð
81
Seats and Stowage
Page 95 of 235
The air conditioning system
Air conditioning system
Introductory information
The heating effect is dependent upon the coolant temperature, thus full heat
output only occurs when the engine has reached its operating temperature.
If the cooling system is switched on, the temperature and air humidity drops in
the vehicle. The well-being of the occupants of the car is enhanced as a result of
this particularly at high outside temperatures and a high air humidity. The system
prevents the windows misting up during the cold season of the year.
It is possible to briefly activate recirculated air mode to enhance the cooling ef-
fect.
Please refer to the information regarding recirculated air mode for the air-condi-
tioning system » page 96 or for Climatronic » page 98 .
The air inlet in front of the windscreen must be free of ice, snow or leaves to en-
sure that the heating and cooling system operates properly.
After switching on the cooling Condensation from the evaporator of the air condi-
tioning may drip down and form a puddle below the vehicle. This is quite normal
and not an indication of a leak! WARNING
■ For your own safety and that of other road users, ensure that all the win-
dows are free of ice, snow and misting. Please familiarize yourself about how
to correctly operate the heating and ventilation systems, how to demist and
defrost the windows, as well as with the cooling mode.
■ Do not leave recirculated air mode on over a longer period of time, as “stale”
air can cause fatigue of the driver and passengers, reduce attention levels and
also cause the windows to mist up. The risk of having an accident increases.
Switch off recirculated air mode as soon as the windows start to mist up. Note
■ The used air streams out through the vents in the boot.
■ We recommend that you do not smoke in the vehicle when the recirculating air
mode is operating since the smoke which is drawn at the evaporator from the in-
terior of the vehicle forms deposits in the evaporator of the air conditioning sys-
tem. This produces a permanent odour when the air conditioning system is oper-
ating which can only be eliminated through considerable effort and expense (re-
placement of compressor). ■ To ensure that the air conditioning system works properly, do not block up the
air outlet vents with any objects. Ð Using the air conditioning system economically
The compressor on the air conditioning system uses power from the engine when
in cooling mode which will effect the fuel consumption.
It recommended to open the windows or the doors of a vehicle for which the inte-
rior has been strongly heated through the effect of direct sunlight in order to al-
low the heated air to escape.
The cooling system should not be switched on while travelling when the window
is open.
If the desired interior temperature can also be achieved without activating the
cooling system, fresh air mode should be selected. For the sake of the environment
Pollutant emissions are also reduced when fuel is saved. Ð Operational problems
If the cooling system does not operate at outside temperatures higher than +5 °C,
there is a problem in the system. The reasons for this may be.
› One of the fuses has blown. Check the fuse and replace if necessa-
ry »
page 207.
› The cooling system has switched off automatically for a short time because the
coolant temperature of the engine is too hot » page 9.
If you cannot rectify the functional fault yourself, or the cooling capacity decrea-
ses, the cooling system must be switched off. Visit a ŠKODA specialist garage. Ð
93
The air conditioning system
Page 102 of 235

Auxiliary heating (auxiliary heating and ventilation)
ä
Introduction
This chapter contains information on the following subjects:
Direct switching on/off 101
System settings 101
Radio remote control 101
Changing the battery of the radio remote control 102
Auxiliary heating (parking heating)
The auxiliary heating (auxiliary heating) functions in connection with the air-con-
ditioning system or Climatronic.
It can be used when stationary, when the engine is switched off to preheat the
vehicle and while driving (e.g. during the heating phase of the engine).
The engine is also preheated, if the auxiliary heating is switched on when the ve-
hicle is stationary and the engine is switched off. This is not valid for vehicles with
the 3.6 l/191 kW
FSI engine.
The auxiliary heating (parking heating) warms up the coolant by combusting fuel
from the vehicle tank. The coolant warms up the air, which (if the blower speed is
not set to zero) flows into the passenger compartment.
Auxiliary ventilation
The auxiliary ventilation enables fresh air to flow into the vehicle interior by
switching off the engine, whereby the interior temperature is effectively de-
creased (e.g. with the vehicle parked in the sun). WARNING
■ The auxiliary heating must never be operated in closed rooms - risk of poi-
soning! ■ The auxiliary heating must not be running during refuelling - risk of fire.
■ The exhaust pipe of the auxiliary heating is located on the underside of the
vehicle. Therefore, if you wish to operate the auxiliary heating, do not park the
vehicle in such a way that the exhaust gases from the auxiliary heating can
come into contact with highly flammable materials (e.g. dry grass) or easily in-
flammable substances (e.g. spilt fuel). Note
■ If the auxiliary heating runs, the fuel consumption comes from the vehicle tank.
The auxiliary heating automatically controls the filling level in the fuel tank. If only
a low quantity of fuel is present in the fuel tank, the function of the auxiliary
heating is blocked. ■ The exhaust pipe of the auxiliary heating, which is located on the underside of
the vehicle, must not be clogged and the exhaust flow must not be blocked.
■ If the auxiliary heating and ventilation is running, the vehicle battery discharges.
If the auxiliary heating and ventilation has been operated several times over a
longer period, the vehicle must be driven a few kilometres in order to recharge
the vehicle battery.
■ The auxiliary heating only switches the blower on, if it has achieved a coolant
temperature of approx. 50 °C.
■ At low outside temperatures, this can result in a formation of water vapour in
the area of the engine compartment. This is quite normal and is not an operating
problem.
■ After switching off the auxiliary heating, the coolant pump runs for a short peri-
od.
■ The auxiliary heating and ventilation does not switch on or comes on, if the ve-
hicle battery indicates a low loading state » page 186, Automatic load deactiva-
tion .
■ The auxiliary heating (parking heating) does not switch on, if the following was
shown in the information display or before switching off the ignition: Please re-
fuel! ■ The air inlet in front of the windscreen must be free of ice, snow or leaves in
order to ensure that the auxiliary heating operates properly.
■ So that warm air can flow into the vehicle interior after switching on the auxili-
ary heating, you must maintain the comfort temperature normally selected by
you, leave the fan switched on and leave the air outlet vents in an open position.
It is recommended to put the air flow in the position or . Ð
100 Using the system