stop start SKODA SUPERB 2014 2.G / (B6/3T) Owner's Guide
[x] Cancel search | Manufacturer: SKODA, Model Year: 2014, Model line: SUPERB, Model: SKODA SUPERB 2014 2.G / (B6/3T)Pages: 246, PDF Size: 17.16 MB
Page 211 of 246
If using a tow rope, ensure that it is always kept taught.
CAUTION
■Do not tow start the engine – there is a risk of damaging the engine and the
catalytic converter. The battery from another vehicle can be used as a jump-
start aid » page 207 , Jump-starting .■
If the gearbox no longer contains any oil because of a defect, your vehicle
must only be towed with the driven wheels raised clear of the ground or on a
special breakdown vehicle or trailer.
■
The vehicle must be transported on a special breakdown vehicle or trailer if it
is not possible to tow in the vehicle in the way described or if the towing dis-
tance is greater than 50 km.
■
To protect both vehicles when tow-starting or towing, the tow rope should
be elastic. Thus one should only use plastic fibre rope or a rope made out of a
similarly elastic material.
■
While towing, take care to avoid impermissibly high tensile forces or jerky
loads. There is always a risk of excessive stresses and damage resulting at the
points to which you attach the tow rope or tow bar when you attempt to tow a
vehicle which is not standing on a paved road.
■
Attach the tow rope or the tow bar to the towing eyes » page 209 , Front
towing eye or » page 210 , Rear towing eye to the detachable ball head of the
towing equipment » page 163 .
Note
■
We recommend using a tow rope from ŠKODA Original Accessories, which is
available from a ŠKODA Partner.■
Towing another vehicle requires a certain amount of practice. Both drivers
should be familiar with the particular points about towing a vehicle. Unskilled
drivers should not attempt to tow in another vehicle or to be towed in.
■
When towing, respect the national legal provisions, especially those which
relate to the identification of the towing vehicle and the vehicle being towed.
■
The tow rope must not be twisted as it may in certain circumstances result in
the front towing eye being unscrewed out of your vehicle.
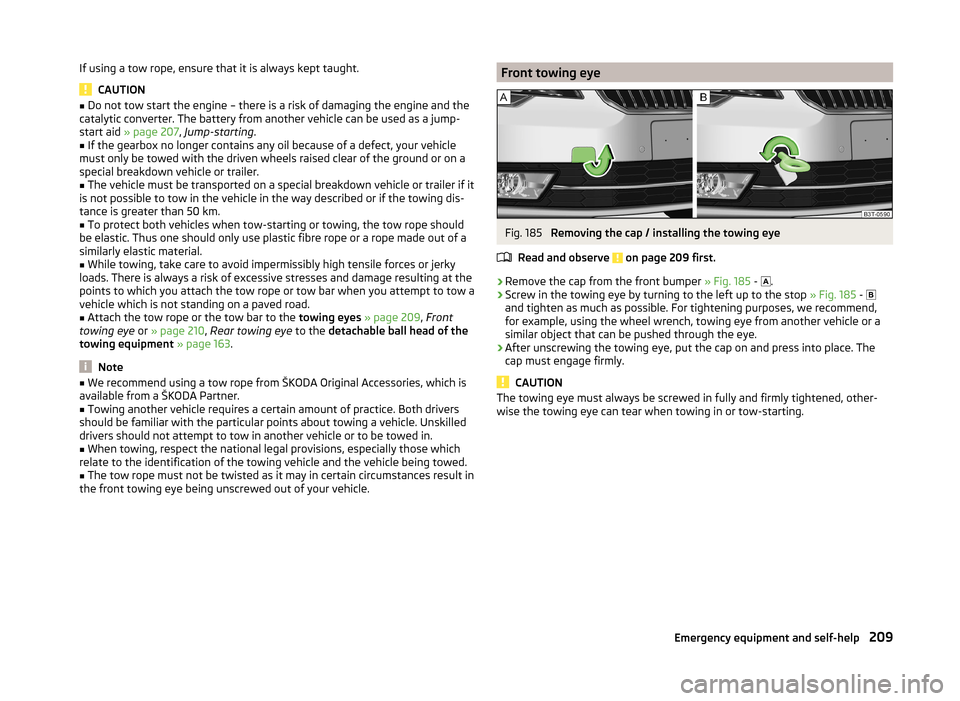
Front towing eyeFig. 185
Removing the cap / installing the towing eye
Read and observe
on page 209 first.
›
Remove the cap from the front bumper » Fig. 185 -
.
›
Screw in the towing eye by turning to the left up to the stop
» Fig. 185 -
and tighten as much as possible. For tightening purposes, we recommend,
for example, using the wheel wrench, towing eye from another vehicle or a
similar object that can be pushed through the eye.
›
After unscrewing the towing eye, put the cap on and press into place. The
cap must engage firmly.
CAUTION
The towing eye must always be screwed in fully and firmly tightened, other-
wise the towing eye can tear when towing in or tow-starting.209Emergency equipment and self-help
Page 212 of 246
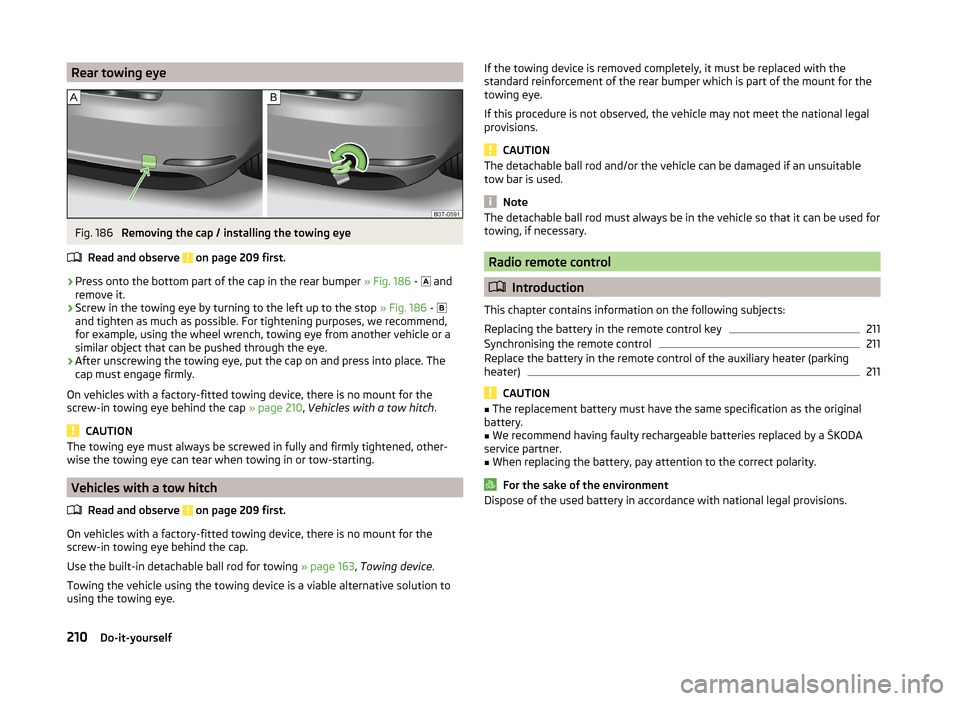
Rear towing eyeFig. 186
Removing the cap / installing the towing eye
Read and observe
on page 209 first.
›
Press onto the bottom part of the cap in the rear bumper » Fig. 186 -
and
remove it.
›
Screw in the towing eye by turning to the left up to the stop » Fig. 186 -
and tighten as much as possible. For tightening purposes, we recommend,
for example, using the wheel wrench, towing eye from another vehicle or a
similar object that can be pushed through the eye.
›
After unscrewing the towing eye, put the cap on and press into place. The
cap must engage firmly.
On vehicles with a factory-fitted towing device, there is no mount for the
screw-in towing eye behind the cap » page 210, Vehicles with a tow hitch .
CAUTION
The towing eye must always be screwed in fully and firmly tightened, other-
wise the towing eye can tear when towing in or tow-starting.
Vehicles with a tow hitch
Read and observe
on page 209 first.
On vehicles with a factory-fitted towing device, there is no mount for the
screw-in towing eye behind the cap.
Use the built-in detachable ball rod for towing » page 163, Towing device .
Towing the vehicle using the towing device is a viable alternative solution to
using the towing eye.
If the towing device is removed completely, it must be replaced with the
standard reinforcement of the rear bumper which is part of the mount for the
towing eye.
If this procedure is not observed, the vehicle may not meet the national legal
provisions.
CAUTION
The detachable ball rod and/or the vehicle can be damaged if an unsuitable
tow bar is used.
Note
The detachable ball rod must always be in the vehicle so that it can be used for
towing, if necessary.
Radio remote control
Introduction
This chapter contains information on the following subjects:
Replacing the battery in the remote control key
211
Synchronising the remote control
211
Replace the battery in the remote control of the auxiliary heater (parking
heater)
211
CAUTION
■ The replacement battery must have the same specification as the original
battery.■
We recommend having faulty rechargeable batteries replaced by a ŠKODA
service partner.
■
When replacing the battery, pay attention to the correct polarity.
For the sake of the environment
Dispose of the used battery in accordance with national legal provisions.210Do-it-yourself
Page 218 of 246
CAUTION■“Never repair” fuses or replace them with a fuse of a higher amperage – risk
of fire! This may also cause damage at another part of the electrical system.■
If a newly inserted fuse blows again after a short time, have the electrical
system checked as quickly as possible by a specialist garage.
■
A blown fuses is recognisable by the molten metal strip. Replace the faulty
fuse with a new one of the same amperage.
Note
■
We recommend always carrying replacement fuses in the vehicle. A box of
replacement fuses can be purchased from ŠKODA Original Accessories.■
There can be several power consuming devices for one fuse.
■
Multiple fuses may exist for a single power consuming device.
Fuses in the dash panel
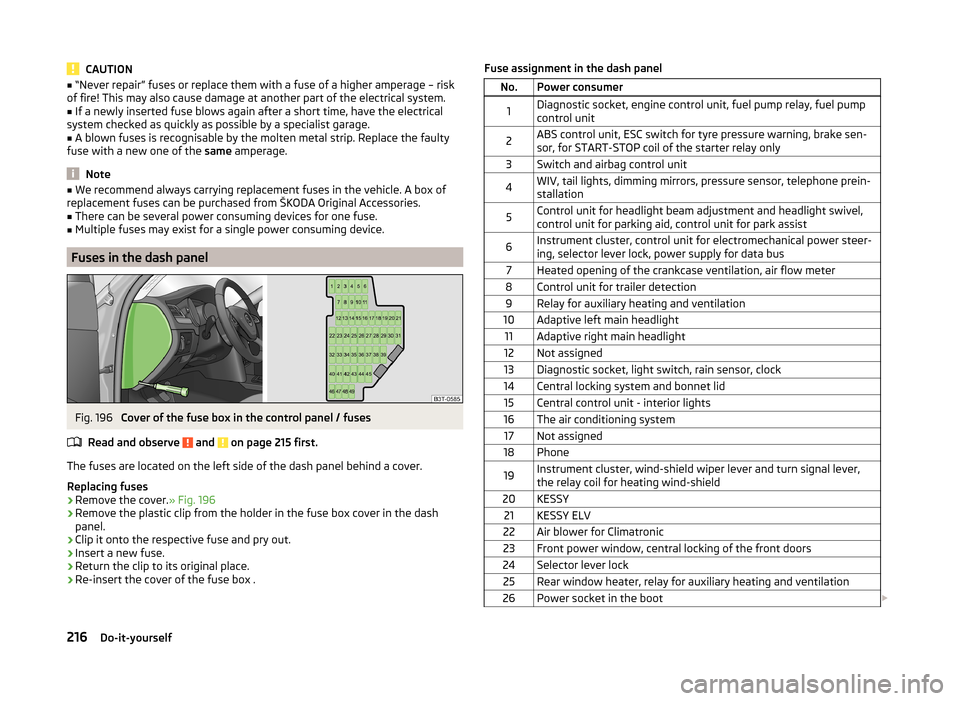
Fig. 196
Cover of the fuse box in the control panel / fuses
Read and observe
and on page 215 first.
The fuses are located on the left side of the dash panel behind a cover.
Replacing fuses
›
Remove the cover. » Fig. 196
›
Remove the plastic clip from the holder in the fuse box cover in the dash
panel.
›
Clip it onto the respective fuse and pry out.
›
Insert a new fuse.
›
Return the clip to its original place.
›
Re-insert the cover of the fuse box .
Fuse assignment in the dash panelNo.Power consumer1Diagnostic socket, engine control unit, fuel pump relay, fuel pump
control unit2ABS control unit, ESC switch for tyre pressure warning, brake sen-
sor, for START-STOP coil of the starter relay only3Switch and airbag control unit4WIV, tail lights, dimming mirrors, pressure sensor, telephone prein-
stallation5Control unit for headlight beam adjustment and headlight swivel,
control unit for parking aid, control unit for park assist6Instrument cluster, control unit for electromechanical power steer-
ing, selector lever lock, power supply for data bus7Heated opening of the crankcase ventilation, air flow meter8Control unit for trailer detection9Relay for auxiliary heating and ventilation10Adaptive left main headlight11Adaptive right main headlight12Not assigned13Diagnostic socket, light switch, rain sensor, clock14Central locking system and bonnet lid15Central control unit - interior lights16The air conditioning system17Not assigned18Phone19Instrument cluster, wind-shield wiper lever and turn signal lever,
the relay coil for heating wind-shield20KESSY21KESSY ELV22Air blower for Climatronic23Front power window, central locking of the front doors24Selector lever lock25Rear window heater, relay for auxiliary heating and ventilation26Power socket in the boot 216Do-it-yourself
Page 219 of 246
No.Power consumer27Fuel pump relay, control unit for fuel pump, injection valves28Electric boot lid29Haldex30Climate controlled front seats31DVD pre-installation32Front power window, central locking system of the rear doors33Electric sliding/tilting roof34Alarm, spare horn35front and rear lighter36Headlight cleaning system37Heated front seats38Heated rear seats39Rear window wiper40Fan air-conditioning system, relay for auxiliary heating and ventila-
tion41Not assigned42Light switch43Control unit for trailer detection44Control unit for trailer detection45Control unit for trailer detection46Switch for seat heating47Telephone preinstallation48Preparation for the aftermarket radio49Only for START-STOP: Central control unit, DC-DC converter, the
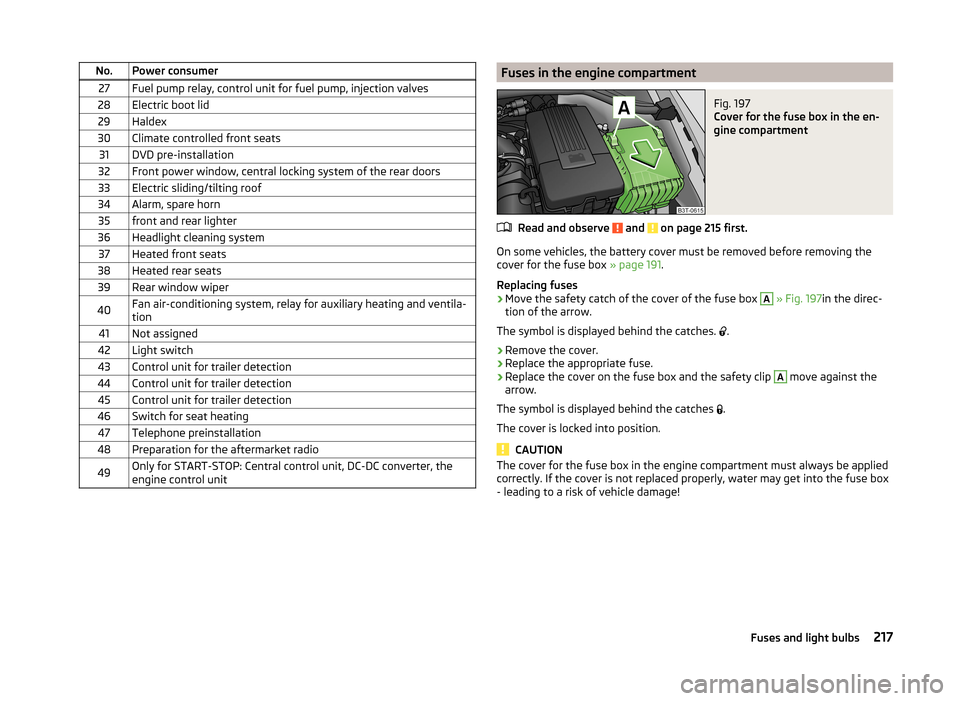
engine control unitFuses in the engine compartmentFig. 197
Cover for the fuse box in the en-
gine compartment
Read and observe and on page 215 first.
On some vehicles, the battery cover must be removed before removing the
cover for the fuse box » page 191.
Replacing fuses
›
Move the safety catch of the cover of the fuse box
A
» Fig. 197 in the direc-
tion of the arrow.
The symbol is displayed behind the catches. .
›
Remove the cover.
›
Replace the appropriate fuse.
›
Replace the cover on the fuse box and the safety clip
A
move against the
arrow.
The symbol is displayed behind the catches .
The cover is locked into position.
CAUTION
The cover for the fuse box in the engine compartment must always be applied
correctly. If the cover is not replaced properly, water may get into the fuse box
- leading to a risk of vehicle damage!217Fuses and light bulbs
Page 234 of 246
Index
A
Abroad Driving abroad
150
Unleaded petrol150
ABS Operation
152
Warning light36
Accessories169
Adaptive headlights (AFS)68
Adjust Auxiliary heating (auxiliary heating and ventila-tion)
117
Adjusting Belt height
13
Exterior mirrors78
Head restraints81
Interior mirror77
Manual air conditioning112
Seats79, 80
Steering wheel8
Adjusting the seats7, 79
Adjustment Headlight beam
66
Aerial173
See windows175
AFS68
Warning light36
Airbag14
Deactivating19
Deactivating the front passenger airbag20
Deployment14
Front airbag15
Head airbag18
Indicator light38
Knee airbag16
Modifications and damage to the airbag system 171 Side airbag
17
Airbag system14
Air conditioning system108
Air outlets108
Climatronic113
Manual air conditioning system110
Air outlets108
Air recirculation Climatronic
115
Alarm Switching off
54
Triggering54
Anti-theft alarm system Activating/deactivating
54
Trailer168
Antilock brake system (ABS)152
Armrest front
85
rear85, 94
Artificial leather178
Ashtray89
ASR Warning light
35
Assist systems151
ABS36, 152
ASR35
Cruise Control System158
DSR152
EDL152
ESC35, 151
HBA152
HHC153
Park assist154
Parking aid153
START-STOP159
TCS152
Auto Check Control31
Automatic driving lamp control68
Automatic gearbox142
Selector lever-emergency unlocking213
Starting-off and driving144
Tiptronic143
Using the selector lever142
Automatic gearbox modes142
Automatic load deactivation193
Automatic retractable cargo cover (Superb Combi))
99
Automatic transmission Kickdown
144
Malfunction144
Selector lever lock143
AUX Installation in the storage compartment
90
Auxiliary heating (auxiliary heating and ventila- tion)
116
Adjust117
Radio remote control118
Switching on/off117
Avoiding damage to the vehicle Driving through water
149
Avoiding damage to your vehicle149
B
Ball head Check fitting
165
Fitting164
Ready position164
Removing165
Battery In the remote control key
211
iReplace the remote control of the auxiliary heater (parking heater)
211
Belts10
Belt tensioners13
Bonnet Closing
183
Opening183
Warning light34
Boot Automatic retraction (Superb Combi)
99
Extending variable loading floor103
232Index
Page 238 of 246
HeadlightsDriving abroad150
Headlight cleaning system77
Replacing a bulb220
Head restraint81
Heater Windscreen and rear window
73
Heating Exterior mirrors
78
Seats83
HHC153
Hill Hold Control (HHC)153
Horn27
Hydraulic Brake Assist (HBA)152
I
Ignition
136
Immobilizer136
Individual settings Locking
52
Unlocking52
Inertia reels13
Information message see KESSY
51
Information system39
Compass point display46
Display a low temperature40
Door warning41
Gear recommendation40
MAXI DOT display44
Multifunction display41
Operation40
Service interval display46
instrument cluster Auto Check Control
31
Instrument cluster28
Counter for distance driven30
Display29
Display of the second speed31
Fuel gauge30
Overview28
Revolutions counter29
see instrument cluster28
Speedometer29
Temperature gauge29
Warning lights32
Interior monitor54
Internet connection127
ISOFIX23
J
Jack
201
Jacking points Raise vehicle
203
Jump-starting207
K
KESSY
50
Information message51
Lock / unlock the steering138
Locking50
Starting the engine139
Switching off the engine139
Switch off ignition138
Switch on ignition138
Unlocking50
Key Starting the engine
136
Stopping the engine137
Knee airbag16
L
Lamp Warning light
36
Lamp failure Warning light
36
LEAVING HOME70
Lever Main beam67
Turn signal67
Windscreen wipers76
Licht COMING HOME / LEAVING HOME
70
Light Cockpit
71
Fog lights with CORNER function69
Replacing bulbs219
Travel mode69
Light bulbs Rear light (Superb Combi)
222
Lighting Luggage compartment
95
Lights65
Adaptive headlights (AFS)68
Automatic driving lamp control68
Daylight running67
Fog lights69
Hazard warning light system70
Headlight beam adjustment66
Headlight flasher67
Instrument lighting66
Low beam lights66
Main beam67
Parking lights66, 71
Rear fog light69
Switching on and off66
Tourist lights69
Turn signal67
Warning lights32
Lock Remote control
49
Vehicle key49
Locking Individual settings
52
KESSY50
Locking and unlocking the vehicle from the in- side
52
236Index
Page 241 of 246
Seat beltwarning light33
Seat belts10
Belt tensioners13
Cleaning178
fastening and unfastening12
Height adjustment13
Inertia reels13
The physical principle of a frontal collision11
Seat features83
Seats Armrest rear
85
Armtest, front85
Convenience features of passenger seat85
Electric adjustment80
Head restraints81
Heating83
Manually adjusting80
save82
Seat backrests85
Storing in memory of remote control key82
Ventilated front seats84
Seats and useful equipment79
Adjusting the seats79
see automatic gearbox Manual shifting of gears on the multifunctionsteering wheel
143
Selector lever Refer to Selector lever
142
Selector lever lock / starter (system KESSY) Warning light
39
Service170
Service interval display46
Service intervals169
Setting30
Setting the30
Shelves86
Shifting gears Driving and saving energy
146
Side airbag17
Side compartment in boot with battery100
Side compartments in the luggage compart- ment
99
ski bag95
Sliding/tilting roof Close (Superb Combi)
64
Closing62
Closing the sun screen (Superb Combi)64
Electric sliding/tilting roof62
Emergency operation213
Opening/closing the sun screen (Superb Combi) 64
Opening and tilting
62
Opening and tilting (Superb Combi)64
Operation62
Operation (Superb Combi)64
Snow chains199
Spare wheel197
Speedometer29
see speedometer29
Speed symbol See Wheels
196
Spoiler171
START-STOP159
Manually deactivating/activating the system161
Operating conditions of the system160
operation in vehicles with automatic gearbox 160
operation in vehicles with manual gearbox
160
system-related automatic start-up161
Starting and stopping the engine - KESSY137
Starting and stopping the engine using the key 135
Starting engine Jump-starting
207
Starting the engine Jump-starting
207
Key136
see KESSY139
START STOP Information messages
161
Jump-starting208
Steering lock / unlock see KESSY138
Steering wheel8
Stopping the engine Key
137
Storage compartment in rear centre console93
Storage compartment on the passenger side92
Storage compartments86
Storage compartment under the passenger seat
92
Storage pockets on the front seats93
Storing skis94
Sun screen74
Sun screen in the rear doors74
Sun visors74
Switch see Ignition
136
Switching lights on and off66
Switching off the engine see KESSY
139
Switch off ignition Refer to KESSY
138
Switch on ignition Refer to KESSY
138
Synchronous adjustment of the rear-view mir- ror
78
T
Tailgate TwinDoor
56
Taking care of the vehicle Natural leather
177
Seat belts178
Taking care of your vehicle Automatic car wash system
173
Cavity protection176
Chrome parts174
Cleaning the wheels176
Decorative films175
239Index