automatic transmission SKODA SUPERB 2014 2.G / (B6/3T) Owner's Manual
[x] Cancel search | Manufacturer: SKODA, Model Year: 2014, Model line: SUPERB, Model: SKODA SUPERB 2014 2.G / (B6/3T)Pages: 246, PDF Size: 17.16 MB
Page 7 of 246
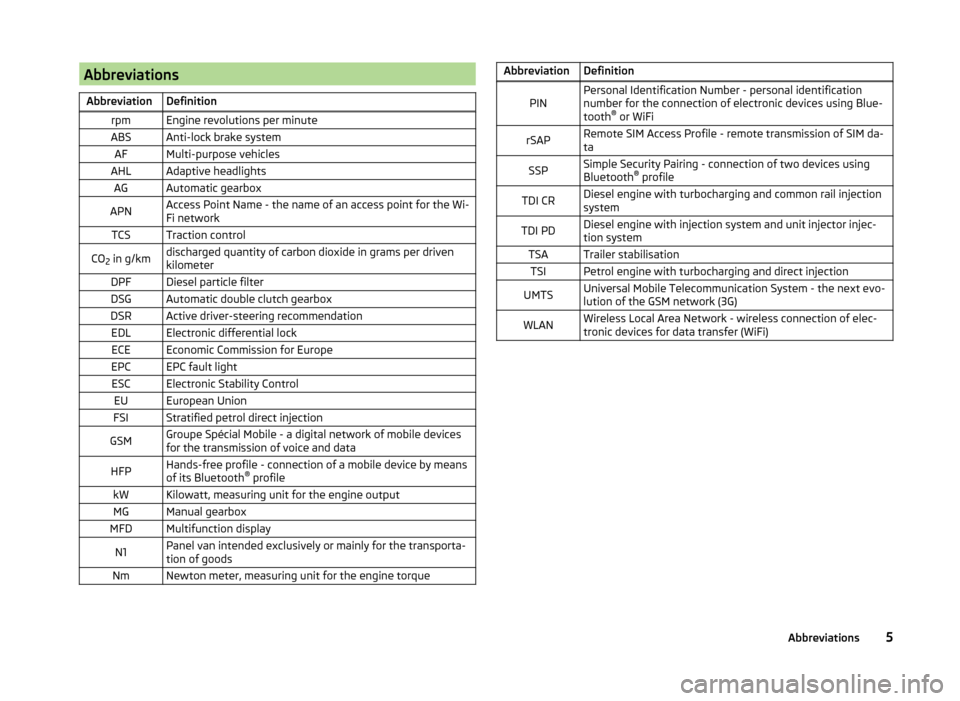
AbbreviationsAbbreviationDefinitionrpmEngine revolutions per minuteABSAnti-lock brake systemAFMulti-purpose vehiclesAHLAdaptive headlightsAGAutomatic gearboxAPNAccess Point Name - the name of an access point for the Wi-
Fi networkTCSTraction controlCO 2 in g/kmdischarged quantity of carbon dioxide in grams per driven
kilometerDPFDiesel particle filterDSGAutomatic double clutch gearboxDSRActive driver-steering recommendationEDLElectronic differential lockECEEconomic Commission for EuropeEPCEPC fault lightESCElectronic Stability ControlEUEuropean UnionFSIStratified petrol direct injectionGSMGroupe Spécial Mobile - a digital network of mobile devices
for the transmission of voice and dataHFPHands-free profile - connection of a mobile device by means
of its Bluetooth ®
profilekWKilowatt, measuring unit for the engine outputMGManual gearboxMFDMultifunction displayN1Panel van intended exclusively or mainly for the transporta-
tion of goodsNmNewton meter, measuring unit for the engine torqueAbbreviationDefinitionPINPersonal Identification Number - personal identification
number for the connection of electronic devices using Blue-
tooth ®
or WiFirSAPRemote SIM Access Profile - remote transmission of SIM da-
taSSPSimple Security Pairing - connection of two devices using
Bluetooth ®
profileTDI CRDiesel engine with turbocharging and common rail injection
systemTDI PDDiesel engine with injection system and unit injector injec-
tion systemTSATrailer stabilisationTSIPetrol engine with turbocharging and direct injectionUMTSUniversal Mobile Telecommunication System - the next evo-
lution of the GSM network (3G)WLANWireless Local Area Network - wireless connection of elec-
tronic devices for data transfer (WiFi)5Abbreviations
Page 43 of 246
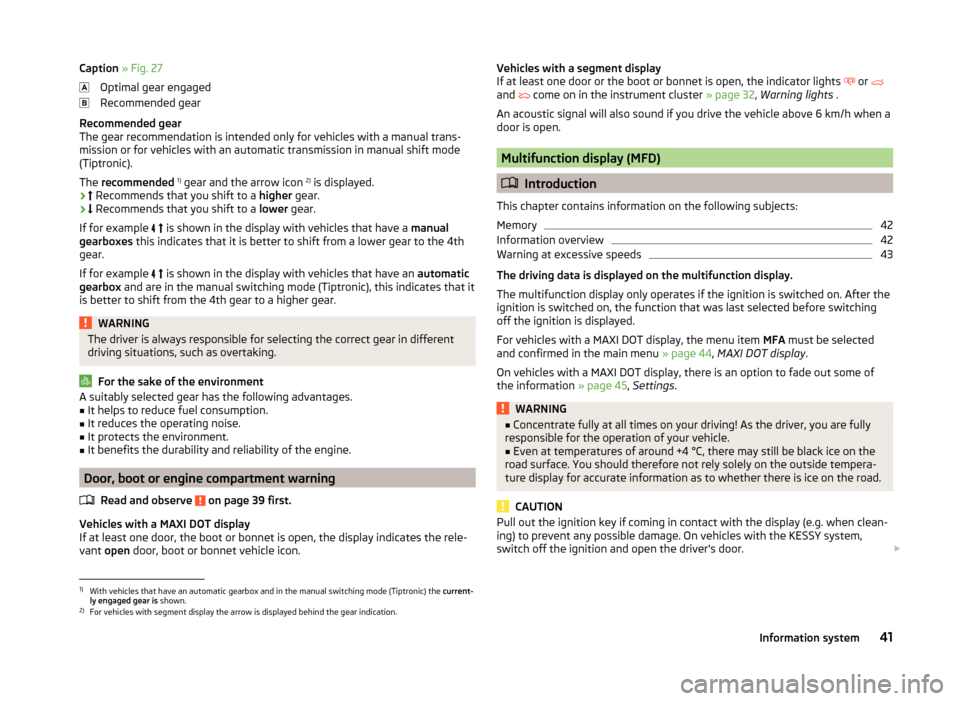
Caption » Fig. 27
Optimal gear engaged
Recommended gear
Recommended gear
The gear recommendation is intended only for vehicles with a manual trans- mission or for vehicles with an automatic transmission in manual shift mode
(Tiptronic).
The recommended 1)
gear and the arrow icon 2)
is displayed.
›
Recommends that you shift to a higher gear.
›
Recommends that you shift to a lower gear.
If for example
is shown in the display with vehicles that have a
manual
gearboxes this indicates that it is better to shift from a lower gear to the 4th
gear.
If for example
is shown in the display with vehicles that have an
automatic
gearbox and are in the manual switching mode (Tiptronic), this indicates that it
is better to shift from the 4th gear to a higher gear.WARNINGThe driver is always responsible for selecting the correct gear in different
driving situations, such as overtaking.
For the sake of the environment
A suitably selected gear has the following advantages.■It helps to reduce fuel consumption.■
It reduces the operating noise.
■
It protects the environment.
■
It benefits the durability and reliability of the engine.
Door, boot or engine compartment warning
Read and observe
on page 39 first.
Vehicles with a MAXI DOT display
If at least one door, the boot or bonnet is open, the display indicates the rele-
vant open door, boot or bonnet vehicle icon.
Vehicles with a segment display
If at least one door or the boot or bonnet is open, the indicator lights or
and
come on in the instrument cluster » page 32, Warning lights .
An acoustic signal will also sound if you drive the vehicle above 6 km/h when a door is open.
Multifunction display (MFD)
Introduction
This chapter contains information on the following subjects:
Memory
42
Information overview
42
Warning at excessive speeds
43
The driving data is displayed on the multifunction display.
The multifunction display only operates if the ignition is switched on. After the ignition is switched on, the function that was last selected before switching
off the ignition is displayed.
For vehicles with a MAXI DOT display, the menu item MFA must be selected
and confirmed in the main menu » page 44, MAXI DOT display .
On vehicles with a MAXI DOT display, there is an option to fade out some of
the information » page 45, Settings .
WARNING■
Concentrate fully at all times on your driving! As the driver, you are fully
responsible for the operation of your vehicle.■
Even at temperatures of around +4 °C, there may still be black ice on the
road surface. You should therefore not rely solely on the outside tempera-
ture display for accurate information as to whether there is ice on the road.
CAUTION
Pull out the ignition key if coming in contact with the display (e.g. when clean-
ing) to prevent any possible damage. On vehicles with the KESSY system,
switch off the ignition and open the driver's door. 1)
With vehicles that have an automatic gearbox and in the manual switching mode (Tiptronic) the
current-
ly engaged gear is shown.
2)
For vehicles with segment display the arrow is displayed behind the gear indication.
41Information system
Page 138 of 246
Electronic immobilizerRead and observe
and on page 135 first.
An electronic chip is integrated in the head of the key. The immobiliser is deac-
tivated with the aid of this chip when the key is inserted in the ignition lock.
The electronic immobiliser is automatically activated when the ignition key is
withdrawn from the lock.
The engine will not start if a non-authorized ignition key is used.
The following message is shown in the information cluster display. Immobilizer active.
IMMOBILISER
Ignition Switch
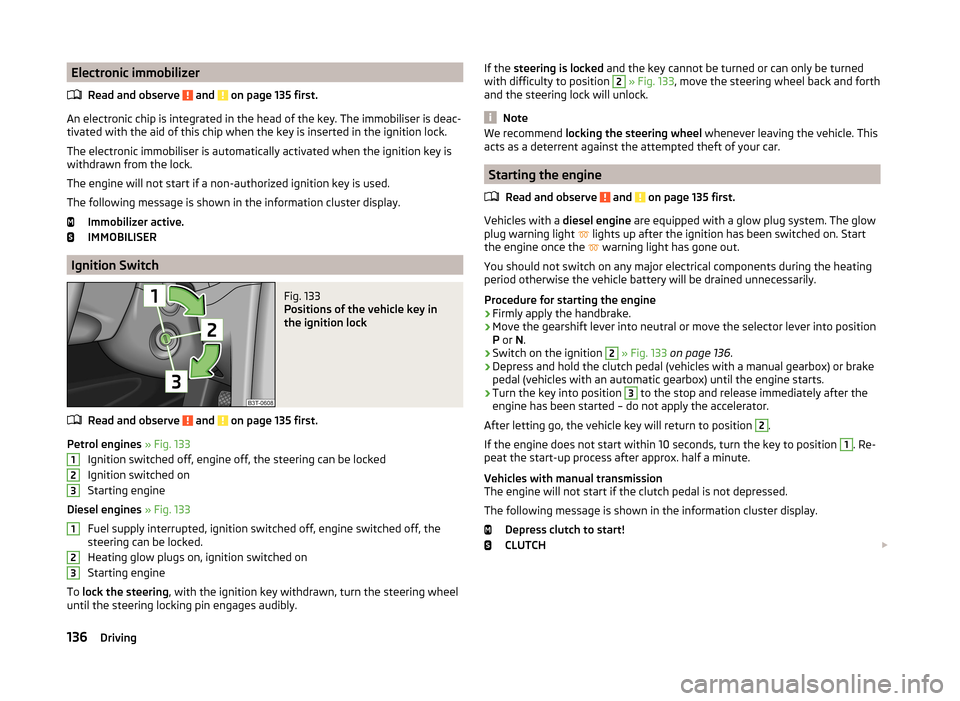
Fig. 133
Positions of the vehicle key in
the ignition lock
Read and observe and on page 135 first.
Petrol engines » Fig. 133
Ignition switched off, engine off, the steering can be locked
Ignition switched on
Starting engine
Diesel engines » Fig. 133
Fuel supply interrupted, ignition switched off, engine switched off, the
steering can be locked.
Heating glow plugs on, ignition switched on
Starting engine
To lock the steering , with the ignition key withdrawn, turn the steering wheel
until the steering locking pin engages audibly.
123123If the steering is locked and the key cannot be turned or can only be turned
with difficulty to position 2 » Fig. 133 , move the steering wheel back and forth
and the steering lock will unlock.
Note
We recommend locking the steering wheel whenever leaving the vehicle. This
acts as a deterrent against the attempted theft of your car.
Starting the engine
Read and observe
and on page 135 first.
Vehicles with a diesel engine are equipped with a glow plug system. The glow
plug warning light lights up after the ignition has been switched on. Start
the engine once the warning light has gone out.
You should not switch on any major electrical components during the heating
period otherwise the vehicle battery will be drained unnecessarily.
Procedure for starting the engine
›
Firmly apply the handbrake.
›
Move the gearshift lever into neutral or move the selector lever into position
P or N.
›
Switch on the ignition
2
» Fig. 133 on page 136 .
›
Depress and hold the clutch pedal (vehicles with a manual gearbox) or brake
pedal (vehicles with an automatic gearbox) until the engine starts.
›
Turn the key into position
3
to the stop and release immediately after the
engine has been started – do not apply the accelerator.
After letting go, the vehicle key will return to position
2
.
If the engine does not start within 10 seconds, turn the key to position
1
. Re-
peat the start-up process after approx. half a minute.
Vehicles with manual transmission
The engine will not start if the clutch pedal is not depressed.
The following message is shown in the information cluster display. Depress clutch to start!
CLUTCH
136Driving
Page 139 of 246
Vehicles with automatic transmission1)
The engine will not start if the brake pedal is not depressed.
The following message is shown in the information cluster display. Depress brake to start!
BRAKE
CAUTION
■ If the engine does not start up after a second attempt, one of the following
fuses may be defective. ■ Petrol engine - fuse for the electric fuel pump.
■ Diesel engine - fuse for the control unit for glow plugs or glow plug relay
and fuel pump.■
Check the fuse and replace if necessary » page 215, or seek assistance from
a specialist garage.
Stopping the engine
Read and observe
and on page 135 first.
Switch off the engine by turning the ignition key to position
1
» Fig. 133 on
page 136 .
For vehicles with automatic transmission, the ignition key can only be removed
if the selector lever is in position P.
Starting and stopping the engine - KESSY
Introduction
This chapter contains information on the following subjects:
Steering lock / unlock
138
Ignition on/off
138
Starting the engine
139
Switching off the engine
139
Emergency start-up of the engine
139
Emergency ignition shutoff system
140The KESSY system (Keyless Entry Exit System, hereinafter referred to only as
system) allows the switching on or switching off of the ignition and starting or
stopping of the engine without the active use of the key.
A key must be in the vehicle to unlock the steering, switch on the ignition and
start the vehicle. When travelling the key must be in the vehicle.
The engine running noises may louder at first be louder for a short time after starting the cold engine. This is quite normal and is not an operating problem.WARNING■ Never leave the key in the vehicle when you exit the vehicle. Unauthor-
ized persons, such as children, for example, could lock the car, turn on the
ignition or start the engine - there is a danger of injury and accidents!■
Never leave the vehicle unattended with the engine running - there is a
risk of theft etc!
■
Never switch off the engine before the vehicle is stationary – risk of acci-
dent!
WARNING■ Never leave the engine running in unventilated or closed rooms. The ex-
haust gases from the engine contain substances such as odourless and col-
ourless carbon monoxide (a poisonous gas) – risk to life! ■Carbon monoxide can cause unconsciousness and death.
CAUTION
■ The system can recognize the valid key, even if it has been forgotten, for ex-
ample, in the front of the vehicle roof D » Fig. 32 on page 50 - There is danger
of loss or damage to the key! It is therefore not always necessary to know
where the key is.■
The starter must only be operated when the engine is not running and the
vehicle is at a standstill. The starter or engine may be damaged if the starter is
activated when the engine is running.
■
Do not tow start the engine – there is a risk of damaging the engine and the
catalytic converter. The battery from another vehicle can be used as a jump-
start aid » page 207 , Jump-starting .
1)
Applies to vehicles with START-STOP system.
137Starting-off and Driving
Page 142 of 246
Emergency ignition shutoff systemRead and observe
and on page 137 first.
The ignition can be turned off in an emergency even when travelling at a
speed of more than 2 km / hr.
›
Press the starter button » Fig. 134 on page 138 for longer than 1 second or
twice within 1 second.
After emergency stop of the ignition, the steering is unlocked.
Brakes
Introduction
This chapter contains information on the following subjects:
Information on braking
140
Handbrake
141WARNING■ Greater physical effort is required for braking when the engine is switch-
ed off – risk of accident!■
The clutch pedal must be actuated when braking on a vehicle with man-
ual transmission, when the vehicle is in gear and at low revs. Otherwise,
the function of the brake booster may be impaired – risk of accident!
■
When leaving the vehicle, never leave persons who might, for example,
release the handbrake or take the vehicle out of gear unattended in the ve-
hicle. The vehicle could then start to move – risk of accident!
WARNINGIn the case of damage to the standard fitted front spoiler or if retrofitting
another front spoiler, hub caps etc. » page 169, Services, modifications,
and technical alterations , make sure that the air supply to the front brakes
is not affected. The front brakes may overheat, which can have a negative
impact on the functioning of the braking system – risk of accident!
CAUTION
■ Observe the recommendations on the new brake pads » page 145.■Never let the brakes slip with light pressure on the pedal if braking is not
necessary. This causes the brakes to overheat and can also result in a longer
braking distance and excessive wear.Information on braking
Read and observe
and on page 140 first.
If the brakes are applied in full and the control unit for the braking system con-siders the situation to be dangerous for the following traffic, the brake light
flashes automatically.
After the speed was reduced below around 10 km/h or the vehicle was stop-
ped, the brake light stops flashing and the hazard warning light system
switches on. The hazard warning light system is switched off automatically af- ter accelerating or driving off again.
Before travelling a long distance with a steep gradient, reduce speed and shift
into the next lowest gear. As a result, the braking effect of the engine will be
used, reducing the load on the brakes. Any additional braking should be com-
pleted intermittently, not continuously.
Wear-and-tear
The wear of the brake pads is dependent on the operating conditions and driv-
ing style.
The brake pads wear more quickly if a lot of journeys are completed in towns
and over short distances or if a very sporty style of driving is adopted.
Under these severe conditions , the thickness of the brake pads must also be
checked by a specialist garage between service intervals.
Wet roads or road salt
The performance of the brakes can be delayed as the brake discs and brake
pads may be moist or have a coating of ice or layer of salt on them in winter.
The brakes are cleaned and dried by applying the brakes several times.
Corrosion
Corrosion on the brake discs and dirt on the bake pads occur if the vehicle has been parked for a long period and if you do not make much use of the braking
system. The brakes are cleaned and dried by applying the brakes several times.
Faults in the brake surface
If it is found that the braking distance has suddenly become longer and that
the brake pedal can be depressed further, the brake system may be faulty.
Visit a specialist garage immediately and adjust your style of driving appropri-
ately, as you will not know the exact extent of the damage.
140Driving
Page 144 of 246
WARNINGNever engage reverse gear when driving – risk of accident!
CAUTION
If not in the process of changing gear, do not leave your hand on the gearshift
lever while driving. The pressure from the hand can cause the gearshift mech-
anism to wear excessively.
Pedals
The operation of the pedals must not be hindered under any circumstances!
In the driver's footwell, only a footmat, which is attached to the two corre-
sponding attachment points, may be used.
Only use factory-supplied footmats or footmats from the range of ŠKODAOrigi-
nal Accessories, which are fitted to two attachment points.
WARNINGNo objects may be placed in the driver's footwell – risk due to obstruction
or limitation of pedal operation.
Automatic gearbox
Introduction
This chapter contains information on the following subjects:
Modes and use of selector lever
142
Manual shifting of gears (Tiptronic)
143
Starting-off and driving
144
Malfunction
144WARNING■ Do not depress the accelerator if changing the forward driving mode –
risk of accident!■
Never move the selector lever to mode R or P when driving – risk of acci-
dent!
■
When the vehicle is stationery and the engine is running, the vehicle must
be held in mode D, S or R with the brake pedal. Even when the engine is
idling, the power transmission is never completely interrupted – the vehicle
creeps.
CAUTION■ If the selector lever is moved to mode N while driving, the accelerator pedal
must be released and you will need to wait until the engine has reached its
idling speed before moving the selector lever to a forward driving mode again.■
At temperatures below -10 °C, the engine can only be started in the selector
lever position P.
■
When stopping on a slope, never try to hold the vehicle using the accelerator
pedal – this may lead to gear damage.
Note
After the ignition is switched off, the ignition key can only be withdrawn if the
selector lever is in the position P.
Modes and use of selector lever
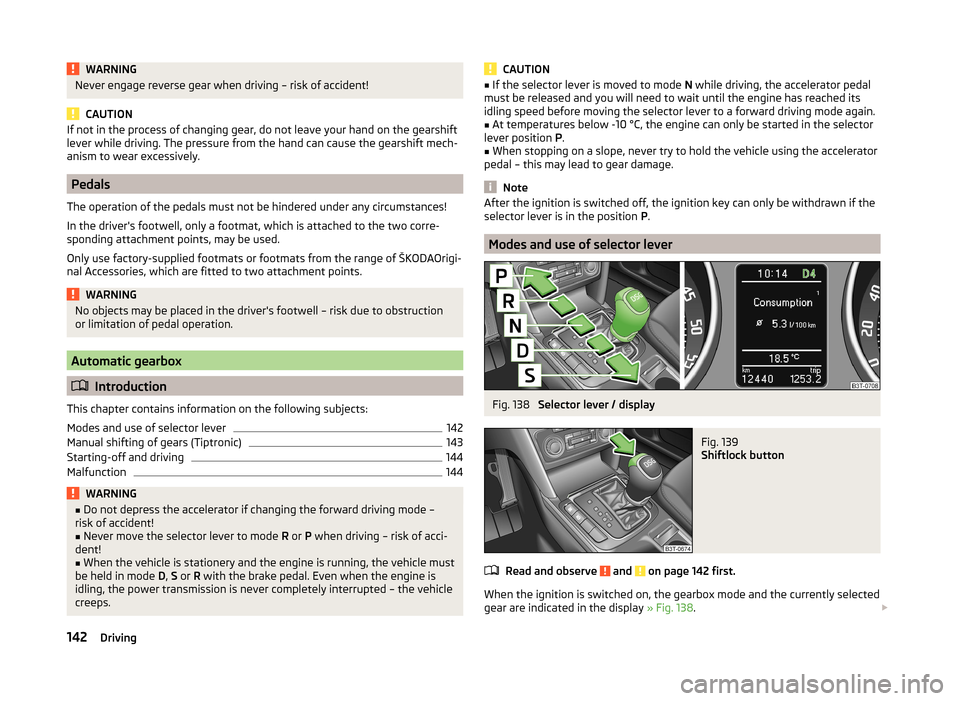
Fig. 138
Selector lever / display
Fig. 139
Shiftlock button
Read and observe and on page 142 first.
When the ignition is switched on, the gearbox mode and the currently selected
gear are indicated in the display » Fig. 138.
142Driving
Page 145 of 246
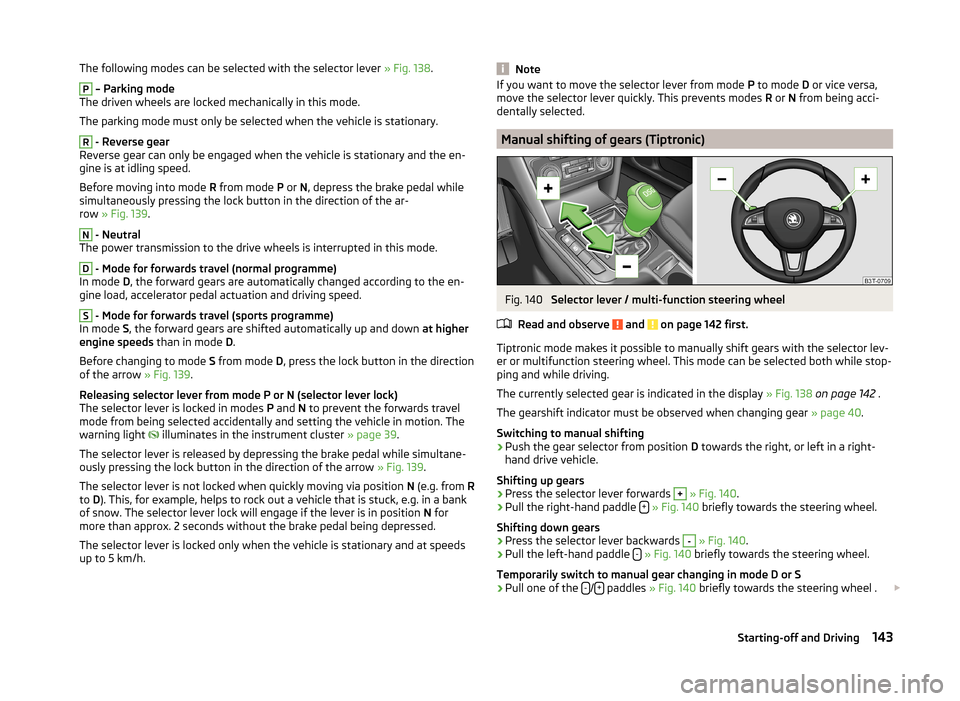
The following modes can be selected with the selector lever » Fig. 138.P
– Parking mode
The driven wheels are locked mechanically in this mode.
The parking mode must only be selected when the vehicle is stationary.
R
- Reverse gear
Reverse gear can only be engaged when the vehicle is stationary and the en-
gine is at idling speed.
Before moving into mode R from mode P or N, depress the brake pedal while
simultaneously pressing the lock button in the direction of the ar-
row » Fig. 139 .
N
- Neutral
The power transmission to the drive wheels is interrupted in this mode.
D
- Mode for forwards travel (normal programme)
In mode D, the forward gears are automatically changed according to the en-
gine load, accelerator pedal actuation and driving speed.
S
- Mode for forwards travel (sports programme)
In mode S, the forward gears are shifted automatically up and down at higher
engine speeds than in mode D.
Before changing to mode S from mode D, press the lock button in the direction
of the arrow » Fig. 139.
Releasing selector lever from mode P or N (selector lever lock)
The selector lever is locked in modes P and N to prevent the forwards travel
mode from being selected accidentally and setting the vehicle in motion. The
warning light illuminates in the instrument cluster
» page 39.
The selector lever is released by depressing the brake pedal while simultane-
ously pressing the lock button in the direction of the arrow » Fig. 139.
The selector lever is not locked when quickly moving via position N (e.g. from R
to D). This, for example, helps to rock out a vehicle that is stuck, e.g. in a bank
of snow. The selector lever lock will engage if the lever is in position N for
more than approx. 2 seconds without the brake pedal being depressed.
The selector lever is locked only when the vehicle is stationary and at speeds up to 5 km/h.
NoteIf you want to move the selector lever from mode P to mode D or vice versa,
move the selector lever quickly. This prevents modes R or N from being acci-
dentally selected.
Manual shifting of gears (Tiptronic)
Fig. 140
Selector lever / multi-function steering wheel
Read and observe
and on page 142 first.
Tiptronic mode makes it possible to manually shift gears with the selector lev-
er or multifunction steering wheel. This mode can be selected both while stop-
ping and while driving.
The currently selected gear is indicated in the display » Fig. 138 on page 142 .
The gearshift indicator must be observed when changing gear » page 40.
Switching to manual shifting
›
Push the gear selector from position D towards the right, or left in a right-
hand drive vehicle.
Shifting up gears
›
Press the selector lever forwards
+
» Fig. 140 .
›
Pull the right-hand paddle +
» Fig. 140 briefly towards the steering wheel.
Shifting down gears
›
Press the selector lever backwards
-
» Fig. 140 .
›
Pull the left-hand paddle -
» Fig. 140 briefly towards the steering wheel.
Temporarily switch to manual gear changing in mode D or S
›
Pull one of the -/+ paddles
» Fig. 140 briefly towards the steering wheel .
143Starting-off and Driving
Page 146 of 246
If one of the rocker switches -/+ is not pulled for more than 1 minute, manual
gear changing is deactivated. The temporary switch to manual gear changing
can also be deactivated by pulling the right-hand rocker switch +
towards the
steering wheel for more than 1 second.
When accelerating, the gearbox automatically shifts up into the higher gear
just before the maximum permissible engine speed is reached.
If a lower gear is selected, the gearbox does not shift down until there is no risk of the engine overrevving.
Note
It may be beneficial, for example, when travelling downhill, to use manual
shifting of gears. Shifting to a lower gear reduces the load on the brakes and
hence the wear of the brakes » page 140.
Starting-off and driving
Read and observe
and on page 142 first.
Starting off
›
Start the engine.
›
Firmly depress and hold the brake pedal.
›
Press the lock button in the direction of to arrow » Fig. 139 on page 142 and
hold.
›
Move the selector lever into the desired position » page 142 and then release
the lock button.
›
Release the brake pedal and accelerate.
Stop
›
Fully depress and hold the brake pedal and bring the vehicle to a stop.
›
Keep holding the brake pedal until driving is resumed.
The selector lever position N does not have to be selected when stopping for a
short time, such as at a cross roads.
Parking
›
Fully depress and hold the brake pedal and bring the vehicle to a stop.
›
Firmly apply the handbrake.
›
Press the lock button in the direction of to arrow » Fig. 139 on page 142 and
hold.
› Move the selector lever into the position
P and then release the locking but-
ton.
Launch control 1)
The Launch control function allows the vehicle to reach maximum acceleration
when starting off in mode S or Tiptronic.›
Activate the ASR » page 151, Brake assist systems .
›
START STOP deactivate » page 161.
›
Fully depress and hold the brake pedal with your left foot.
›
Fully depress the accelerator pedal with your right foot.
›
Release the brake pedal.
The vehicle starts off with maximum acceleration.
Reactivate the ASR and START-STOP as soon as the desired speed is reached.
Kickdown
The kickdown function allows you to achieve the maximum acceleration of
your vehicle while driving.
When the accelerator pedal is fully depressed, the kickdown function is activa-
ted in any forward driving mode.
The gearbox shifts down one or more gears depending on the vehicle speed
and engine speed, and the vehicle accelerates.
The gearbox does not shift up into the highest gear until the engine has
reached its maximum revolutions for this gear range.
WARNINGRapid acceleration, particularly on slippery roads, can lead to loss of control
of the vehicle – risk of accident!
Malfunction
Read and observe
and on page 142 first.
Emergency programme
The transmission switches to the emergency programme, if there is a fault in
system of the automatic gearbox.
1)
This function is only valid for some engines.
144Driving
Page 147 of 246
Indications of an activated emergency programme include the following:
› Only certain gears are selected.
› The reverse gear
R cannot be used.
› Shifting gears in Tiptronic mode is not possible.
Gearbox overheating The gearbox may, for example, become too hot due to frequent repeated
starting or stop-and-go traffic. Overheating is indicated by the warning
light » page 31 ,
Clutches of the automatic DSG gearbox are too hot .
Defective selector lever lock
If the selector lever lock is defective or its power supply is interrupted (e.g. dis-
charged vehicle battery, faulty fuse), the selector lever can no longer be moved
out of position P in the normal manner, and the vehicle can no longer be driv-
en. The selector lever must be unlocked specially » page 213.
Note
If the gearbox has switched to the emergency programme, visit a specialist ga-
rage.
Running in
Introduction
This chapter contains information on the following subjects:
New engine
145
New tyres
145
New brake pads
145
New engine
The engine has to be run in during the first 1 500 kilometres.
Up to 1 000 kilometres
›
Do not drive faster than 3/4 of the maximum speed of the gear in use, i.e. 3/4
of the maximum permissible engine speed.
›
No full throttle.
›
Avoid high engine speeds.
›
Do not tow a trailer.
From 1 000 up to 1 500 kilometres
Gradually increase the power output of the engine up to the full speed of the
gear engaged, i.e. up to the maximum permissible engine speed.
The red scale of the rev counter indicates the range in which the system be-
gins to limit the engine speed.
During the first operating hours the engine has higher internal friction than
later until all of the moving parts have harmonized. The driving style which you
adopt during the first approx.1 500 kilometres plays a decisive part in the suc-
cess of running in your car.
Never drive at unnecessarily high engine speeds even after the running-in pe-
riod.
On vehicles fitted with a manual gearbox, at the very latest shift up into the
next gear when the red area is reached. Observe the recommended
gear » page 40 , Gear recommendation . Very high engine speeds when acceler-
ating (accelerator) are automatically restricted »
.
In vehicles with manual transmission, do not drive at unnecessarily low engine
speeds. Shift down a gear when the engine is no longer running smoothly. Ob-
serve the recommended gear » page 40, Gear recommendation .
CAUTION
■
The engine is not protected from excessive engine revs caused by shifting
down at the wrong time. This can result in a sudden increase in revs beyond
the permissible maximum rpm, thereby causing engine damage.■
Never rev up a cold engine when the vehicle is stationary or when driving in
individual gears.
For the sake of the environment
Do not drive at unnecessarily high engine speeds. Shifting up sooner helps
save fuel, reduces engine noise and protects the environment.
New tyres
New tyres must firstly be “run in”, as they do not offer optimal grip at first.
Therefore, drive especially carefully for the first 500 km or so.
New brake pads
New brake pads do not initially provide optimal braking performance. They first
need to be “run in”. Therefore, drive especially carefully for the first 200 km or
so.
145Starting-off and Driving
Page 160 of 246
The system cannot be activated because a fault exists on the vehicle. Seek
help from a specialist garage.
Park Assist stopped. System currently unavailable.
The parking procedure was ended because a fault exists on the vehicle. Seek
help from a specialist garage.
Park Assist faulty. Workshop!
The parking procedure is not possible because a fault exists in the system.
Seek help from a specialist garage.
ASR intervention. take over steering!
The parking procedure is terminated by a TCS intervention. PARK ASSIST Turn on turn signal and select reverse gear
The prerequisites for manoeuvring out of a parking space using the system
have been met. Switch on the turn signals and shift into reverse.
Automatic space departure not possible. Space too small.
The manoeuvring procedure using the system is not possible. The parking gap
is too small.
Park Assist: Brake interv. Speed too high.
The speed was too high during the parking and was automatically reduced.
Cruise Control System
Introduction
This chapter contains information on the following subjects:
Activating/deactivating
158
Storing and maintaining speed
159
Changing the stored speed
159
Switching off temporarily
159
The Cruise Control System (CCS) maintains a set speed, more than 25 km/h,
without you having to actuate the accelerator pedal.
This is only possible within the range which is permitted by the power output and braking power of the engine.
The warning light illuminates in the instrument cluster when the cruise con-
trol system is switched on.
WARNING■ For safety reasons, the cruise control system must not be used in dense
traffic or on unfavourable road surfaces (such as icy roads, slippery roads,
loose gravel) – risk of accident!■
The saved speed may only be resumed if it is not too high for the current
traffic conditions.
■
Always deactivate the cruise control system after use to prevent the sys-
tem being switched on unintentionally.
CAUTION
■ The cruise control system is not able to maintain a constant speed when
driving in areas with steeper gradients. The weight of the vehicle increases the
speed at which it travels. In such cases, select a lower gear or brake the vehi-
cle using the footbrake.■
The cruise control system cannot be activated when first gear or reverse
gear is selected (vehicles with manual transmission).
■
The cruise control system cannot be activated when the selector lever is in
positions P, N or R (vehicles with automatic transmission).
■
The cruise control system may automatically switch off when some brake as-
sist systems (e.g. ESC) intervene, when the maximum permissible engine
speed is exceeded, etc.
Activating/deactivating
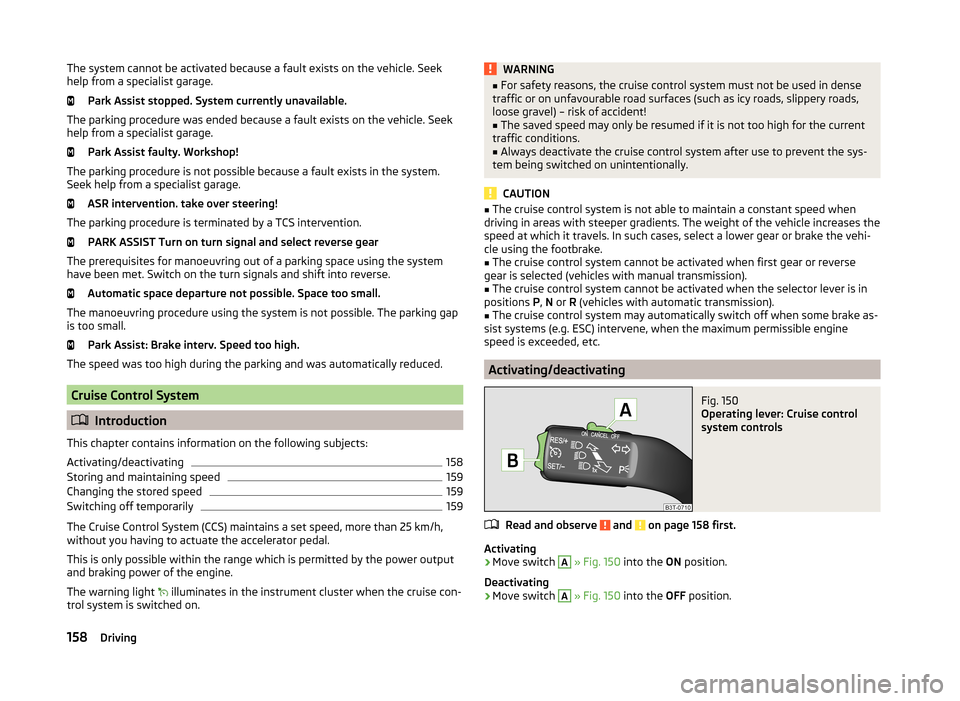
Fig. 150
Operating lever: Cruise control
system controls
Read and observe and on page 158 first.
Activating
›
Move switch
A
» Fig. 150 into the ON position.
Deactivating
›
Move switch
A
» Fig. 150 into the OFF position.
158Driving