emergency towing SKODA SUPERB 2014 2.G / (B6/3T) Owner's Manual
[x] Cancel search | Manufacturer: SKODA, Model Year: 2014, Model line: SUPERB, Model: SKODA SUPERB 2014 2.G / (B6/3T)Pages: 246, PDF Size: 17.16 MB
Page 6 of 246
Inspecting and replenishing179Fuel179
Engine compartment
182
Engine oil
185
Coolant
187
Brake fluid
189
Vehicle battery
189
Wheels
193
Tyres and wheel rims
193
Winter operation
198
Do-it-yourself
Emergency equipment and self-help
200
Emergency equipment
200
Changing a wheel
201
Tyre repair
204
Jump-starting
207
Towing the vehicle
208
Radio remote control
210
Emergency unlocking/locking
212
Emergency operation of the sliding/tilting
roof
213
Replacing windscreen wiper blades
214
Fuses and light bulbs
215
Fuses
215
Bulbs
219
Technical data
Technical data
224
Vehicle data
224
Index
4Table of Contents
Page 53 of 246
Information messageRead and observe
on page 48 first.
Key in the vehicle
The protection against inadvertently locking the key in the vehicle unlocks the
vehicle automatically if the following conditions are met.
The vehicle, including the boot lit, has been locked.
The key with which the vehicle has been locked remains in the vehicle in
the zone
D
» Fig. 32 on page 50 .
The turn signal lights flash four times as confirmation that the vehicle has
been unlocked again.
The following message is shown in the information cluster display. Key in vehicle.
KEY IN VEHICLE
Additionally, on vehicles which are fitted with the anti-theft alarm system, an audible signal sounds.
The system has not found a key
If the system has not found a key in the vehicle, the following message ap-
pears in the display of the instrument cluster.
Key not found.
NO KEY
This can occur if the key is outside the vehicle, the battery in the key is dis-
charged, the key is defective or the electromagnetic field is strongly disturbed.
Fault in KESSY system
If there is a fault in the KESSY system, the following message will appear in
the display of the instrument cluster.
Keyless access system faulty.
CHECK KEYLESS
Low voltage of the key battery
If the voltage of the battery in the remote control key is too low, the following
message appears in the display of the instrument cluster.
Change the key battery!
KEY BATTERY
Change the key battery » page 211!
Parking the vehicle
Read and observe
on page 48 first.
If the vehicle is not unlocked within 60 or 90 hours, the sensors in the handle
of the driver or front passenger's door are deactivated automatically » Fig. 32
on page 50 .
Activation after 60 hours
›
Unlock the driver's door using the sensor
2
» Fig. 32 on page 50 .
›
Press the handle of the boot lid.
›
Unlock the vehicle using the symbol button
on the remote control key.
›
Unlocking the driver's door in an emergency » page 212.
Activation after 90 hours
›
Unlock the vehicle using the symbol button on the remote control key.
›
Unlocking the driver's door in an emergency
» page 212.
Safe securing
Read and observe
on page 48 first.
The door locks are blocked automatically if the vehicle is locked from the out-side. Afterwards, it is not possible to open the doors with the door handle ei-
ther from the inside or from the outside.
This fact is pointed out by the following message on the display of the instru-
ment cluster after switching out the ignition.
Check SAFELOCK! Log book!
CHECK SAFELOCK
Switching off
The safe lock can be switched off in one of the following ways.
›
By locking twice within 2 seconds.
›
By disabling the interior monitoring » page 54, Interior monitor and towing
protection .
If the vehicle is locked and the safe securing system is switched off, the door can be opened separately from the inside by a single pull on opening lever.
Switching on
The safelock switches on automatically the next time the vehicle is locked and
unlocked.
51Unlocking and opening
Page 156 of 246
FunctionFig. 147
Range of sensors / system button
Read and observe
and on page 153 first.
The parking aid (hereafter referred to solely as system) only works when the
ignition is switched on.
The system supports the driver via audible signals, via the display on the radio
or via the factory-installed navigation system when parking and manoeu-
vring » Radio user guide, Navigation system user guide.
The system uses ultrasound waves to calculate the distance between the
bumper and an obstacle. The ultrasound sensors are located on the front/rear
bumper.
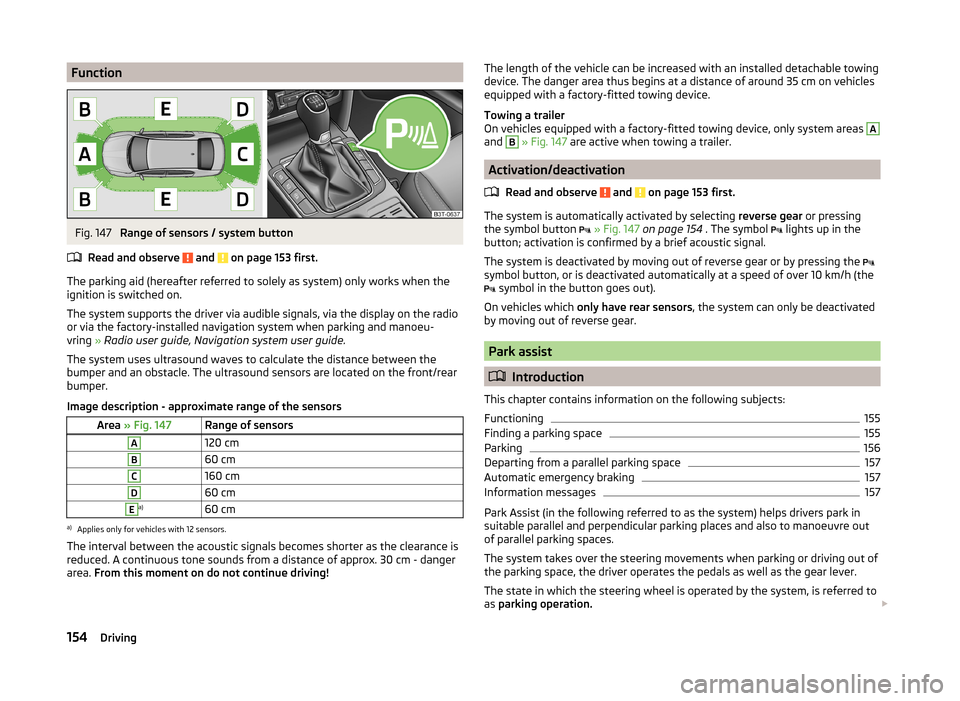
Image description - approximate range of the sensors
Area » Fig. 147Range of sensorsA120 cmB60 cmC160 cmD60 cmEa)60 cma)
Applies only for vehicles with 12 sensors.
The interval between the acoustic signals becomes shorter as the clearance is
reduced. A continuous tone sounds from a distance of approx. 30 cm - danger
area. From this moment on do not continue driving!
The length of the vehicle can be increased with an installed detachable towing
device. The danger area thus begins at a distance of around 35 cm on vehicles equipped with a factory-fitted towing device.
Towing a trailer
On vehicles equipped with a factory-fitted towing device, only system areas A
and
B
» Fig. 147 are active when towing a trailer.
Activation/deactivation
Read and observe
and on page 153 first.
The system is automatically activated by selecting reverse gear or pressing
the symbol button
» Fig. 147 on page 154 . The symbol
lights up in the
button; activation is confirmed by a brief acoustic signal.
The system is deactivated by moving out of reverse gear or by pressing the
symbol button, or is deactivated automatically at a speed of over 10 km/h (the
symbol in the button goes out).
On vehicles which only have rear sensors , the system can only be deactivated
by moving out of reverse gear.
Park assist
Introduction
This chapter contains information on the following subjects:
Functioning
155
Finding a parking space
155
Parking
156
Departing from a parallel parking space
157
Automatic emergency braking
157
Information messages
157
Park Assist (in the following referred to as the system) helps drivers park in
suitable parallel and perpendicular parking places and also to manoeuvre out
of parallel parking spaces.
The system takes over the steering movements when parking or driving out of
the parking space, the driver operates the pedals as well as the gear lever.
The state in which the steering wheel is operated by the system, is referred to
as parking operation.
154Driving
Page 188 of 246
Specifications and capacity (in l) for vehicles with fixed service intervalsPetrol enginesSpecificationCapacity1.4 ltr./92 kW TSIVW 501 01, VW 502 003.6
1.8 l/112, 118 kW TSI
VW 502 00
4.6
applies to RussiaSAE 0W - 30
VW 502 00/505 00
2.0 ltr./147 kW TSI
VW 502 00
4.6
applies to Russia SAE 0W - 30
VW 502 00/505 003.6 l/191 kW FSIVW 502 005.5Diesel engines a)SpecificationCapacity1.6 ltr./77 kW TDI CRVW 507 004.32.0 ltr/103 kW TDI CR DPFVW 507 004.32.0 ltr/125 kW TDI CR DPFVW 507 004.3a)
Engine oil VW 505 01 can optionally be used in diesel engines
without a DPF.
CAUTION
■
If the above engine oils are not available, a different engine oil can be used in
an emergency. To prevent damage to the engine, a maximum of 0.5 litres only
of the following engine oils may be used until the next oil change: ■ For petrol engine models: ACEA A3/ACEA B4 or API SN/API SM;
■ For diesel engine models: ACEA C3 or API CJ-4.
Checking the oil level
Fig. 163
Principle sketch: Dipstick
Read and observe and on page 185 first.
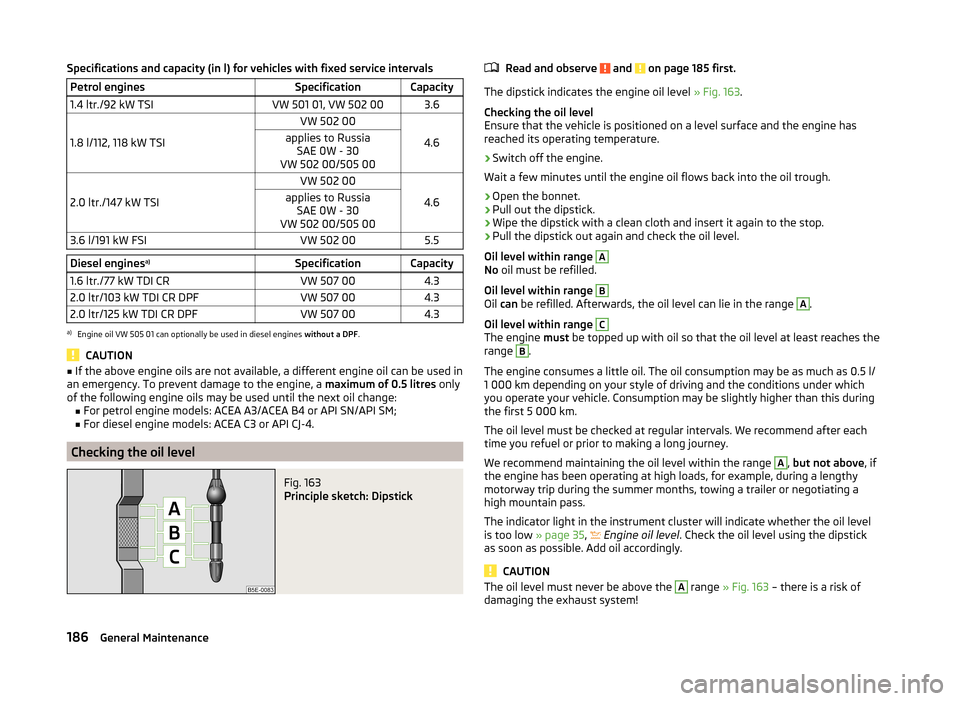
The dipstick indicates the engine oil level » Fig. 163.
Checking the oil level
Ensure that the vehicle is positioned on a level surface and the engine has
reached its operating temperature.
›
Switch off the engine.
Wait a few minutes until the engine oil flows back into the oil trough.
›
Open the bonnet.
›
Pull out the dipstick.
›
Wipe the dipstick with a clean cloth and insert it again to the stop.
›
Pull the dipstick out again and check the oil level.
Oil level within range
A
No oil must be refilled.
Oil level within range
B
Oil can be refilled. Afterwards, the oil level can lie in the range
A
.
Oil level within range
C
The engine must be topped up with oil so that the oil level at least reaches the
range
B
.
The engine consumes a little oil. The oil consumption may be as much as 0.5 l/
1 000 km depending on your style of driving and the conditions under which
you operate your vehicle. Consumption may be slightly higher than this during
the first 5 000 km.
The oil level must be checked at regular intervals. We recommend after each
time you refuel or prior to making a long journey.
We recommend maintaining the oil level within the range
A
, but not above , if
the engine has been operating at high loads, for example, during a lengthy
motorway trip during the summer months, towing a trailer or negotiating a
high mountain pass.
The indicator light in the instrument cluster will indicate whether the oil level
is too low » page 35,
Engine oil level
. Check the oil level using the dipstick
as soon as possible. Add oil accordingly.
CAUTION
The oil level must never be above the A range » Fig. 163 – there is a risk of
damaging the exhaust system!186General Maintenance
Page 202 of 246

Do-it-yourself
Emergency equipment and self-help
Emergency equipment
Introduction
This chapter contains information on the following subjects:
First aid kit and warning triangle
200
fire extinguisher
200
Vehicle tool kit
201
First aid kit and warning triangle
Fig. 173
Stowage compartment for the first aid kit: Superb / Superb Com-
bi
Fig. 174
Placing of the warning triangle
First-aid box
The compartment for stowing the first-aid box is located in the right of the
boot » Fig. 173 .
Warning triangle
The warning triangle can be attached to the rear wall trim panel with rubber
straps » Fig. 174 .WARNINGThe first-aid kit and warning triangle must always be secured safely so that
they do not come loose when making an emergency braking or in a vehicle
collision which could cause injuries to occupants.
Note
■ Pay attention to the expiration date of the first-aid kit.■We recommend using a first-aid kit from ŠKODA Original Accessories, which
are available from a ŠKODA Partner.
fire extinguisher
Fig. 175
Fire extinguisher
The fire extinguisher is attached by two straps in a holder under the driver
seat.
Removing / attaching
›
Loosen the two straps by pulling the buckles in the direction of the ar-
row » Fig. 175 .
›
Remove the fire extinguisher.
Installation is carried out in the reverse order.
Please read carefully the instructions which are attached to the fire extin- guisher.
200Do-it-yourself
Page 203 of 246
The fire extinguisher must be checked by an authorised person once a year.
The national legal requirements must be observed.WARNINGThe fire extinguisher must always be secured safely so that they do not
come loose when making an emergency braking or in a vehicle collision
which could cause injuries to occupants.
Note
■ The fire extinguisher must comply with national legal requirements.■Pay attention to the expiration date of the fire extinguisher. Proper function-
ing of the fire extinguisher is not assured once it has passed its expiry date.■
The fire extinguisher is part of the scope of delivery in certain countries only.
Vehicle tool kit
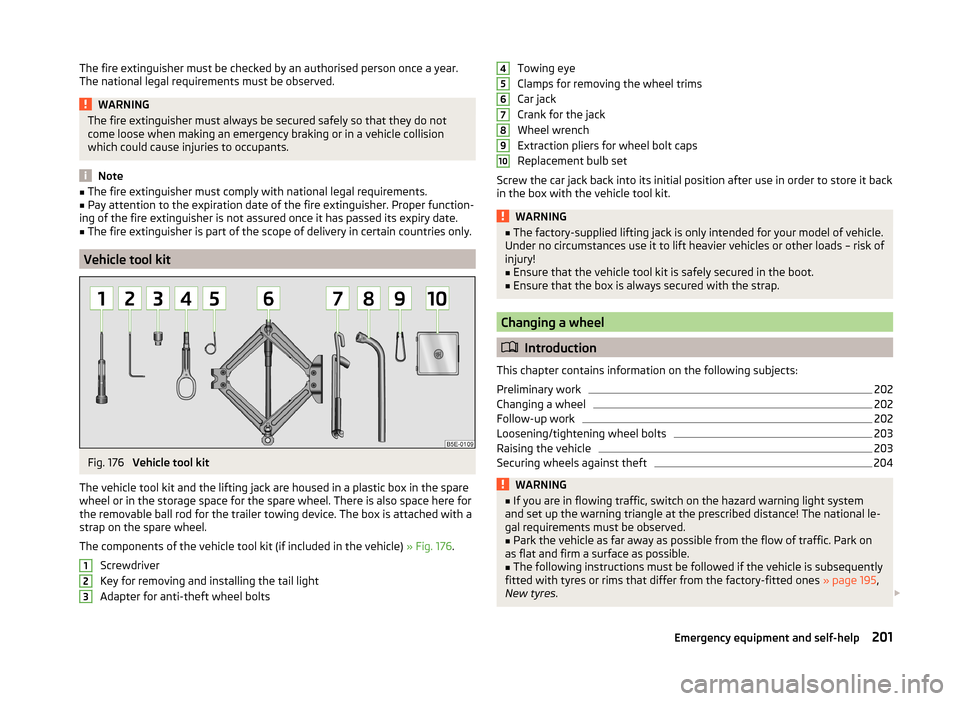
Fig. 176
Vehicle tool kit
The vehicle tool kit and the lifting jack are housed in a plastic box in the spare
wheel or in the storage space for the spare wheel. There is also space here for
the removable ball rod for the trailer towing device. The box is attached with a
strap on the spare wheel.
The components of the vehicle tool kit (if included in the vehicle) » Fig. 176.
Screwdriver
Key for removing and installing the tail light
Adapter for anti-theft wheel bolts
123Towing eye
Clamps for removing the wheel trims
Car jack
Crank for the jack
Wheel wrench
Extraction pliers for wheel bolt caps
Replacement bulb set
Screw the car jack back into its initial position after use in order to store it back
in the box with the vehicle tool kit.WARNING■ The factory-supplied lifting jack is only intended for your model of vehicle.
Under no circumstances use it to lift heavier vehicles or other loads – risk of
injury!■
Ensure that the vehicle tool kit is safely secured in the boot.
■
Ensure that the box is always secured with the strap.
Changing a wheel
Introduction
This chapter contains information on the following subjects:
Preliminary work
202
Changing a wheel
202
Follow-up work
202
Loosening/tightening wheel bolts
203
Raising the vehicle
203
Securing wheels against theft
204WARNING■ If you are in flowing traffic, switch on the hazard warning light system
and set up the warning triangle at the prescribed distance! The national le-
gal requirements must be observed.■
Park the vehicle as far away as possible from the flow of traffic. Park on
as flat and firm a surface as possible.
■
The following instructions must be followed if the vehicle is subsequently
fitted with tyres or rims that differ from the factory-fitted ones » page 195,
New tyres .
45678910201Emergency equipment and self-help
Page 211 of 246
If using a tow rope, ensure that it is always kept taught.
CAUTION
■Do not tow start the engine – there is a risk of damaging the engine and the
catalytic converter. The battery from another vehicle can be used as a jump-
start aid » page 207 , Jump-starting .■
If the gearbox no longer contains any oil because of a defect, your vehicle
must only be towed with the driven wheels raised clear of the ground or on a
special breakdown vehicle or trailer.
■
The vehicle must be transported on a special breakdown vehicle or trailer if it
is not possible to tow in the vehicle in the way described or if the towing dis-
tance is greater than 50 km.
■
To protect both vehicles when tow-starting or towing, the tow rope should
be elastic. Thus one should only use plastic fibre rope or a rope made out of a
similarly elastic material.
■
While towing, take care to avoid impermissibly high tensile forces or jerky
loads. There is always a risk of excessive stresses and damage resulting at the
points to which you attach the tow rope or tow bar when you attempt to tow a
vehicle which is not standing on a paved road.
■
Attach the tow rope or the tow bar to the towing eyes » page 209 , Front
towing eye or » page 210 , Rear towing eye to the detachable ball head of the
towing equipment » page 163 .
Note
■
We recommend using a tow rope from ŠKODA Original Accessories, which is
available from a ŠKODA Partner.■
Towing another vehicle requires a certain amount of practice. Both drivers
should be familiar with the particular points about towing a vehicle. Unskilled
drivers should not attempt to tow in another vehicle or to be towed in.
■
When towing, respect the national legal provisions, especially those which
relate to the identification of the towing vehicle and the vehicle being towed.
■
The tow rope must not be twisted as it may in certain circumstances result in
the front towing eye being unscrewed out of your vehicle.
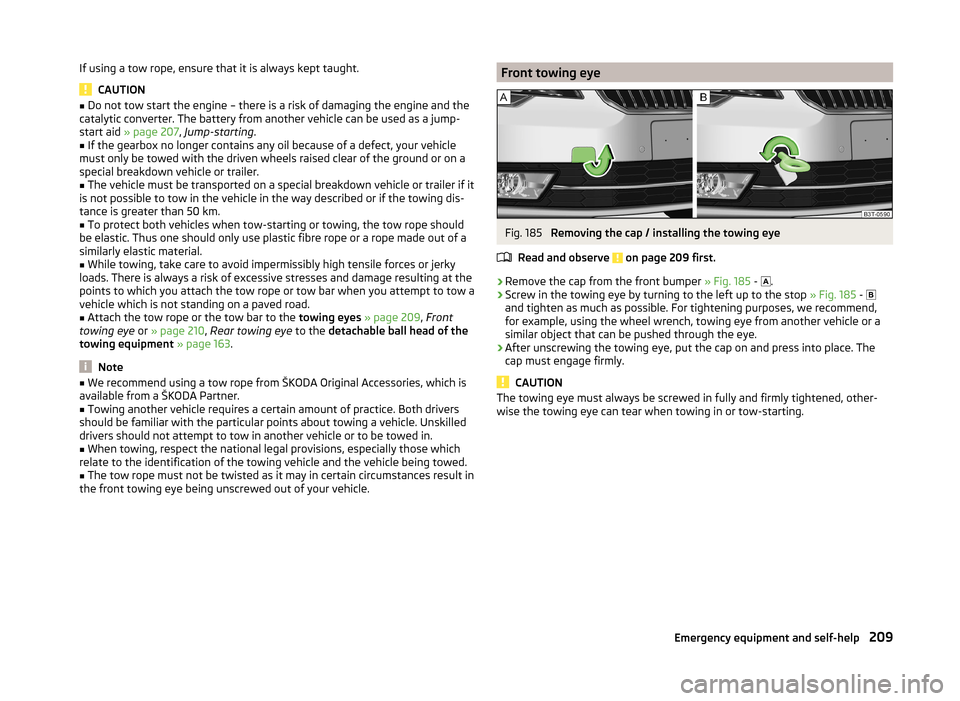
Front towing eyeFig. 185
Removing the cap / installing the towing eye
Read and observe
on page 209 first.
›
Remove the cap from the front bumper » Fig. 185 -
.
›
Screw in the towing eye by turning to the left up to the stop
» Fig. 185 -
and tighten as much as possible. For tightening purposes, we recommend,
for example, using the wheel wrench, towing eye from another vehicle or a
similar object that can be pushed through the eye.
›
After unscrewing the towing eye, put the cap on and press into place. The
cap must engage firmly.
CAUTION
The towing eye must always be screwed in fully and firmly tightened, other-
wise the towing eye can tear when towing in or tow-starting.209Emergency equipment and self-help
Page 236 of 246
Temperature gauge29
Warning light34
CORNER See Fog lights with CORNER function
69
Correct seated position7
Driver7
Front passenger8
Instructions9
Rear seats9
Counter for distance driven30
Cruise control system Activating/deactivating
158
Changing the stored speed159
Storing and maintaining speed159
Switching off temporarily159
Warning light39
Cruise Control System158
Cup holders88
D
DAY LIGHT see Daylight running lights
67
Daylight running lights67
De-icing the windscreen and rear window73
Deactivating an airbag19
Decorative films175
Delayed locking of the boot lid see boot lid
56
Diesel refer to Fuel
181
diesel - particulate filter
37
Diesel fuel Operation in winter
181
Diesel particulate filter warning light
37
Digital Clock Time
30
Dipstick186
Display29
Compass points46
Coolant temperature29
Fuel supply30
Gear changes40
Service intervals46
Display a low temperature40
Display of the second speed31
Distance driven30
Door Child safety lock
53
Closing53
Emergency locking the driver's door212
Opening53
Warning light door open34
Door locking Emergency
212
Door open Warning light
34
Doors Emergency locking
212
Driver Steering Recommendation (DSR)152
Driving Abroad
150
Driving through water on streets149
Emissions225
Fuel consumption225
Driving economically Economical gear changing
146
Driving through water149
DSR152
DVD-preinstallation134
E
Economical and environmentally friendly driv- ing
146
Economical driving Ballast
147
Driving at full throttle147
Idling147
Looking ahead146
Regular maintenance148
Saving energy148
Short distances147
Tyre inflation pressure147
EDL Operation
152
Electrical power windows61
Button in the driver's door59, 60
Button in the rear doors61
Operational faults62
Electric boot lid Force limit
57
Manual operation57
Electric luggage compartment lid Acoustic signals
59
Adjusting the top lid position59
Deleting the top lid position59
Malfunctions59
Operating57
Electric sliding/tilting roof62
Electronic Differential Lock (EDL)152
Electronic immobilizer136
Electronic Stability Control (ESC)151
Emergency Activation of the sliding/tilting roof
214
Changing a wheel201
Door locking212
Hazard warning light system70
jump-starting207
Jump-starting207
Locking the driver's door212
Selector lever-unlocking213
Sliding/tilting roof213
Start engine - KESSY139
Switching off the ignition –KESSY140
Towing the using the tow hitch210
Towing the vehicle208
Tyre repair204
234Index