service reset SKODA SUPERB 2014 2.G / (B6/3T) Owner's Manual
[x] Cancel search | Manufacturer: SKODA, Model Year: 2014, Model line: SUPERB, Model: SKODA SUPERB 2014 2.G / (B6/3T)Pages: 246, PDF Size: 17.16 MB
Page 30 of 246

Instruments and Indicator Lights
Instrument cluster
Introduction
This chapter contains information on the following subjects:
Overview
28
Revolutions counter
29
Speedometer
29
Coolant temperature gauge
29
Display
29
Fuel gauge
30
Counter for distance driven
30
30
Display of the second speed
31
Display in rear centre console
31
Auto Check Control
31
Fault display
If there is a fault in the instrument cluster, the Error message will appear in
the display. Have the fault rectified as soon as possible by a specialist garage.
WARNING■ Concentrate fully at all times on your driving! As the driver you are fully
responsible for road safety.■
Never operate the controls in the instrument cluster while driving - risk of
accident. Operate the controls only when the vehicle is at a standstill.
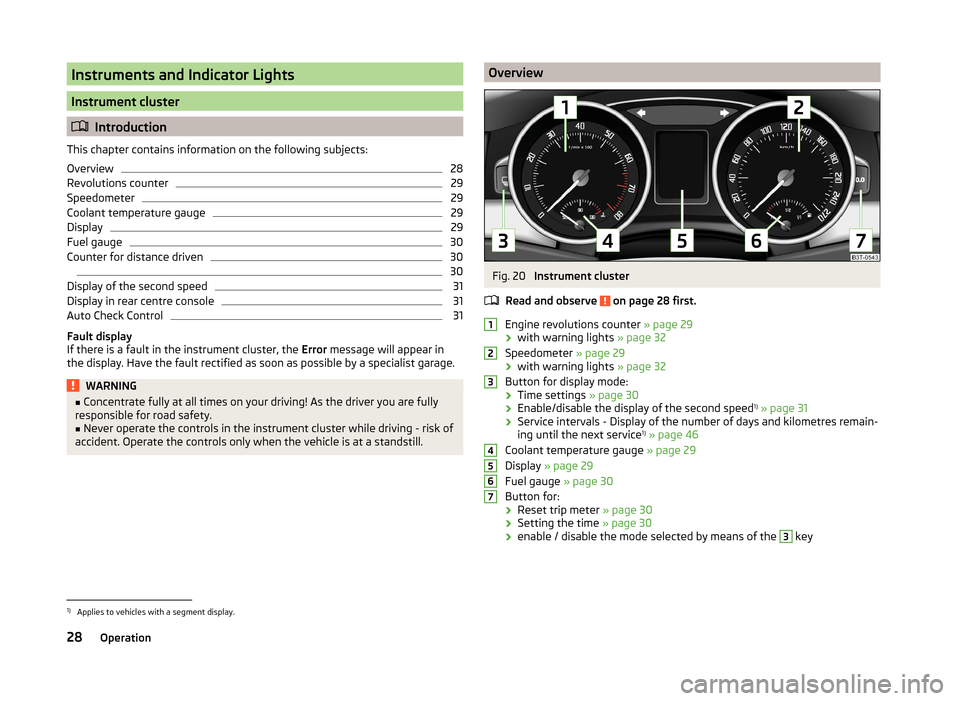
OverviewFig. 20
Instrument cluster
Read and observe
on page 28 first.
Engine revolutions counter » page 29
› with warning lights
» page 32
Speedometer » page 29
› with warning lights
» page 32
Button for display mode:
› Time settings
» page 30
› Enable/disable the display of the second speed 1)
» page 31
› Service intervals - Display of the number of days and kilometres remain-
ing until the next service 1)
» page 46
Coolant temperature gauge » page 29
Display » page 29
Fuel gauge » page 30
Button for: › Reset trip meter
» page 30
› Setting the time
» page 30
› enable / disable the mode selected by means of the
3
key
12345671)
Applies to vehicles with a segment display.
28Operation
Page 48 of 246

As soon as the parking procedure is completed, an audible signal sounds and
the following message appears in the information display.
Winter tyres: maximum ... km/h.
Units of measurement
The units for the temperature, consumption and distance driven can be set
here.
Assistants
The tones of the audible signals for the parking aid can be adjusted here.
Alt. speed dis.
Here, the display of the second speed in mph 1)
can be activated.
Further information » page 31, Display of the second speed .
Service
The days and kilometres remaining until the next service can be displayed
here.
Further information » page 46, Service interval display .
Factory setting
The factory setting of the functions of the MAXI DOT display can be restored
here.
Compass point display
Read and observe
and on page 44 first.
For vehicles with a factory fitted navigation system, an abbreviation for eachpoint of the compass (depending on the current direction of travel) is shown
on the top left-hand corner of the display.
The compass point display only operates when the ignition is switched on.
Service interval display
Introduction
This chapter contains information on the following subjects:
Prompt in the MAXI DOT display
46
Prompt in the segment display
47
Resetting the service interval display
47
The service interval display shows the time and mileage to the next service
event.
The service due date is automatically displayed on the display and this infor-
mation can be displayed manually if necessary.
The kilometre indicator or the days indicator reduces in steps of 100 km or,
where applicable, days until the service due date is reached.
The information regarding the service intervals can be found in the service
schedule.
Note
Information is retained in the Service Interval Display even after the vehicle
battery is disconnected.
Prompt in the MAXI DOT display
Oil change service
If an oil change service is due, the following message appears: Oil change in …
km or … days.
As soon as the service interval date has been reached, the message Oil
change now! appears once the ignition has been switched on!
Inspection
If an inspection is due, the following message appears: Inspection in ... km
or ... days.
As soon as the service interval date has been reached, the message Inspec-
tion now! appears once the ignition has been switched on!
1)
For models with the speedometer in mph, the second speed is displayed in km/h.
46Operation
Page 49 of 246

Displaying the distance and days until the next service interval
You can view the remaining distance and days until the next service appoint- ment at any time when the ignition is switched on by going to the Service
menu item » page 45, Settings or from the Vehicle status in the main menu of
the Maxi DOTdisplay. » page 44, Main menu .
The following message is displayed for 10 seconds. Oil change ... km / ... days
Inspection ... km / ... days
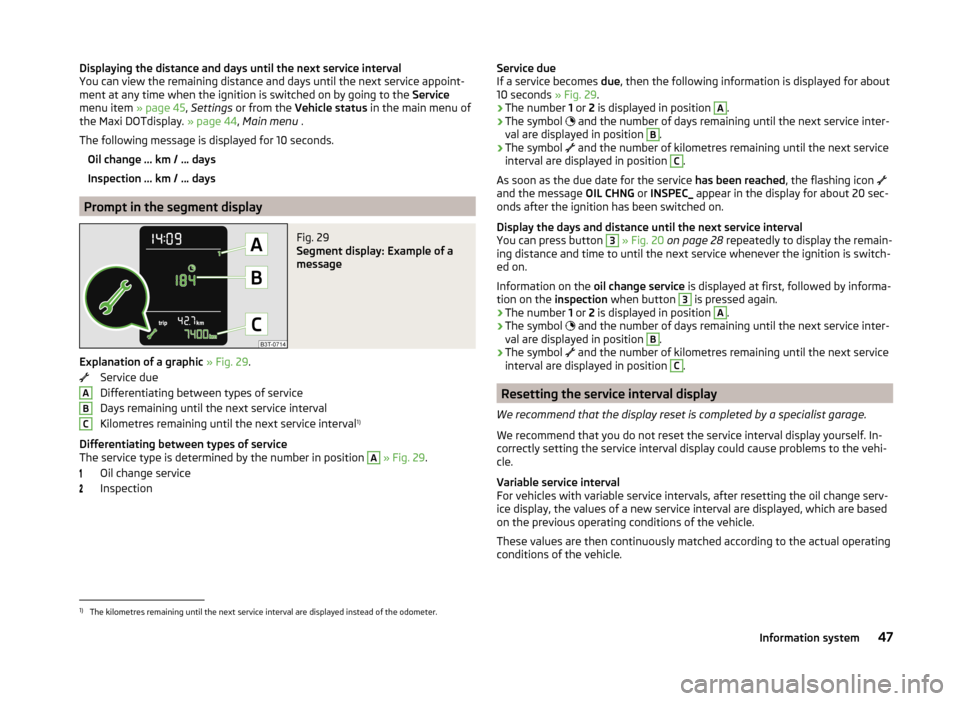
Prompt in the segment display
Fig. 29
Segment display: Example of a
message
Explanation of a graphic » Fig. 29 .
Service due
Differentiating between types of service
Days remaining until the next service interval
Kilometres remaining until the next service interval 1)
Differentiating between types of service
The service type is determined by the number in position
A
» Fig. 29 .
Oil change service
Inspection
ABCService due
If a service becomes due, then the following information is displayed for about
10 seconds » Fig. 29.
› The number
1 or 2 is displayed in position A
.
› The symbol
and the number of days remaining until the next service inter-
val are displayed in position
B
.
› The symbol
and the number of kilometres remaining until the next service
interval are displayed in position
C
.
As soon as the due date for the service has been reached, the flashing icon
and the message OIL CHNG or INSPEC_ appear in the display for about 20 sec-
onds after the ignition has been switched on.
Display the days and distance until the next service interval
You can press button
3
» Fig. 20 on page 28 repeatedly to display the remain-
ing distance and time to until the next service whenever the ignition is switch-
ed on.
Information on the oil change service is displayed at first, followed by informa-
tion on the inspection when button
3
is pressed again.
› The number
1 or 2 is displayed in position
A
.
› The symbol
and the number of days remaining until the next service inter-
val are displayed in position
B
.
› The symbol
and the number of kilometres remaining until the next service
interval are displayed in position
C
.
Resetting the service interval display
We recommend that the display reset is completed by a specialist garage.
We recommend that you do not reset the service interval display yourself. In-
correctly setting the service interval display could cause problems to the vehi-
cle.
Variable service interval
For vehicles with variable service intervals, after resetting the oil change serv-
ice display, the values of a new service interval are displayed, which are based
on the previous operating conditions of the vehicle.
These values are then continuously matched according to the actual operating
conditions of the vehicle.
1)
The kilometres remaining until the next service interval are displayed instead of the odometer.
47Information system
Page 195 of 246

OperationOperating measureSetting the clock» page 30Data in the multifunction display are de-
leted.» page 41
Note
We recommend having the vehicle checked by a specialist garage in order to
ensure full functionality of all electrical systems.
Automatic load deactivation
Read and observe
and on page 190 first.
The vehicle voltage control unit automatically prevents the battery from dis-
charging when the battery is put under high levels of strain. This manifests it-
self by the following.
› The idling speed is raised to allow the generator to deliver more electricity to
the electrical system.
› Where necessary, large convenience consumers such as seat heaters and
rear window heaters have their power limited or are shut off completely in
the event of an emergency.
CAUTION
■ Despite such intervention by the vehicle electric system management, the
vehicle battery may be drained. For example, when the ignition is switched on
a long time with the engine turned off or the side or parking lights are turned
on during longer parking.■
Consumers that are supplied via a 12-V power socket can cause the vehicle
battery to discharge when the ignition is switched off.
Note
Driving comfort is not impaired by consumers being deactivated. The driver is
often not aware of it having taken place.Wheels
Tyres and wheel rims
Introduction
This chapter contains information on the following subjects:
Service life of tyres
194
New tyres
195
Unidirectional tyres
196
Tyre pressure monitor
196
Spare and temporary spare wheel
197
Full wheel trim
198
Wheel bolts
198
Wheel bolts
198WARNINGThe national legal regulations must be observed for the use of tyres.WARNINGInstructions for the use of tyres■For the first 500 km, new tyres do not yet provide optimum grip, and ap-
propriate care should therefore be taken when driving – risk of accident!■
Only use radial tyres of the same type, size (rolling circumference) and
tread pattern on all four wheels.
■
For reasons of driving safety, do not replace tyres individually.
■
Never exceed the maximum permissible load bearing capacity for fitted
tyres – risk of accident!
■
Never exceed the maximum permissible speed for fitted tyres – risk of ac-
cident!
■
Incorrect wheel alignment at the front or rear impairs handling – risk of
accident!
■
Unusual vibrations or pulling of the vehicle to one side could be a sign of
tyre damage. If there is any doubt that a wheel is damaged, immediately re-
duce your speed and stop! If no external damage is evident, drive slowly
and carefully to the nearest specialist garage to have the vehicle checked.
■
Only use tyres or wheel rims that have been approved by ŠKODA for your
model of vehicle. Failure to observe this instruction may impair the road
safety of your vehicle – risk of accident!
193Wheels