service SKODA SUPERB 2015 3.G / (B8/3V) Columbus Infotainment System Manual
[x] Cancel search | Manufacturer: SKODA, Model Year: 2015, Model line: SUPERB, Model: SKODA SUPERB 2015 3.G / (B8/3V)Pages: 100, PDF Size: 11.13 MB
Page 8 of 100
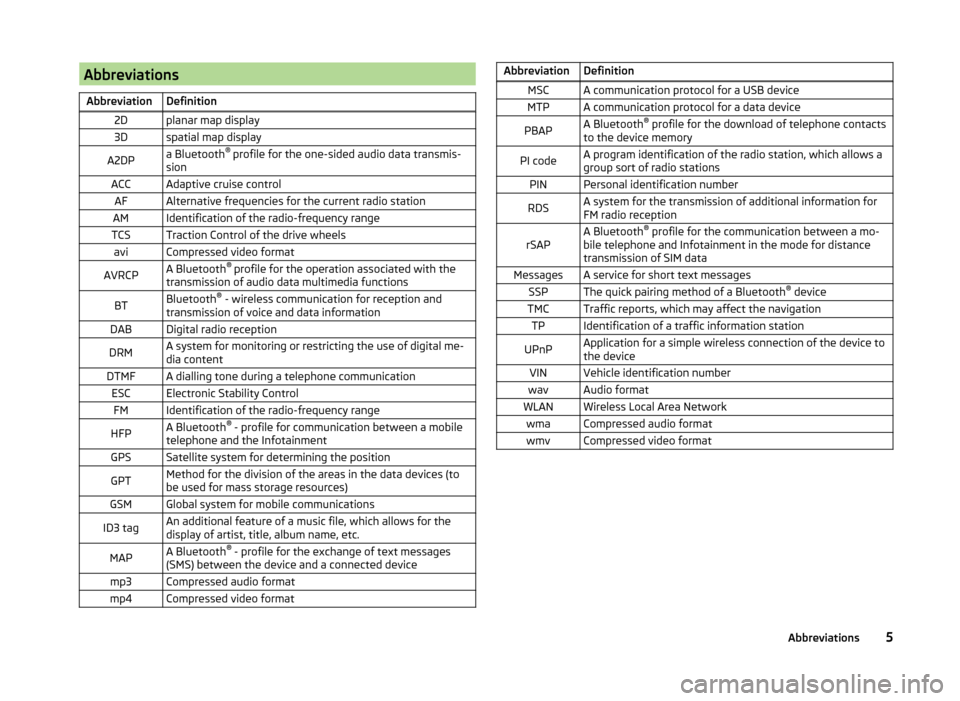
AbbreviationsAbbreviationDefinition2Dplanar map display3Dspatial map displayA2DPa Bluetooth®
profile for the one-sided audio data transmis-
sionACCAdaptive cruise controlAFAlternative frequencies for the current radio stationAMIdentification of the radio-frequency rangeTCSTraction Control of the drive wheelsaviCompressed video formatAVRCPA Bluetooth ®
profile for the operation associated with the
transmission of audio data multimedia functionsBTBluetooth ®
- wireless communication for reception and
transmission of voice and data informationDABDigital radio receptionDRMA system for monitoring or restricting the use of digital me-
dia contentDTMFA dialling tone during a telephone communicationESCElectronic Stability ControlFMIdentification of the radio-frequency rangeHFPA Bluetooth ®
- profile for communication between a mobile
telephone and the InfotainmentGPSSatellite system for determining the positionGPTMethod for the division of the areas in the data devices (to
be used for mass storage resources)GSMGlobal system for mobile communicationsID3 tagAn additional feature of a music file, which allows for the
display of artist, title, album name, etc.MAPA Bluetooth ®
- profile for the exchange of text messages
(SMS) between the device and a connected devicemp3Compressed audio formatmp4Compressed video formatAbbreviationDefinitionMSCA communication protocol for a USB deviceMTPA communication protocol for a data devicePBAPA Bluetooth ®
profile for the download of telephone contacts
to the device memoryPI codeA program identification of the radio station, which allows a
group sort of radio stationsPINPersonal identification numberRDSA system for the transmission of additional information for
FM radio receptionrSAPA Bluetooth ®
profile for the communication between a mo-
bile telephone and Infotainment in the mode for distance
transmission of SIM dataMessagesA service for short text messagesSSPThe quick pairing method of a Bluetooth ®
deviceTMCTraffic reports, which may affect the navigationTPIdentification of a traffic information stationUPnPApplication for a simple wireless connection of the device to
the deviceVINVehicle identification numberwavAudio formatWLANWireless Local Area NetworkwmaCompressed audio formatwmvCompressed video format5Abbreviations
Page 10 of 100
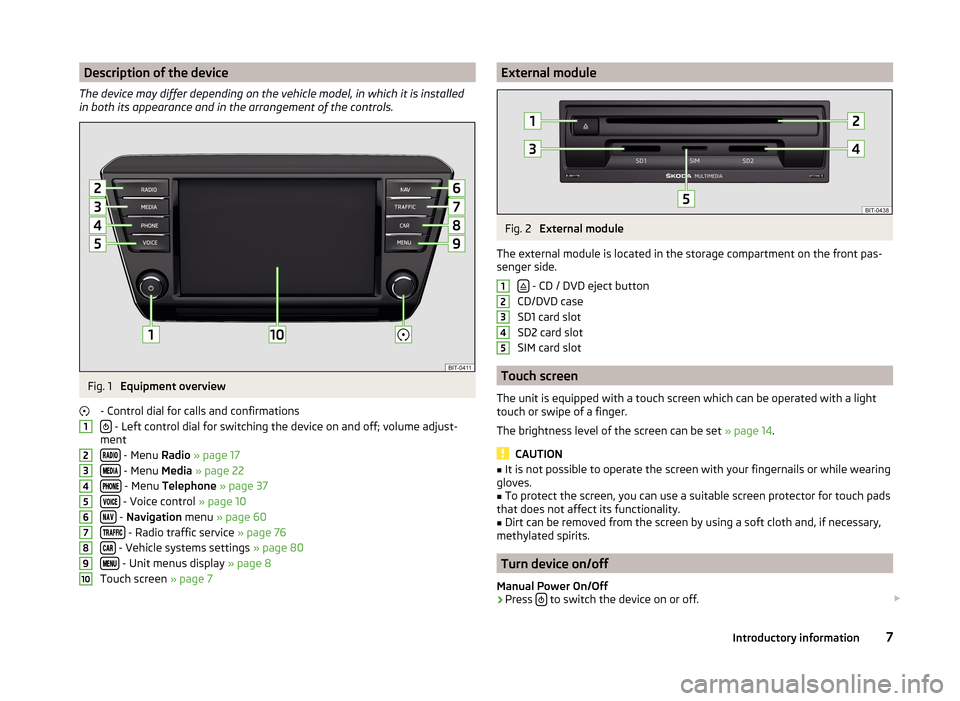
Description of the device
The device may differ depending on the vehicle model, in which it is installed
in both its appearance and in the arrangement of the controls.Fig. 1
Equipment overview
- Control dial for calls and confirmations
- Left control dial for switching the device on and off; volume adjust-
ment
- Menu Radio » page 17
- Menu Media » page 22
- Menu Telephone » page 37
- Voice control » page 10
- Navigation menu » page 60
- Radio traffic service » page 76
- Vehicle systems settings » page 80
- Unit menus display » page 8
Touch screen » page 7
12345678910External moduleFig. 2
External module
The external module is located in the storage compartment on the front pas-
senger side.
- CD / DVD eject button
CD/DVD case
SD1 card slot
SD2 card slot
SIM card slot
Touch screen
The unit is equipped with a touch screen which can be operated with a light
touch or swipe of a finger.
The brightness level of the screen can be set » page 14.
CAUTION
■
It is not possible to operate the screen with your fingernails or while wearing
gloves.■
To protect the screen, you can use a suitable screen protector for touch pads
that does not affect its functionality.
■
Dirt can be removed from the screen by using a soft cloth and, if necessary,
methylated spirits.
Turn device on/off
Manual Power On/Off
›
Press to switch the device on or off.
123457Introductory information
Page 35 of 100
DVD video
Video player
Introduction
This chapter contains information on the following subjects:
Main menu
32
Select a video source
32
Video playback
32
DVD menu
33
Supported video sources and file formats
33
Settings
33
First and foremost, pay attention to the safety instructions » page 6 , Impor-
tant notes .
Main menu
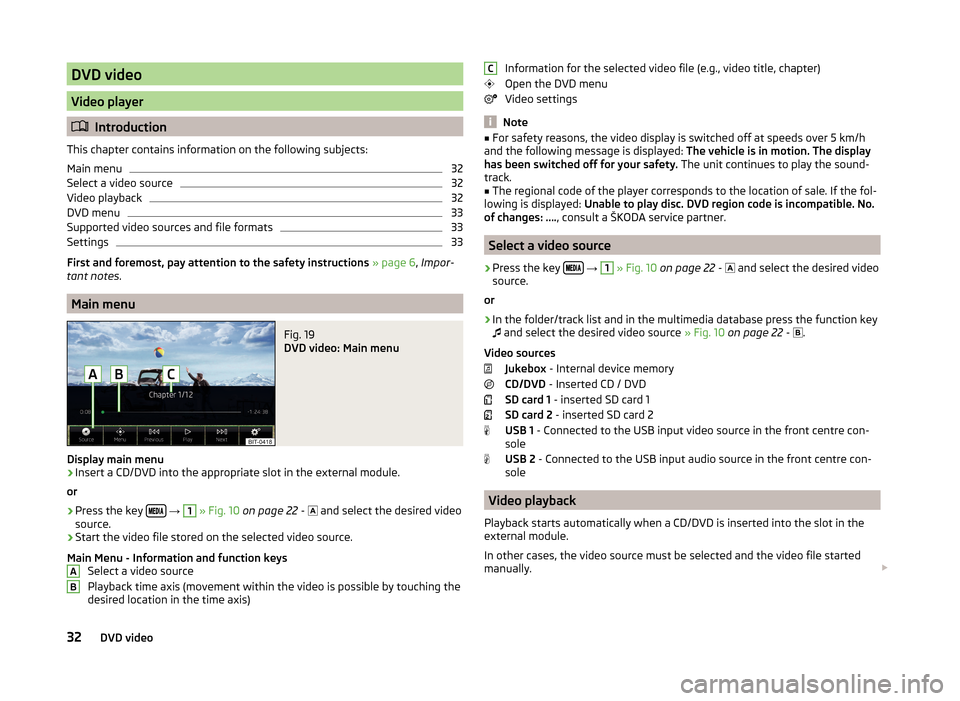
Fig. 19
DVD video: Main menu
Display main menu
›
Insert a CD/DVD into the appropriate slot in the external module.
or
›
Press the key
→
1
» Fig. 10 on page 22 -
and select the desired video
source.
›
Start the video file stored on the selected video source.
Main Menu - Information and function keys Select a video source
Playback time axis (movement within the video is possible by touching the
desired location in the time axis)
ABInformation for the selected video file (e.g., video title, chapter)
Open the DVD menu
Video settings
Note
■ For safety reasons, the video display is switched off at speeds over 5 km/h
and the following message is displayed: The vehicle is in motion. The display
has been switched off for your safety. The unit continues to play the sound-
track.■
The regional code of the player corresponds to the location of sale. If the fol-
lowing is displayed: Unable to play disc. DVD region code is incompatible. No.
of changes: …. , consult a ŠKODA service partner.
Select a video source
›
Press the key
→
1
» Fig. 10 on page 22 -
and select the desired video
source.
or
›
In the folder/track list and in the multimedia database press the function key
and select the desired video source
» Fig. 10 on page 22 -
.
Video sources Jukebox - Internal device memory
CD/DVD - Inserted CD / DVD
SD card 1 - inserted SD card 1
SD card 2 - inserted SD card 2
USB 1 - Connected to the USB input video source in the front centre con-
sole
USB 2 - Connected to the USB input audio source in the front centre con-
sole
Video playback
Playback starts automatically when a CD/DVD is inserted into the slot in the
external module.
In other cases, the video source must be selected and the video file started
manually.
C32DVD video
Page 40 of 100
Telephone
Introductory information
Introduction
This chapter contains information on the following subjects:
Possible connection types
37
Telephone
37
Settings
38
Function problems
39
This chapter deals with the operation of a device with the telephone connec-
ted via Bluetooth ®
as well as the use of the SIM-card in the external module.
Depending on the Bluetooth ®
profile used, there is a possibility to connect one
telephone or two telephones at the same time with the device.
The SIM card in the external module can be used for data and telephone serv-
ices.
If telephones are connected to the device with multiple SIM cards, calls can be
accepted by all SIM cards from the connected telephones.
For outgoing calls, it depends on the type of connected telephone, either only
the primary SIM card or one of the other SIM cards can be selected.
The device allows you to work with text messages of the main telephone, if
supported by the telephone, or text messages on the SIM card in the external
module with activated telephone services.
WARNINGThe national regulations for using a mobile telephone in a vehicle must be
observed.
Possible connection types
Read and observe
on page 37 first.
Depending on the number of connected telephones, as well as the use of the
SIM-card in the external module, the following functions are available.
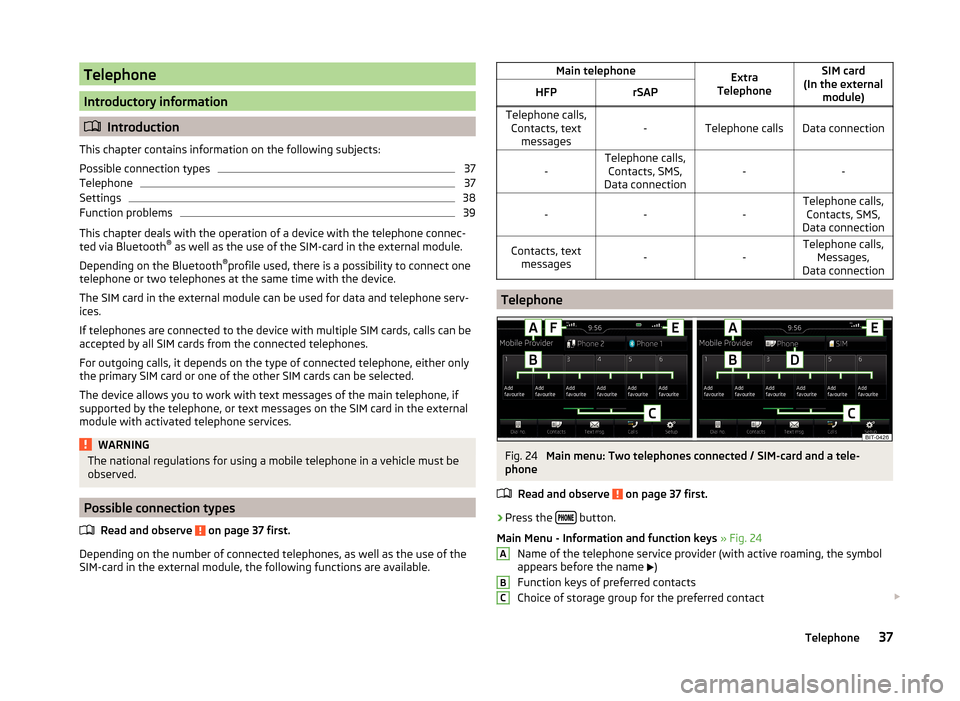
Main telephoneExtra
TelephoneSIM card
(In the external module)HFPrSAPTelephone calls,Contacts, text messages-Telephone callsData connection-Telephone calls,Contacts, SMS,
Data connection-----Telephone calls, Contacts, SMS,
Data connectionContacts, text messages--Telephone calls, Messages,
Data connection
Telephone
Fig. 24
Main menu: Two telephones connected / SIM-card and a tele-
phone
Read and observe
on page 37 first.
›
Press the button.
Main Menu - Information and function keys » Fig. 24
Name of the telephone service provider (with active roaming, the symbol
appears before the name )
Function keys of preferred contacts
Choice of storage group for the preferred contact
ABC37Telephone
Page 41 of 100
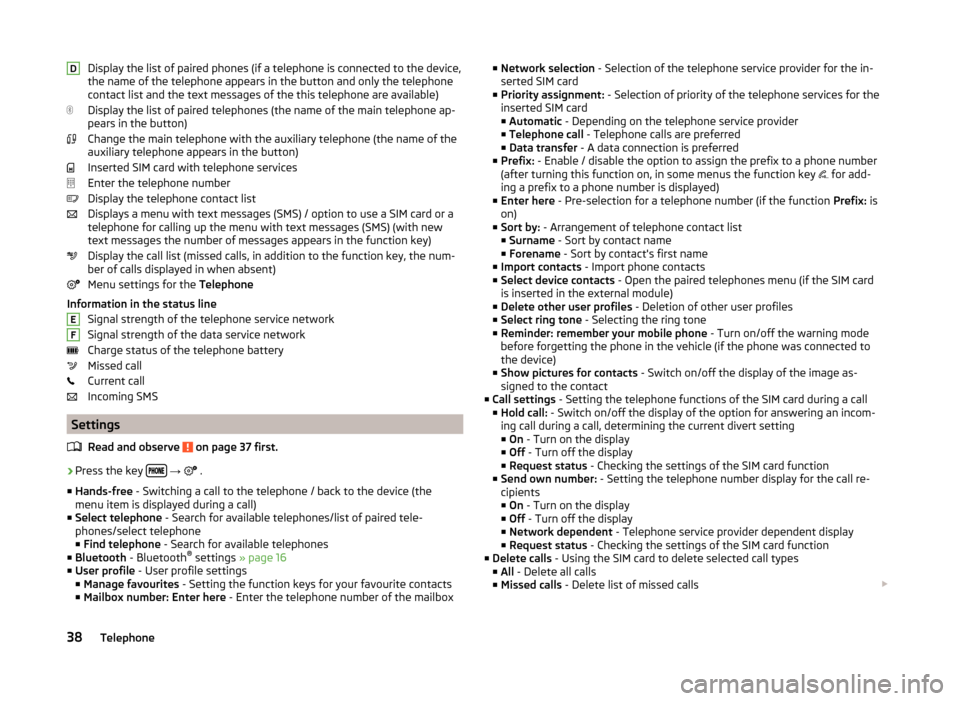
Display the list of paired phones (if a telephone is connected to the device,
the name of the telephone appears in the button and only the telephone
contact list and the text messages of the this telephone are available)
Display the list of paired telephones (the name of the main telephone ap-
pears in the button)
Change the main telephone with the auxiliary telephone (the name of the
auxiliary telephone appears in the button)
Inserted SIM card with telephone services
Enter the telephone number
Display the telephone contact list
Displays a menu with text messages (SMS) / option to use a SIM card or a telephone for calling up the menu with text messages (SMS) (with new
text messages the number of messages appears in the function key)
Display the call list (missed calls, in addition to the function key, the num-
ber of calls displayed in when absent)
Menu settings for the Telephone
Information in the status line Signal strength of the telephone service network
Signal strength of the data service network Charge status of the telephone battery
Missed call
Current call
Incoming SMS
Settings
Read and observe
on page 37 first.
›
Press the key
→
.
■ Hands-free - Switching a call to the telephone / back to the device (the
menu item is displayed during a call)
■ Select telephone - Search for available telephones/list of paired tele-
phones/select telephone ■ Find telephone - Search for available telephones
■ Bluetooth - Bluetooth ®
settings » page 16
■ User profile - User profile settings
■ Manage favourites - Setting the function keys for your favourite contacts
■ Mailbox number: Enter here - Enter the telephone number of the mailbox
DEF■
Network selection - Selection of the telephone service provider for the in-
serted SIM card
■ Priority assignment: - Selection of priority of the telephone services for the
inserted SIM card ■ Automatic - Depending on the telephone service provider
■ Telephone call - Telephone calls are preferred
■ Data transfer - A data connection is preferred
■ Prefix: - Enable / disable the option to assign the prefix to a phone number
(after turning this function on, in some menus the function key
for add-
ing a prefix to a phone number is displayed)
■ Enter here - Pre-selection for a telephone number (if the function Prefix: is
on)
■ Sort by: - Arrangement of telephone contact list
■ Surname - Sort by contact name
■ Forename - Sort by contact's first name
■ Import contacts - Import phone contacts
■ Select device contacts - Open the paired telephones menu (if the SIM card
is inserted in the external module)
■ Delete other user profiles - Deletion of other user profiles
■ Select ring tone - Selecting the ring tone
■ Reminder: remember your mobile phone - Turn on/off the warning mode
before forgetting the phone in the vehicle (if the phone was connected to
the device)
■ Show pictures for contacts - Switch on/off the display of the image as-
signed to the contact
■ Call settings - Setting the telephone functions of the SIM card during a call
■ Hold call: - Switch on/off the display of the option for answering an incom-
ing call during a call, determining the current divert setting ■ On - Turn on the display
■ Off - Turn off the display
■ Request status - Checking the settings of the SIM card function
■ Send own number: - Setting the telephone number display for the call re-
cipients
■ On - Turn on the display
■ Off - Turn off the display
■ Network dependent - Telephone service provider dependent display
■ Request status - Checking the settings of the SIM card function
■ Delete calls - Using the SIM card to delete selected call types
■ All - Delete all calls
■ Missed calls - Delete list of missed calls 38Telephone
Page 42 of 100
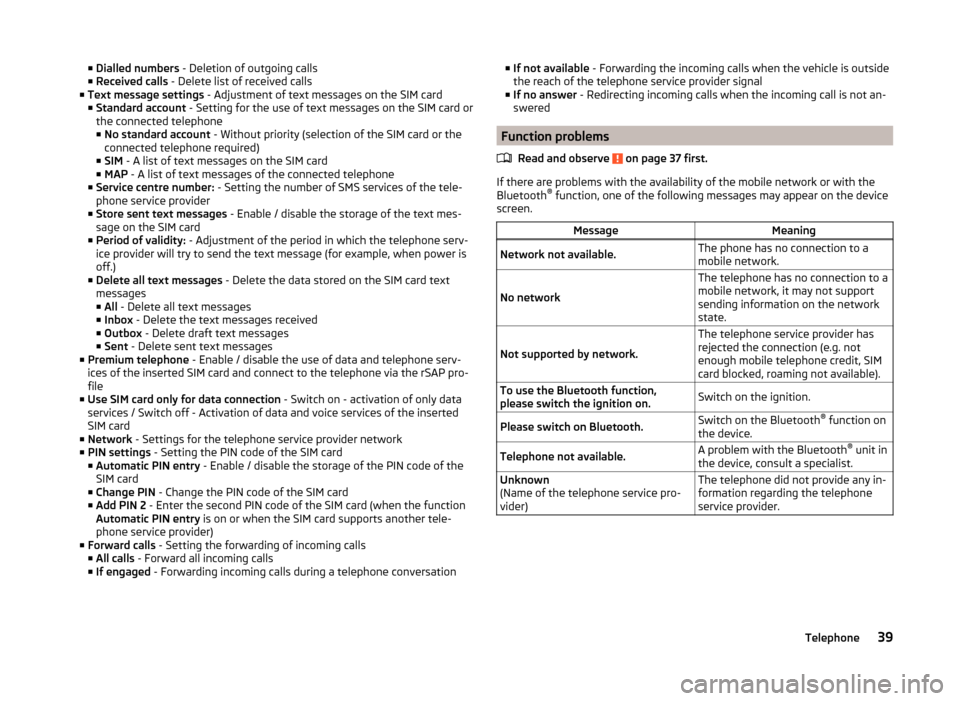
■Dialled numbers - Deletion of outgoing calls
■ Received calls - Delete list of received calls
■ Text message settings - Adjustment of text messages on the SIM card
■ Standard account - Setting for the use of text messages on the SIM card or
the connected telephone
■ No standard account - Without priority (selection of the SIM card or the
connected telephone required)
■ SIM - A list of text messages on the SIM card
■ MAP - A list of text messages of the connected telephone
■ Service centre number: - Setting the number of SMS services of the tele-
phone service provider
■ Store sent text messages - Enable / disable the storage of the text mes-
sage on the SIM card
■ Period of validity: - Adjustment of the period in which the telephone serv-
ice provider will try to send the text message (for example, when power is
off.)
■ Delete all text messages - Delete the data stored on the SIM card text
messages
■ All - Delete all text messages
■ Inbox - Delete the text messages received
■ Outbox - Delete draft text messages
■ Sent - Delete sent text messages
■ Premium telephone - Enable / disable the use of data and telephone serv-
ices of the inserted SIM card and connect to the telephone via the rSAP pro-
file
■ Use SIM card only for data connection - Switch on - activation of only data
services / Switch off - Activation of data and voice services of the inserted
SIM card
■ Network - Settings for the telephone service provider network
■ PIN settings - Setting the PIN code of the SIM card
■ Automatic PIN entry - Enable / disable the storage of the PIN code of the
SIM card
■ Change PIN - Change the PIN code of the SIM card
■ Add PIN 2 - Enter the second PIN code of the SIM card (when the function
Automatic PIN entry is on or when the SIM card supports another tele-
phone service provider)
■ Forward calls - Setting the forwarding of incoming calls
■ All calls - Forward all incoming calls
■ If engaged - Forwarding incoming calls during a telephone conversation■
If not available - Forwarding the incoming calls when the vehicle is outside
the reach of the telephone service provider signal
■ If no answer - Redirecting incoming calls when the incoming call is not an-
swered
Function problems
Read and observe
on page 37 first.
If there are problems with the availability of the mobile network or with the
Bluetooth ®
function, one of the following messages may appear on the device
screen.
MessageMeaningNetwork not available.The phone has no connection to a
mobile network.
No network
The telephone has no connection to a
mobile network, it may not support
sending information on the network
state.
Not supported by network.
The telephone service provider has
rejected the connection (e.g. not
enough mobile telephone credit, SIM
card blocked, roaming not available).To use the Bluetooth function,
please switch the ignition on.Switch on the ignition.Please switch on Bluetooth.Switch on the Bluetooth ®
function on
the device.Telephone not available.A problem with the Bluetooth ®
unit in
the device, consult a specialist.Unknown
(Name of the telephone service pro-
vider)The telephone did not provide any in-
formation regarding the telephone
service provider.39Telephone
Page 47 of 100
- Delete all device
- Delete the desired device
› Confirm the deletion by pressing the function key
Delete.
Note
The Bluetooth ®
audio profile can be turned off/on by pressing the button →
→ Bluetooth → Bluetooth audio (A2DP/AVRCP) .
Connection using the SIM card in the external module
Introduction
This chapter contains information on the following subjects:
Slot in SIM card and establish connection
44
Remove SIM card
45
The device allows the use of a connection in the external module of the device
by means of the inserted SIM card.
The SIM card can be used for data and telephone services.
The services are available (with the ignition on when the ignition is switched off or if a telephone call is made).
The SIM card slot is located in an external module in the glove box on the front
passenger side.
A SIM card size mini (standard size 25x15 mm) is to be used.
CAUTION
■
When inserting an improperly sized SIM card, there is a risk of damaging the
device.■
Avoid using a an adapter for the SIM card as the SIM card may fall out while
driving due to vehicle vibrations. There is a risk of damage to the external
module.
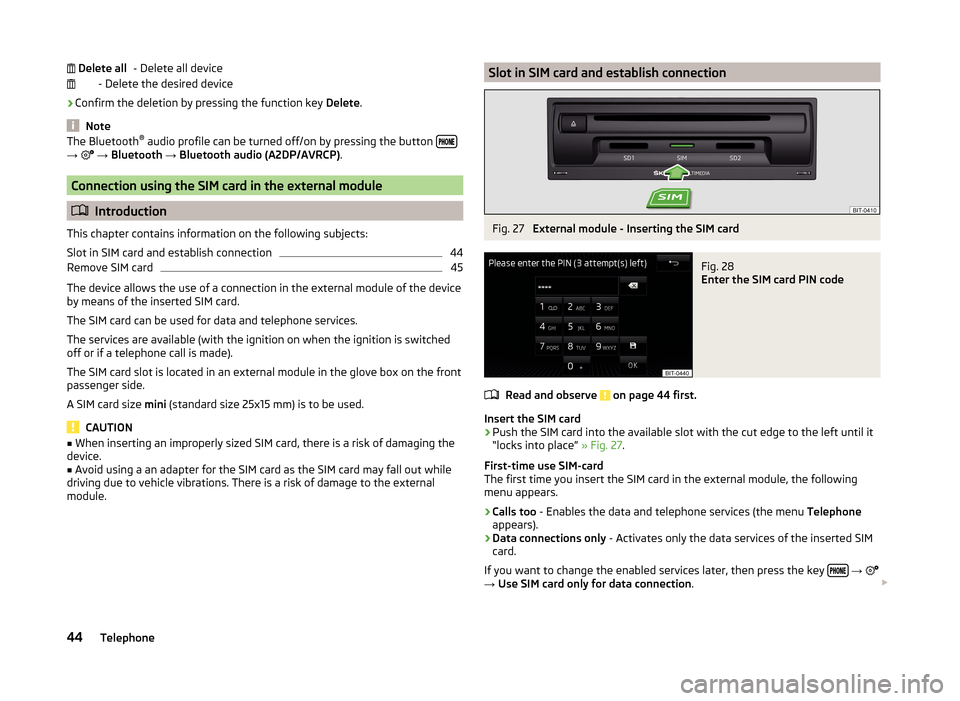
Delete allSlot in SIM card and establish connectionFig. 27
External module - Inserting the SIM card
Fig. 28
Enter the SIM card PIN code
Read and observe on page 44 first.
Insert the SIM card
›
Push the SIM card into the available slot with the cut edge to the left until it
“locks into place” » Fig. 27.
First-time use SIM-card
The first time you insert the SIM card in the external module, the following
menu appears.
›
Calls too - Enables the data and telephone services (the menu Telephone
appears).
›
Data connections only - Activates only the data services of the inserted SIM
card.
If you want to change the enabled services later, then press the key
→
→ Use SIM card only for data connection .
44Telephone
Page 49 of 100
Dial the mailbox number
Entering a number using the voice control
Edit the entered telephone number
The telephone number you entered can be edited even before dialling, by
pressing one of the function keys.
›
- To delete the last number entered.
›
- Display of the function keys
/
for the movement of the cursor in the
input line » Fig. 29 -
.
Prefix code
If the telephone number entered has no prefix code, then the prefix number
can be added before the number by using the function key.
Press the function key is displayed only when the prefix function
» page 38,
Settings is shown.
The prefix can, for example, be used for international calls.
Breakdown and info numbers
The breakdown and info numbers are free of charge. Charges are only made
for a telephone call in accordance with the fare conditions of your telephone
service provider.
The telephone numbers are already set at the factory. If you want to change
the numbers, then consult a ŠKODA service partner.
If no breakdown or Info calls can be made then a ŠKODA service partner should
be consulted.
Search for a contact using the numeric keypad
The numeric keypad can also be used for a contact search.
For example, if you enter 32, the unit will display contacts with the letter se-
quence DA, FA, EB, etc. next to the numerical keypad in areas 1
» Fig. 29 .
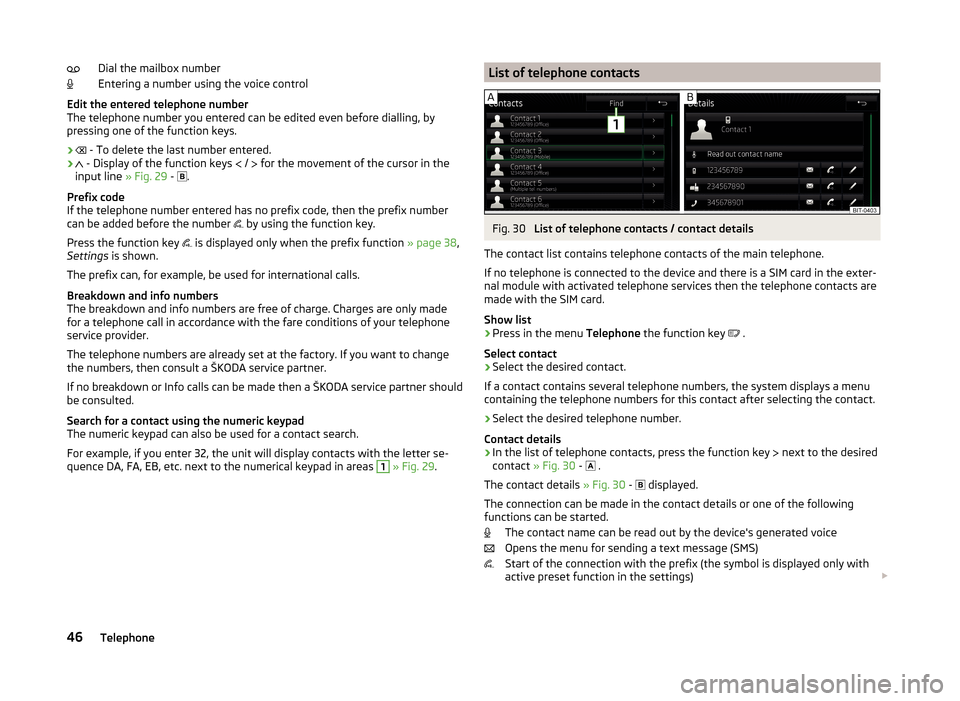
List of telephone contactsFig. 30
List of telephone contacts / contact details
The contact list contains telephone contacts of the main telephone.
If no telephone is connected to the device and there is a SIM card in the exter-
nal module with activated telephone services then the telephone contacts are
made with the SIM card.
Show list
›
Press in the menu Telephone the function key
.
Select contact
›
Select the desired contact.
If a contact contains several telephone numbers, the system displays a menu
containing the telephone numbers for this contact after selecting the contact.
›
Select the desired telephone number.
Contact details
› In the list of telephone contacts, press the function key
next to the desired
contact » Fig. 30 -
.
The contact details » Fig. 30 -
displayed.
The connection can be made in the contact details or one of the following
functions can be started.
The contact name can be read out by the device's generated voice
Opens the menu for sending a text message (SMS)
Start of the connection with the prefix (the symbol is displayed only with
active preset function in the settings)
46Telephone
Page 52 of 100
View details of participant
Talk to a participant separately from the conference
End the call to a conference participant
Text messages (SMS)
Introduction
This chapter contains information on the following subjects:
Main menu
49
New text message
49
Received text message
50
Main menu
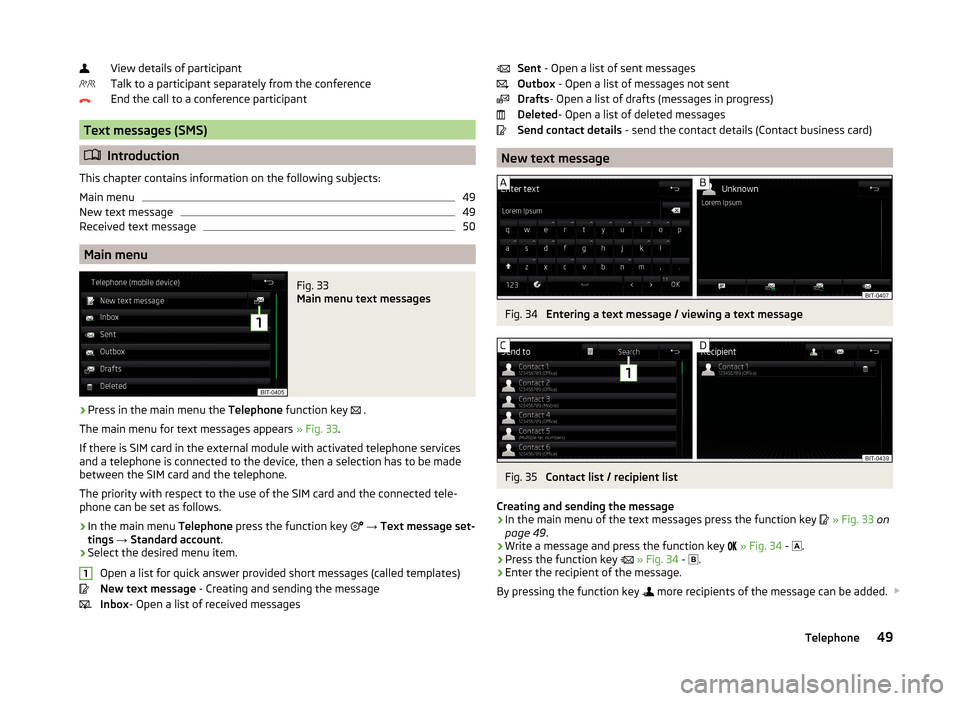
Fig. 33
Main menu text messages
›
Press in the main menu the Telephone function key
.
The main menu for text messages appears » Fig. 33.
If there is SIM card in the external module with activated telephone services
and a telephone is connected to the device, then a selection has to be made
between the SIM card and the telephone.
The priority with respect to the use of the SIM card and the connected tele-
phone can be set as follows.
›
In the main menu Telephone press the function key
→ Text message set-
tings → Standard account .
›
Select the desired menu item.
Open a list for quick answer provided short messages (called templates)
New text message - Creating and sending the message
Inbox - Open a list of received messages
1Sent
- Open a list of sent messages
Outbox - Open a list of messages not sent
Drafts - Open a list of drafts (messages in progress)
Deleted - Open a list of deleted messages
Send contact details - send the contact details (Contact business card)
New text message
Fig. 34
Entering a text message / viewing a text message
Fig. 35
Contact list / recipient list
Creating and sending the message
›
In the main menu of the text messages press the function key
» Fig. 33 on
page 49 .
›
Write a message and press the function key
» Fig. 34 -
.
›
Press the function key
» Fig. 34 -
.
›
Enter the recipient of the message.
By pressing the function key
more recipients of the message can be added.
49Telephone
Page 54 of 100
WLAN connectivity and data connection
WLAN
Introduction
This chapter contains information on the following subjects:
WLAN Hotspot - Connection to the external device with the device WLAN
51
WLAN Client - Connect the device to an external device with WLAN
51
WLAN client - manual settings
52
The requirement for the WLAN function is the ignition is switched on.
After switching on the ignition, the last-used WLAN connection appears.
WLAN can be used to connect to the Internet or as a source for playing audio
files in the menu Media.
The device allows you to set up the WLAN hotspot on which up to 8 external
devices can be connected, or to connect to an external device via WLAN client.
WLAN hotspot and WLAN client are two independent connections, these can
be turned on simultaneously.
If the external module has a SIM card with activated data services or if there is
a connection with the telephone via the rSAP profile then it is not possible to
connect the device to the external device using WLAN.
WLAN Hotspot - Connection to the external device with the device
WLAN
WLAN hotspot switch on/off
›
Press the key
→
→ WLAN → Mobile hotspot → Mobile hotspot .
Connection set-up
›
Set WLAN hotspot in the device » page 16, WLAN Settings .
›
Enable the WLAN in the external device and search for any available WLAN.
›
Select the WLAN hotspot of the device (WLAN name of the device - SSID
» page 16 , WLAN Settings ).
›
Enter the type of security and the access password (if required).
WLAN Client - Connect the device to an external device with
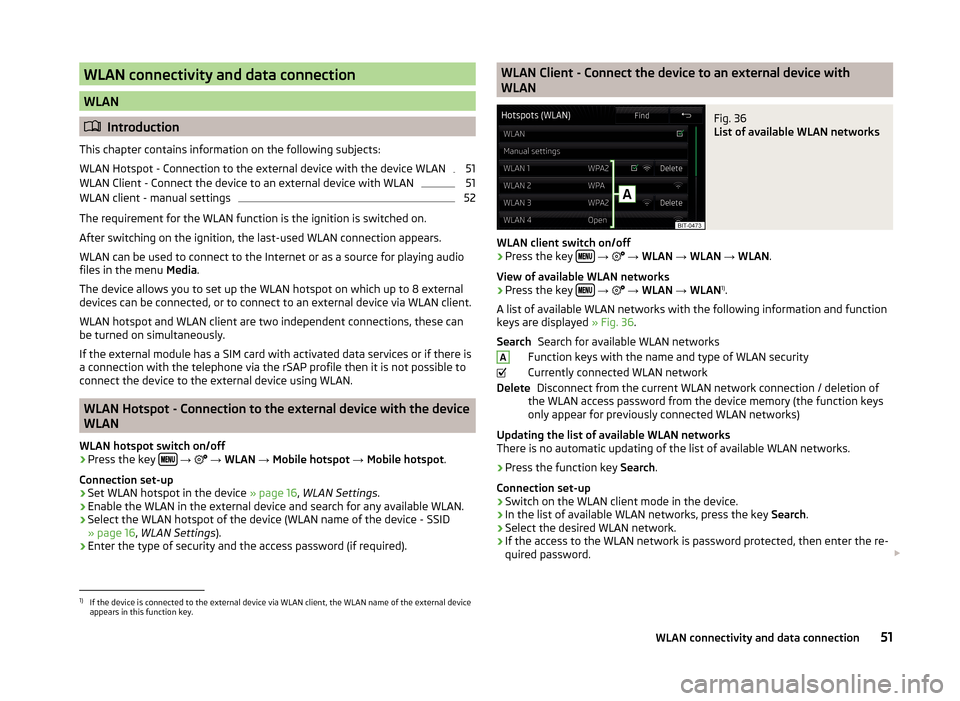
WLANFig. 36
List of available WLAN networks
WLAN client switch on/off
›
Press the key
→
→ WLAN → WLAN → WLAN .
View of available WLAN networks
› Press the key
→
→ WLAN → WLAN 1)
.
A list of available WLAN networks with the following information and function
keys are displayed » Fig. 36.
Search for available WLAN networks
Function keys with the name and type of WLAN security
Currently connected WLAN network Disconnect from the current WLAN network connection / deletion of
the WLAN access password from the device memory (the function keys
only appear for previously connected WLAN networks)
Updating the list of available WLAN networks
There is no automatic updating of the list of available WLAN networks.
› Press the function key
Search.
Connection set-up › Switch on the WLAN client mode in the device.
› In the list of available WLAN networks, press the key
Search.
› Select the desired WLAN network.
› If the access to the WLAN network is password protected, then enter the re-
quired password.
SearchADelete1)
If the device is connected to the external device via WLAN client, the WLAN name of the external device
appears in this function key.
51WLAN connectivity and data connection