key SKODA SUPERB 2015 3.G / (B8/3V) Service Manual
[x] Cancel search | Manufacturer: SKODA, Model Year: 2015, Model line: SUPERB, Model: SKODA SUPERB 2015 3.G / (B8/3V)Pages: 276, PDF Size: 42.14 MB
Page 135 of 276
Wet roads or road salt
The performance of the brakes can be delayed as the brake discs and brake
pads may be moist or have a coating of ice or layer of salt on them in winter.
The brakes are cleaned and dried by applying the brakes several times »
.
Corrosion
Corrosion on the brake discs and dirt on the bake pads occur if the vehicle has
been parked for a long period and if you do not make much use of the braking
system. The brakes are to be cleaned by applying the brakes several times
»
.
Long or steep slopes
Before travelling a long distance with a steep gradient, reduce speed and shift
into the next lowest gear. As a result, the braking effect of the engine will be
used, reducing the load on the brakes. Any additional braking should be com-
pleted intermittently, not continuously.
Emergency brake display
If the brakes are applied in full and the vehicle systems evaluate the situation
as dangerous for the traffic following behind, the brake light flashes automati-
cally.
After the speed was reduced below around 10 km/h or the vehicle was stop-
ped, the brake light stops flashing and the hazard warning light system
switches on. The hazard warning light system is switched off automatically af-
ter accelerating or driving off again.
Faults in the brake surface
If it is found that the braking distance has suddenly become longer and that
the brake pedal can be depressed further, the brake system may be faulty.
Visit a specialist garage immediately and adjust your style of driving appropri-
ately, as you will not know the exact extent of the damage.
Low brake fluid level
An insufficient level of brake fluid may result in problems in the brake system.
The level of the brake fluid is monitored electronically » page 33,
Brake sys-
tem .
Brake booster
The brake booster increases the pressure generated with the brake pedal. The
brake booster only operates when the engine is running.
WARNINGOnly apply the brakes for the purpose of drying and cleaning the brake
discs if the traffic conditions permit this. Do not place any other road users
in jeopardy.
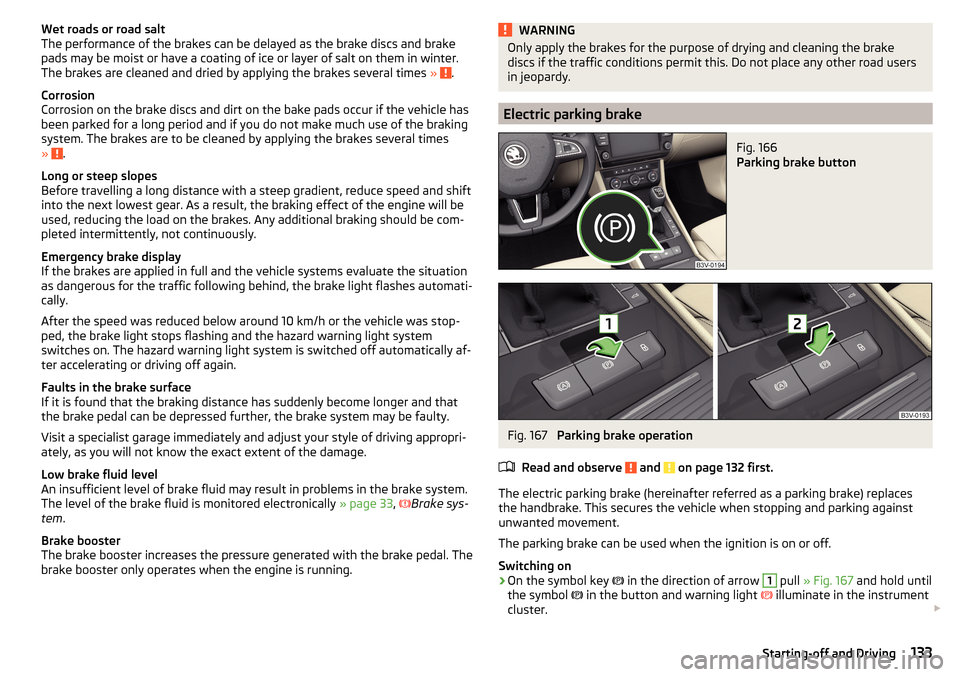
Electric parking brake
Fig. 166
Parking brake button
Fig. 167
Parking brake operation
Read and observe
and on page 132 first.
The electric parking brake (hereinafter referred as a parking brake) replaces the handbrake. This secures the vehicle when stopping and parking against
unwanted movement.
The parking brake can be used when the ignition is on or off.
Switching on
›
On the symbol key
in the direction of arrow
1
pull » Fig. 167 and hold until
the symbol
in the button and warning light
illuminate in the instrument
cluster.
133Starting-off and Driving
Page 136 of 276

Manual shut-down›With the ignition switched on press the brake pedal and at the same time
push the symbol key
in the direction of arrow 2
» Fig. 167 .
›
With the engine running press either the brake or accelerator pedal and
press the symbol key
in the direction of arrow
2
.
The symbol on the key
and the warning light
goes out.
Automatic shut-off
The parking brake switches off when starting, as long as the driver's door is
closed, and the driver has fastened the seat belt.
Should the vehicle start to roll away when starting on a downhill slope then
step on the accelerator or and turn on the parking brake.
Turning off the parking brake can be prevented if, before starting the symbol key is pulled and held in the direction of arrow
1
» Fig. 167 . The parking
brake turns off after releasing the button.
Emergency braking function
If while driving a brake pedal error occurs or should the pedal block, then the
parking brake can be used as an emergency brake »
.
›
Pull on the symbol key
in the direction of arrow
1
» Fig. 167 and hold (at
the same time there is an audible signal).
The emergency brake is activated and the vehicle starts braking sharply.
The braking process is interrupted when the key is released or the accelerator
pedal is actuated.
Parking on a slope
If the parking brake is turned on while on a steep slope, the following message
may be displayed in the instrument cluster.
Parking brake: gradient too steep. Owner's manual!GRADIENT TOO STEEP
Find a parking space on a flat surface or on a slope that is not so steep.
WARNING■ The emergency brake is to be used only in an emergency when the vehi-
cle cannot be stopped with the brake pedal.■
When stopping and parking, the parking brake should always be on, oth-
erwise the vehicle could move off - there is the risk of an accident!
■
Do not place any objects in the recessed grip for the finger of the parking
brake key. The object could get into the space below the key and prevent
the operation of the parking brake!
Note
■ If the vehicle battery is discharged, it is not possible to release the parking
brake. First connect the vehicle first to a power source, such as the battery of
another vehicle » page 230, Jump-starting and then turn off the parking
brake.■
Noise when switching on and off of the parking brake is normal and there-
fore harmless.
Parking
Read and observe
and on page 132 first.
When stopping and parking, look for a place with a suitable surface » .
Only carry out the activities while parking in the specified order.
›
Bring the vehicle to a stop and depress the brake pedal.
›
The parking brake switch.
›
On vehicles with automatic transmission place the selector lever in the P po-
sition.
›
Switch off the engine.
›
For vehicles with manual transmission engage 1st gear or reverse gear R .
›
Release the brake pedal.
WARNINGThe exhaust system components can become very hot. Therefore, never
stop the vehicle at places where the underside of your vehicle can come in-
to contact with flammable materials such as dry grass, undergrowth,
leaves, spilled fuel or such like. - Risk of fire and serious injury can occur!134Driving
Page 138 of 276

WARNING (Continued)■If the vehicle is in the D, S , R or Tiptronic mode and comes to a standstill
while at idle the engine stops, then prevent the vehicle from rolling away
with the brake pedal, the parking brake of the auto-hold function. Even
when the engine is idling, the power transmission is never completely in-
terrupted – the vehicle creeps.■
When leaving the vehicle, the selector lever is always to put in the P
mode. Otherwise, the vehicle could start to move - risk of accident.
CAUTION
■ If the selector lever is moved to mode N while driving, the accelerator pedal
must be released and you will need to wait until the engine has reached its
idling speed before moving the selector lever to a forward driving mode again.■
When the outdoor temperature is below -10 ° C, the selector lever when
starting must always be in P mode.
■
When stopping on a slope, never try to hold the vehicle using the accelerator
pedal – this may lead to gear damage.
Note
After the ignition is switched off, the ignition key can only be withdrawn if the
selector lever is in the position P.
Modes and use of selector lever
Fig. 169
Selector lever/display
Read and observe and on page 135 first.
When the ignition is switched on, the gearbox mode and the currently selected
gear are indicated in the display » Fig. 169.
The following modes can be selected with the selector lever » Fig. 169.
P – Parking mode
The driven wheels are locked mechanically in this mode.
The parking mode must only be selected when the vehicle is stationary.R
- Reverse gear
Reverse gear can only be engaged when the vehicle is stationary and the en-
gine is at idling speed.
N
- Neutral
The power transmission to the drive wheels is interrupted in this mode.
D
/
S
- mode for driving forward (Normal program) / mode for driving
forward (Sport program)
The system switches from one mode to the other by moving the selector lever
into the spring-loaded position
» Fig. 169 .
In mode D or S, the forward gears are shifted automatically depending on the
engine load, the operation of the accelerator pedal, the vehicle speed, and the
selected driving mode .
In mode S , the forward gears are shifted automatically up and down at high-
er engine speeds than in mode D.
If the Sport driving mode is selected with the engine running » page 171, Se-
lection of the driving mode(Driving Mode Selection) , the transmission is auto-
matically set in the S mode.
E – Economical driving mode
If the driving mode Eco or Individual (engine - Eco) » page 171 is selected and
the selection lever is in the setting D/S, the transmission is automatically set
to mode E. This mode cannot be selected with the selector lever.
In mode E , the forward gears are shifted automatically up and down at lower
engine speeds than in mode D.
136Driving
Page 142 of 276

DriveGreen functionFig. 172
Shown in the infotainment dis-
play
The DriveGreen function (hereinafter referred to as DriveGreen) evaluates the
driving efficiency based on the information respecting the driving style. Useful
tips for reducing fuel consumption are also offered.
DriveGreen can be displayed on the Infotainment as follows.
›
Press the button in the Infotainment and then in the display the function
keys one after the other
→
DriveGreen
.
A
driving liquid display
With the driving is liquid the display is near the green dot. When accelerating
or braking, the indicator moves down or up.
B
“Green leaf”
The leaf margin shown in green shows with a few seconds, the current drive
efficiency. When driving economically there are several green layers on the
edge of the leaf. If driving less economically, no green colour appears and the
leaf can disappear completely.
C
Graphical review summary
The evaluation of the driving economy during the last 3 minutes or 1.5 minutes
(depending on type of Infotainment) is shown like a beam in 5-second incre-
ments. The current status is shown on the left and moves gradually to the
right. The higher the green bars, the more economic the driving style is.
D
Scoring
In the function key, the evaluation of driving efficiency is shown from the start
in the range from 0 to 100 points. The higher the indicated value, the more
economic the driving style is.
When you press the function key, a detailed assessment showing the driving
efficiency during the last 30 minutes is shown.
If the trip from the start, takes less than 30 minutes, then the assessment
takes in information from the previous trip (the bars are shown in dark green).E
Average fuel consumption
In the function key, the average fuel consumption from the start is displayed.
When you press the function key a detailed overview of the average fuel con-
sumption during the last 30 minutes is shown.
If the trip from the start, takes less than 30 minutes, then the average fuel
consumption takes in information from the previous trip (the bars are shown in
dark green).
F
Symbols in the display
The display may show the following four symbols, which give information on
the current driving style.
Ecological trip
The current speed has a negative effect on fuel consumption. The driving is not liquid, drive with anticipation.
Recommended gear.
Tips for reducing fuel consumption
When tapping the “Page” the display shows useful tips on how to reduce fuel consumption. These tips can to be helpful to drive more economically.
Note
■ Resetting the single-trip memory “from start” also resets the average con-
sumption E and the driving assessment D.■
With some Infotainment types changing the units for the fuel consumption
indicator causes the resetting of the average fuel consumption values
E
.
Radiator blind
The radiator blind(hereinafter: blind) helps to reduce CO 2emissions as well as
harmful emissions and to save fuel.
If the system detects that it is possible to reduce the amount of air flowing to
the radiator, it closes the blinds. As a result the wind resistance at the front of
the vehicle is reduced.
The blinds are located between the grille in the front bumper and the radiator.
140Driving
Page 146 of 276

WARNINGThe general information relating to the use of assistance systems must be
observed » page 142, in section Introduction .
Stability Control (ESC)
Fig. 175
Press the ESC system
Read and observe on page 144 first.
The ESC improves vehicle stability in dynamic driving situations, such as when
the vehicle starts to skid.
The ESC monitors whether the desired direction of the current vehicle motion
is occurring. In case of any deviation (e.g. over steer), the ESC automatically
brakes individual wheels to maintain the desired direction.
During an intervention of the system, the indicator light
flashes in the in-
strument cluster.
Enable/disable ESC Sport
The activation of the ESC sports allows a sportier driving style. With a slight
over or under steering of the vehicle take no ESC interventions take place and
the TCS is restricted so that the spinning of the wheels of the driven axle can
occur.
The activation or deactivation of the ESC sports can be done in one of two
ways. ▶ By pressing the Symbol key
for the activation and briefly pressing the but-
ton for the deactivation » Fig. 175.
▶ Infotainment » Owner´s Manual Infotainment , chapter CAR - vehicle set-
tings .
Upon deactivation, in the instrument cluster the indicator light comes on and
the display shows the following message.ESC sport: directional stabil. restricted.ESC SPORT
Upon deactivation, in the instrument cluster the control indicator
turns off
and the display shows the following message.
Stabilisation control (ESC) activated.ESC ON
Anti-lock braking system (ABS)
Read and observe
on page 144 first.
ABS prevents the wheels locking when braking. Thus helping the driver to
maintain control of the vehicle.
The intervention of the ABS is noticeable from the pulsating movements of
the brake pedal which is accompanied by noises.
When the ABS system is active, do not brake periodically or reduce the pres-
sure on the brake pedal.
Traction control (TCS)
Read and observe
on page 144 first.
TCS prevents the spinning of the wheels of the driven axle. TCS reduces thedrive power transmitted to the wheels in the case of slipping wheels. Thus, for
example, driving on road surfaces with low grip is made easier.
During a TCS intervention, the indicator light flashes in the instrument clus-
ter.
Activating/deactivating TCS
The activation or deactivation of TCS can be done, depending on equipment, in
one of the following ways. ▶ Infotainment » Owner´s Manual Infotainment , chapter CAR - vehicle set-
tings .
▶ By briefly pressing the symbol key
» Fig. 175 on page 144 .
144Driving
Page 148 of 276

The automatic brake interventions can take place only if the following condi-
tions are met.
There was a front, side and rear-end collision of a certain severity.
The impact speed was higher than approx. 10 km/h.
The brakes, the ESL and other required electrical systems remain function-
al after impact.
The accelerator pedal is not actuated.
Trailer stabilization system (TSA)
Read and observe
on page 144 first.
The TSA helps the combination stable in situations where the trailer sways
and then the whole trailer combination.
TSA brakes the individual wheels of the towing vehicle in order to damp the rocking motion of the entire vehicle combination.
The following conditions are required for the correct TSA function. The trailer was shipped from the factory or purchased from the ŠKODA
genuine accessories.
The trailer is electrically connected to the towing vehicle via the trailer
socket.
The parking aid is activated.
The speed is higher than approx. 60 km/h.
Further information » page 184, Hitch and trailer .
Auto Hold function
Fig. 176
The Auto-Hold function button
Read and observe on page 144 first.
The Auto Hold function (hereinafter referred to only as system) prevents the
vehicle from rolling unintentionally when stopped. It is, for example, not nec-
essary to secure the vehicle with the brake pedal or parking brake at traffic
lights.
For the activation, deactivation and correct functioning of the system, the
following basic conditions are required.
The driver's door is closed.
The engine is running (or shut-down automatically by the START-STOP
system).
On vehicles with automatic transmission the selector lever is not in mode
N (in this mode, the system is not available).
Stopping and starting
When stopping the system prevents the vehicle from rolling away. The warn- ing light illuminates in the instrument cluster. The brake pedal can be re-
leased.
The vehicle's brakes are released at the moment of stating off. The warning
light in the instrument cluster goes out.
Should the vehicle start to roll away when starting on a downhill slope then
step on the accelerator or and turn on the parking brake.
If the vehicle is secured by the system and the driver's door is opened or the ignition is turned off, the vehicle is secured by the parking brake to prevent
unwanted movement.
In this case, the indicator light turns off in the instrument cluster and the
warning light illuminates.
Activation/deactivation
The activation and deactivation of the system is done by pressing the symbol
key
» Fig. 176 .
When the system is activated, the symbol illuminates.
After switching off and switching on the ignition system several times the sys-
tem remains either activated or deactivated depending on the last setting.
146Driving
Page 151 of 276
The road ahead is displayed when a forward gear or Neutral is engaged or the
selector lever is in mode D/S or position N is set.
The road behind the vehicle is displayed when reverse gear is engaged or the
selector lever is in mode R.
Activation / deactivation
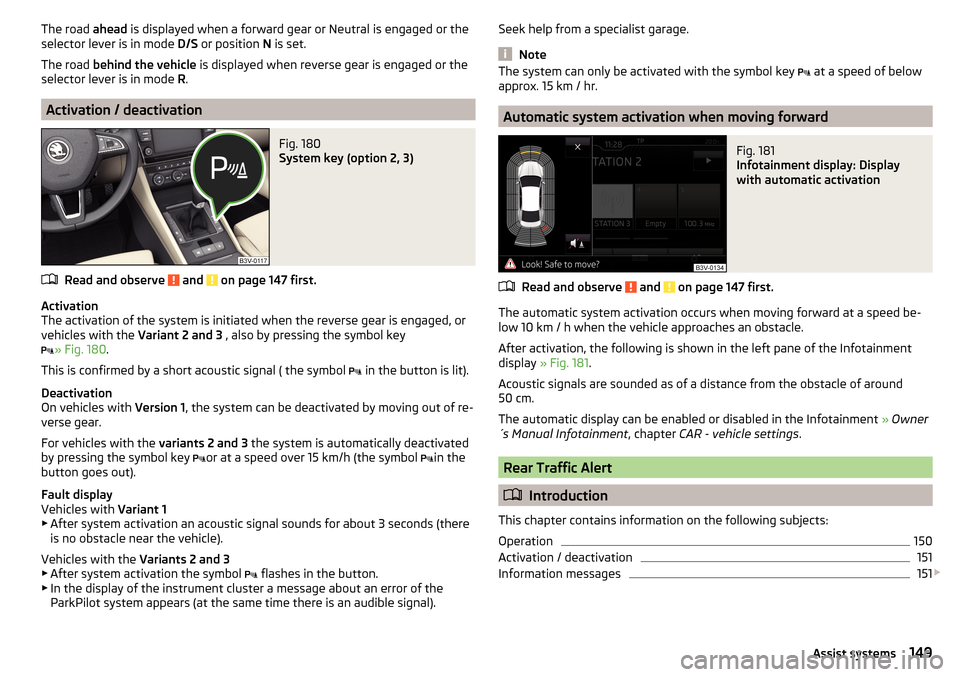
Fig. 180
System key (option 2, 3)
Read and observe and on page 147 first.
Activation
The activation of the system is initiated when the reverse gear is engaged, or
vehicles with the Variant 2 and 3 , also by pressing the symbol key
» Fig. 180
.
This is confirmed by a short acoustic signal ( the symbol in the button is lit).
Deactivation
On vehicles with Version 1, the system can be deactivated by moving out of re-
verse gear.
For vehicles with the variants 2 and 3 the system is automatically deactivated
by pressing the symbol key or at a speed over 15 km/h (the symbol
in the
button goes out).
Fault display
Vehicles with Variant 1
▶ After system activation an acoustic signal sounds for about 3 seconds (there
is no obstacle near the vehicle).
Vehicles with the Variants 2 and 3
▶ After system activation the symbol flashes in the button.
▶ In the display of the instrument cluster a message about an error of the
ParkPilot system appears (at the same time there is an audible signal).
Seek help from a specialist garage.
Note
The system can only be activated with the symbol key at a speed of below
approx. 15 km / hr.
Automatic system activation when moving forward
Fig. 181
Infotainment display: Display
with automatic activation
Read and observe and on page 147 first.
The automatic system activation occurs when moving forward at a speed be-
low 10 km / h when the vehicle approaches an obstacle.
After activation, the following is shown in the left pane of the Infotainment
display » Fig. 181 .
Acoustic signals are sounded as of a distance from the obstacle of around
50 cm.
The automatic display can be enabled or disabled in the Infotainment » Owner
´s Manual Infotainment , chapter CAR - vehicle settings .
Rear Traffic Alert
Introduction
This chapter contains information on the following subjects:
Operation
150
Activation / deactivation
151
Information messages
151
149Assist systems
Page 153 of 276
Activation / deactivationRead and observe
on page 150 first.
The activation or deactivation of the system can be carried out in one of twoways. ▶ In the instrument cluster display » page 48, Menu item
Assist systems
.
▶ Infotainment » Owner´s Manual Infotainment , chapter CAR - vehicle set-
tings .
After switching off and switching on the ignition system several times the sys-
tem remains either activated or deactivated depending on the last setting.
Information messages
Read and observe
on page 150 first.
The warning messages are available for both the Rear Traffic Alert and the as-
sist systems for “Blind spot monitoring” together and are displayed in the in-
strument cluster.
Rear Traffic Alert/ Blind Spot Monitor currently not avail.
The system is not available for an unknown reason.
Stop the vehicle, switch off the engine and then start it again.
If after engine start the message persists, then the help of a professional or- ganisation is required.
Error: Rear Traffic Alert/ Blind Spot Monitor
A system error is present. Seek help from a specialist garage.
R. Traf. Alert/Blind Spt Mntr not avail. No sensor view.
The sensors are dirty or covered.
Stop the vehicle, stop the engine, clean the area in front of and around the
sensors or remove the obstructing item.
If, after the engine restarts, the message persists, the help of a professional
organisation should be sought.
Trailer: Rear Traf. Alert/Blind Spot Mntr not avail.
If the vehicle has a towing device, a trailer or any other accessory connected
that was done at the factors then the system is not available.
Rear View Camera
Introduction
This chapter contains information on the following subjects:
Operation
152
Activation / deactivation
152
Function keys
153
Guidelines and roadway
153
Mode - traverse parking
154
Mode - parallel parking
154
Mode - driving up to a trailer / distance monitoring
155
Mode - monitor the area behind the vehicle
155
The rear view camera (following as system) helps the driver when parking and
manoeuvring by displaying the area behind the vehicle in the Infotainment dis-
play (following as display).
There are four modes available for different situations during the park and ma-
noeuvring action.
WARNING■ The general information relating to the use of assistance systems must
be observed » page 142, in section Introduction .■
The system detects obstacles. The display of the auxiliary boxes and lines
is independent of the actual vehicle environment. The driver must judge for
themselves whether the vehicle can park safely in the selected parking
space.
■
Make sure that the camera lens is not dirty or covered, otherwise the sys-
tem function can be significantly impaired. Information on cleaning
» page 197 , Camera lens
CAUTION
■
The camera lens distorts and enlarges the field of view of the difference in
eye sight. The display is therefore only of limited use for estimating distances
to following vehicles.■
Some items, such as thin columns, chain link fences or lattice may not be
represented adequately in terms of display resolution.
151Assist systems
Page 154 of 276
■It is only a two-dimensional display. Therefore, protruding objects or roadway
depressions, for example, may not be recognised due to lack of space depth.■
In a crash or damage the vehicle's rear camera can possibly deviate from the
correct position. If this is the case, have the sensor checked by a specialist ga-
rage.
Operation
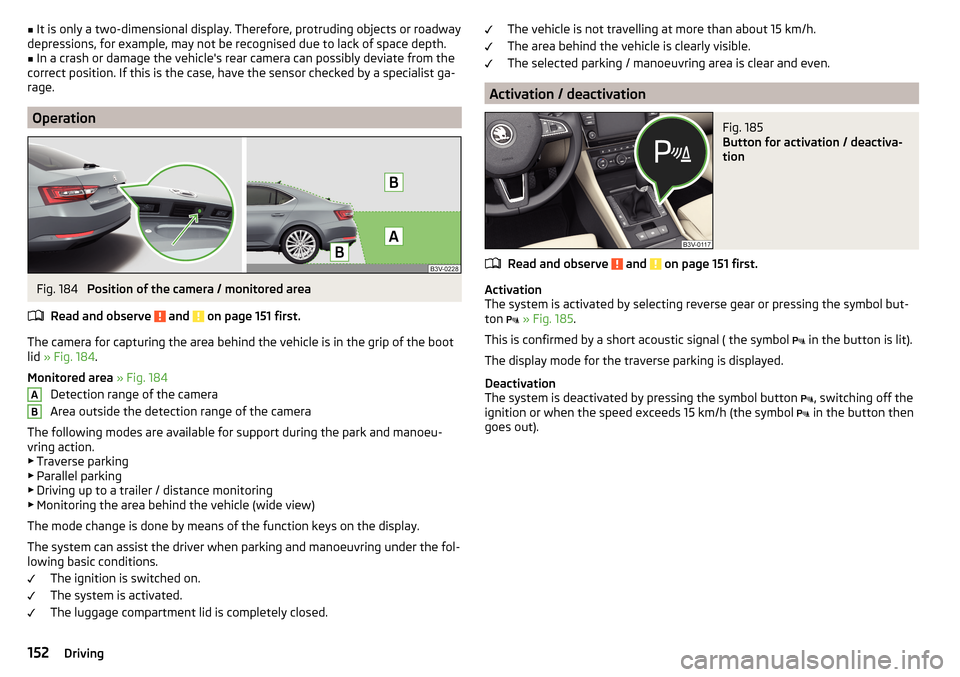
Fig. 184
Position of the camera / monitored area
Read and observe
and on page 151 first.
The camera for capturing the area behind the vehicle is in the grip of the boot
lid » Fig. 184 .
Monitored area » Fig. 184
Detection range of the camera
Area outside the detection range of the camera
The following modes are available for support during the park and manoeu- vring action.
▶ Traverse parking
▶ Parallel parking
▶ Driving up to a trailer / distance monitoring
▶ Monitoring the area behind the vehicle (wide view)
The mode change is done by means of the function keys on the display.
The system can assist the driver when parking and manoeuvring under the fol-
lowing basic conditions.
The ignition is switched on.
The system is activated.
The luggage compartment lid is completely closed.
ABThe vehicle is not travelling at more than about 15 km/h.
The area behind the vehicle is clearly visible.
The selected parking / manoeuvring area is clear and even.
Activation / deactivation
Fig. 185
Button for activation / deactiva-
tion
Read and observe and on page 151 first.
Activation
The system is activated by selecting reverse gear or pressing the symbol but-
ton
» Fig. 185 .
This is confirmed by a short acoustic signal ( the symbol in the button is lit).
The display mode for the traverse parking is displayed.
Deactivation
The system is deactivated by pressing the symbol button , switching off the
ignition or when the speed exceeds 15 km/h (the symbol in the button then
goes out).
152Driving
Page 155 of 276
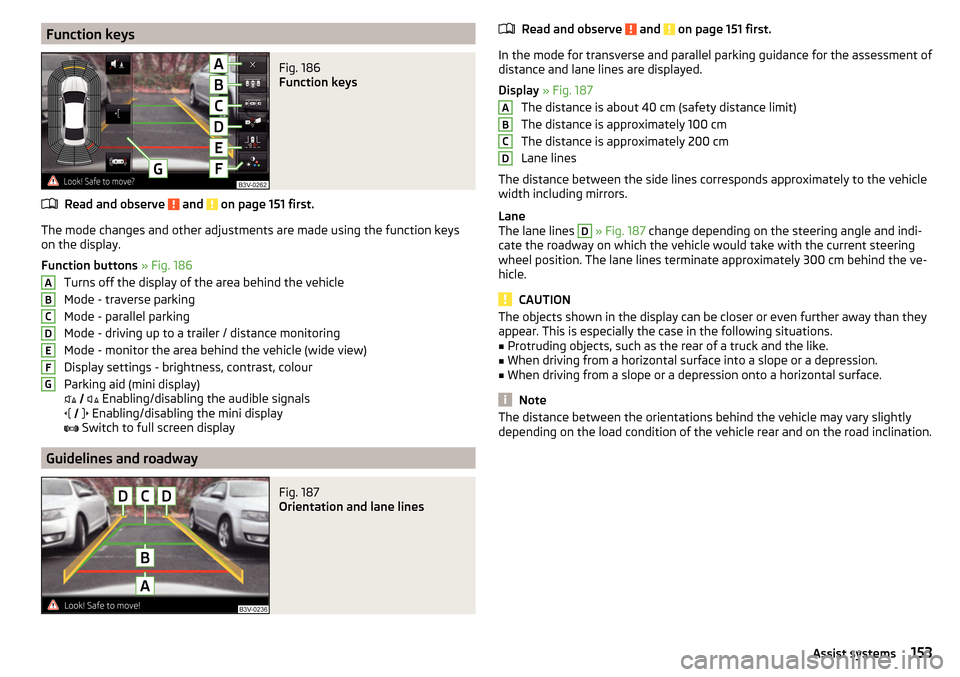
Function keysFig. 186
Function keys
Read and observe and on page 151 first.
The mode changes and other adjustments are made using the function keys
on the display.
Function buttons » Fig. 186
Turns off the display of the area behind the vehicle
Mode - traverse parking
Mode - parallel parking
Mode - driving up to a trailer / distance monitoring
Mode - monitor the area behind the vehicle (wide view)
Display settings - brightness, contrast, colour
Parking aid (mini display)
Enabling/disabling the audible signals
Enabling/disabling the mini display
Switch to full screen display
Guidelines and roadway
Fig. 187
Orientation and lane lines
ABCDEFGRead and observe and on page 151 first.
In the mode for transverse and parallel parking guidance for the assessment of
distance and lane lines are displayed.
Display » Fig. 187
The distance is about 40 cm (safety distance limit)
The distance is approximately 100 cm
The distance is approximately 200 cm
Lane lines
The distance between the side lines corresponds approximately to the vehicle width including mirrors.
Lane
The lane lines
D
» Fig. 187 change depending on the steering angle and indi-
cate the roadway on which the vehicle would take with the current steering
wheel position. The lane lines terminate approximately 300 cm behind the ve-
hicle.
CAUTION
The objects shown in the display can be closer or even further away than they
appear. This is especially the case in the following situations.■
Protruding objects, such as the rear of a truck and the like.
■
When driving from a horizontal surface into a slope or a depression.
■
When driving from a slope or a depression onto a horizontal surface.
Note
The distance between the orientations behind the vehicle may vary slightly
depending on the load condition of the vehicle rear and on the road inclination.ABCD153Assist systems