steering SKODA SUPERB 2015 3.G / (B8/3V) Workshop Manual
[x] Cancel search | Manufacturer: SKODA, Model Year: 2015, Model line: SUPERB, Model: SKODA SUPERB 2015 3.G / (B8/3V)Pages: 276, PDF Size: 42.14 MB
Page 195 of 276

WARNING■No modifications of any kind must be made to parts of the airbag system.■Any work on the airbag system including the installation and removal of
system components due to other repair work (e.g. removal of the steering
wheel) must only be carried out by a specialist garage.■
Never make any changes to the front bumper or the bodywork.
■
It is prohibited to manipulate individual parts of the airbag system, as this
might result in the airbag being deployed.
■
The protective function of the airbag system is sufficient for only one ac-
cident. The airbag system must then be replaced if the airbag has been de-
ployed.
WARNINGThe airbag system operates using pressure sensors located in the front
doors. For this reason, no adjustments may be carried out to the doors or
door panels (e.g. installation of additional loudspeakers). Resulting damage
can have a negative impact on the function of the airbag system. Any work
on the front doors and their door panels must be carried out by a specialist
garage. The following guidelines must be observed.■
Never drive with inner door panels removed.
■
Never drive if parts of the inner door panel have been removed and the
resulting openings have not been properly sealed.
■
Never drive if the loudspeakers in the doors have been removed, unless
the loudspeaker openings have been properly sealed.
■
Always make sure that the openings are covered or filled if additional
loudspeakers or other equipment parts have been installed in the inner
door panels.
Acceptance and recycling of used vehicles
Read and observe
on page 190 first.
ŠKODA meets the requirements of the brand and its products with regard to
protecting the environment and the preserving resources. All new ŠKODA ve-
hicles are 95% recyclable.
Note
You can find more detailed information about the trade-in and recycling of old
cars from a specialist garage.Washing vehicle
Introduction
This chapter contains information on the following subjects:
Washing by hand
193
Automatic car wash systems
194
Washing with a high-pressure cleaner
194
The best way to protect your vehicle against harmful environmental influences
is frequent washing.
The longer insect residues, bird droppings, road salt and other aggressive de-
posits remain on the paintwork of your vehicle, the more detrimental their de-
structive effect can be. High temperatures, such as those caused by intensive
sun's rays, accentuate this caustic effect.
It is essential to also thoroughly clean the underside of the vehicle at the end
of the winter.
WARNINGWhen washing your vehicle in the winter: Water and ice in the braking sys-
tem can affect the braking efficiency – risk of accident!
CAUTION
The temperature of the water used for cleaning must not exceed 60 °C – risk
of damaging the vehicle.
For the sake of the environment
Only wash the vehicle at washing bays intended for this purpose.
Washing by hand
Read and observe
and on page 193 first.
Soak the dirt with plenty of water and rinse as well as possible.
Clean the vehicle with a soft sponge, a washing glove or a washing brush.
Work from the top to the bottom - starting with the roof.
For stubborn dirt, agents specifically intended for this purpose are to be used.
Wash out the sponge or washing glove thoroughly at short intervals.
193Care and maintenance
Page 200 of 276
Regularly remove salt and brake abrasion, otherwise the rim material will be
corroded.
Light alloy wheel trims
After washing thoroughly and treat the wheel rims with a protective product
for light alloy wheels.
For the treatment of wheel rims do not use products which may cause damage
to the paint on the rims.
CAUTION
■ Damage to the paint layer on the wheel rims must be touched up immediate-
ly.■
Severe layers of dirt on the wheels can also result in wheel imbalance. This
may show itself in the form of a wheel vibration which is transmitted to the
steering wheel which, in certain circumstances, can cause premature wear of
the steering. This means it is necessary to remove the dirt.
Under-body protection
Read and observe
and on page 195 first.
The underside of your vehicle is already permanently protected by the factory
against chemical and mechanical influences.
It is not possible to guarantee that the protective coating will not suffer any
damage as the vehicle is driven.
We recommend having the protective coating underneath the vehicle and the
chassis checked — preferably before the beginning of winter and at the end of
winter.
WARNINGNever use additional underbody protection or anti-corrosion agents for ex-
haust pipes, catalytic converters, diesel particle filters or heat shields.
When the engine reaches its operating temperature, these substances may ignite - risk of fire!Wiper blades
Read and observe
and on page 195 first.
Clean the wiper blades regularly with a glass cleaner. The wiper blades should
be cleaned with a sponge or cloth if they are heavily soiled by insect residues,
for example.
The wiper blades can become soiled with wax residues after washing in auto-
matic vehicle wash systems for example.
Interior care
Introduction
This chapter contains information on the following subjects:
Natural leather
199
Artificial leather, materials and Alcantara ®
199
Seat covers
200
Safety belts
200
We recommend using vehicle care products from ŠKODA Original Accessories.
These are available from ŠKODA Partners. The usage instructions on the pack-
age must be observed.
WARNING■ Vehicle care products may be harmful to your health if not used according
to the instructions.■
Always keep the vehicle care products safe from people who are not com-
pletely independent, e.g. children - there is a danger of poisoning!
■
Air fresheners and scents can be hazardous to heath when the tempera-
ture inside the vehicle is high.
CAUTION
■ Be sure to check clothing for colour fastness to avoid any damage or visible
stains on the material (leather), panels and textiles.■
Remove fresh stains such as those from ball-point pens, ink, lipstick, shoe
polish, etc., from the material (leather), panels and textiles as quickly as possi-
ble.
■
Do not attach scents or air fresheners to the dash panel – there is a risk of
damage to the dash panel.
198General Maintenance
Page 201 of 276
■Do not attach any stickers to the filaments or glass antenna - there is risk of
damage.■
Do not clean the roof panelling with a brush – risk of damage to the surface
of the panelling.
■
Cleaner that contain solvents can damage the material being cleaned.
■
Apply only a small amount of the cleaning and care product.
Note
Due to the special tools and knowledge required, and to avoid any potential
problems with the cleaning and care of the interior of your vehicle, we recom-
mend that cleaning and care of the interior of your vehicle be carried out by a
ŠKODA service partner.
Natural leather
Read and observe
and on page 198 first.
The leather needs, depending on the strain placed on it, regular cleaning and
maintenance.
Dust and dirt in pores and creases cause abrasions on the surface and lead to
premature embrittlement of the leather surface. Therefore, they must be re-
moved regularly at short intervals with a cloth or vacuum cleaner.
Clean soiled leather surfaces with a water-dampened cotton or woollen cloth
and then dry with a clean, dry cloth »
.
Clean severely soiled areas with a cloth soaked in a mild soap solution (2 ta-
blespoons of neutral soap to 1 litre of water).
To remove stains , use a cleaning agent specially designed for this purpose.
Treat the leather periodically with a suitable leather protector and use a skin
care cream with light blocker and impregnation after each cleaning.
CAUTION
■ Ensure that no part of the leather is soaked through during cleaning and that
no water gets into the seams. Otherwise, the leather could become brittle or
cracked.■
Avoid leaving the vehicle for lengthy periods in bright sunlight to avoid the
leather from bleaching. If the vehicle is parked in the open for lengthy periods,
protect the leather from direct sunlight by covering it.
■
The use of an additional mechanical steering wheel lock may damage the
leather surface of the steering wheel.
■ Some clothing materials, e.g. dark denim, do not have sufficient colour fast-
ness. This can cause damage or clearly visible discolouration to seat covers,
even when used correctly. This applies particularly to light-coloured seat cov-
ers. This does not relate to a fault in the seat cover, but rather to poor colour
fastness of the clothing textiles.■
Sharp-edged objects on items of clothing such as zip fasteners, rivets, sharp-
edged belts etc. may leave permanent scratches or signs of rubbing on the
surface or damage these. Such damage cannot be subsequently recognised as
a justified complaint.
Note
When using the vehicle, minor visible changes may occur to the leather parts
of the covers (e.g. wrinkles or creases) as a result of the stress applied to the
covers.
Artificial leather, materials and Alcantara ®
Read and observe
and on page 198 first.
Artificial leather
Clean artificial leather with a damp cloth.
If this method does not completely clean the artificial leather, use a mild soap
solution or cleaning products specially designed for this purpose.
Fabric
Clean upholstery cover materials and cloth trims on doors, boot cover, etc. us-
ing specific cleaning agents, e.g., dry foam.
Use a soft sponge, brush, or commercially available microfibre cloth.
Use a cloth and a cleaning agent specifically designed for this purpose to clean
the roof trim.
Remove any lumps on the cover fabric and any fabric residue using a brush.
Remove stubborn hair using a “cleaning glove”.
Alcantara ®
Dust and dirt in pores, creases and seams may chafe and damage the surface.
Therefore, they must be removed regularly at short intervals with a cloth or
vacuum cleaner.
Minor changes in colour caused by use are normal.
199Care and maintenance
Page 220 of 276
Tyre diameter in inches
These details are intended only as information for the specified tyre pres-
sure and does not list approved tyre sizes for your vehicle.
The approved tyre sizes for your vehicle are listed in the vehicle's technical
documentation (the so called COC document) and this also states the dec-
laration of conformity.
The approved tyre diameter for your vehicle is also provided with the vehi-
cle data » page 246 .
Tyre pressure value on the front axle
Tyre pressure value on the rear axle
Check tyre pressures
Check the tyre pressure, including that of the spare wheel, at least once a
month and also before setting off on a long journey.
Always check the inflation pressure when the tyres are cold. Do not reduce the
higher pressure of warm tyres.
In vehicles with tyre pressure monitoring, tyre pressure values must be stored
every time the tyre pressure changes » page 183.WARNING■
Having the correct tyre inflation pressure is always the driver's responsi-
bility.■
Too low or too high inflation pressure impairs handling.
■
If the inflation pressure is too low, the tyre will have to overcome a higher
rolling resistance. This will cause a significant increase in the temperature
of the tyre, especially at higher speeds. This can result in tread separation
and a tyre blow-out.
■
In the event of very fast tyre inflation pressure loss, such as a sudden tyre
failure, an attempt should be made to bring the vehicle carefully to a stop
without sudden steering movements and without any hard braking.
For the sake of the environment
Tyres that are insufficiently inflated increase your fuel consumption.
Note
The declaration of conformity (COC document), can be obtained from a ŠKODA 1)
partner.EFGTyre wear
Read and observe
on page 217 first.
Tyre wear depends on the pressure, driving style, and other circumstances.
Attention to the following factors can reduce tyre wear.
Driving style
Fast cornering, sharp acceleration and braking increase the wear of your tyres.
Wheel balance
The wheels of a new vehicle are balanced. When driving, however, there are a
range of factors that may result in an imbalance. This may become apparent by
a “vibration” in the steering. If this is the case, have the wheels checked by a
specialist garage.
Have the wheels likewise rebalanced after replacing the tyres.
Setting the vehicle geometry
Incorrect wheel alignment at the front or rear leads to excess wear on the
tyres and impairs driving safety. With a distinct tyre wear pattern, we recom-
mend that you check the setting of the vehicle geometry in a specialist work-
shop.
WARNING■ An incorrect wheel alignment at the front or rear impairs handling.■Unusual vibrations or pulling of the vehicle to one side could be a sign of
tyre damage. If there is any doubt that a wheel is damaged, immediately re-
duce your speed and stop! If no external tyre damage is evident, drive slow-
ly and carefully to the nearest specialist garage to have the vehicle
checked.1)
Only valid for some countries and some models.
218General Maintenance
Page 234 of 276
Vehicles with automatic transmission may be towed in with a tow bar or a tow
rope or with the front wheels raised. If the vehicle is raised at rear, the auto-
matic gearbox is damaged! If possible, the vehicle should be towed with the
engine running or at least with the ignition on.
Driver of the tow vehicle›
Engage the clutch gently when starting off or depress the accelerator partic-
ularly gently if the vehicle is fitted with an automatic gearbox.
›
Only then approach correctly when the rope is taut.
The maximum towing speed is 50 km/h.
Driver of the towed vehicle
›
Switch on the ignition so that the steering wheel is not locked and so that
the turn-signal lights, windscreen wipers and windscreen washer system can
be used.
›
Take the vehicle out of gear or move the selector lever into position N if the
vehicle is fitted with an automatic gearbox.
Please note that the brake servo unit and power steering only operate if the
engine is running. If the engine is not running, significantly more physical force
is required to depress the brake pedal and steer the vehicle.
If using a tow rope, ensure that it is always kept taught.
General information for the towing process
Both drivers should be familiar with the problems which might occur while a vehicle is being towed. Unskilled drivers should not attempt to tow in another
vehicle or to be towed in.
The vehicle must be transported on a special breakdown vehicle or trailer if it
is not possible to tow in the vehicle in the way described or if the towing dis-
tance is greater than 50 km.
If the gearbox has no oil, your vehicle must be towed with the front axle raised
clear of the ground or on a breakdown vehicle or trailer.
To protect both vehicles when tow-starting or towing, the tow rope should be elastic. Thus one should only use plastic fibre rope or a rope made out of a
similarly elastic material.
Attach the tow rope or the tow bar to the towing eyes » page 232 or
» page 233 to the detachable ball head of the towing device » page 184 .
WARNING■
When towing, exercise increased caution.■Do not use spiral rope for towing » Fig. 251- , the towing eye may un-
screw from the vehicle - risk of accident.■
Ensure tow rope is not twisted - risk of accident.
CAUTION
■ Do not start engine by towing - there is a risk of damaging the engine parts.
The battery from another vehicle can be used as a jump-start aid » page 230,
Jump-starting .■
There is always a risk of excessive stresses and damage resulting at the
points to which you attach the tow rope or tow bar when you attempt to tow a
vehicle which is not standing on a paved road.
Note
We recommend using a tow rope from ŠKODA Original Accessories, which is
available from a ŠKODA Partner.
Front towing eye
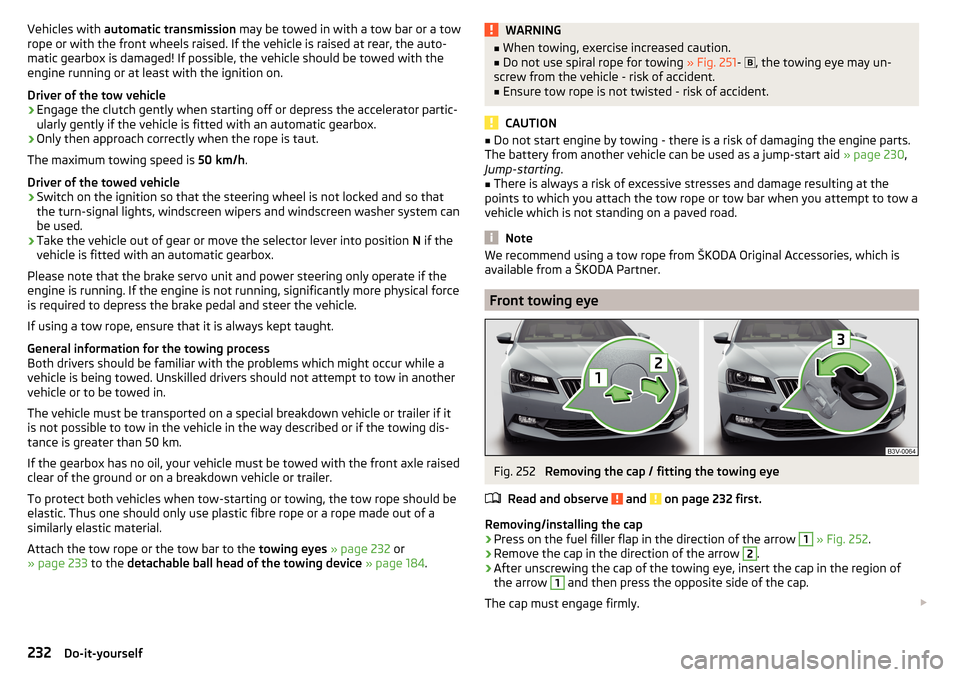
Fig. 252
Removing the cap / fitting the towing eye
Read and observe
and on page 232 first.
Removing/installing the cap
›
Press on the fuel filler flap in the direction of the arrow
1
» Fig. 252 .
›
Remove the cap in the direction of the arrow
2
.
›
After unscrewing the cap of the towing eye, insert the cap in the region of
the arrow
1
and then press the opposite side of the cap.
The cap must engage firmly.
232Do-it-yourself
Page 242 of 276
Installing the storage compartment›Raise the storage compartment in the direction of the arrow 4.›
Overcome the resistance of the detents
A
.
›
Insert the brake control linkage in the opposite direction to arrow
2
.
›
Lock the brake control linkage in the opposite direction to arrow
1
.
›
Close the storage compartment.
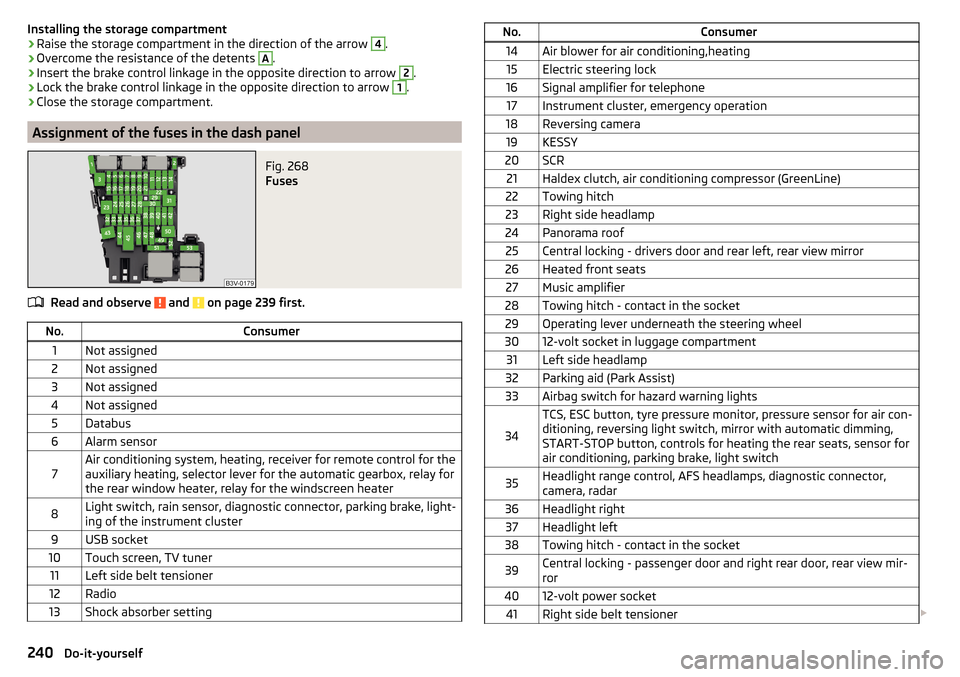
Assignment of the fuses in the dash panel
Fig. 268
Fuses
Read and observe and on page 239 first.
No.Consumer1Not assigned2Not assigned3Not assigned4Not assigned5Databus6Alarm sensor7Air conditioning system, heating, receiver for remote control for the
auxiliary heating, selector lever for the automatic gearbox, relay for
the rear window heater, relay for the windscreen heater8Light switch, rain sensor, diagnostic connector, parking brake, light-
ing of the instrument cluster9USB socket10Touch screen, TV tuner11Left side belt tensioner12Radio13Shock absorber settingNo.Consumer14Air blower for air conditioning,heating15Electric steering lock16Signal amplifier for telephone17Instrument cluster, emergency operation18Reversing camera19KESSY20SCR21Haldex clutch, air conditioning compressor (GreenLine)22Towing hitch23Right side headlamp24Panorama roof25Central locking - drivers door and rear left, rear view mirror26Heated front seats27Music amplifier28Towing hitch - contact in the socket29Operating lever underneath the steering wheel3012-volt socket in luggage compartment31Left side headlamp32Parking aid (Park Assist)33Airbag switch for hazard warning lights
34
TCS, ESC button, tyre pressure monitor, pressure sensor for air con-
ditioning, reversing light switch, mirror with automatic dimming,
START-STOP button, controls for heating the rear seats, sensor for
air conditioning, parking brake, light switch35Headlight range control, AFS headlamps, diagnostic connector,
camera, radar36Headlight right37Headlight left38Towing hitch - contact in the socket39Central locking - passenger door and right rear door, rear view mir-
ror4012-volt power socket41Right side belt tensioner 240Do-it-yourself
Page 258 of 276
Index
A
abroad lead-free petrol
202
Abroad Headlights
72
ABS Operation
144
Warning light34
ACC163
Acceptance and recycling of used vehicles193
Accessories190
Adaptive chassis control Warning light
41
Adaptive Chassis Control171
Adaptive cruise control automatic stop-start
165
Information messages168
Operation164
Operation Overview165
Set/change the desired speed166
special driving conditions167
Start control166
Stop/resume control166
Adaptive Cruise Control163
Radar sensor143
Set the clearance level167
Adaptive headlight see xenon headlight
69
AdBlue204, 205
refilling204
replenish205
Warning light39
Adjust Auxiliary heating (auxiliary heating and ventila- tion)
124
AdjustingExterior mirrors80
Steering wheel9
Adjusting the seats8
Adjustment Front seats
81
Headlight beam67
Headrests87
Seats82
Advance warning / emergency braking Warning light
41
AHL see xenon headlight
69
Air-conditioning system Air outlet vents
122
Airbag14
Deactivating19
Deactivating the front passenger airbag19
Deployment15
Front airbag15
Head airbag18
Knee airbag17
Modifications and damage to the airbag system 192
Side airbag
17
Warning light35
Airbag system14
Air conditioning118
Air distribution control122
Climatronic120
Manual air conditioning119
Air distribution control122
Air outlet vents122
Alarm Enable/disable
57
Switch off57
Trailer189
Triggering57
Alcantara cleaning
199
Anodized partsRefer to vehicle maintenance196
Anti-lock braking system (ABS)144
Anti-theft alarm system Enable/disable
57
Trailer189
Anti-theft wheel bolts225
Armrest Front
85
rear98
Rear86
artificial leather199
Ashtray103
removal104
Assistant for blind spot monitoring177
Activation / deactivation178
Driving conditions and warnings178
Information messages179
Operation177
Assistant for emergencies179
Operating conditions180
Operation180
Assist systems142
Auto-check control41
Auto Hold146
Warning light37
Auto Hold function146
Warning light37
Automatic Distance Control Warning light
33
Warning lights40
Automatic driving lamp control69
Automatic gearbox Selector lever-emergency unlocking
237
Selector lever lock137
Starting-off and driving138
Tiptronic137
Using the selector lever136
Automatic gearbox modes136
Automatic load deactivation216
256Index
Page 261 of 276
Fuel supply30
Gear changes42
Service interval49
Disposal Acceptance and recycling of used vehicles
193
Distance driven31
Distance warning Warning light
40
Door Child safety lock
57
Closing56
Emergency locking236
Emergency locking the driver's door236
Opening56
Door warning41
Drive Driving through water
141
DriveGreen140
Driver Steering Recommendation (DSR)145
Driving Emissions
248
Fuel consumption248
through water141
driving data operation
43
Driving mode171
driving mode select Normal mode
172
Driving Mode Selection171
DSR145
Dynamic Light Assist72
E
ECO-TIP
49
Eco-tips49
Economical driving Tips
139
Economy mode Warning light
41
EDL145
Electrical boot lid set the top position of the lid
60
Electrical power windows Buttons in the driver's door
62
Electric boot lid Force limit
59
Manual operation59
Electric luggage compartment lid Malfunctions
61
Operating60
Electric parking brake133
Electric window lifter61, 63
Button in the passenger door63
Button in the rear doors63
Window operation malfunctions64
Electronic differential lock (EDL, XDS)145
Electronic immobilizer126
emergency replace battery in the remote control
235
Emergency Changing a wheel
224
Hazard warning light system71
Jump-starting230
Locking the door without a locking cylinder236
Locking the driver's door236
Selector lever-unlocking237
Switch off the engine by pressing a button129
Towing the using the tow hitch233
Towing the vehicle231
Tyre repair228
Unlocking the driver's door236
emergency equipment reflective vest
223
Emergency equipment Fire extinguisher
223
First aid kit222
Jack223
Vehicle tool kit223
Warning triangle222
Emissions248
Engine Information messages
38
Running-in139
Engine compartment206
Brake fluid212
Overview208
Vehicle battery213
Engine number246
engine oil specification
209
Engine oil209
Checking210
Replenishing210
Warning light38
EPC Warning light
35
ESC Operation
144
Warning light34
ESC Sport144
Exhaust emissions control system Warning light
34
F
Fastening elements
106
Fatigue detection182
Function182
Information messages182
Films195
Fire extinguisher223
First aid kit222
Floor covering Fixing
108
in the luggage compartment108
Fog lights Warning light
36
Fog Lights70
Fold in passenger's mirror80
259Index
Page 264 of 276
Luggage compartment cover108
Roll-up cover109
Luggage compartment lid58
Luggage net108
Luggage storage Multi-function pocket
111
M
Main beam
68
Warning light37
Maintenance see vehicle care
195
Manual air conditioning Air distribution control
122
Controls119
Manual gear changing see gear changing
135
Manually adjusting seats82
MAXI DOT display45
Main menu45
Menu item assist systems48
Menu item Audio47
Menu item navigation47
Menu item telephone47
Operation46
MAXI DOT see MAXI DOT display
45
Maximum permissible weights
246
MCB145
Media AUX
99
see Infotainment4
USB99
Memory44
Memory Function for the seat83
Mirror Exterior mirrors80
Interior mirror79
Make-up76
MODE button see driving mode selection
171
Modifications190
Modifications and technical alterations Airbags
192
Service191
Spoiler192
Multi-function display operation
43
Multi-function pocket111
Multi collision brake (MCB)145
Multifunction display Functions
42
Information43
Memory44
Multifunction steering wheel Operation
46
Multimedia AUX
99
USB99
N
N1
114
Nameplate246
Navigation see Infotainment
4
Net partition116
behind the front seats116
behind the rarer seats116
Removing and refitting the housing117
Nets107
Non-contact boot lid opening61
Notes for driving with repaired tyres230
Notes on using wheels217
O
Oil See Engine oil
210
Warning messages38
Oil pressure Warning messages
38
On-board computer see multifunction display
42
Operating weight247
Operation in winter Diesel fuel
203
Vehicle battery214
Original accessories191
Overhang angle251
Overview Engine compartment
208
Warning lights31
P
Park assist Departing from a parallel parking space
159
Information messages159
Park Assist155
Automatic brake assist159
Operation156
Park forward158
Parking space search157
Reverse parking157
Switch to park mode157
Parking134
Park Assist155
Parking aid147
Rear Traffic Alert149
Rear View Camera151
Parking aid147
Automatic system activation when moving for- ward
149
Function147
262Index
Page 265 of 276
Parking assistanceActivation / deactivation149
Display in the Infotainment display148
Parking brake133
Warning light32
Parking brake - Auto Hold function Warning light
37
Parking lights67
ParkPilot147
Park the vehicle see Parking
134
Part replacement190
Passive safety Before setting off
8
Driving safety8
Passive Safety8
Pedals135
Footmats135
Petrol see fuel
202
Phone box92
Plastic parts196
Polishing vehicle paint work see vehicle care
195
Power limit sliding/tilting roof
65
Power steering Warning light
33
Practical equipment Reflective vest
223
Practical features 12 volt socket in luggage compartment
101
12 volt socket inside100
Pockets on the backs of the front seats97
Pockets on the inner sides of the front seats97
Seat backrest with long cargo channel86
Storage compartment for umbrella97
Storage compartment under passenger seat96
Waste container93
Proactive passenger protection173
Warning light35
ProActive passenger protection Function
174
Protective films195
Puncture repair kit228
R
Radiator blind
140
Radiator fan208
Radio see Infotainment
4
Radio remote control Auxiliary heating (heating and ventilation)
125
Raising the vehicle226
Rear Interior light
74
Rear-view mirror Exterior mirrors
80
Fold in passenger mirror80
Synchronous adjustment of the rear-view mir- ror
80
Rear fog light70
Warning light34
Rear mirror79
Rear Traffic Alert149
Activation / deactivation151
Information messages151
Operation150
Rear View Camera151
Activation / deactivation152
Function keys153
Guidelines and roadway153
Mode - driving up to a trailer / distance moni- toring
155
Mode - monitor the area behind the vehicle155
Mode - parallel parking154
Mode - traverse parking154
Operation152
Rear view mirror Interior mirror79
Rear window - heater75
Refuelling201
Fuel201
Remote control Locking
53
Replacing the battery234
Synchronisation process235
Unlocking53
Remote control key Replacing the battery
234
Removable lamp Change the lamp battery
235
Removable light Removing light
114
Removable through-loading bag98
Repairs and technical alterations190
Replace Bulb for dipped beam (Halogen-headlamp)
243
Bulb for main beam (Halogen-headlamp)243
the battery in the auxiliary heating (auxiliary heating) in the remote control
235
Replacing Bulb for the fog light
244
Bulb in rear light245
Bulbs242
Fuses238
Fuses – engine compartment241
Fuses – LHD239
Fuses – RHD239
Rear window wiper blade238
Vehicle battery215
windscreen wiper blades237
Replenishing Coolant
212
Engine oil210
Windscreen washer fluid208
Reversible seat belts14
263Index