light SKODA SUPERB 2016 3.G / (B8/3V) Brief Instructions
[x] Cancel search | Manufacturer: SKODA, Model Year: 2016, Model line: SUPERB, Model: SKODA SUPERB 2016 3.G / (B8/3V)Pages: 32, PDF Size: 11.01 MB
Page 2 of 32
This brochure is intended to quickly acquaint you with some vehicle functions.
This does not replace the vehicle Owner's Manual, because it does not provide information on operation, e.g. the safety notices. Therefore, when
using our vehicles, proceed in accordance with the vehicle Owner's Manual in the first instance.›
Overview of this brochure by topic
› Unlocking and opening1
›Correct and safe seating position
2
›Lights and visibility
4
›Air conditioning system
6
›Instrument cluster
8
›Starting and stopping the engine
10
›Braking and parking
12
›Park Assist systems
13›
Driver assist systems15
›At the petrol station
17
›Telephone
19
›Radio
20
›Navigation
21
›Media
22
›Connectivity
22
›Warning lights overview
24This brochure is also available in each language version on the website
http://go.skoda.eu/owners-manualsSee QR code, available for download.
Page 6 of 32
Lights and visibility›Operate light function
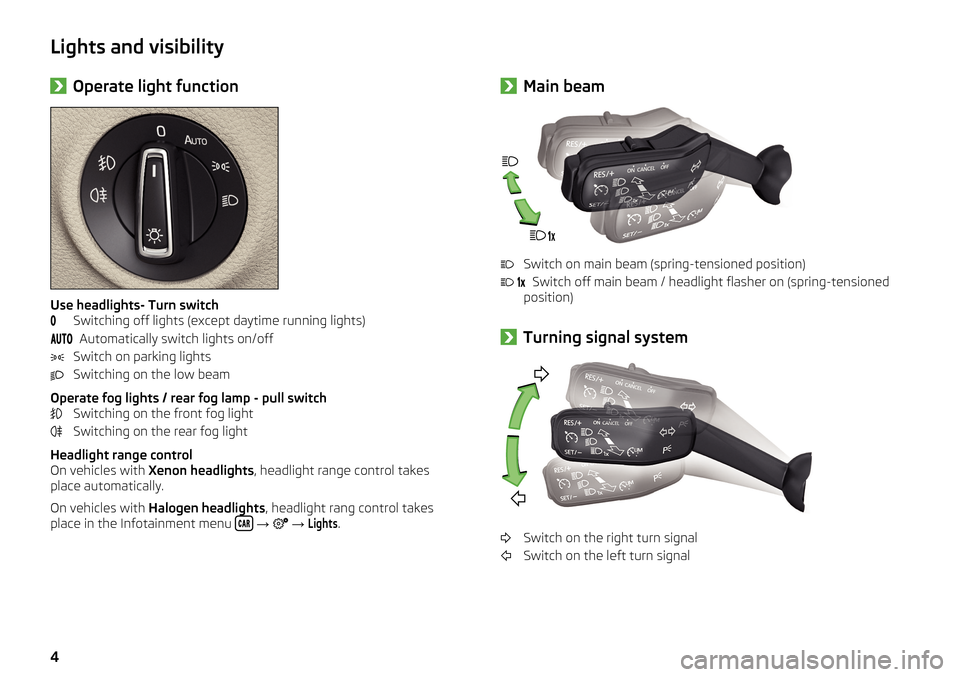
Use headlights- Turn switch
Switching off lights (except daytime running lights)
Automatically switch lights on/off
Switch on parking lights
Switching on the low beam
Operate fog lights / rear fog lamp - pull switch Switching on the front fog light
Switching on the rear fog light
Headlight range control
On vehicles with Xenon headlights , headlight range control takes
place automatically.
On vehicles with Halogen headlights , headlight rang control takes
place in the Infotainment menu
→
→
Lights
.
› Main beam
Switch on main beam (spring-tensioned position)
Switch off main beam / headlight flasher on (spring-tensioned
position)
›
Turning signal system
Switch on the right turn signal
Switch on the left turn signal
4
Page 8 of 32
Air conditioning system›Climatronic
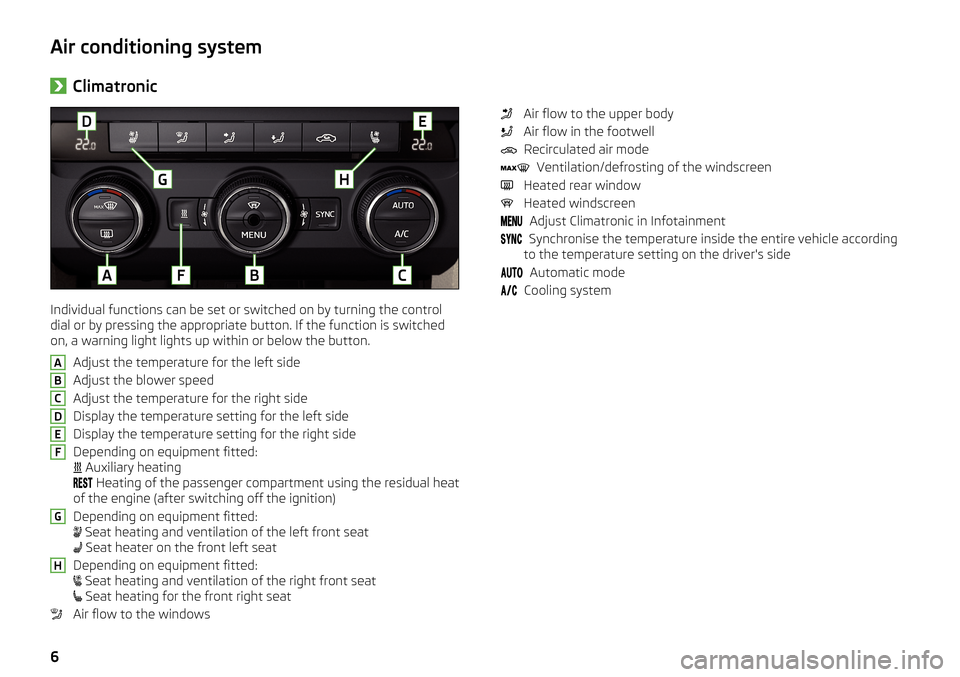
Individual functions can be set or switched on by turning the control
dial or by pressing the appropriate button. If the function is switched
on, a warning light lights up within or below the button.
Adjust the temperature for the left side
Adjust the blower speed
Adjust the temperature for the right side
Display the temperature setting for the left side
Display the temperature setting for the right side
Depending on equipment fitted:
Auxiliary heating
Heating of the passenger compartment using the residual heat
of the engine (after switching off the ignition)
Depending on equipment fitted:
Seat heating and ventilation of the left front seat
Seat heater on the front left seat
Depending on equipment fitted:
Seat heating and ventilation of the right front seat
Seat heating for the front right seat
Air flow to the windows
ABCDEFGHAir flow to the upper body
Air flow in the footwell Recirculated air mode Ventilation/defrosting of the windscreen
Heated rear window
Heated windscreen
Adjust Climatronic in Infotainment
Synchronise the temperature inside the entire vehicle according
to the temperature setting on the driver's side
Automatic mode
Cooling system
6
Page 9 of 32
›Climatronic - Operation of the rear bench seat
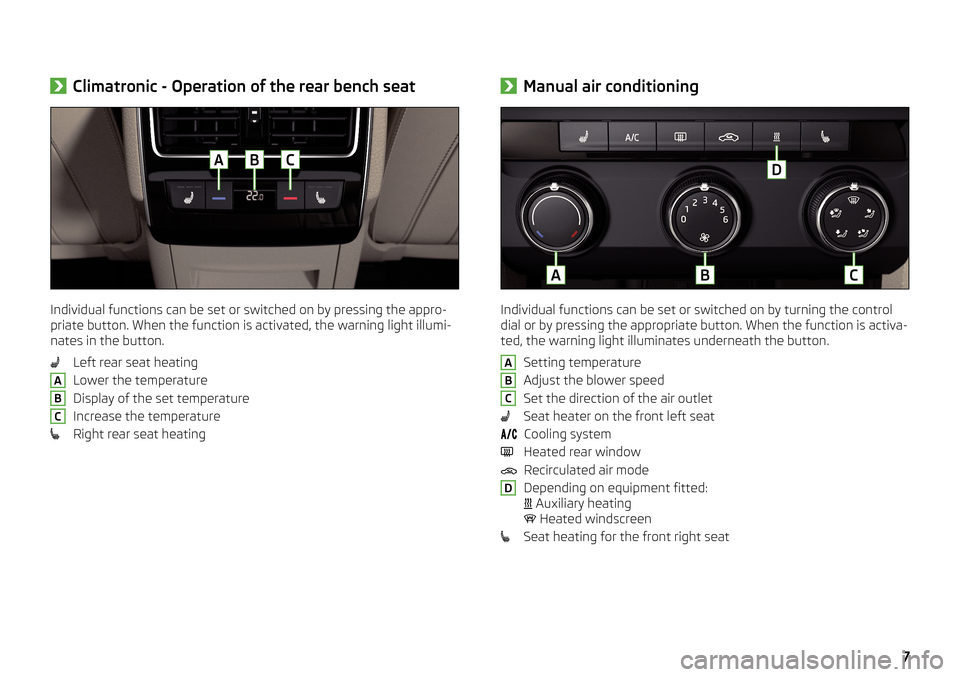
Individual functions can be set or switched on by pressing the appro-
priate button. When the function is activated, the warning light illumi-
nates in the button.
Left rear seat heating
Lower the temperature
Display of the set temperature
Increase the temperature
Right rear seat heating
ABC› Manual air conditioning
Individual functions can be set or switched on by turning the control
dial or by pressing the appropriate button. When the function is activa-
ted, the warning light illuminates underneath the button.
Setting temperature
Adjust the blower speed
Set the direction of the air outlet
Seat heater on the front left seat Cooling system
Heated rear window Recirculated air mode
Depending on equipment fitted:
Auxiliary heating
Heated windscreen
Seat heating for the front right seat
ABCD7
Page 13 of 32
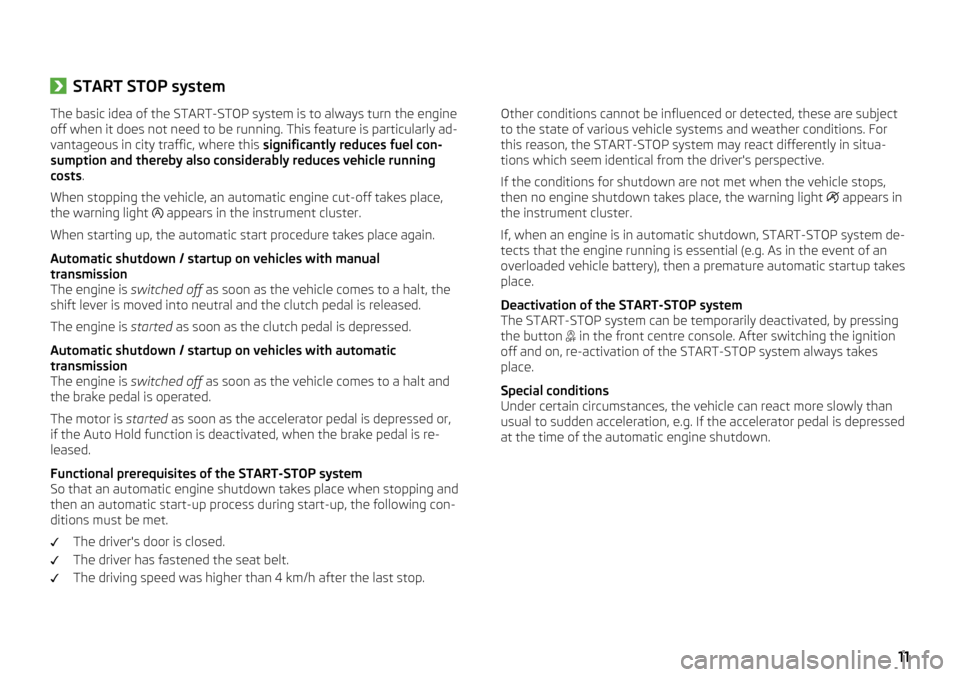
›START STOP system The basic idea of the START-STOP system is to always turn the engine
off when it does not need to be running. This feature is particularly ad-
vantageous in city traffic, where this significantly reduces fuel con-
sumption and thereby also considerably reduces vehicle running
costs .
When stopping the vehicle, an automatic engine cut-off takes place,
the warning light appears in the instrument cluster.
When starting up, the automatic start procedure takes place again.
Automatic shutdown / startup on vehicles with manual
transmission
The engine is switched off as soon as the vehicle comes to a halt, the
shift lever is moved into neutral and the clutch pedal is released.
The engine is started as soon as the clutch pedal is depressed.
Automatic shutdown / startup on vehicles with automatic
transmission
The engine is switched off as soon as the vehicle comes to a halt and
the brake pedal is operated.
The motor is started as soon as the accelerator pedal is depressed or,
if the Auto Hold function is deactivated, when the brake pedal is re-
leased.
Functional prerequisites of the START-STOP system
So that an automatic engine shutdown takes place when stopping and
then an automatic start-up process during start-up, the following con-
ditions must be met.
The driver's door is closed.
The driver has fastened the seat belt.
The driving speed was higher than 4 km/h after the last stop.Other conditions cannot be influenced or detected, these are subject
to the state of various vehicle systems and weather conditions. For
this reason, the START-STOP system may react differently in situa-
tions which seem identical from the driver's perspective.
If the conditions for shutdown are not met when the vehicle stops,
then no engine shutdown takes place, the warning light appears in
the instrument cluster.
If, when an engine is in automatic shutdown, START-STOP system de-
tects that the engine running is essential (e.g. As in the event of an
overloaded vehicle battery), then a premature automatic startup takes
place.
Deactivation of the START-STOP system
The START-STOP system can be temporarily deactivated, by pressing
the button in the front centre console. After switching the ignition
off and on, re-activation of the START-STOP system always takes
place.
Special conditions
Under certain circumstances, the vehicle can react more slowly than
usual to sudden acceleration, e.g. If the accelerator pedal is depressed
at the time of the automatic engine shutdown.11
Page 14 of 32
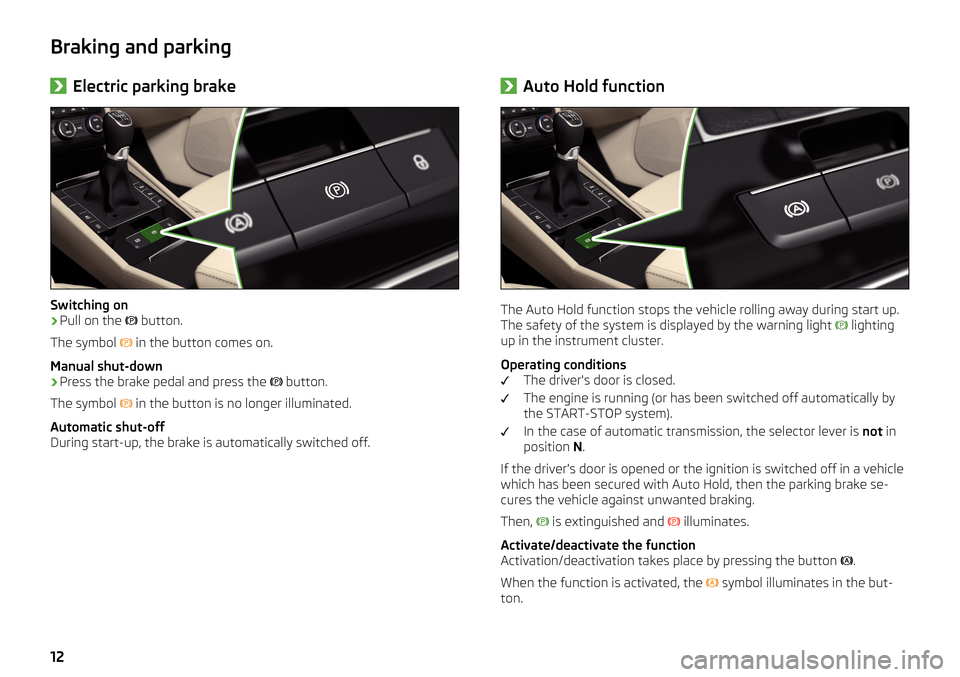
Braking and parking›Electric parking brake
Switching on
›
Pull on the
button.
The symbol
in the button comes on.
Manual shut-down
›
Press the brake pedal and press the
button.
The symbol
in the button is no longer illuminated.
Automatic shut-off
During start-up, the brake is automatically switched off.
› Auto Hold function
The Auto Hold function stops the vehicle rolling away during start up.
The safety of the system is displayed by the warning light
lighting
up in the instrument cluster.
Operating conditions The driver's door is closed.
The engine is running (or has been switched off automatically by
the START-STOP system).
In the case of automatic transmission, the selector lever is not in
position N.
If the driver’s door is opened or the ignition is switched off in a vehicle
which has been secured with Auto Hold, then the parking brake se-
cures the vehicle against unwanted braking.
Then,
is extinguished and
illuminates.
Activate/deactivate the function
Activation/deactivation takes place by pressing the button
.
When the function is activated, the symbol illuminates in the but-
ton.
12
Page 17 of 32
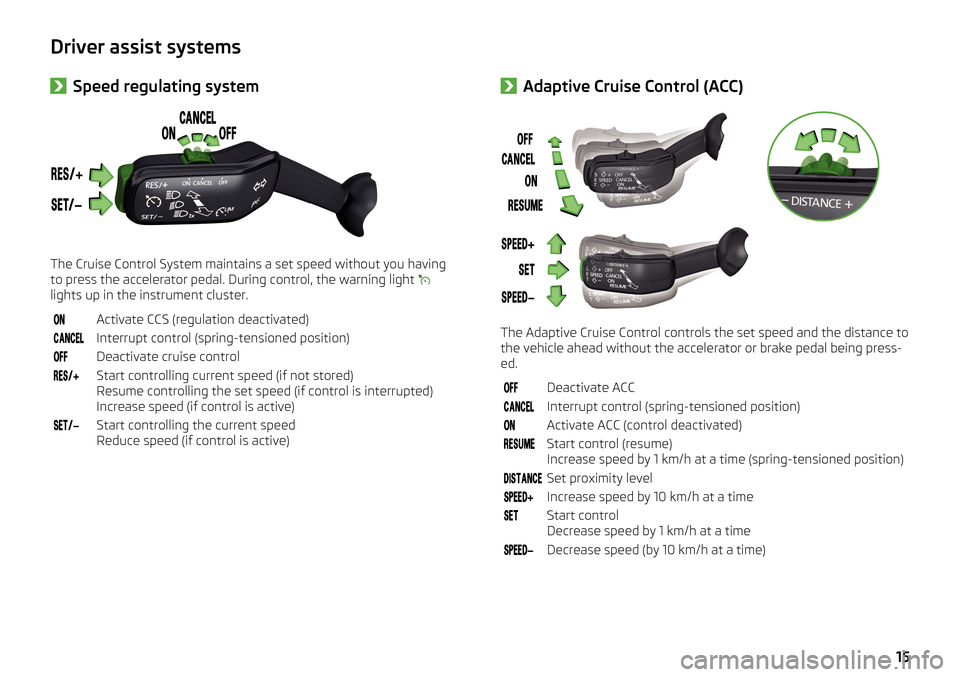
Driver assist systems›Speed regulating system
The Cruise Control System maintains a set speed without you having
to press the accelerator pedal. During control, the warning light
lights up in the instrument cluster.
Activate CCS (regulation deactivated)Interrupt control (spring-tensioned position)Deactivate cruise controlStart controlling current speed (if not stored)
Resume controlling the set speed (if control is interrupted)
Increase speed (if control is active)Start controlling the current speed
Reduce speed (if control is active)› Adaptive Cruise Control (ACC)
The Adaptive Cruise Control controls the set speed and the distance to
the vehicle ahead without the accelerator or brake pedal being press-
ed.
Deactivate ACCInterrupt control (spring-tensioned position)Activate ACC (control deactivated)Start control (resume)
Increase speed by 1 km/h at a time (spring-tensioned position)Set proximity levelIncrease speed by 10 km/h at a timeStart control
Decrease speed by 1 km/h at a timeDecrease speed (by 10 km/h at a time)15
Page 18 of 32
›Front Assist
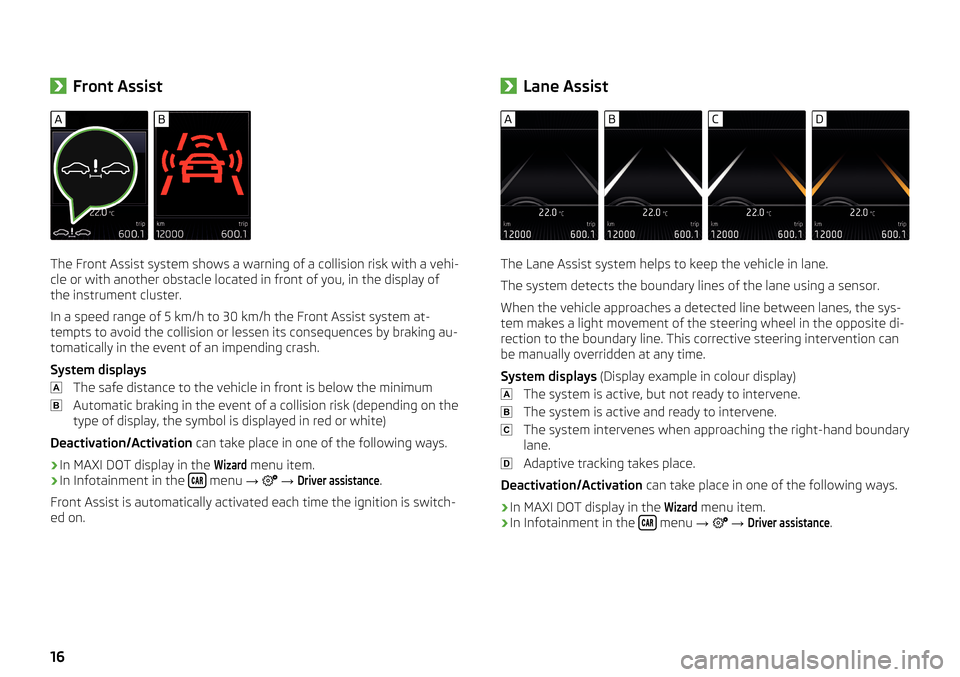
The Front Assist system shows a warning of a collision risk with a vehi-
cle or with another obstacle located in front of you, in the display of
the instrument cluster.
In a speed range of 5 km/h to 30 km/h the Front Assist system at- tempts to avoid the collision or lessen its consequences by braking au-
tomatically in the event of an impending crash.
System displays The safe distance to the vehicle in front is below the minimumAutomatic braking in the event of a collision risk (depending on the
type of display, the symbol is displayed in red or white)
Deactivation/Activation can take place in one of the following ways.
› In MAXI DOT display in the
Wizard
menu item.
› In Infotainment in the
menu
→
→
Driver assistance
.
Front Assist is automatically activated each time the ignition is switch-
ed on.
› Lane Assist
The Lane Assist system helps to keep the vehicle in lane.
The system detects the boundary lines of the lane using a sensor.
When the vehicle approaches a detected line between lanes, the sys-
tem makes a light movement of the steering wheel in the opposite di-
rection to the boundary line. This corrective steering intervention can
be manually overridden at any time.
System displays (Display example in colour display)
The system is active, but not ready to intervene.
The system is active and ready to intervene.
The system intervenes when approaching the right-hand boundary
lane.
Adaptive tracking takes place.
Deactivation/Activation can take place in one of the following ways.
› In MAXI DOT display in the
Wizard
menu item.
› In Infotainment in the
menu
→
→
Driver assistance
.
16
Page 19 of 32
At the petrol station›Refuelling›
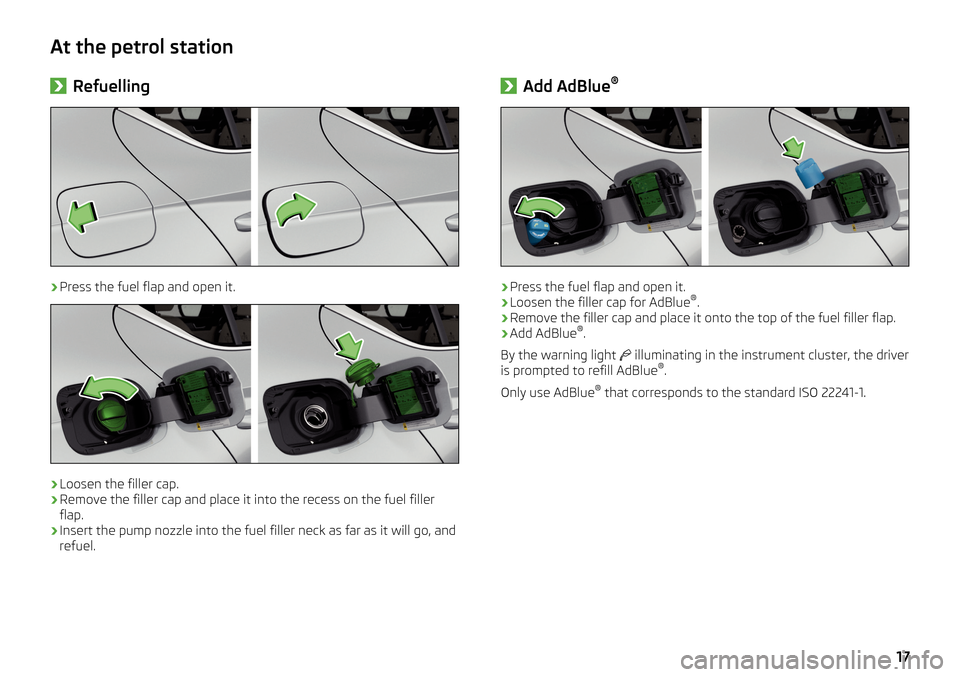
Press the fuel flap and open it.
›
Loosen the filler cap.
›
Remove the filler cap and place it into the recess on the fuel filler
flap.
›
Insert the pump nozzle into the fuel filler neck as far as it will go, and
refuel.
› Add AdBlue ®›
Press the fuel flap and open it.
›
Loosen the filler cap for AdBlue
®
.
›
Remove the filler cap and place it onto the top of the fuel filler flap.
›
Add AdBlue ®
.
By the warning light
illuminating in the instrument cluster, the driver
is prompted to refill AdBlue ®
.
Only use AdBlue ®
that corresponds to the standard ISO 22241-1.
17
Page 26 of 32
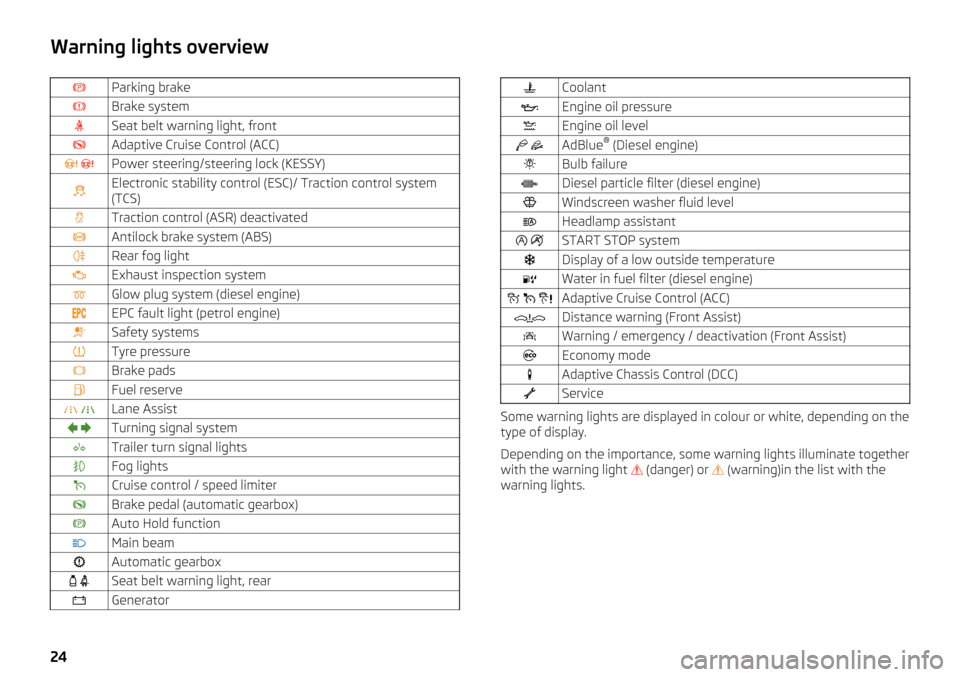
Warning lights overviewParking brakeBrake systemSeat belt warning light, frontAdaptive Cruise Control (ACC) Power steering/steering lock (KESSY)Electronic stability control (ESC)/ Traction control system
(TCS)Traction control (ASR) deactivatedAntilock brake system (ABS)Rear fog lightExhaust inspection systemGlow plug system (diesel engine)EPC fault light (petrol engine)Safety systemsTyre pressureBrake padsFuel reserve Lane Assist Turning signal systemTrailer turn signal lightsFog lightsCruise control / speed limiterBrake pedal (automatic gearbox)Auto Hold functionMain beamAutomatic gearbox Seat belt warning light, rearGeneratorCoolantEngine oil pressureEngine oil level AdBlue ®
(Diesel engine)Bulb failureDiesel particle filter (diesel engine)Windscreen washer fluid levelHeadlamp assistant START STOP systemDisplay of a low outside temperatureWater in fuel filter (diesel engine) Adaptive Cruise Control (ACC)Distance warning (Front Assist)Warning / emergency / deactivation (Front Assist)Economy modeAdaptive Chassis Control (DCC)Service
Some warning lights are displayed in colour or white, depending on the
type of display.
Depending on the importance, some warning lights illuminate together
with the warning light (danger) or
(warning)in the list with the
warning lights.
24