buttons SKODA SUPERB 2016 3.G / (B8/3V) Columbus Amundsen Bolero Infotainment System Navigation Manual
[x] Cancel search | Manufacturer: SKODA, Model Year: 2016, Model line: SUPERB, Model: SKODA SUPERB 2016 3.G / (B8/3V)Pages: 100, PDF Size: 12.8 MB
Page 23 of 100
Radio
Operation
Introduction to the subject
The device allows analogue radio reception of FM and AM frequency ranges as
well as DAB digital radio reception.
CAUTION
■ For vehicles with window antennas do not stick foil or metal coated stickers
to the window - Radio signal reception could be affected.■
Car parks, tunnels, tall buildings or mountains can interfere with the radio
signal even causing it to fail completely.
Main menu
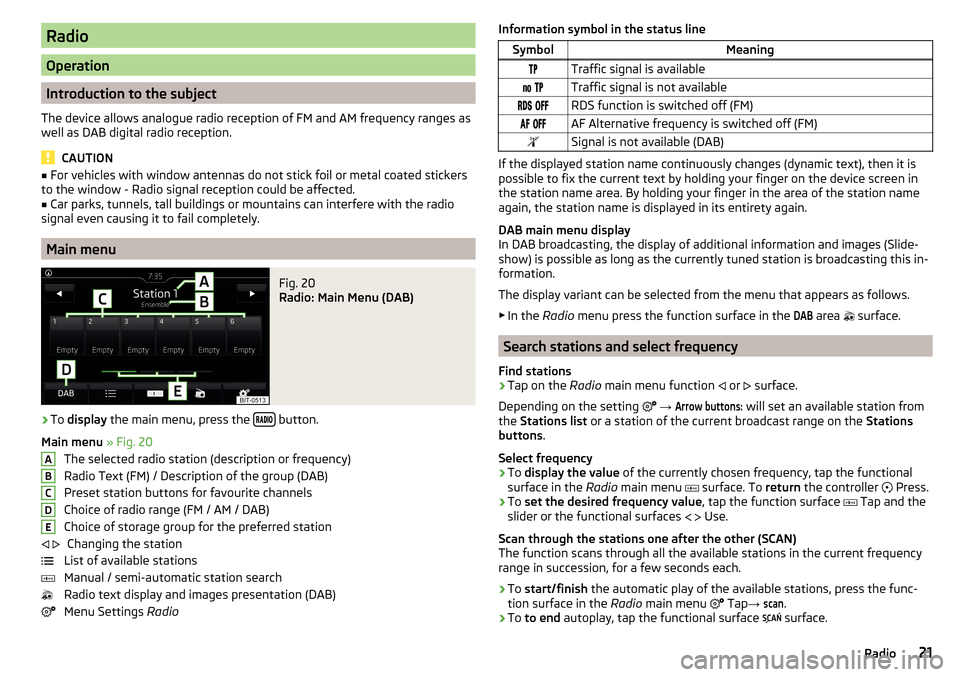
Fig. 20
Radio: Main Menu (DAB)
›
To display the main menu, press the button.
Main menu » Fig. 20
The selected radio station (description or frequency)
Radio Text (FM) / Description of the group (DAB)
Preset station buttons for favourite channels
Choice of radio range (FM / AM / DAB) Choice of storage group for the preferred station Changing the station
List of available stations
Manual / semi-automatic station search
Radio text display and images presentation (DAB)
Menu Settings Radio
ABCDE Information symbol in the status lineSymbolMeaningTraffic signal is available Traffic signal is not available RDS function is switched off (FM) AF Alternative frequency is switched off (FM)Signal is not available (DAB)
If the displayed station name continuously changes (dynamic text), then it is
possible to fix the current text by holding your finger on the device screen in
the station name area. By holding your finger in the area of the station name
again, the station name is displayed in its entirety again.
DAB main menu display
In DAB broadcasting, the display of additional information and images (Slide-
show) is possible as long as the currently tuned station is broadcasting this in-
formation.
The display variant can be selected from the menu that appears as follows. ▶ In the Radio menu press the function surface in the
DAB
area
surface.
Search stations and select frequency
Find stations
›
Tap on the Radio main menu function
or
surface.
Depending on the setting
→
Arrow buttons:
will set an available station from
the Stations list or a station of the current broadcast range on the Stations
buttons .
Select frequency
›
To display the value of the currently chosen frequency, tap the functional
surface in the Radio main menu
surface. To
return the controller
Press.
›
To
set the desired frequency value , tap the function surface
Tap and the
slider or the functional surfaces
Use.
Scan through the stations one after the other (SCAN)
The function scans through all the available stations in the current frequency
range in succession, for a few seconds each.
›
To start/finish the automatic play of the available stations, press the func-
tion surface in the Radio main menu
Tap
→
scan
.
›
To to end autoplay, tap the functional surface
surface.
21Radio
Page 24 of 100
List of available stationsFig. 21
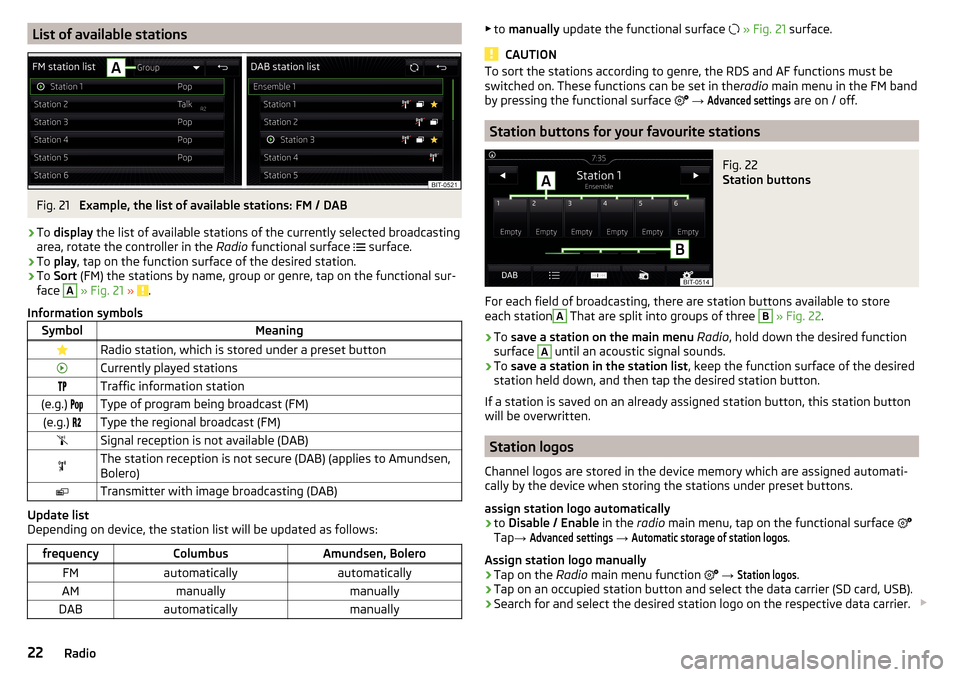
Example, the list of available stations: FM / DAB
›
To display the list of available stations of the currently selected broadcasting
area, rotate the controller in the Radio functional surface
surface.
›
To
play , tap on the function surface of the desired station.
›
To Sort (FM) the stations by name, group or genre, tap on the functional sur-
face
A
» Fig. 21 » .
Information symbols
SymbolMeaningRadio station, which is stored under a preset buttonCurrently played stationsTraffic information station(e.g.) Type of program being broadcast (FM)(e.g.) Type the regional broadcast (FM)Signal reception is not available (DAB)The station reception is not secure (DAB) (applies to Amundsen,
Bolero)Transmitter with image broadcasting (DAB)
Update list
Depending on device, the station list will be updated as follows:
frequencyColumbusAmundsen, BoleroFMautomaticallyautomaticallyAMmanuallymanuallyDABautomaticallymanually▶ to manually update the functional surface » Fig. 21 surface.
CAUTION
To sort the stations according to genre, the RDS and AF functions must be
switched on. These functions can be set in the radio main menu in the FM band
by pressing the functional surface
→ Advanced settings
are on / off.
Station buttons for your favourite stations
Fig. 22
Station buttons
For each field of broadcasting, there are station buttons available to store
each station
A
That are split into groups of three
B
» Fig. 22 .
›
To save a station on the main menu Radio , hold down the desired function
surface
A
until an acoustic signal sounds.
›
To save a station in the station list , keep the function surface of the desired
station held down, and then tap the desired station button.
If a station is saved on an already assigned station button, this station button
will be overwritten.
Station logos
Channel logos are stored in the device memory which are assigned automati-
cally by the device when storing the stations under preset buttons.
assign station logo automatically
›
to Disable / Enable in the radio main menu, tap on the functional surface
Tap →
Advanced settings
→
Automatic storage of station logos
.
Assign station logo manually
›
Tap on the Radio main menu function
→
Station logos
.
›
Tap on an occupied station button and select the data carrier (SD card, USB).
›
Search for and select the desired station logo on the respective data carrier.
22Radio
Page 25 of 100
Remove channel logo manually›Tap on the Radio main menu function →
Station logos
.›
Tap on the station button from which you want to remove a logo.
Update station logos
Current information on the on available software, the components of which
are also station logos, can be found on the following ŠKODAwebsite.
http://go.skoda.eu/infotainment
Note
■ The following image formats are supported: jpg, gif, png, bmp.■We recommend a resolution of up to 500 x 500 pixels.
TP Traffic programme
›
To switch on/off the traffic monitoring in the main menu Radio, tap on the
function surface
→
Traffic programme (TP)
.
During a traffic announcement, it is possible to cancel the current announce-
ment if necessary by deactivating the traffic monitoring.
Note
■ Should this station not transmit traffic reports or the signal is not available,
then the device automatically searches in the background for another TP sta-
tion.■
During playback in menu Media or a station in the AM radio range, traffic
news is received from the previously selected FM radio range.
Settings
Settings for all broadcasting areas
›
Tap on the Radio main menu function
surface.
■
Sound
- sound settings
■
Scan
- Auto-play all available stations in the current frequency band, each sta-
tion for around 5 seconds
■
Arrow buttons:
- setting the function of the station change (function surfaces
)
■
Preset list
- Change between stations stored under the preset buttons
■
Station list
- Change between all available stations of the selected broad-
casting range
■
Traffic programme (TP)
- Switches TP traffic programme on/off
■Delete presets - Deletes the preset buttons
■Station logos
- manual assignment /removal of station logos
■
Radio text
- Switching the text display radio (valid only for FM and DAB) on and
off
■
Advanced settings
- further settings that are different depending on the selec-
ted broadcasting range(valid only for FM and DAB)
Advanced Settings (FM)
›
Select the FM band in the Radio main menu and tap on the function surface
Tap →
Advanced settings
.
■
Auto-save station logos
- Automatic storage of the station logos
■
Region for station logo
- Clarification of the station logo region
■
Automatic frequency control (AF)
- Search for alternative frequencies of the station
currently being played to on/off
■
Radio Data System (RDS)
- enable/disable RDS function (receiving additional in-
formation from the station)
■
RDS Regional:
- Setting of the automatic change to a regional related stations
with stronger reception signal
■
Fix
- Turn off the automatic change
■
Automatic
- Switching on the automatic change
Advanced settings (DAB)
›
In the Radio main menu, select the DAB range and tap on the function sur-
face Tap
→
Advanced settings
.
■
Auto-save station logos
- Automatic storage of the station logos
■
DAB traffic announcements
- Switch on/off DAB traffic announcements
■
Other DAB announcements
- Switch on/off other announcements (e.g., warnings,
regional weather, sports reports, financial news)
■
DAB - DAB station tracking
- Switch on/off automatic DAB station tracking on an-
other frequency or in other station groups
■
Automatic DAB - FM switching
- Switch on/off auto-switching from DAB to the FM
broadcasting range if the DAB signal is lost
■
L-band
- Enable / disable the availability of L-band
DAB station tracking
When a DAB transmitter is a part of several broadcast stations and if the cur-
rent station group is not available on any other frequency, then when the sig-
nal is poor, the same station will be searched in another channel group.
23Radio
Page 38 of 100
Symbol » Fig. 33FunctionDisplay program information for the next 24 hours (EPG) / / / Display the specified line in the lower teletext page (the
same colour field or number)
Settings
›
In the main menu TV tuner press the function surface
surface.
■
Arrow buttons
- Set the station select function in the TV tuner menu
■
Preset list
- Change between stations stored in the preset list
■
Station list
- Switch between all available TV stations
■
Screen
- Brightness, contrast and colour settings
■
Format:
- Selection of aspect ratio
■
Audio channel:
- Audio channel selection
■
TV standard:
- Selection of TV-Region
■
Subtitles
- Enable / disable the subtitle display
■
Sound
- sound settings
■
Automatic station tracking
- Switch on / off the automatic station tracking
■
Preset list
- Management of the storage list
Media Command
Using the system
Introduction to the subject
Applies to Amundsen (Does not apply to Yeti).
The Media Commandfunction allows playback of audio files or videos in up to
two Tablets That are connected to the device via WLAN, to control the device.
The Media Command function enables operation of tablets with the operating
system Android or iOS and with the running application ŠKODA Media
Command.
Connect tablet with device
›
Turn on the device hotspot (WLAN) (press the button then the functional
surface Tap
→
WLAN
→
Mobile hotspot
→
Mobile hotspot
.
›
Turn on WiFi in tablet.
›
The hotspot of the device (if necessary, enter the password for the connec-
tion setup according to the setting of the device hotspots » page 52).
›
In the tablet, start the application ŠKODA Media Command.
CAUTION
If several devices are connected to the device via WLAN, there is a risk that the
quality of the WLAN connection, and thus the function of Media Command may
be affected.
Main Menu - connected to a tablet
Fig. 34
Main menu: a tablet is connected
›
to display of the main menu Media Command press the button , then the
functional surface
surface.
36Media Command
Page 56 of 100
SmartLink
Introductory information
Introduction to the subject
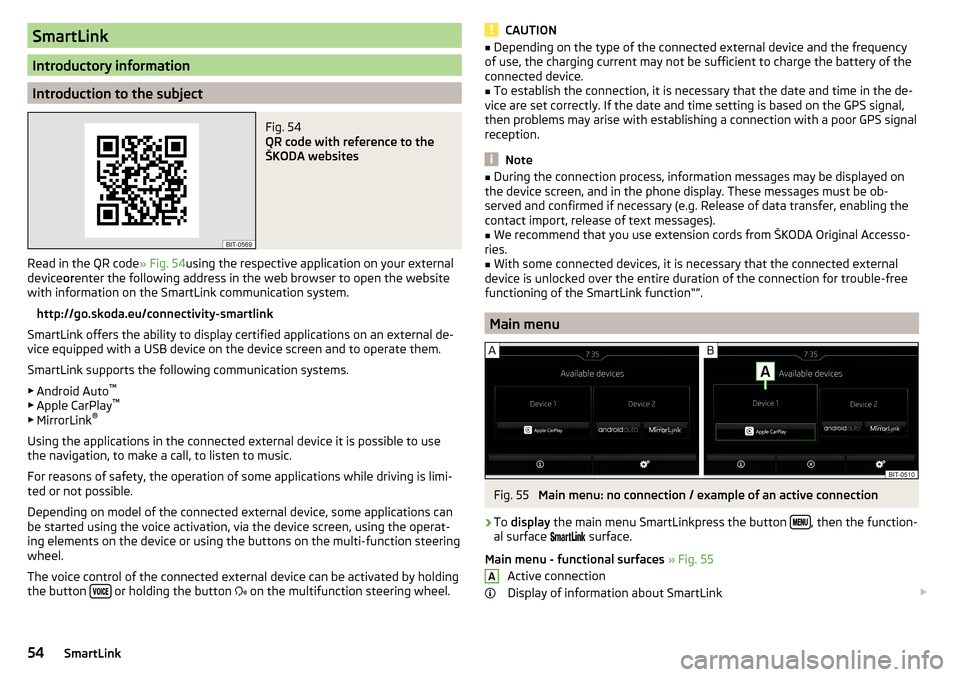
Fig. 54
QR code with reference to the
ŠKODA websites
Read in the QR code » Fig. 54using the respective application on your external
device orenter the following address in the web browser to open the website
with information on the SmartLink communication system.
http://go.skoda.eu/connectivity-smartlink
SmartLink offers the ability to display certified applications on an external de-
vice equipped with a USB device on the device screen and to operate them.
SmartLink supports the following communication systems. ▶ Android Auto ™
▶ Apple CarPlay ™
▶ MirrorLink ®
Using the applications in the connected external device it is possible to use
the navigation, to make a call, to listen to music.
For reasons of safety, the operation of some applications while driving is limi-
ted or not possible.
Depending on model of the connected external device, some applications can
be started using the voice activation, via the device screen, using the operat-
ing elements on the device or using the buttons on the multi-function steering
wheel.
The voice control of the connected external device can be activated by holding
the button
or holding the button
on the multifunction steering wheel.
CAUTION■
Depending on the type of the connected external device and the frequency
of use, the charging current may not be sufficient to charge the battery of the
connected device.■
To establish the connection, it is necessary that the date and time in the de-
vice are set correctly. If the date and time setting is based on the GPS signal,
then problems may arise with establishing a connection with a poor GPS signal
reception.
Note
■ During the connection process, information messages may be displayed on
the device screen, and in the phone display. These messages must be ob-
served and confirmed if necessary (e.g. Release of data transfer, enabling the
contact import, release of text messages).■
We recommend that you use extension cords from ŠKODA Original Accesso-
ries.
■
With some connected devices, it is necessary that the connected external
device is unlocked over the entire duration of the connection for trouble-free
functioning of the SmartLink function“”.
Main menu
Fig. 55
Main menu: no connection / example of an active connection
›
To display the main menu SmartLinkpress the button , then the function-
al surface
surface.
Main menu - functional surfaces » Fig. 55
Active connection
Display of information about SmartLink
A54SmartLink
Page 91 of 100
Radio21
Telephone41
Own POI categories64
P
Pairing process
43
Parking80
Parking aid80
Parking spot62
ParkPilot80
Personalisation79
Configuration wizard16
Personal POIs64
Petrol station logo76
Phone39
Adjust text messages41
Clear calls41
Diverting calls41
Import contacts41
Manage Favourites41
Premium41
rSAP46
Settings call41
set to41
User profile41
Voice control14
Phonebox39
Phone Premium rSAP
46
SIM card45
Pictures31
Compatible sources32
File formats32
Requirements and restrictions32
Supported file formats32
Pin code set to
41
Play Media
25
PlaybackVideo DVD33
POI64
Choose in the map65
Import64
My POIs64
Speed dial62
Tap in the map65
Pop-up window Map
67
Preferred contacts48
Principles of device operation12
Proactive passenger protection80
Q
Qi
39
R
radio Select station
21
Radio21
Broadcasting21
DAB settings23
FM - settings23
L-band24
List of available stations22
Main menu21
Operation21
Preface21
Radio station Logo22
Save station22
Scan21
Search stations21
set to23
Station buttons22
Traffic programme (TP)23
Voice control14
Radio station Logo
22
Radio station logos22
Update19
Radio stations Choose
21
Save station22
Search stations21
Select station21
Station buttons22
Rear seats83
Rear Traffic Alert80
Rear window - automatic wiping81
Recirculation mode83
Record waypoints73
Remote transfer of SIM data46
Reset - vehicle settings82
Restart the device11
restaurant62
Road sign67
Route68
New route72
Route import72
Route memory72
Route calculation68
Trailer towing69
Route import72
Route information70
Route memory72
Route options76
Route plan70
Route schedule70
rSAP46
S
Safe removal of the data source
18
Save station22
Screen See device screen
10
Screen display12
89Index