light SKODA SUPERB 2016 3.G / (B8/3V) Columbus Amundsen Bolero Infotainment System Navigation Manual
[x] Cancel search | Manufacturer: SKODA, Model Year: 2016, Model line: SUPERB, Model: SKODA SUPERB 2016 3.G / (B8/3V)Pages: 100, PDF Size: 12.8 MB
Page 5 of 100
Important information about this Owner's Manual
This manual is valid for all types of Columbus, Amundsen and Bolero infotain-
ment systems (hereafter only known as devices). The device may differ de-
pending on the vehicle model, in which it is installed in both its appearance
and in the arrangement of the controls.
This Owner's Manual describes all possible device functions without identify-
ing them as special equipment, model variants or market-dependent equip-
ment. Consequently, the device in your vehicle does not need to contain all of
the functions described in this Owner's Manual.
For example, if the vehicle is not factory equipped with the CANTON sound
system, the menu points
CANTON Optimisation
,
CANTON Surround
and
CANTON Equalis-er
are not shown.
The availability of some features described in this Owner's Manual depends
on the type of external devices (for example, telephone, music player, etc.).
The illustrations in this Owner's Manual are for illustrative purposes only. The
illustrations can differ in minor details from your vehicle; they are only inten-
ded to provide general information.
ŠKODA AUTO pursues a policy of ongoing product and model development
with all vehicles. Therefore, changes to the scope of delivery with regard to
design, equipment and technology are possible at any time. The information
provided in this Owner's Manual corresponds to the information available at
the time of publishing.
Therefore, legal claims cannot be made based on the technical data, illustra-
tions and information contained in this Owner's Manual.
We recommend that the web pages that are referred to in this Owner's Man-
ual are displayed using the classic view. Not all necessary information may be
displayed correctly if the mobile view is chosen.
Screen texts that appear in this Owner's Manual may differ slightly depending
on the texts show on the device screen.
Information and System Support
Information e.g. related to updating the device software, compatible external
devices etc., Please refer to the following websites.
http://go.skoda.eu/infotainment
Declaration of conformity
ŠKODA AUTO hereby declares that the ŠKODA Infotainment systems meet the
basic requirements and additional provisions of the 1999/5/EC Directive with
reference to radio equipment and telecommunications devices.3Important information about this Owner's Manual
Page 12 of 100
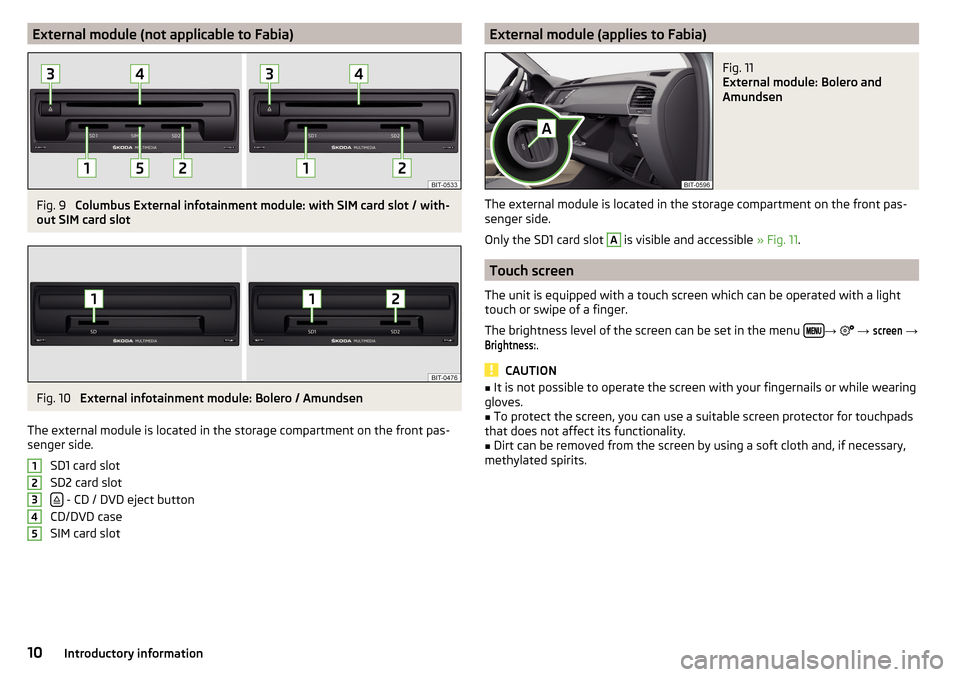
External module (not applicable to Fabia)Fig. 9
Columbus External infotainment module: with SIM card slot / with-
out SIM card slot
Fig. 10
External infotainment module: Bolero / Amundsen
The external module is located in the storage compartment on the front pas-
senger side.
SD1 card slot
SD2 card slot
- CD / DVD eject button
CD/DVD case
SIM card slot
12345External module (applies to Fabia)Fig. 11
External module: Bolero and
Amundsen
The external module is located in the storage compartment on the front pas-
senger side.
Only the SD1 card slot
A
is visible and accessible » Fig. 11.
Touch screen
The unit is equipped with a touch screen which can be operated with a light
touch or swipe of a finger.
The brightness level of the screen can be set in the menu
→
→
screen
→
Brightness:
.
CAUTION
■
It is not possible to operate the screen with your fingernails or while wearing
gloves.■
To protect the screen, you can use a suitable screen protector for touchpads
that does not affect its functionality.
■
Dirt can be removed from the screen by using a soft cloth and, if necessary,
methylated spirits.
10Introductory information
Page 19 of 100
The selected menu item is with the symbol provided.
Menu items which can be set by tapping on the respective function surface in
the A
» Fig. 19 area.
Sound settings
The scope of the following menu is dependent on the vehicle equipment with the sound system.
›
Press the button, then tap on the function surface
Tap.
■
Volume
- Volume settings
■
Announcements
- Adjustment of traffic announcements volume (TP)
■
Navigation announcements
- sets the volume for the navigation announce-
ments
■
Voice control
- volume setting for voice output
■
Maximum switch-on volume
- Sets the maximum volume after switching on the
device
■
Speed-dependent vol. adjustment
- increases the volume as speed increases
■
AUX volume:
- Sets the volume for the device connected through AUX exter-
nal devices
■
Quiet
- low volume
■
Medium
- Medium volume
■
Loud
- High volume
■
Bluetooth audio:
- Volume setting of the external device connected via Blue-
tooth ®
audio profile
■
Entertainment fading while parking
- Lowers the audio volume (e.g. radio volume)
with activated parking aid
■
Entertainment fading (nav. announcements)
- Lowers the audio volume (e.g. radio
volume) in the event of a nav. announcements
■
Bass - Mid - Treble
- setting the equalizer
■
Balance - Fader
- Sets the balance between left and right, front and rear
■
CANTON Equaliser
- Setting the equalizer
■
Individual
- Adjustment of treble, mid and bass
■
Profile
- Setting of the profile (e.g.
Rock
.
Classical
and so on).
■
CANTON optimisation
- Setting the optimum room sound perception
■
All
- Optimising the sound for the entire vehicle interior
■
Front
- Optimising the surround sound for the front seats
■
Driver
- Optimising the sound for the driver
■
CANTON surround
- Setting the surround sound levels in the area (“-9 ”Stereo /
“+9”full surround)
■
Subwoofer
- Subwoofer volume settings
■ŠKODA Surround - Turn surround sound on/off (Cannot be used in Radio mode)
■Virtual Subwoofer
-Turn virtual subwoofer on/off (Cannot be used in Radio
mode)
■
Sound Character
- Select the sound character (applies to Yeti)
■
Surround
- Optimising the sound for the room (applies to Yeti)
■
Sound focus
-Setting the optimum room sound perception
■
All
- Optimising the sound for the entire vehicle interior
■
Driver
- Optimising the sound for the driver
■
Touchscreen tone
- Switch on/off audible tone when touching the screen
■
No navigation announcements during call
- Switches on or off the navigation
prompts during a telephone conversation
Screen settings
›
Press the button, then tap on the function surface
→ Tap
screen
.
■
Switch off screen (in 10 seconds)
- Enable / disable the automatic power off func-
tion
■
Brightness:
- Adjusts the brightness of the screen
■
Touchscreen tone
- Switch on/off audible tone when touching the screen
■
Proximity sensor
- Turn the proximity sensors on/off (When the function is on,
e.g. Navigation will be shown in the main menu when moving a finger to-
wards the bottom bar with the functional surfaces on the screen)
■
Show clock in standby mode
- Time and date displayed on the screen when the
ignition is switched on and the unit is switched off
Time and date settings
›
Press the button, then tap on the function surface
Tap
→
Time and date
.
■
Clock time source:
- Setting the time source: manual,GPS (applies to Columbus,
Amundsen)
■
Time:
- Time settings
■
Summertime
- Activate / deactivate summer time (applies to Columbus,
Amundsen)
■
automatically adjust DST
- Turn on / off the automatic switch to daylight saving
time
■
Time zone:
- Select the time zone
■
Time format:
- Set the time format
■
Date:
- Date settings
■
Date format:
- Set the date format
17Device operation and settings
Page 68 of 100
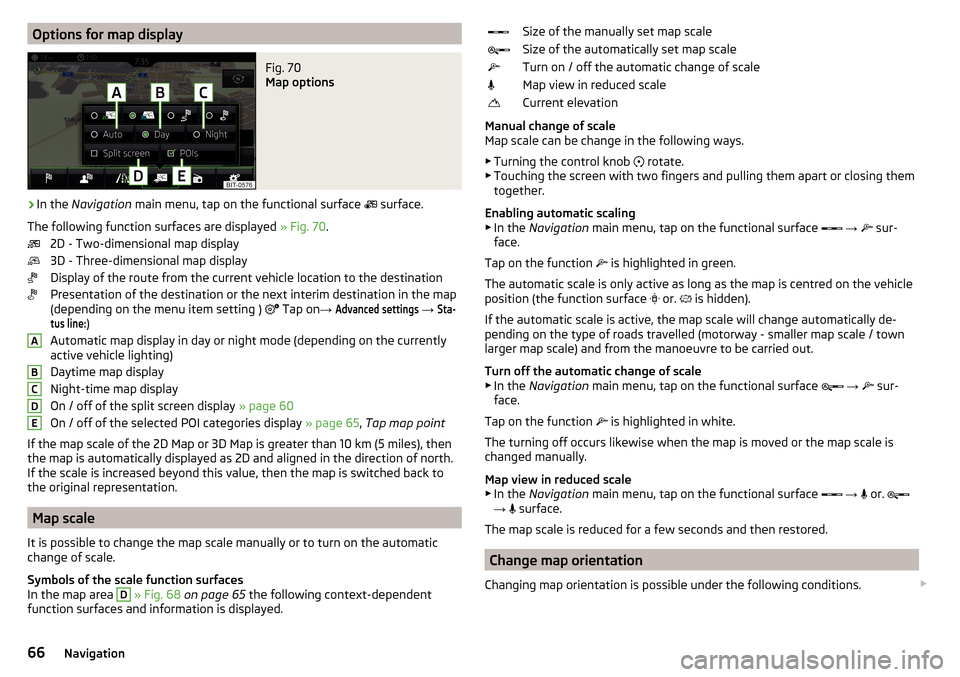
Options for map displayFig. 70
Map options
›
In the Navigation main menu, tap on the functional surface
surface.
The following function surfaces are displayed » Fig. 70.
2D - Two-dimensional map display
3D - Three-dimensional map display
Display of the route from the current vehicle location to the destination
Presentation of the destination or the next interim destination in the map
(depending on the menu item setting ) Tap on
→
Advanced settings
→
Sta-tus line:
)
Automatic map display in day or night mode (depending on the currently
active vehicle lighting)
Daytime map display
Night-time map display
On / off of the split screen display » page 60
On / off of the selected POI categories display » page 65, Tap map point
If the map scale of the 2D Map or 3D Map is greater than 10 km (5 miles), then
the map is automatically displayed as 2D and aligned in the direction of north.
If the scale is increased beyond this value, then the map is switched back to
the original representation.
Map scale
It is possible to change the map scale manually or to turn on the automatic
change of scale.
Symbols of the scale function surfaces
In the map area
D
» Fig. 68 on page 65 the following context-dependent
function surfaces and information is displayed.
ABCDESize of the manually set map scaleSize of the automatically set map scaleTurn on / off the automatic change of scaleMap view in reduced scaleCurrent elevation
Manual change of scale
Map scale can be change in the following ways.
▶ Turning the control knob
rotate.
▶ Touching the screen with two fingers and pulling them apart or closing them
together.
Enabling automatic scaling ▶ In the Navigation main menu, tap on the functional surface
→
sur-
face.
Tap on the function is highlighted in green.
The automatic scale is only active as long as the map is centred on the vehicle
position (the function surface or.
is hidden).
If the automatic scale is active, the map scale will change automatically de-
pending on the type of roads travelled (motorway - smaller map scale / town
larger map scale) and from the manoeuvre to be carried out.
Turn off the automatic change of scale ▶ In the Navigation main menu, tap on the functional surface
→
sur-
face.
Tap on the function is highlighted in white.
The turning off occurs likewise when the map is moved or the map scale is
changed manually.
Map view in reduced scale
▶ In the Navigation main menu, tap on the functional surface
→
or.
→ surface.
The map scale is reduced for a few seconds and then restored.
Change map orientation
Changing map orientation is possible under the following conditions.
66Navigation
Page 71 of 100
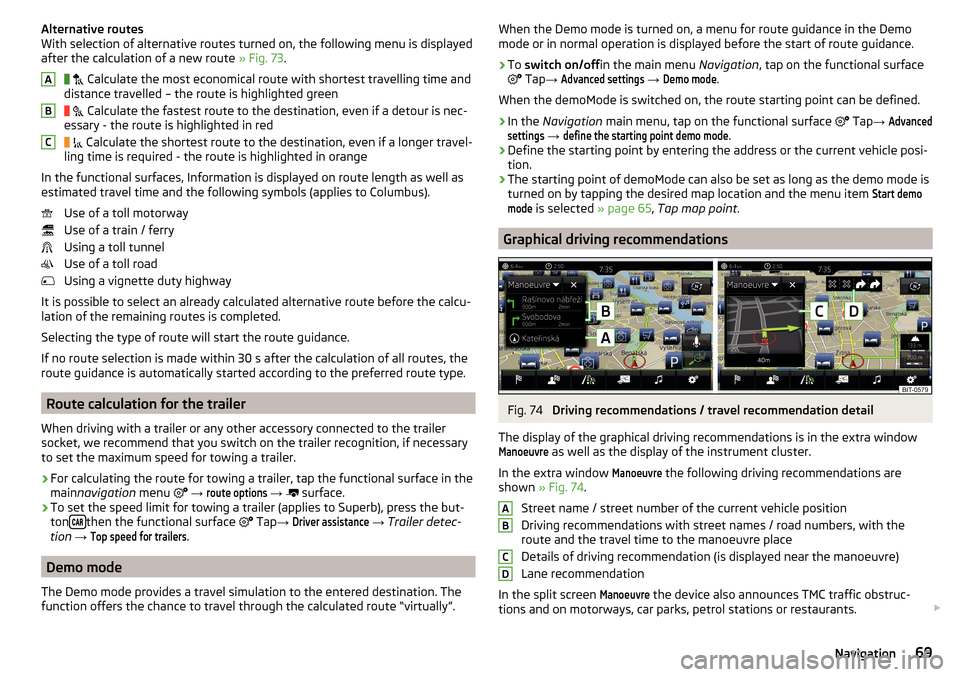
Alternative routes
With selection of alternative routes turned on, the following menu is displayed
after the calculation of a new route » Fig. 73.
Calculate the most economical route with shortest travelling time and
distance travelled – the route is highlighted green
Calculate the fastest route to the destination, even if a detour is nec-
essary - the route is highlighted in red
Calculate the shortest route to the destination, even if a longer travel-
ling time is required - the route is highlighted in orange
In the functional surfaces, Information is displayed on route length as well as
estimated travel time and the following symbols (applies to Columbus).
Use of a toll motorway
Use of a train / ferry
Using a toll tunnel
Use of a toll road
Using a vignette duty highway
It is possible to select an already calculated alternative route before the calcu-
lation of the remaining routes is completed.
Selecting the type of route will start the route guidance.
If no route selection is made within 30 s after the calculation of all routes, the
route guidance is automatically started according to the preferred route type.
Route calculation for the trailer
When driving with a trailer or any other accessory connected to the trailer
socket, we recommend that you switch on the trailer recognition, if necessary
to set the maximum speed for towing a trailer.
›
For calculating the route for towing a trailer, tap the functional surface in the
main navigation menu
→
route options
→
surface.
›
To set the speed limit for towing a trailer (applies to Superb), press the but-
ton then the functional surface
Tap
→
Driver assistance
→ Trailer detec-
tion →
Top speed for trailers
.
Demo mode
The Demo mode provides a travel simulation to the entered destination. The
function offers the chance to travel through the calculated route “virtually”.
ABCWhen the Demo mode is turned on, a menu for route guidance in the Demo
mode or in normal operation is displayed before the start of route guidance.›
To switch on/off in the main menu Navigation, tap on the functional surface
Tap →
Advanced settings
→
Demo mode
.
When the demoMode is switched on, the route starting point can be defined.
›
In the Navigation main menu, tap on the functional surface
Tap →
Advancedsettings
→
define the starting point demo mode
.
›
Define the starting point by entering the address or the current vehicle posi-
tion.
›
The starting point of demoMode can also be set as long as the demo mode is
turned on by tapping the desired map location and the menu item
Start demomode
is selected » page 65, Tap map point .
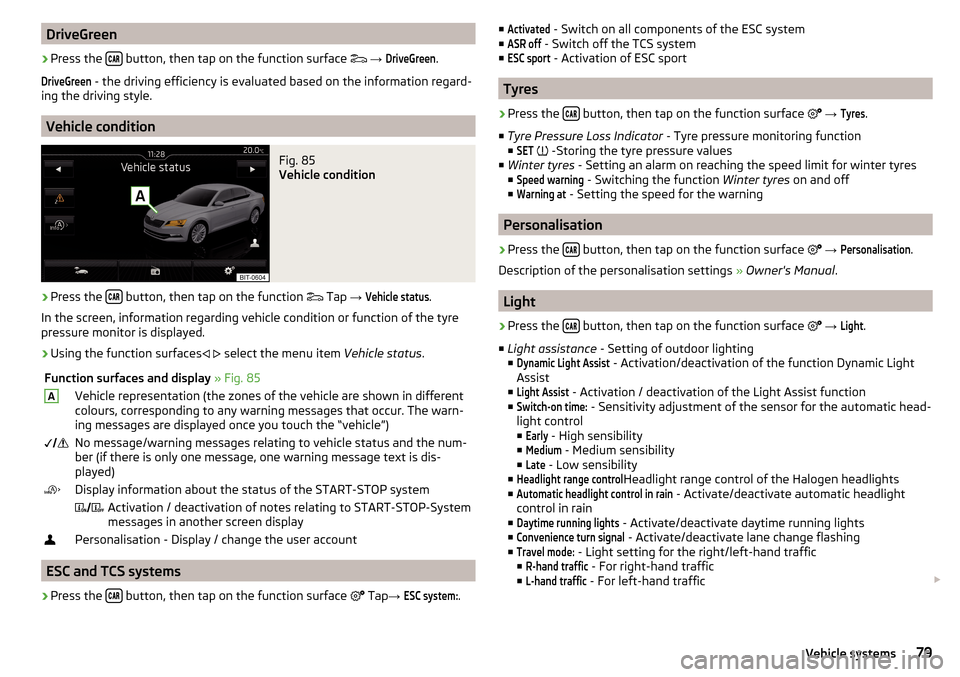
Graphical driving recommendations
Fig. 74
Driving recommendations / travel recommendation detail
The display of the graphical driving recommendations is in the extra window
Manoeuvre
as well as the display of the instrument cluster.
In the extra window
Manoeuvre
the following driving recommendations are
shown » Fig. 74 .
Street name / street number of the current vehicle position
Driving recommendations with street names / road numbers, with the
route and the travel time to the manoeuvre place
Details of driving recommendation (is displayed near the manoeuvre)
Lane recommendation
In the split screen
Manoeuvre
the device also announces TMC traffic obstruc-
tions and on motorways, car parks, petrol stations or restaurants.
ABCD69Navigation
Page 81 of 100
DriveGreen›
Press the button, then tap on the function surface
→
DriveGreen
.
DriveGreen
- the driving efficiency is evaluated based on the information regard-
ing the driving style.
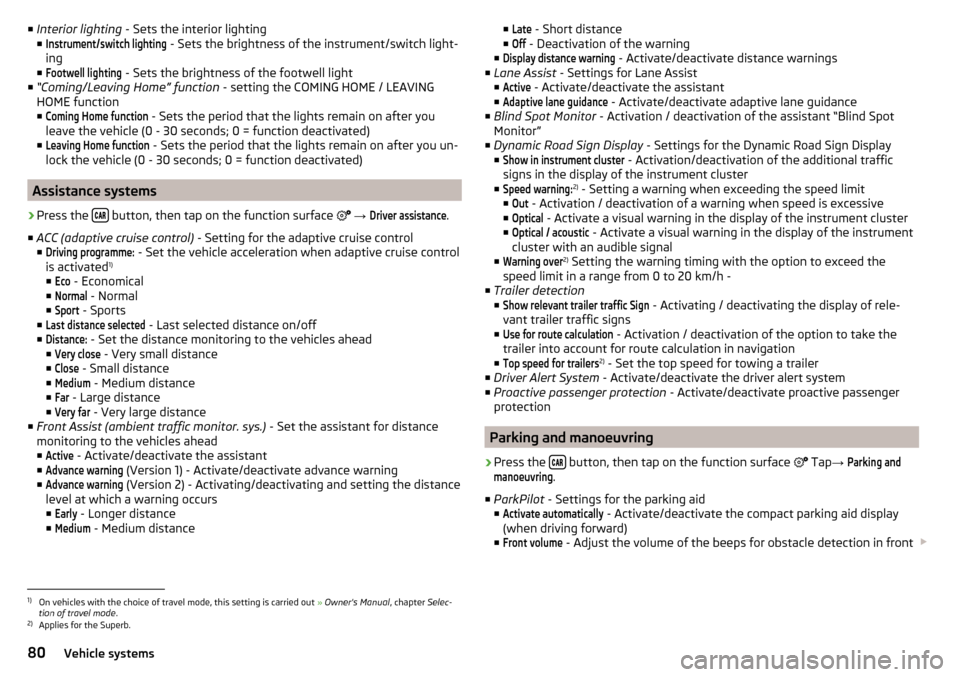
Vehicle condition
Fig. 85
Vehicle condition
›
Press the button, then tap on the function
Tap
→
Vehicle status
.
In the screen, information regarding vehicle condition or function of the tyre
pressure monitor is displayed.
›
Using the function surfaces
select the menu item
Vehicle status.
Function surfaces and display » Fig. 85AVehicle representation (the zones of the vehicle are shown in different
colours, corresponding to any warning messages that occur. The warn-
ing messages are displayed once you touch the “vehicle”) No message/warning messages relating to vehicle status and the num-
ber (if there is only one message, one warning message text is dis-
played)Display information about the status of the START-STOP system Activation / deactivation of notes relating to START-STOP-System
messages in another screen displayPersonalisation - Display / change the user account
ESC and TCS systems
›
Press the button, then tap on the function surface
Tap
→
ESC system:
.
■Activated - Switch on all components of the ESC system
■ASR off
- Switch off the TCS system
■
ESC sport
- Activation of ESC sport
Tyres
›
Press the button, then tap on the function surface
→
Tyres
.
■ Tyre Pressure Loss Indicator - Tyre pressure monitoring function
■
SET
-Storing the tyre pressure values
■ Winter tyres - Setting an alarm on reaching the speed limit for winter tyres
■
Speed warning
- Switching the function Winter tyres on and off
■
Warning at
- Setting the speed for the warning
Personalisation
›
Press the button, then tap on the function surface
→
Personalisation
.
Description of the personalisation settings » Owner's Manual .
Light
›
Press the button, then tap on the function surface
→
Light
.
■ Light assistance - Setting of outdoor lighting
■
Dynamic Light Assist
- Activation/deactivation of the function Dynamic Light
Assist
■
Light Assist
- Activation / deactivation of the Light Assist function
■
Switch-on time:
- Sensitivity adjustment of the sensor for the automatic head-
light control ■
Early
- High sensibility
■
Medium
- Medium sensibility
■
Late
- Low sensibility
■
Headlight range control
Headlight range control of the Halogen headlights
■
Automatic headlight control in rain
- Activate/deactivate automatic headlight
control in rain
■
Daytime running lights
- Activate/deactivate daytime running lights
■
Convenience turn signal
- Activate/deactivate lane change flashing
■
Travel mode:
- Light setting for the right/left-hand traffic
■
R-hand traffic
- For right-hand traffic
■
L-hand traffic
- For left-hand traffic
79Vehicle systems
Page 82 of 100
■Interior lighting - Sets the interior lighting
■Instrument/switch lighting
- Sets the brightness of the instrument/switch light-
ing
■
Footwell lighting
- Sets the brightness of the footwell light
■ “Coming/Leaving Home” function - setting the COMING HOME / LEAVING
HOME function
■
Coming Home function
- Sets the period that the lights remain on after you
leave the vehicle (0 - 30 seconds; 0 = function deactivated)
■
Leaving Home function
- Sets the period that the lights remain on after you un-
lock the vehicle (0 - 30 seconds; 0 = function deactivated)
Assistance systems
›
Press the button, then tap on the function surface
→
Driver assistance
.
■ ACC (adaptive cruise control) - Setting for the adaptive cruise control
■
Driving programme:
- Set the vehicle acceleration when adaptive cruise control
is activated 1)
■
Eco
- Economical
■
Normal
- Normal
■
Sport
- Sports
■
Last distance selected
- Last selected distance on/off
■
Distance:
- Set the distance monitoring to the vehicles ahead
■
Very close
- Very small distance
■
Close
- Small distance
■
Medium
- Medium distance
■
Far
- Large distance
■
Very far
- Very large distance
■ Front Assist (ambient traffic monitor. sys.) - Set the assistant for distance
monitoring to the vehicles ahead ■
Active
- Activate/deactivate the assistant
■
Advance warning
(Version 1) - Activate/deactivate advance warning
■
Advance warning
(Version 2) - Activating/deactivating and setting the distance
level at which a warning occurs ■
Early
- Longer distance
■
Medium
- Medium distance
■Late - Short distance
■Off
- Deactivation of the warning
■
Display distance warning
- Activate/deactivate distance warnings
■ Lane Assist - Settings for Lane Assist
■
Active
- Activate/deactivate the assistant
■
Adaptive lane guidance
- Activate/deactivate adaptive lane guidance
■ Blind Spot Monitor - Activation / deactivation of the assistant “Blind Spot
Monitor”
■ Dynamic Road Sign Display - Settings for the Dynamic Road Sign Display
■
Show in instrument cluster
- Activation/deactivation of the additional traffic
signs in the display of the instrument cluster
■
Speed warning:
2) - Setting a warning when exceeding the speed limit
■
Out
- Activation / deactivation of a warning when speed is excessive
■
Optical
- Activate a visual warning in the display of the instrument cluster
■
Optical / acoustic
- Activate a visual warning in the display of the instrument
cluster with an audible signal
■
Warning over
2) Setting the warning timing with the option to exceed the
speed limit in a range from 0 to 20 km/h -
■ Trailer detection
■
Show relevant trailer traffic Sign
- Activating / deactivating the display of rele-
vant trailer traffic signs
■
Use for route calculation
- Activation / deactivation of the option to take the
trailer into account for route calculation in navigation
■
Top speed for trailers
2) - Set the top speed for towing a trailer
■ Driver Alert System - Activate/deactivate the driver alert system
■ Proactive passenger protection - Activate/deactivate proactive passenger
protection
Parking and manoeuvring
›
Press the button, then tap on the function surface
Tap
→
Parking andmanoeuvring
.
■ ParkPilot - Settings for the parking aid
■
Activate automatically
- Activate/deactivate the compact parking aid display
(when driving forward)
■
Front volume
- Adjust the volume of the beeps for obstacle detection in front
1)
On vehicles with the choice of travel mode, this setting is carried out
» Owner's Manual , chapter Selec-
tion of travel mode .
2)
Applies for the Superb.
80Vehicle systems
Page 83 of 100
■Front tone setting - Setting the pitch of the beeps for obstacle detection in
front
■Rear volume
- Set the volume level of the beeps for the rear obstacle detec-
tion
■
Rear tone setting
- Setting the pitch of the beeps for the rear obstacle detec-
tion
■
Entertainment fading (parking)
- Lowers the audio volume (e.g. radio volume)
with activated parking aid
■ Rear Traffic Alert - Activate/deactivate the Rear Traffic Alert
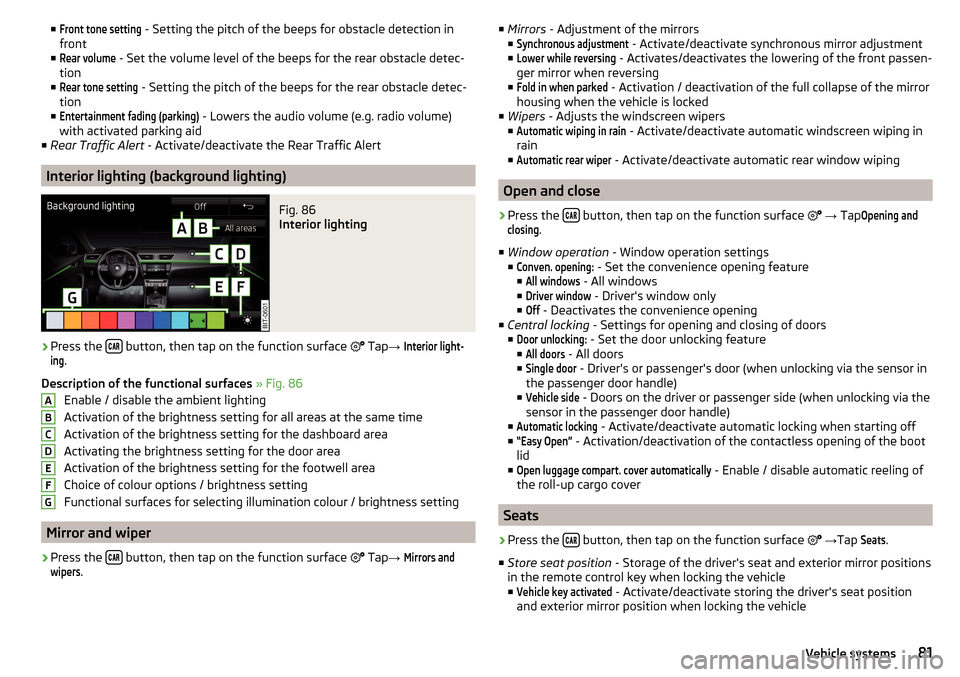
Interior lighting (background lighting)
Fig. 86
Interior lighting
›
Press the button, then tap on the function surface
Tap
→
Interior light-ing
.
Description of the functional surfaces » Fig. 86
Enable / disable the ambient lighting
Activation of the brightness setting for all areas at the same time
Activation of the brightness setting for the dashboard area
Activating the brightness setting for the door area
Activation of the brightness setting for the footwell area
Choice of colour options / brightness setting
Functional surfaces for selecting illumination colour / brightness setting
Mirror and wiper
›
Press the button, then tap on the function surface
Tap
→
Mirrors andwipers
.
ABCDEFG■
Mirrors - Adjustment of the mirrors
■Synchronous adjustment
- Activate/deactivate synchronous mirror adjustment
■
Lower while reversing
- Activates/deactivates the lowering of the front passen-
ger mirror when reversing
■
Fold in when parked
- Activation / deactivation of the full collapse of the mirror
housing when the vehicle is locked
■ Wipers - Adjusts the windscreen wipers
■
Automatic wiping in rain
- Activate/deactivate automatic windscreen wiping in
rain
■
Automatic rear wiper
- Activate/deactivate automatic rear window wiping
Open and close
›
Press the button, then tap on the function surface
→ Tap
Opening andclosing
.
■ Window operation - Window operation settings
■
Conven. opening:
- Set the convenience opening feature
■
All windows
- All windows
■
Driver window
- Driver's window only
■
Off
- Deactivates the convenience opening
■ Central locking - Settings for opening and closing of doors
■
Door unlocking:
- Set the door unlocking feature
■
All doors
- All doors
■
Single door
- Driver's or passenger's door (when unlocking via the sensor in
the passenger door handle)
■
Vehicle side
- Doors on the driver or passenger side (when unlocking via the
sensor in the passenger door handle)
■
Automatic locking
- Activate/deactivate automatic locking when starting off
■
“Easy Open”
- Activation/deactivation of the contactless opening of the boot
lid
■
Open luggage compart. cover automatically
- Enable / disable automatic reeling of
the roll-up cargo cover
Seats
›
Press the button, then tap on the function surface
→ Tap
Seats
.
■ Store seat position - Storage of the driver's seat and exterior mirror positions
in the remote control key when locking the vehicle
■
Vehicle key activated
- Activate/deactivate storing the driver's seat position
and exterior mirror position when locking the vehicle
81Vehicle systems
Page 84 of 100
Instrument cluster (multifunction display)›
Press the button, then tap on the function surface
→
Instrument cluster
.
In this menu it is possible to hide/show the appearance of the menu items in
the instrument cluster multifunction display and reset the trip data.
■
Current consumption
- Display of current fuel consumption on/off
■
Average consumption
- Display of average fuel consumption on/off
■
Refuel quantity
- Display of refuel quantity on/off
■
Conv. consumers
- Display of fuel consumption of convenience consumers
on/off
■
Eco tips
- Switch on/off the display for tips on saving fuel
■
Travelling time
- Display of travelling time on/off
■
Distance travelled
- Display of distance travelled on/off
■
Average speed
- Display of average speed on/off
■
Digital speed display
- Display of current speed on/off
■
Speed warning
- Winter tyres warning on/off
■
Oil temperature
- Oil temperature on/off
■
Dynamic Road Sign Display
- Turn on/off the display of detected traffic signs
■
Reset "Since start" driving data
- Reset the single-trip memory in the device
screen and in the display of the instrument cluster
■
Reset "Long-term" driving data
- Reset the long-term memory in the device screen
and in the display of the instrument cluster
Time, date and unit setting
›
Press the button, then tap the function surface
Time and date
.
›
Press the button, then tap the function surface
Units
.
Service
›
Press the button, then tap on the function
→
Service
.
■ Vehicle identification number: - Display of the vehicle identification number
(VIN)
■ Inspection in … or … days - number of km/days until the next inspection
■ Oil change service in ... or ... days - number of km/days until the next oil
change
Reset to factory settings
›
Press the button, then tap on the function surface
→
Factory settings
.
In this menu you have the possibility to reset the menu items in the settings of
the vehicle systems to factory settings.
■ Reset all settings and data
■All settings
- Restoration of the settings all menu items
■ Reset individual settings/data
■
Light
- Restoration of the
Light
menus
■
Driver assistance
- Restoration of the
Driver assistance
menus
■
Parking and manoeuvring
- Restoration of the
Parking and manoeuvring
menu items
■
Interior lighting
- Restoration of the
Interior lighting
menu
■
Mirrors and wipers
- Restoration of the
Mirrors and wipers
menu
■
Opening and closing
- Restoration of the
Opening and closing
menu
■
Instrument cluster
- Restoration of the
Instrument cluster
menu
■
personalisation
- Restoration of the
personalisation
menu
If one of the above menu items is selected, the system will ask you whether
you really want to restore the settings.
■
Cancel
- Return to higher-level menu
■
Reset
- Restore the settings
Adjustment of the heating and cooling system
Introduction to the subject
Applies to Superb and Octavia
In the display some of the settings for the Climatronic, the auxiliary heating
and ventilation can be made.
Description of the individual systems » Owner's Manual .
Note
The settings can only be made when the ignition is switched on.82Vehicle systems
Page 85 of 100
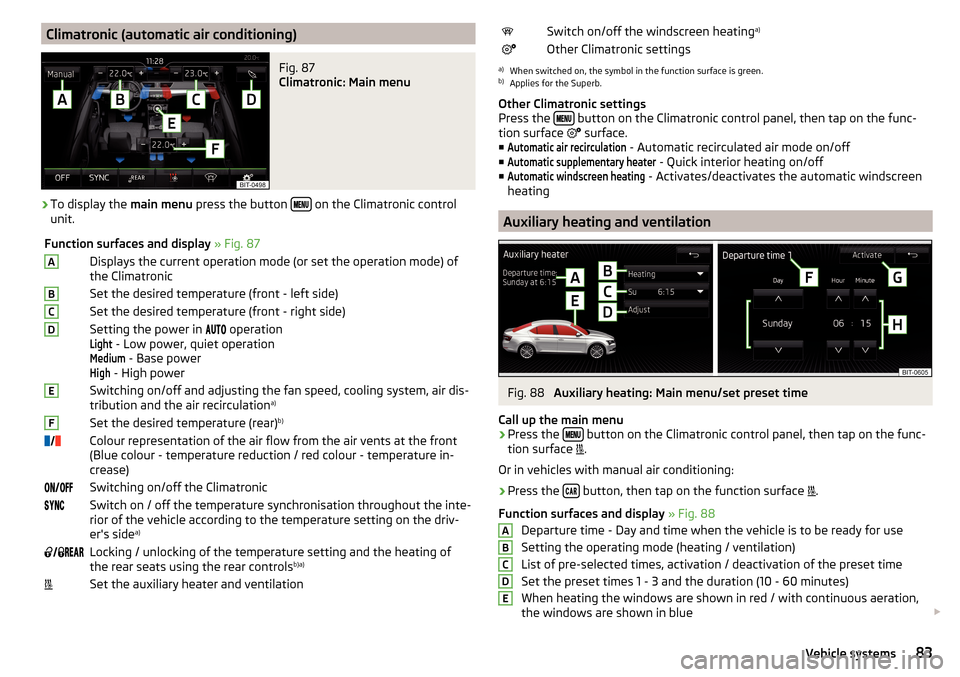
Climatronic (automatic air conditioning)Fig. 87
Climatronic: Main menu
›
To display the main menu press the button on the Climatronic control
unit.
Function surfaces and display » Fig. 87ADisplays the current operation mode (or set the operation mode) of
the ClimatronicBSet the desired temperature (front - left side)CSet the desired temperature (front - right side)DSetting the power in operationLight
- Low power, quiet operation
Medium
- Base power
High
- High power
ESwitching on/off and adjusting the fan speed, cooling system, air dis-
tribution and the air recirculation a)FSet the desired temperature (rear)
b)
Colour representation of the air flow from the air vents at the front
(Blue colour - temperature reduction / red colour - temperature in-
crease)Switching on/off the ClimatronicSwitch on / off the temperature synchronisation throughout the inte-
rior of the vehicle according to the temperature setting on the driv-
er's side a)
Locking / unlocking of the temperature setting and the heating of
the rear seats using the rear controls b)a)Set the auxiliary heater and ventilationSwitch on/off the windscreen heating
a)Other Climatronic settingsa)
When switched on, the symbol in the function surface is green.
b)
Applies for the Superb.
Other Climatronic settings
Press the
button on the Climatronic control panel, then tap on the func-
tion surface
surface.
■
Automatic air recirculation
- Automatic recirculated air mode on/off
■
Automatic supplementary heater
- Quick interior heating on/off
■
Automatic windscreen heating
- Activates/deactivates the automatic windscreen
heating
Auxiliary heating and ventilation
Fig. 88
Auxiliary heating: Main menu/set preset time
Call up the main menu
›
Press the button on the Climatronic control panel, then tap on the func-
tion surface .
Or in vehicles with manual air conditioning:
›
Press the button, then tap on the function surface
.
Function surfaces and display » Fig. 88
Departure time - Day and time when the vehicle is to be ready for use
Setting the operating mode (heating / ventilation) List of pre-selected times, activation / deactivation of the preset timeSet the preset times 1 - 3 and the duration (10 - 60 minutes)When heating the windows are shown in red / with continuous aeration,
the windows are shown in blue
ABCDE83Vehicle systems