jacking points SKODA SUPERB 2016 3.G / (B8/3V) Owner's Manual
[x] Cancel search | Manufacturer: SKODA, Model Year: 2016, Model line: SUPERB, Model: SKODA SUPERB 2016 3.G / (B8/3V)Pages: 336, PDF Size: 53.89 MB
Page 286 of 336

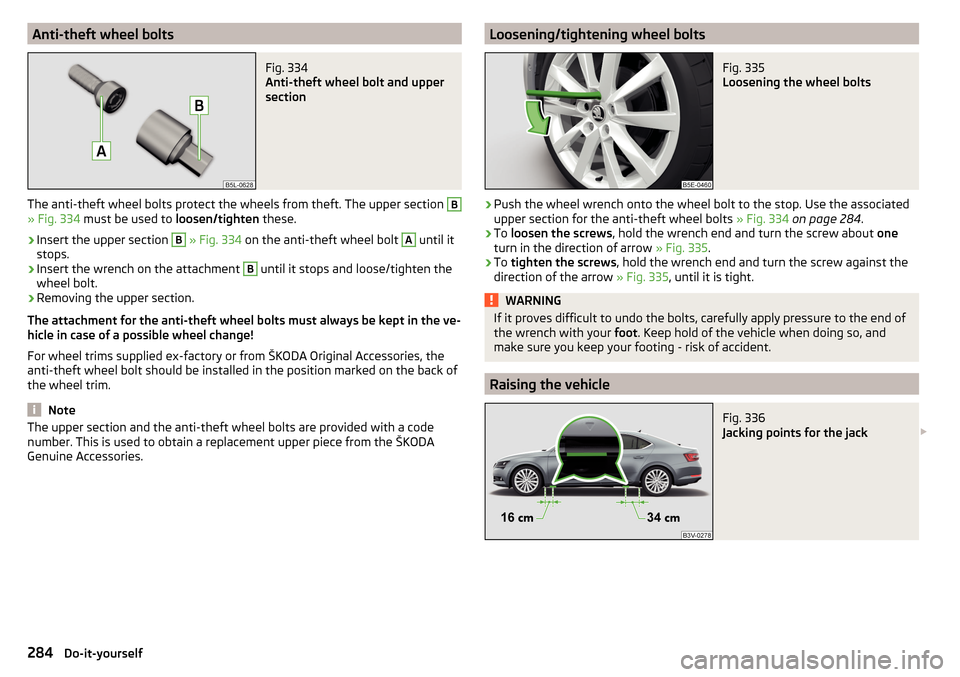
Anti-theft wheel boltsFig. 334
Anti-theft wheel bolt and upper
section
The anti-theft wheel bolts protect the wheels from theft. The upper section
B
» Fig. 334 must be used to loosen/tighten these.
›
Insert the upper section
B
» Fig. 334 on the anti-theft wheel bolt
A
until it
stops.
›
Insert the wrench on the attachment
B
until it stops and loose/tighten the
wheel bolt.
›
Removing the upper section.
The attachment for the anti-theft wheel bolts must always be kept in the ve-
hicle in case of a possible wheel change!
For wheel trims supplied ex-factory or from ŠKODA Original Accessories, the
anti-theft wheel bolt should be installed in the position marked on the back of
the wheel trim.
Note
The upper section and the anti-theft wheel bolts are provided with a code
number. This is used to obtain a replacement upper piece from the ŠKODA
Genuine Accessories.Loosening/tightening wheel boltsFig. 335
Loosening the wheel bolts
›
Push the wheel wrench onto the wheel bolt to the stop. Use the associated
upper section for the anti-theft wheel bolts » Fig. 334 on page 284 .
›
To loosen the screws , hold the wrench end and turn the screw about one
turn in the direction of arrow » Fig. 335.
›
To tighten the screws , hold the wrench end and turn the screw against the
direction of the arrow » Fig. 335, until it is tight.
WARNINGIf it proves difficult to undo the bolts, carefully apply pressure to the end of
the wrench with your foot. Keep hold of the vehicle when doing so, and
make sure you keep your footing - risk of accident.
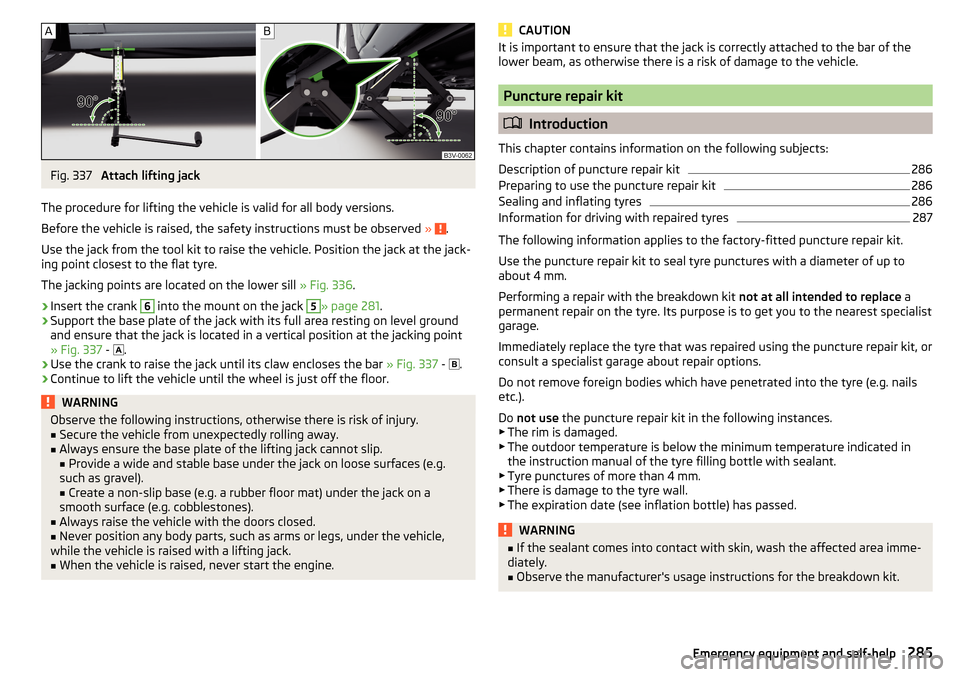
Raising the vehicle
Fig. 336
Jacking points for the jack
284Do-it-yourself
Page 287 of 336

Fig. 337
Attach lifting jack
The procedure for lifting the vehicle is valid for all body versions.
Before the vehicle is raised, the safety instructions must be observed »
.
Use the jack from the tool kit to raise the vehicle. Position the jack at the jack-
ing point closest to the flat tyre.
The jacking points are located on the lower sill » Fig. 336.
›
Insert the crank
6
into the mount on the jack
5
» page 281 .
›
Support the base plate of the jack with its full area resting on level ground
and ensure that the jack is located in a vertical position at the jacking point
» Fig. 337 -
.
›
Use the crank to raise the jack until its claw encloses the bar
» Fig. 337 -
.
›
Continue to lift the vehicle until the wheel is just off the floor.
WARNINGObserve the following instructions, otherwise there is risk of injury.■Secure the vehicle from unexpectedly rolling away.■
Always ensure the base plate of the lifting jack cannot slip.
■ Provide a wide and stable base under the jack on loose surfaces (e.g.
such as gravel). ■ Create a non-slip base (e.g. a rubber floor mat) under the jack on a
smooth surface (e.g. cobblestones).
■
Always raise the vehicle with the doors closed.
■
Never position any body parts, such as arms or legs, under the vehicle,
while the vehicle is raised with a lifting jack.
■
When the vehicle is raised, never start the engine.
CAUTIONIt is important to ensure that the jack is correctly attached to the bar of the
lower beam, as otherwise there is a risk of damage to the vehicle.
Puncture repair kit
Introduction
This chapter contains information on the following subjects:
Description of puncture repair kit
286
Preparing to use the puncture repair kit
286
Sealing and inflating tyres
286
Information for driving with repaired tyres
287
The following information applies to the factory-fitted puncture repair kit.
Use the puncture repair kit to seal tyre punctures with a diameter of up to
about 4 mm.
Performing a repair with the breakdown kit not at all intended to replace a
permanent repair on the tyre. Its purpose is to get you to the nearest specialist
garage.
Immediately replace the tyre that was repaired using the puncture repair kit, or
consult a specialist garage about repair options.
Do not remove foreign bodies which have penetrated into the tyre (e.g. nails etc.).
Do not use the puncture repair kit in the following instances.
▶ The rim is damaged.
▶ The outdoor temperature is below the minimum temperature indicated in
the instruction manual of the tyre filling bottle with sealant.
▶ Tyre punctures of more than 4 mm.
▶ There is damage to the tyre wall.
▶ The expiration date (see inflation bottle) has passed.
WARNING■ If the sealant comes into contact with skin, wash the affected area imme-
diately.■
Observe the manufacturer's usage instructions for the breakdown kit.
285Emergency equipment and self-help