turn signal SKODA SUPERB 2016 3.G / (B8/3V) Owner's Manual
[x] Cancel search | Manufacturer: SKODA, Model Year: 2016, Model line: SUPERB, Model: SKODA SUPERB 2016 3.G / (B8/3V)Pages: 336, PDF Size: 53.89 MB
Page 14 of 336
Safety
Passive Safety
General information
Introduction
This chapter contains information on the following subjects:
Before setting off
12
Driving safety
12
This section of the manual includes important information on the subject of
passive safety. We have combined everything here which you should be famili-
ar with, for example, regarding seat belts, airbags, safety of children and any-
thing similar.
Other important safety information can also be found in the following chapters
of this Owner´s Manual. The Owner´s Manual should therefore always be in
the vehicle.
Before setting off
For your own safety and the safety of the people travelling with you, please
pay attention to the following points before setting off.
▶ Check the function of the lighting and turn signal systems.
▶ Check the function of the wipers and check the wiper blades for wear. Check
the windscreen washer fluid level.
▶ Ensure that all of the windows offer good visibility to the outside.
▶ Adjust the rear-view mirror so that vision to the rear is guaranteed. Ensure
that the mirrors are not covered.
▶ Check the tyre inflation pressure.
▶ Check the engine oil, brake fluid and coolant level.
▶ Secure all items of luggage.
▶ Do not exceed the permissible axle loads and permissible gross weight of the
vehicle.
▶ Close all doors as well as the bonnet and boot lid.
▶ Ensure that no objects can obstruct the pedals.
▶
Protect children by using a suitable child seat » page 22, Transporting chil-
dren safely .
▶ Adopt the correct seated position. Instruct your passengers to assume the
correct seated position » page 12, Correct and safe seated position .
Driving safety
In the interests of traffic safety, the following information must be observed. ▶ Do not become distracted from concentrating on the traffic situation, (e.g. by
your passengers or mobile telephone calls).
▶ Never drive when your driving ability is impaired, (e.g. due to medication, al-
cohol or drugs).
▶ Keep to the traffic regulations and the permissible speed limit.
▶ Always adjust the driving speed to the road, traffic and weather conditions.
▶ Take regular breaks on long journeys (at least every two hours).
Correct and safe seated position
Introduction
This chapter contains information on the following subjects:
Driver’s correct seating position
13
Adjusting the steering wheel position
13
Correct seating position of the passenger
14
Correct seating position for the passengers in the rear seats
14
Always assume the correct seated position before setting off and do not
change this position while driving. Also advise your passengers to adopt the
correct seated position and not to change this position while the car is moving.
The following list contains instructions for the Passenger which, if not ob-
served, may cause serious injuries or death. ▶ Do not lean against the dash panel.
▶ Do not put your feet on the dash panel.
The following list contains instructions for all Passengers which, if not ob-
served, may cause serious injuries or death.
▶ Do not sit only on the front part of the seat.
▶ Do not sit facing to the side.
▶ Do not lean out of the window.
▶ Do not put your limbs out of the window.
▶ Do not put your feet on the seat cushion.
12Safety
Page 36 of 336
Brake linings38 Fuel reserve38
Lane Departure Warning (Lane Assist)
38
Turn signal system
38
Trailer turn signal lights
38
Fog lights
38
Speed regulating system / speed limiter
38
Brake pedal (automatic gearbox)
38
Auto Hold function
39
Main beam
39
Automatic gearbox
39
Rear seat belt warning light
39
Generator
39
Coolant
39
Engine oil pressure
40
Engine oil level
40
AdBlue ®
40
Lamp failure
41
Diesel particle filter (diesel)
41
Windscreen washer fluid level
41
Headlight assistant
41
START-STOPsystem
41
Display - a low temperature
42
Water in the fuel filter (diesel)
42
Adaptive cruise control (ACC)
42
Distance warning (Front Assist)
42
front Assist
42
Economy mode
42
Adaptive Chassis Control (DCC)
42
Service
42
The warning lights in the instrument cluster indicate certain functions or
faults.
Some warning lights can be accompanied by acoustic signals and messages in
the display of the instrument cluster.
After switching on the ignition, some warning lights light up briefly as a func-
tion test. If the tested systems are OK, the corresponding warning lights go
out a few seconds after switching on the ignition or after starting the engine.
The warning lights are located at the following positions in the instrument
cluster » Fig. 18 on page 32 .
▶ Engine revolutions counter 1
▶Display
2
▶Speedometer
3
▶Bar with warning lights
5
Warning lights in the display
Depending on the importance the warning light
(danger) or
(warning) illu-
minate along with some of the warning lights in the list with the warning
lights.
Depending on vehicle equipment, some warning lights can be displayed in col-
our on the display. For example. the coolant warning lamp may be represented
as follows.
▶ - Segment display / monochromatic (“black and white”) MAXI DOT display
▶ - Coloured MAXI DOT display
WARNING■
Ignoring illuminated warning lights and related messages or instructions
in the display of the instrument cluster may lead to serious personal injury
or damage to the vehicle.■
If you have to stop for technical reasons, then park the vehicle at a safe
distance from the traffic, switch off the engine and switch on the hazard
warning lights » page 70. Place the warning triangle at the prescribed dis-
tance.
■
The engine compartment of your car is a hazardous area. While working in
the engine compartment, be sure to observe the following warnings
» page 268 .
Parking brake
Read and observe
on page 34 first.
illuminates - the parking brake is switched on.
Parking brake error
Illumi-
nates
Error: electronic parking brakePARKING BRAKE FAILURE
▶ Seek help from a specialist garage.
34Using the system
Page 39 of 336
EPC warning light (petrol)Read and observe
on page 34 first.
lights up – there is a fault in the engine management system. The system
makes it possible to drive on in emergency mode - there may be a noticeable
reduction in engine performance.
▶ You can drive on, exercising appropriate caution. Seek assistance from a spe-
cialist garage immediately.
Safety systems
Read and observe
on page 34 first.
System fault
lights up - there is a fault in the airbag system.
Error: AirbagAIRBAG ERROR
▶
Seek help from a specialist garage.
The front passenger airbag has been disabled with the key switch
illuminates for around 4 seconds after the ignition has been switched on.
One of the airbags or a belt tensioner has been disabled by the diagnostic
tool
illuminates for around 4 seconds after the ignition is switched on and then
flashes for approximately 12 seconds.
Airbag/ belt tensioner deactivated.AIRBAG/ BELT TENSIONER OFF
ProActive passenger protection
illuminates and the following message is shown in the information cluster
display.
Proactive passenger protection unavailable.PROACTIVE PASSENGER PROTECTION UNAVAILABLE
or
Proactive passenger protection: function restricted.LIMITED PROACTIVE PASSENGER PROTECT
The seat belt for the driver and front passenger needs to be replaced.
▶ Seek help from a specialist garage.WARNINGWhen a fault in the airbag system occurs, there is a risk of the system not
being triggered in the event of an accident. Therefore, this must be
checked immediately by a specialized garage.
Tyre pressure
Read and observe
on page 34 first.
Change of tyre pressure values
lights up - there was a pressure change in one of the tyres.
An audible signal sounds as a warning. ▶ Immediately reduce speed and avoid sudden steering and braking manoeu-
vres.
▶ Stop the vehicle, turn the ignition off and check the tyres and their inflation
pressures » page 277 .
▶ Correct the tyre pressure if necessary or replace the affected wheel
» page 282 or use the repair kit » page 285.
▶ Save the tyre pressure values in the system » page 249.
System fault
flashes for approximately 1 minute and remains lit – there may be a fault in
the tyre pressure monitoring system.
▶ Stop the vehicle, turn the ignition off and start the engine again.
If the warning light flashes after starting the engine again, there is a system
error.
▶ You can drive on, exercising appropriate caution. Seek assistance from a spe-
cialist garage immediately.
Disconnecting the vehicle battery
If the vehicle's battery has been disconnected and reconnected, the indicator
light comes on after switching on the ignition.
The warning light should go out after driving a short distance.
If, after a short drive, the indicator light does not go out, there is a system er-
ror.
▶ You can drive on, exercising appropriate caution. Seek assistance from a spe-
cialist garage immediately.
37Instruments and warning lights
Page 40 of 336
Other incidents
The illumination of the warning light can have the following reasons.
▶ The vehicle is loaded on one side. Distribute the load evenly.
▶ The wheels of one axle are loaded more heavily (e.g. when towing a trailer or
when driving uphill or downhill).
▶ Snow chains are mounted.
▶ A wheel has been changed.
CAUTION
Under certain circumstances (e.g. sporty style of driving, wintry or unpaved
roads) the warning light can be delayed or does not light up at all.
Brake linings
Read and observe
on page 34 first.
illuminates - the brake pads are worn.
▶ You can drive on, exercising appropriate caution. Seek assistance from a spe-
cialist garage immediately.
Fuel reserve
Read and observe
on page 34 first.
illuminates – the fuel level in the fuel tank is at the reserve level (approxi-
mately 6 litres).
An audible signal sounds as a warning. ▶ Please refuel » page 265.
Note
The text in the display goes out after refuelling and driving a short distance.
Lane Departure Warning (Lane Assist)
Read and observe
on page 34 first.
The warning lights
indicates the state of the Lane Assist system.
More information about the Lane Assist System » page 243.
Turn signal system
Read and observe
on page 34 first.
flashes – the left turn signal is turned on.
flashes – the right turn signal is turned on.
If there is a fault in the turn signal system, the warning light flashes at twice
its normal rate (does not apply when towing).
When the hazard warning light system is switched on, this will cause all of the turn signal lights as well as both warning lights to flash.
Trailer turn signal lights
Read and observe
on page 34 first.
flashes – the trailer turn signal lights are switched on.
If a trailer is hitched and the warning light is not flashing, one of the trailer
turn signal lights has failed.
▶ Check the trailer bulbs.
Fog lights
Read and observe
on page 34 first.
illuminates – the fog lights are switched on.
Speed regulating system / speed limiter
Read and observe
on page 34 first.
illuminates - the vehicle speed is limited by the speed regulating system
and/or the adaptive cruise control or by the speed limiter.
flashes – the speed set with the speed limiter has been exceeded.
Brake pedal (automatic gearbox)
Read and observe
on page 34 first.
lights up – apply the brake.
38Using the system
Page 52 of 336
FunctionFig. 31
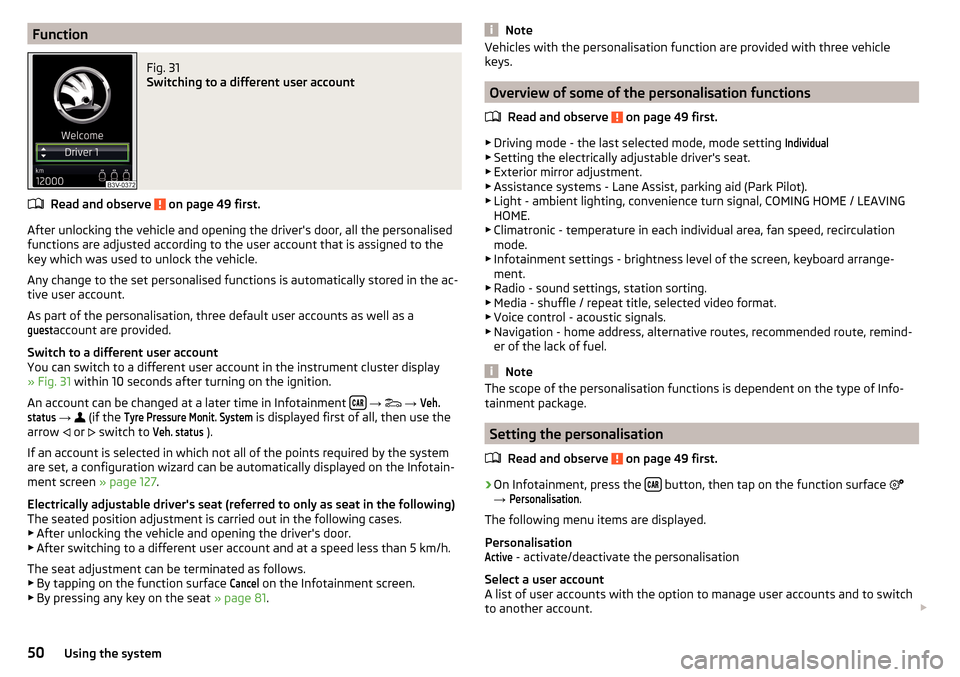
Switching to a different user account
Read and observe on page 49 first.
After unlocking the vehicle and opening the driver's door, all the personalised
functions are adjusted according to the user account that is assigned to the
key which was used to unlock the vehicle.
Any change to the set personalised functions is automatically stored in the ac- tive user account.
As part of the personalisation, three default user accounts as well as a
guest
account are provided.
Switch to a different user account
You can switch to a different user account in the instrument cluster display
» Fig. 31 within 10 seconds after turning on the ignition.
An account can be changed at a later time in Infotainment
→
→
Veh.status
→
(if the
Tyre Pressure Monit. System
is displayed first of all, then use the
arrow or
switch to
Veh. status
).
If an account is selected in which not all of the points required by the system
are set, a configuration wizard can be automatically displayed on the Infotain-
ment screen » page 127.
Electrically adjustable driver's seat (referred to only as seat in the following)
The seated position adjustment is carried out in the following cases. ▶ After unlocking the vehicle and opening the driver's door.
▶ After switching to a different user account and at a speed less than 5 km/h.
The seat adjustment can be terminated as follows.
▶ By tapping on the function surface
Cancel
on the Infotainment screen.
▶ By pressing any key on the seat » page 81.
NoteVehicles with the personalisation function are provided with three vehicle
keys.
Overview of some of the personalisation functions
Read and observe
on page 49 first.
▶Driving mode - the last selected mode, mode setting
Individual
▶Setting the electrically adjustable driver's seat.
▶ Exterior mirror adjustment.
▶ Assistance systems - Lane Assist, parking aid (Park Pilot).
▶ Light - ambient lighting, convenience turn signal, COMING HOME / LEAVING
HOME.
▶ Climatronic - temperature in each individual area, fan speed, recirculation
mode.
▶ Infotainment settings - brightness level of the screen, keyboard arrange-
ment.
▶ Radio - sound settings, station sorting.
▶ Media - shuffle / repeat title, selected video format.
▶ Voice control - acoustic signals.
▶ Navigation - home address, alternative routes, recommended route, remind-
er of the lack of fuel.
Note
The scope of the personalisation functions is dependent on the type of Info-
tainment package.
Setting the personalisation
Read and observe
on page 49 first.
›
On Infotainment, press the button, then tap on the function surface
→
Personalisation
.
The following menu items are displayed.
Personalisation
Active
- activate/deactivate the personalisation
Select a user account
A list of user accounts with the option to manage user accounts and to switch
to another account.
50Using the system
Page 55 of 336
›Restart SmartGate by tapping on the “Reboot” 1)
button.
Changing the PIN code for the Wi-Fi Direct connection›
Open the SmartGate web interface » page 52.
›
In the menu item “WiFi Direct PIN:”, enter the new PIN code (6 digits).
›
Confirm the PIN code change by tapping on the “Save” button.
›
Restart SmartGate by tapping on the “Reboot” 1 )
button.
Note
If you have forgotten your password/PIN code for connecting to SmartGate,
SmartGate must be reset to the factory settings in a specialist workshop.Unlocking and opening
Unlocking and locking
Introduction
This chapter contains information on the following subjects:
Unlocking/locking with the remote control key
54
Remove KESSY emergency key
54
Locking / unlocking - KESSY
55
Locking/unlocking the vehicle with the central locking button
55
SafeLock
56
Individual settings
56
Open / close door
57
Child safety lock
57
Malfunctions
57
The vehicle is equipped with a central locking system which makes it possible
to unlock / lock all the doors, the fuel filler flap and boot lid simultaneously.
The door unlocking can be adjusted individually » page 56.
The unlocking of the vehicle is displayed by the turn signal lights flashing
twice.
If you unlock the vehicle and do not open a door or the boot lid within the next
45 seconds, the vehicle will lock again automatically.
The locking of the vehicle is displayed by the turn signal lights flashing once.
If the driver's door has been opened, the vehicle cannot be locked.
If the doors or the boot lid remain open after the vehicle has been locked, the turn signal lights do not flash until they have been closed.
1)
If the “Reboot” button is not displayed, you must manually restore the web browser display.
53Unlocking and opening
Page 56 of 336
WARNING■Never leave the key in the vehicle when you exit the vehicle. Unauthor-
ized persons (e.g. children) could lock the car, turn on the ignition or start
the engine - there is a danger of injury and accidents!■
When leaving the vehicle, never leave people who are not completely in-
dependent, such as children, unattended in the vehicle. These individuals
might not be able to leave the vehicle on their own or to help themselves.
Can be fatal at very high or very low temperatures!
CAUTION
■ Each key contains electronic components; therefore it must be protected
against moisture and severe shocks.■
Keep the keyway clean. Impurities (textile fibres, dust etc.) have a negative
effect on the functionality of the locking cylinder and ignition lock.
Unlocking/locking with the remote control key
Fig. 33
Key with fold/out key bit/KESSY key
Read and observe
and on page 54 first.
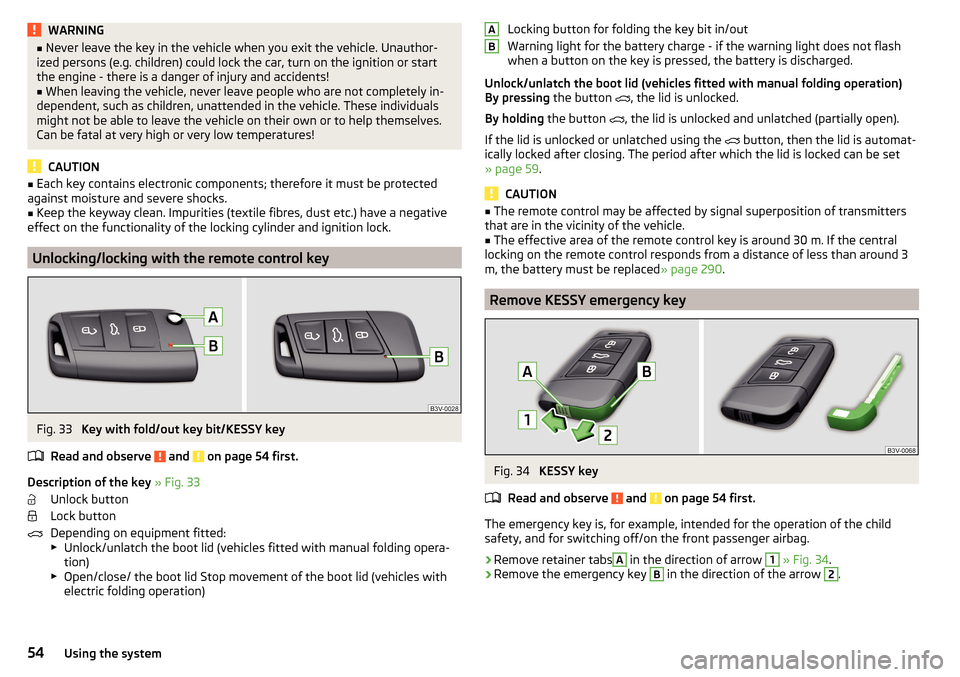
Description of the key » Fig. 33
Unlock button
Lock button
Depending on equipment fitted:
▶ Unlock/unlatch the boot lid (vehicles fitted with manual folding opera-
tion)
▶ Open/close/ the boot lid Stop movement of the boot lid (vehicles with
electric folding operation)
Locking button for folding the key bit in/out
Warning light for the battery charge - if the warning light does not flash
when a button on the key is pressed, the battery is discharged.
Unlock/unlatch the boot lid (vehicles fitted with manual folding operation)
By pressing the button
, the lid is unlocked.
By holding the button
, the lid is unlocked and unlatched (partially open).
If the lid is unlocked or unlatched using the
button, then the lid is automat-
ically locked after closing. The period after which the lid is locked can be set
» page 59 .
CAUTION
■
The remote control may be affected by signal superposition of transmitters
that are in the vicinity of the vehicle.■
The effective area of the remote control key is around 30 m. If the central
locking on the remote control responds from a distance of less than around 3
m, the battery must be replaced » page 290.
Remove KESSY emergency key
Fig. 34
KESSY key
Read and observe
and on page 54 first.
The emergency key is, for example, intended for the operation of the child
safety, and for switching off/on the front passenger airbag.
›
Remove retainer tabs
A
in the direction of arrow
1
» Fig. 34 .
›
Remove the emergency key
B
in the direction of the arrow
2
.
AB54Using the system
Page 57 of 336
Locking / unlocking - KESSYFig. 35
Vehicle unlocking / vehicle locking
Read and observe
and on page 54 first.
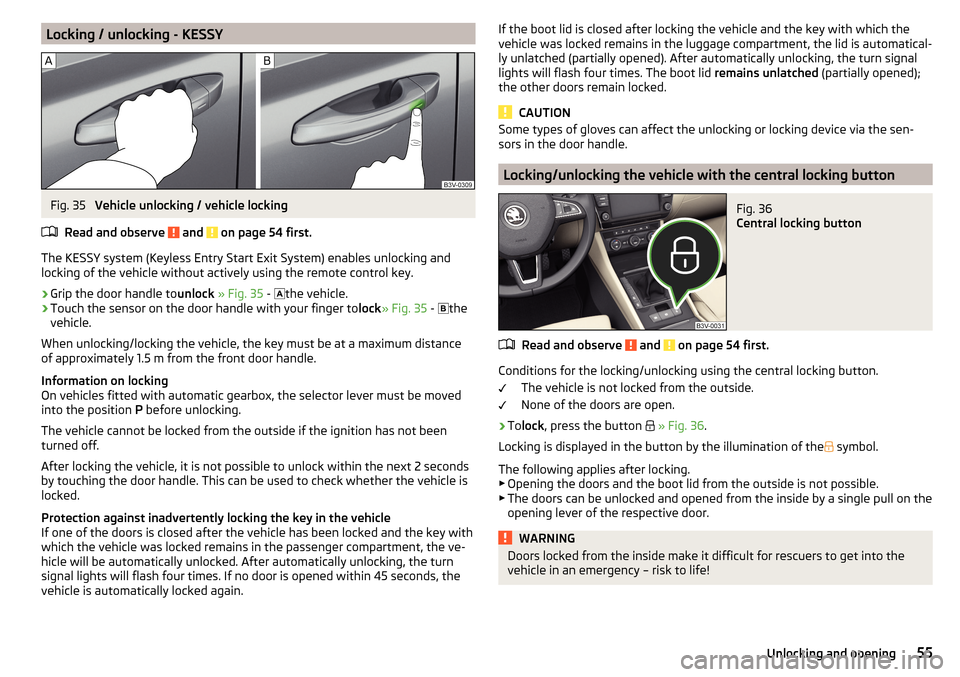
The KESSY system (Keyless Entry Start Exit System) enables unlocking and
locking of the vehicle without actively using the remote control key.
›
Grip the door handle to unlock » Fig. 35 -
the vehicle.
›
Touch the sensor on the door handle with your finger to
lock» Fig. 35 -
the
vehicle.
When unlocking/locking the vehicle, the key must be at a maximum distance
of approximately 1.5 m from the front door handle.
Information on locking
On vehicles fitted with automatic gearbox, the selector lever must be moved
into the position P before unlocking.
The vehicle cannot be locked from the outside if the ignition has not been
turned off.
After locking the vehicle, it is not possible to unlock within the next 2 seconds
by touching the door handle. This can be used to check whether the vehicle is
locked.
Protection against inadvertently locking the key in the vehicle
If one of the doors is closed after the vehicle has been locked and the key with
which the vehicle was locked remains in the passenger compartment, the ve-
hicle will be automatically unlocked. After automatically unlocking, the turn
signal lights will flash four times. If no door is opened within 45 seconds, the
vehicle is automatically locked again.
If the boot lid is closed after locking the vehicle and the key with which the
vehicle was locked remains in the luggage compartment, the lid is automatical-
ly unlatched (partially opened). After automatically unlocking, the turn signal
lights will flash four times. The boot lid remains unlatched (partially opened);
the other doors remain locked.
CAUTION
Some types of gloves can affect the unlocking or locking device via the sen-
sors in the door handle.
Locking/unlocking the vehicle with the central locking button
Fig. 36
Central locking button
Read and observe and on page 54 first.
Conditions for the locking/unlocking using the central locking button.
The vehicle is not locked from the outside.
None of the doors are open.
›
To lock , press the button
» Fig. 36 .
Locking is displayed in the button by the illumination of the
symbol.
The following applies after locking. ▶ Opening the doors and the boot lid from the outside is not possible.
▶ The doors can be unlocked and opened from the inside by a single pull on the
opening lever of the respective door.
WARNINGDoors locked from the inside make it difficult for rescuers to get into the
vehicle in an emergency – risk to life!55Unlocking and opening
Page 68 of 336
Activating operation of the sunshadeRead and observe
and on page 64 first.
If the operation of sunshade is deactivated (e.g. after disconnecting and con-
necting the battery), then the operation will have to be activated.
›
Switch on the ignition, press and hold the
» Fig. 47 on page 65 button.
The sunshade opens and closes again after around 10 seconds.
›
Release the button.
Lights and visibility
Light
Introduction
This chapter contains information on the following subjects:
Operating the lights
67
Daytime running lights(DAY LIGHT)
67
Turn signal and main beam
68
Automatic driving light control
68
Xenon headlight
69
Fog lights/rear fog light
69
Fog lights with CORNER function
70
COMING HOME / LEAVING HOME
70
Hazard warning light system
70
Parking light
70
Entry space lighting
71
Driving abroad
71
Unless otherwise stated, the lights only work when the ignition is switched on.
WARNINGThe automatic driving lamp control only operates as a support and
does not release the driver from his responsibility to check the lights and, if
necessary, to switch on the light depending on the prevailing light condi-
tions.
Note
The headlights may mist up temporarily. When the light is switched on, the
light-emitting surface demists after a short period of time.66Using the system
Page 70 of 336

Turn signal and main beamFig. 49
Operating lever: Turn signal and
main beam operation
Read and observe on page 66 first.
Control stalk positions » Fig. 49
Switch on the right turn signal
Switch on the left turn signal
Switch on main beam (spring-tensioned position) Switch off main beam / headlight flasher on (spring-tensioned position)
The main beam can only be switched on when the low beam lights are on.
The headlight flasher can be operated even if the ignition is switched off.
The turn signal switches off automatically depending on the steering angle af-
ter turning.
Use the control stalk to switch on/off the headlight assistant» page 71.
Comfort indicating
When the control talk is pressed slightly up or down, the respective turn signal
indicates three times.
If during the convenience turn signal, the operating lever is pressed in the op-
posite direction, the indicating will stop.
Comfort indicating can be activated / deactivated in the Infotainment menu
→
→
Mirrors and wipersWARNINGOnly turn on the main beam or the headlight flasher if other road users will
not be dazzled. NoteThe setting (activation/deactivation) of the convenience turn signal is stored
(depending on the Infotainment type) in the active user account personalisa-
tion » page 49 .
Automatic driving light control
Fig. 50
Light switch: AUTO position
Read and observe on page 66 first.
The light switch is in position
» Fig. 50 then depending on the equipment,
the automatic switch on / off the lights corresponding to the light or weather
conditions (rain) takes place.
If the light switch is in position
, the lettering
illuminates next to the
light switch. If the light is switched on automatically, the symbol
also illumi-
nates next to the light switch.
Automatic driving light control in the rain (referred to as function in the
following)
The dipped beam is switched on automatically if the following conditions are
met.
The function is activated.
The light switch is in the position
.
The windscreen wipers are on for more than 30 s.
The light turns off automatically about 4 minutes after turning off the wipers.
Setting, activation/deactivation
The following functions can be set or activated / deactivated in the Infotain-
ment menu
→
→
light
.
▶ Sensitivity adjustment of the sensor for determining the lighting conditions
for automatic driving light control
▶ Automatic driving light control during rain
68Using the system