wheel alignment SKODA SUPERB 2016 3.G / (B8/3V) Owner's Manual
[x] Cancel search | Manufacturer: SKODA, Model Year: 2016, Model line: SUPERB, Model: SKODA SUPERB 2016 3.G / (B8/3V)Pages: 336, PDF Size: 53.89 MB
Page 226 of 336
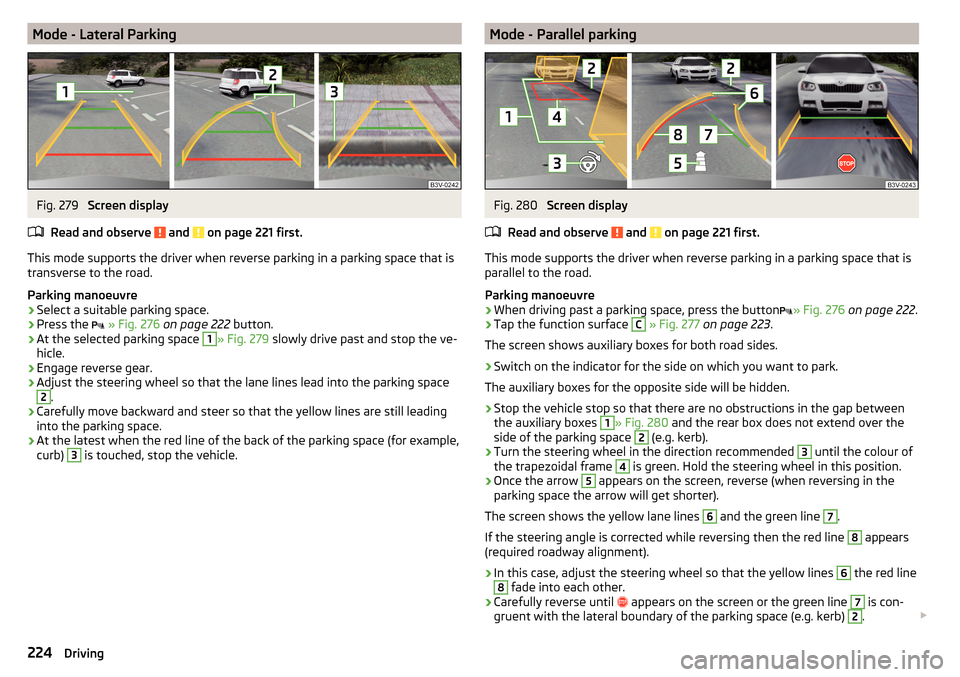
Mode - Lateral ParkingFig. 279
Screen display
Read and observe
and on page 221 first.
This mode supports the driver when reverse parking in a parking space that is
transverse to the road.
Parking manoeuvre
›
Select a suitable parking space.
›
Press the
» Fig. 276 on page 222 button.
›
At the selected parking space
1
» Fig. 279 slowly drive past and stop the ve-
hicle.
›
Engage reverse gear.
›
Adjust the steering wheel so that the lane lines lead into the parking space
2
.
›
Carefully move backward and steer so that the yellow lines are still leading
into the parking space.
›
At the latest when the red line of the back of the parking space (for example,
curb)
3
is touched, stop the vehicle.
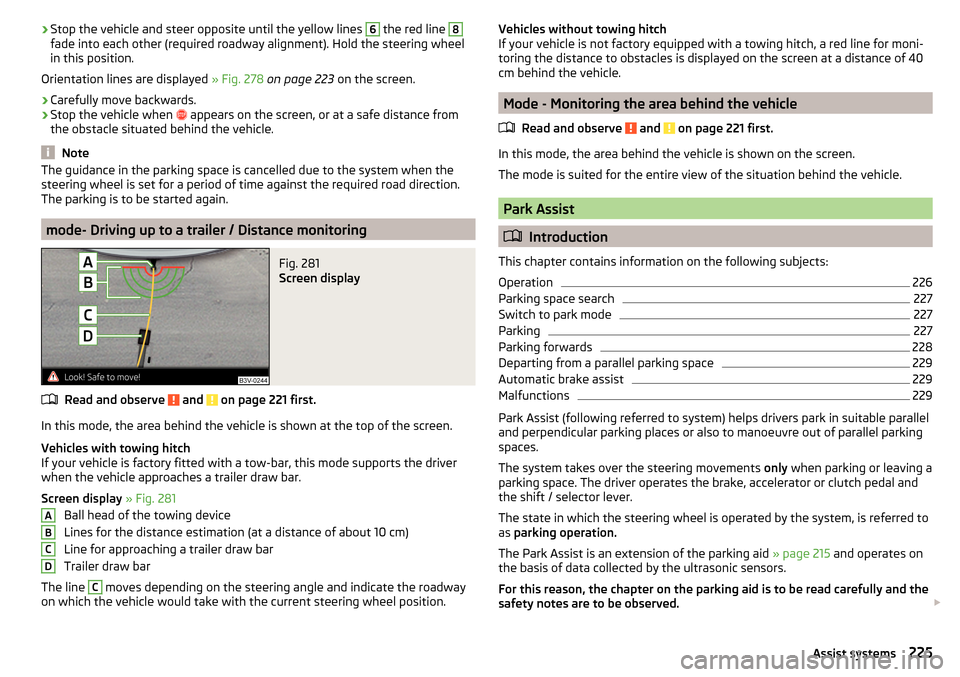
Mode - Parallel parkingFig. 280
Screen display
Read and observe
and on page 221 first.
This mode supports the driver when reverse parking in a parking space that is
parallel to the road.
Parking manoeuvre
›
When driving past a parking space, press the button » Fig. 276
on page 222 .
›
Tap the function surface
C
» Fig. 277 on page 223 .
The screen shows auxiliary boxes for both road sides.
›
Switch on the indicator for the side on which you want to park.
The auxiliary boxes for the opposite side will be hidden.
›
Stop the vehicle stop so that there are no obstructions in the gap between
the auxiliary boxes
1
» Fig. 280 and the rear box does not extend over the
side of the parking space
2
(e.g. kerb).
›
Turn the steering wheel in the direction recommended
3
until the colour of
the trapezoidal frame
4
is green. Hold the steering wheel in this position.
›
Once the arrow
5
appears on the screen, reverse (when reversing in the
parking space the arrow will get shorter).
The screen shows the yellow lane lines
6
and the green line
7
.
If the steering angle is corrected while reversing then the red line
8
appears
(required roadway alignment).
›
In this case, adjust the steering wheel so that the yellow lines
6
the red line
8
fade into each other.
›
Carefully reverse until appears on the screen or the green line
7
is con-
gruent with the lateral boundary of the parking space (e.g. kerb)
2
.
224Driving
Page 227 of 336
›Stop the vehicle and steer opposite until the yellow lines 6 the red line 8fade into each other (required roadway alignment). Hold the steering wheel
in this position.
Orientation lines are displayed » Fig. 278 on page 223 on the screen.›
Carefully move backwards.
›
Stop the vehicle when
appears on the screen, or at a safe distance from
the obstacle situated behind the vehicle.
Note
The guidance in the parking space is cancelled due to the system when the
steering wheel is set for a period of time against the required road direction.
The parking is to be started again.
mode- Driving up to a trailer / Distance monitoring
Fig. 281
Screen display
Read and observe and on page 221 first.
In this mode, the area behind the vehicle is shown at the top of the screen.
Vehicles with towing hitch
If your vehicle is factory fitted with a tow-bar, this mode supports the driver
when the vehicle approaches a trailer draw bar.
Screen display » Fig. 281
Ball head of the towing device
Lines for the distance estimation (at a distance of about 10 cm)
Line for approaching a trailer draw bar
Trailer draw bar
The line
C
moves depending on the steering angle and indicate the roadway
on which the vehicle would take with the current steering wheel position.
ABCDVehicles without towing hitch
If your vehicle is not factory equipped with a towing hitch, a red line for moni-
toring the distance to obstacles is displayed on the screen at a distance of 40
cm behind the vehicle.
Mode - Monitoring the area behind the vehicle
Read and observe
and on page 221 first.
In this mode, the area behind the vehicle is shown on the screen.
The mode is suited for the entire view of the situation behind the vehicle.
Park Assist
Introduction
This chapter contains information on the following subjects:
Operation
226
Parking space search
227
Switch to park mode
227
Parking
227
Parking forwards
228
Departing from a parallel parking space
229
Automatic brake assist
229
Malfunctions
229
Park Assist (following referred to system) helps drivers park in suitable parallel
and perpendicular parking places or also to manoeuvre out of parallel parking
spaces.
The system takes over the steering movements only when parking or leaving a
parking space. The driver operates the brake, accelerator or clutch pedal and
the shift / selector lever.
The state in which the steering wheel is operated by the system, is referred to
as parking operation.
The Park Assist is an extension of the parking aid » page 215 and operates on
the basis of data collected by the ultrasonic sensors.
For this reason, the chapter on the parking aid is to be read carefully and the safety notes are to be observed.
225Assist systems
Page 279 of 336
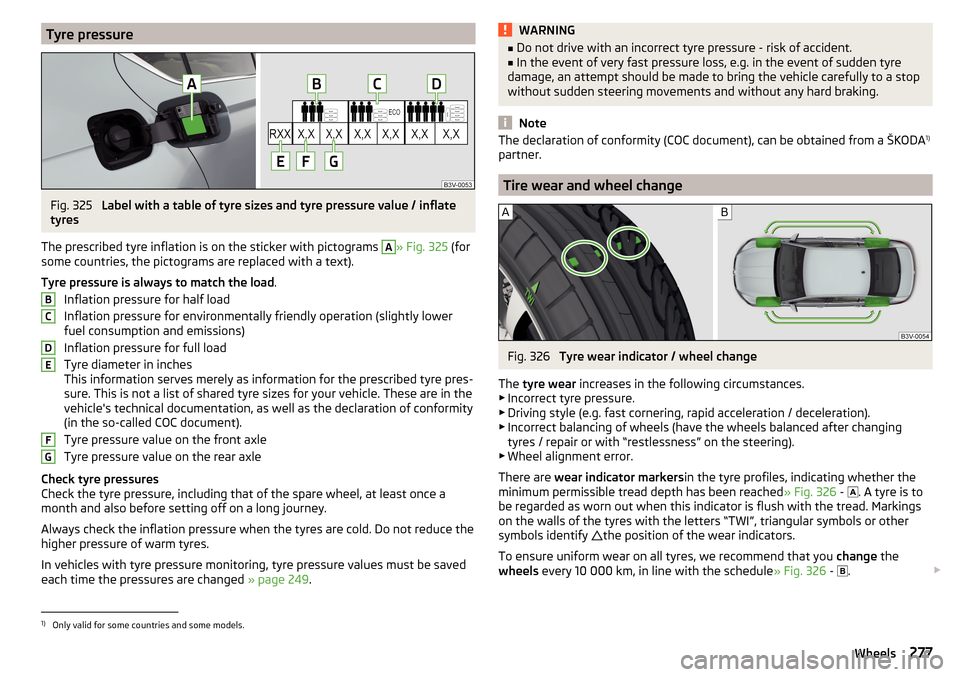
Tyre pressureFig. 325
Label with a table of tyre sizes and tyre pressure value / inflate
tyres
The prescribed tyre inflation is on the sticker with pictograms
A
» Fig. 325 (for
some countries, the pictograms are replaced with a text).
Tyre pressure is always to match the load .
Inflation pressure for half load
Inflation pressure for environmentally friendly operation (slightly lower
fuel consumption and emissions)
Inflation pressure for full load
Tyre diameter in inches
This information serves merely as information for the prescribed tyre pres-
sure. This is not a list of shared tyre sizes for your vehicle. These are in the
vehicle's technical documentation, as well as the declaration of conformity
(in the so-called COC document).
Tyre pressure value on the front axle
Tyre pressure value on the rear axle
Check tyre pressures
Check the tyre pressure, including that of the spare wheel, at least once a
month and also before setting off on a long journey.
Always check the inflation pressure when the tyres are cold. Do not reduce the
higher pressure of warm tyres.
In vehicles with tyre pressure monitoring, tyre pressure values must be saved
each time the pressures are changed » page 249.
BCDEFGWARNING■
Do not drive with an incorrect tyre pressure - risk of accident.■In the event of very fast pressure loss, e.g. in the event of sudden tyre
damage, an attempt should be made to bring the vehicle carefully to a stop
without sudden steering movements and without any hard braking.
Note
The declaration of conformity (COC document), can be obtained from a ŠKODA 1)
partner.
Tire wear and wheel change
Fig. 326
Tyre wear indicator / wheel change
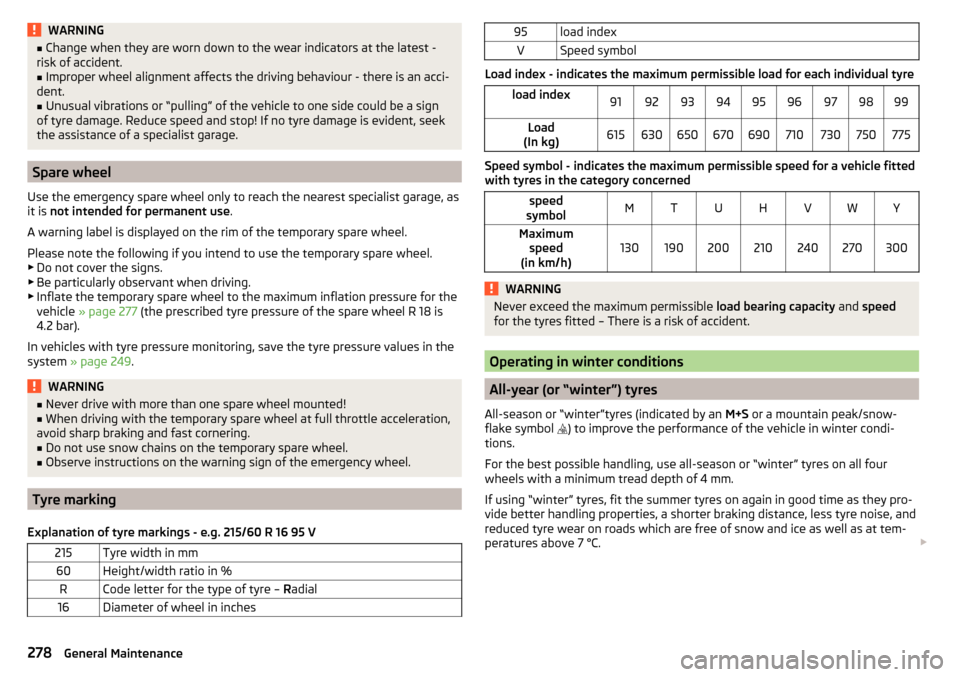
The tyre wear increases in the following circumstances.
▶ Incorrect tyre pressure.
▶ Driving style (e.g. fast cornering, rapid acceleration / deceleration).
▶ Incorrect balancing of wheels (have the wheels balanced after changing
tyres / repair or with “restlessness” on the steering).
▶ Wheel alignment error.
There are wear indicator markers in the tyre profiles, indicating whether the
minimum permissible tread depth has been reached » Fig. 326 -
. A tyre is to
be regarded as worn out when this indicator is flush with the tread. Markings
on the walls of the tyres with the letters “TWI”, triangular symbols or other
symbols identify the position of the wear indicators.
To ensure uniform wear on all tyres, we recommend that you change the
wheels every 10 000 km, in line with the schedule » Fig. 326 -
.
1)
Only valid for some countries and some models.
277Wheels
Page 280 of 336
WARNING■Change when they are worn down to the wear indicators at the latest -
risk of accident.■
Improper wheel alignment affects the driving behaviour - there is an acci-
dent.
■
Unusual vibrations or “pulling” of the vehicle to one side could be a sign
of tyre damage. Reduce speed and stop! If no tyre damage is evident, seek
the assistance of a specialist garage.
Spare wheel
Use the emergency spare wheel only to reach the nearest specialist garage, as
it is not intended for permanent use .
A warning label is displayed on the rim of the temporary spare wheel.
Please note the following if you intend to use the temporary spare wheel. ▶ Do not cover the signs.
▶ Be particularly observant when driving.
▶ Inflate the temporary spare wheel to the maximum inflation pressure for the
vehicle » page 277 (the prescribed tyre pressure of the spare wheel R 18 is
4.2 bar).
In vehicles with tyre pressure monitoring, save the tyre pressure values in the
system » page 249 .
WARNING■
Never drive with more than one spare wheel mounted!■When driving with the temporary spare wheel at full throttle acceleration,
avoid sharp braking and fast cornering.■
Do not use snow chains on the temporary spare wheel.
■
Observe instructions on the warning sign of the emergency wheel.
Tyre marking
Explanation of tyre markings - e.g. 215/60 R 16 95 V
215Tyre width in mm60Height/width ratio in %RCode letter for the type of tyre – Radial16Diameter of wheel in inches95load indexVSpeed symbol
Load index - indicates the maximum permissible load for each individual tyre
load index919293949596979899Load
(In kg)615630650670690710730750775
Speed symbol - indicates the maximum permissible speed for a vehicle fitted
with tyres in the category concerned
speed
symbolMTUHVWYMaximum speed
(in km/h)130190200210240270300WARNINGNever exceed the maximum permissible load bearing capacity and speed
for the tyres fitted – There is a risk of accident.
Operating in winter conditions
All-year (or “winter”) tyres
All-season or “winter”tyres (indicated by an M+S or a mountain peak/snow-
flake symbol ) to improve the performance of the vehicle in winter condi-
tions.
For the best possible handling, use all-season or “winter” tyres on all four
wheels with a minimum tread depth of 4 mm.
If using “winter” tyres, fit the summer tyres on again in good time as they pro-
vide better handling properties, a shorter braking distance, less tyre noise, and
reduced tyre wear on roads which are free of snow and ice as well as at tem-
peratures above 7 °C.
278General Maintenance
Page 322 of 336
Navigation menu item48
Operation45
Telephone menu item48
Maximum speed309
MCB215
Media Audio source
149
AUX90, 150
Bluetooth Audio151
Browser148
CD / DVD149
Compatible sources152, 153
File formats152, 153
Foreword146
Jukebox151
List148
Main menu146
Multimedia database148
Operation146
Playback operation147
Requirements and Restrictions152, 153
safe removal of the data source133
Safe removal of the data source140
SD card150
Select audio source146
Settings135
Set to141
USB90, 150
Voice control128
WLAN151
Media Command Control
159
Main menu158
Supported formats160
Memory47
Memory Function for the seat81
Menu Setup
131, 139
Mirror77
Vanity75
MirrorLink®178
Connection establishment179
Disconnection179
Function issues179
Main menu179
Operation179
MODE button See driving mode
240
Modes of the automatic transmission207
Modifications and technical alterations256
Most common routes192
MSR213
Multi-function pocket108
Multi-media AUX
150
Multicollision brake (MCB)215
Multifunction display Functions
46
Information46
Memory47
Multifunction steering wheel45
Multimedia USB
150
Multimedia database148
Mute127
My destinations186
My POIs186
N
N1
109
navigation Destination on the map
184
Map orientation188
Navigation Abort route guidance
192
Additional windows182
Advanced settings138
Alternative route137
Contacts185
Demo mode138, 191
Destination address183
Destination details190
destination memory185
Destination presentation in the split screen189
Destination representation187
Dynamic route137
Edit route192
Favourites185
Final destinations184
Finish route guidance192
Foreword180
GPS180
Graphical driving recommendations191
Home address185
Image with GPS187
Import destination186
Imported destinations137
Intermediate target190
Main menu181
Manage memory137
Map137
Map alignment189
Map scale188
Most common routes192
My destinations186
Navigation data181
Nav. announcements138, 192
Options for map display187
Options for map display in the split screen189
Preferred route type137
Route190
Route calculation190
Route change193
Route display187
Route display in the split screen189
Route guidance190
Route information192
Route list194
Route options137
320Index