width SKODA SUPERB 2016 3.G / (B8/3V) Owner's Manual
[x] Cancel search | Manufacturer: SKODA, Model Year: 2016, Model line: SUPERB, Model: SKODA SUPERB 2016 3.G / (B8/3V)Pages: 336, PDF Size: 53.89 MB
Page 86 of 336
Headrests
Introduction
This chapter contains information on the following subjects:
Setting the height of the front headrests
84
Setting the height of the rear headrests
84
Removing/inserting the rear headrests
84
Note
In sports seats, the headrests are integrated into the seat backrests and can-
not be adjusted in height.
Setting the height of the front headrests
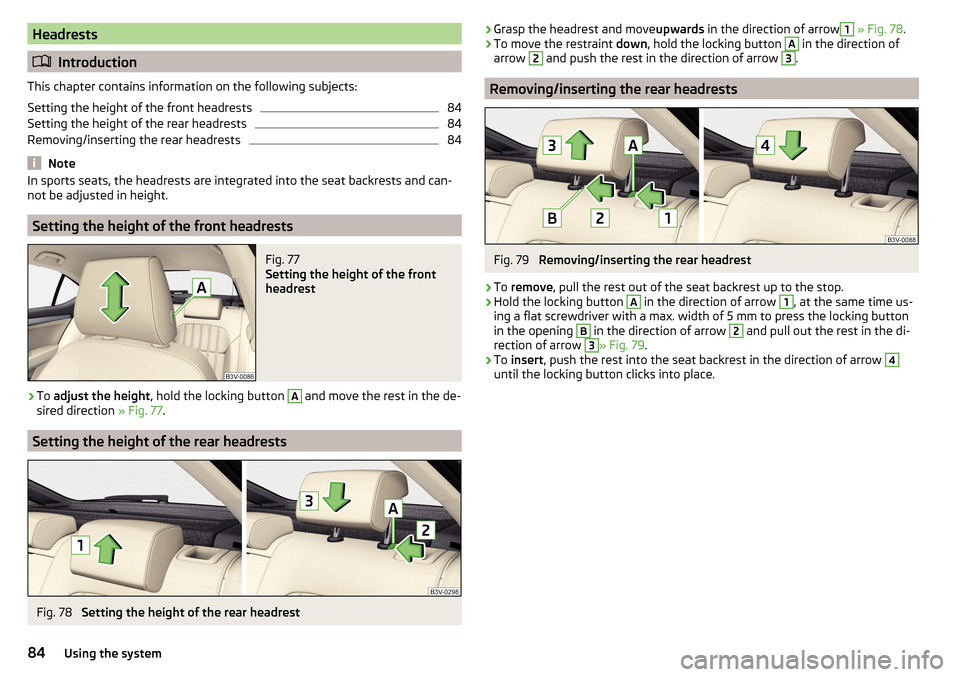
Fig. 77
Setting the height of the front
headrest
›
To adjust the height , hold the locking button
A
and move the rest in the de-
sired direction » Fig. 77.
Setting the height of the rear headrests
Fig. 78
Setting the height of the rear headrest
›Grasp the headrest and move
upwards in the direction of arrow1 » Fig. 78 .›To move the restraint down, hold the locking button A in the direction of
arrow 2
and push the rest in the direction of arrow
3
.
Removing/inserting the rear headrests
Fig. 79
Removing/inserting the rear headrest
›
To remove , pull the rest out of the seat backrest up to the stop.
›
Hold the locking button
A
in the direction of arrow
1
, at the same time us-
ing a flat screwdriver with a max. width of 5 mm to press the locking button
in the opening
B
in the direction of arrow
2
and pull out the rest in the di-
rection of arrow
3
» Fig. 79 .
›
To insert , push the rest into the seat backrest in the direction of arrow
4
until the locking button clicks into place.
84Using the system
Page 137 of 336
■Auto-save station logos- Automatic storage of the station logos
■DAB traffic announcements
- Switch on/off DAB traffic announcements
■
Other DAB messages
- Switch on/off other announcements (e.g., warnings, re-
gional weather, sports reports, financial news)
■
DAB - DAB station tracking
- Switch on/off automatic DAB station tracking on an-
other frequency or in other station groups
■
Automatic DAB - FM switching
- Switch on/off auto-switching from DAB to the FM
broadcasting range if the DAB signal is lost
■
Switch to a similar station
- Enable / disable automatic switching to another sta-
tion with similar content in the event of signal loss (applies to Infotainment
Columbus)
■
L-band
- Enable / disable the availability of L-band
Automatic change from DAB to FM
If DAB reception is poor, the device tries to find an FM station.
The station name is followed by ( ) while the station is being received on the
FM band. When the corresponding DAB station is can be received again, the
system automatically switches from FM to DAB.
If a DAB station is also not available in the FM band due to poor reception, In-
fotainment will be switched to mute.
L-band
For the DAB radio reception in different countries, different broadcasting rang-
es are used. In some countries the DAB radio reception is only possible in the
so called L-band.
If no L-band DAB radio reception is possible in the country then we recom-
mend turning off the L-band. The channel scan is therefore faster.
Media menu settings
›
Tap on the function surface in the Media main
surface.
■
Sound
- sound settings
■
Manage Jukebox
- Administration (record / delete) supported files (audio / video)
in Infotainment internal memory (applies to Infotainment Columbus)
■
Mix/repeat including subfolders
- Switching the title display including subfolders
■
Bluetooth
- Settings for the Bluetooth ®
function
■
WLAN
- WLAN settings (applies to Infotainment Columbus)
■
Video (DVD) settings
- Setting the parameters of the DVD video (applies to Info-
tainment Columbus)
■
Remove safely:
- Safe removal of the external device
■
Traffic program (TP)
- Switches traffic programme on/off
Image menu settings›
In the images main menu, tap on the function surface
surface.
■
Image display:
- Image view setting
■
Full
- Display the maximum image size while retaining the aspect ratio
■
Automatic
- Full screen display
■
Display time:
- Set the display time for the slideshow
■
Repeat slideshow
- Switching on/off the slideshow repeat
Video DVD menu settings
Only valid for Infotainment Columbus.
›
In the Video DVD main menu, tap on the function surface
.
Depending on the DVD some of the following menu items are displayed.
■
Format:
- Set the screen width/height ratio
■
Audio channel:
- Audio channel selection
■
Subtitles:
- Selecting subtitles
■
Enter/change PIN for parental settings
- Management of the PIN code for parental
control
■
Parental settings:
- Parental settings selection
TV tuner menu settings
Only valid for Infotainment Columbus.
›
In the TV tuner main menu , tap on the function surface
.
■
Arrow buttons:
- Setting the function of the functional surfaces
■
Preset list
- Change between stations stored in the preset list
■
Station list
- Switch between all available TV stations
■
Screen
- Brightness, contrast and colour settings
■
Format:
- Select aspect ratio
■
Audio channel:
- Audio channel selection
■
TV standard:
- Select TV-Region
■
Subtitles
- Enable / disable the subtitle display
■
Sound
- sound settings
■
Automatic station tracking
- Switch on / off the automatic station tracking
■
Preset list
- Management of the TV station preset list
135Infotainment settings - Columbus, Amundsen, Bolero
Page 139 of 336
■Telephone Interface “Business” - Turn on / off the Telephone function of the ex-
ternal module (applies to Infotainment Columbus with the SIM card slot in
the external module)
■Use SIM card only for data connection
- turn on - Activating only data services / To
turn off - Activation of data and telephone services of the SIM card inserted
in the external module (valid for Infotainment Columbus with the SIM card
slot in the external module)
■
Network:
- Set the Telephone service provider network of the SIM card inser-
ted in the external module (valid for Infotainment Columbus with the SIM
card slot in the external module) » page 133
■
Pin settings:
- Set the pin code of the SIM card inserted in the external module
(valid for Infotainment Columbus with the SIM card slot in the external mod-
ule)
■
Automatic PIN entry
- Enable / disable the storage of the PIN code of the SIM
card
■
Change PIN
- Change the PIN code of the SIM card
■
Add PIN 2.
- Enter the second PIN code of the SIM card (when the function
Automatic PIN entry
is on or when the SIM card supports another Telephone
service provider)
■
Diverting calls
- Setting diversion of incoming calls (valid for Infotainment Co-
lumbus with the SIM card slot in the external module) ■
All calls
- Forward all incoming calls
■
If engaged
- Forwarding incoming calls during a telephone conversation
■
If not available
- Forwarding the incoming calls when the vehicle is outside
the reach of the telephone service provider signal
■
If no answer
- Redirecting incoming calls when the incoming call is not an-
swered
SmartLink menu settings
›
In the SmartLink main menu, tap the function surface
.
■
Enable data transfer for ŠKODA apps
- Turning data transfer on and off for ŠKODA
applications
■ MirrorLink® - Settings of the system MirrorLink ®
■
Screen orientation:
- Setting screen orientation
■
Landscape
- Width display
■
Portrait
- Height display
■
Rotated 180 degrees
- Turn on / off the 180 ° inversion
■
Allow MirrorLink® notification to be shown
- Turn on / off the display of messages
of MirrorLink ®
applications in the Infotainment screen
Navigation menu settings
Route options
›
In the Navigation main menu, tap the functional surface
Tap →
Route op-tions
.
■
Suggest 3 alternative routes
- Switch on/off the menu for alternative routes (eco-
nomical, fast, short)
■
Route:
- Setting the preferred route
■
Most frequent routes
- Show/hide the menu of the most frequent routes in the
split screen
■
Dynamic route
- Switch on/off dynamic route recalculation due to TMC traffic
reports
■
Avoid motorways
- Switch on/off the non-use of motorways in the route cal-
culation
■
Avoid ferries and motorail trains
- Switch on/off the non-use of ferries and mo-
torail trains in the route calculation
■
Avoid toll roads
- Switch on/off use of toll roads for the route calculation
■
Avoid tunnels
- Switch on/off use of tunnels for the route calculation
■
Avoid routes requiring toll stickers
- Switch use of routes requiring toll stickers
on/off for route calculation
■
Show available toll stickers
- Selection of countries for which a valid toll sticker is
required (routes requiring toll stickers are used for route calculation)
■
Include trailer
- Turn on / off the setting to take a trailer into account for
route calculation » page 191
Map
›
In the Navigation main menu, tap the functional surface
→
Map
.
■
Show road signs
- Switch on/off the display of traffic signs
■
Lane guidance
- Display of lane guidance on/off
■
Show favourites
- Switch on/off the display of favourites
■
Show POIs
- Switch on/off the display of POIs
■
Select categories for POIs
- Selection of the displayed category for POIs
■
Show brands for POIs
- Switch on/off the company logos available for the POIs
shown
Manage memory
›
In the Navigation main menu, tap the functional surface
→
Manage memory
.
137Infotainment settings - Columbus, Amundsen, Bolero
Page 222 of 336
Wizard for “Blind Spot”Monitoring - OperationRead and observe
and on page 219 first.
At a speed over 15 km/h, the area alongside and behind the vehicle is moni-
tored by the system. At the same time, the distance and the difference in
speed between your vehicle and the other vehicles in the monitored area can
be measured.
When driving, the sensors monitor an area to the left and right to the extent of
a normal lane width.
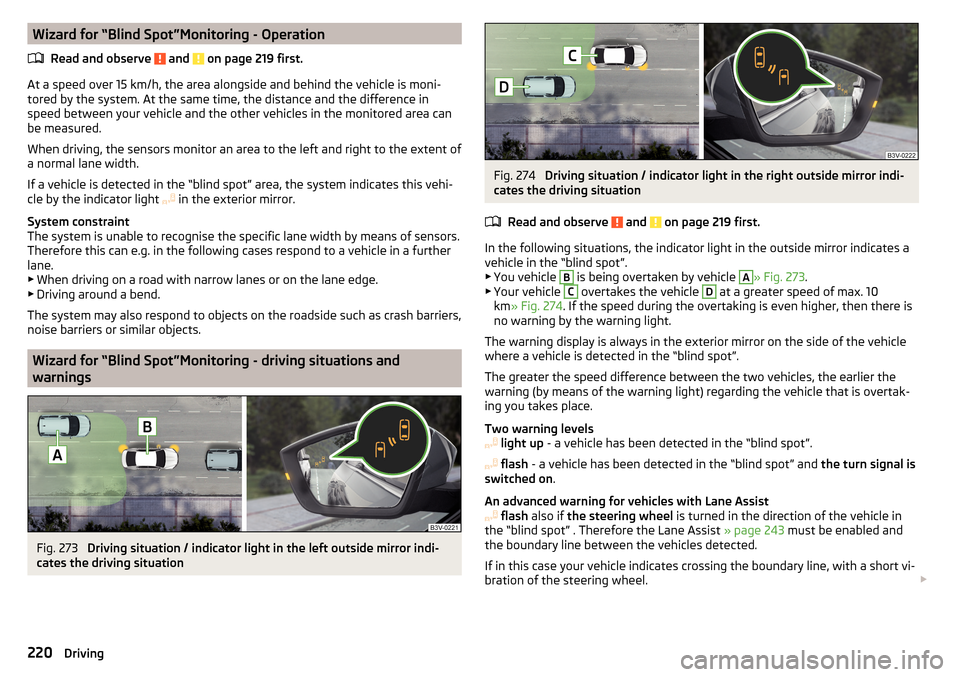
If a vehicle is detected in the “blind spot” area, the system indicates this vehi-
cle by the indicator light in the exterior mirror.
System constraint
The system is unable to recognise the specific lane width by means of sensors.
Therefore this can e.g. in the following cases respond to a vehicle in a further
lane.
▶ When driving on a road with narrow lanes or on the lane edge.
▶ Driving around a bend.
The system may also respond to objects on the roadside such as crash barriers,
noise barriers or similar objects.
Wizard for “Blind Spot”Monitoring - driving situations and
warnings
Fig. 273
Driving situation / indicator light in the left outside mirror indi-
cates the driving situation
Fig. 274
Driving situation / indicator light in the right outside mirror indi-
cates the driving situation
Read and observe
and on page 219 first.
In the following situations, the indicator light in the outside mirror indicates avehicle in the “blind spot”.
▶ You vehicle
B
is being overtaken by vehicle
A
» Fig. 273 .
▶ Your vehicle
C
overtakes the vehicle
D
at a greater speed of max. 10
km » Fig. 274 . If the speed during the overtaking is even higher, then there is
no warning by the warning light.
The warning display is always in the exterior mirror on the side of the vehicle where a vehicle is detected in the “blind spot”.
The greater the speed difference between the two vehicles, the earlier the
warning (by means of the warning light) regarding the vehicle that is overtak-
ing you takes place.
Two warning levels
light up - a vehicle has been detected in the “blind spot”.
flash - a vehicle has been detected in the “blind spot” and the turn signal is
switched on .
An advanced warning for vehicles with Lane Assist
flash also if the steering wheel is turned in the direction of the vehicle in
the “blind spot” . Therefore the Lane Assist » page 243 must be enabled and
the boundary line between the vehicles detected.
If in this case your vehicle indicates crossing the boundary line, with a short vi-
bration of the steering wheel.
220Driving
Page 225 of 336
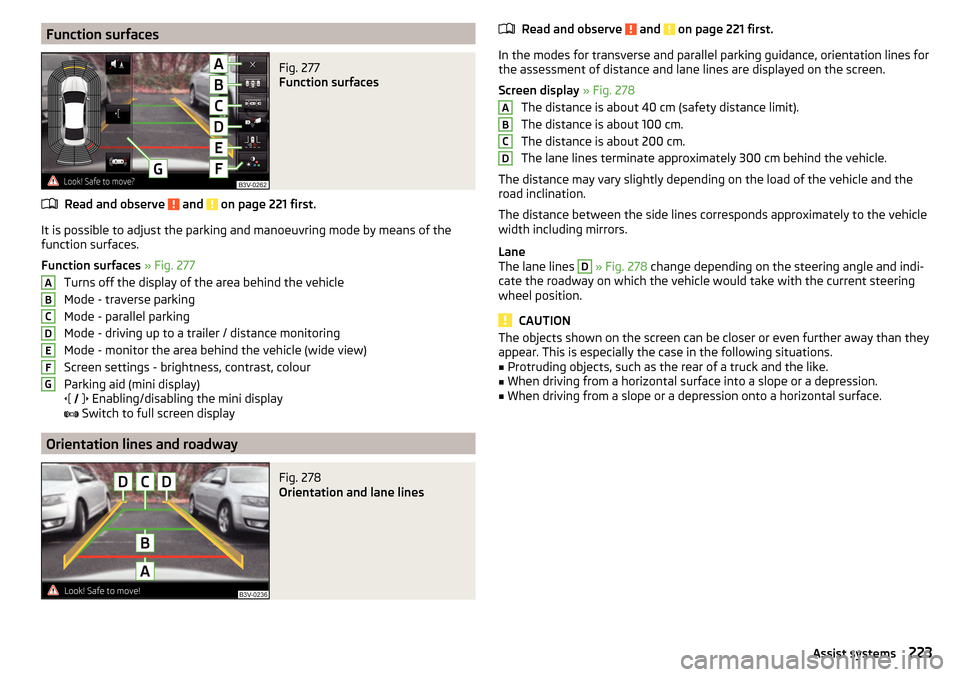
Function surfacesFig. 277
Function surfaces
Read and observe and on page 221 first.
It is possible to adjust the parking and manoeuvring mode by means of the
function surfaces.
Function surfaces » Fig. 277
Turns off the display of the area behind the vehicle
Mode - traverse parking
Mode - parallel parking
Mode - driving up to a trailer / distance monitoring
Mode - monitor the area behind the vehicle (wide view)
Screen settings - brightness, contrast, colour
Parking aid (mini display)
Enabling/disabling the mini display
Switch to full screen display
Orientation lines and roadway
Fig. 278
Orientation and lane lines
ABCDEFGRead and observe and on page 221 first.
In the modes for transverse and parallel parking guidance, orientation lines for
the assessment of distance and lane lines are displayed on the screen.
Screen display » Fig. 278
The distance is about 40 cm (safety distance limit).
The distance is about 100 cm.
The distance is about 200 cm.
The lane lines terminate approximately 300 cm behind the vehicle.
The distance may vary slightly depending on the load of the vehicle and the
road inclination.
The distance between the side lines corresponds approximately to the vehicle
width including mirrors.
Lane
The lane lines
D
» Fig. 278 change depending on the steering angle and indi-
cate the roadway on which the vehicle would take with the current steering
wheel position.
CAUTION
The objects shown on the screen can be closer or even further away than they
appear. This is especially the case in the following situations.■
Protruding objects, such as the rear of a truck and the like.
■
When driving from a horizontal surface into a slope or a depression.
■
When driving from a slope or a depression onto a horizontal surface.
ABCD223Assist systems
Page 246 of 336
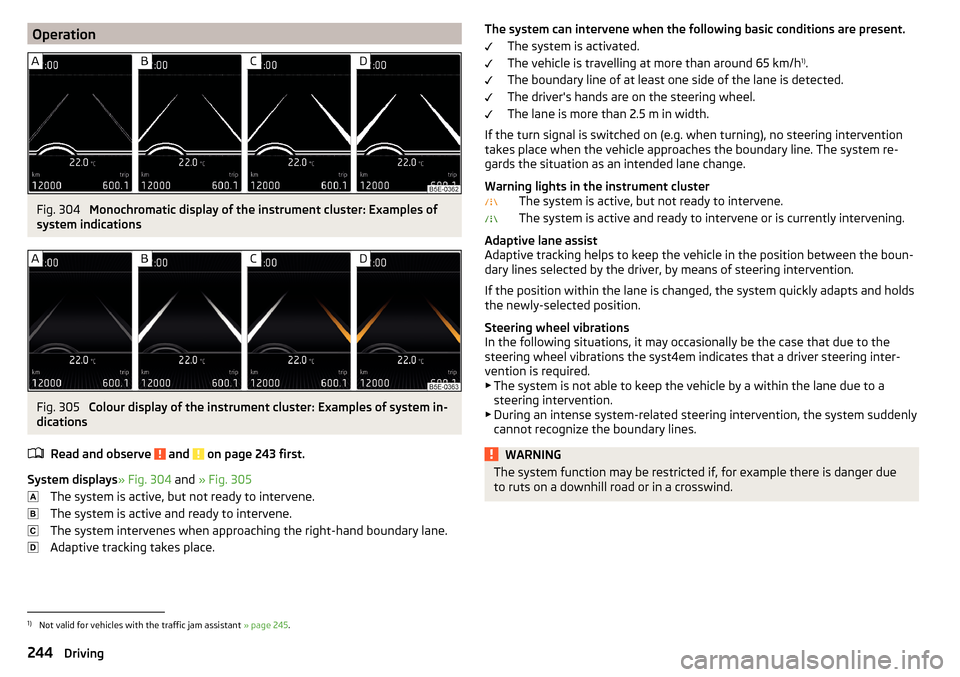
OperationFig. 304
Monochromatic display of the instrument cluster: Examples of
system indications
Fig. 305
Colour display of the instrument cluster: Examples of system in-
dications
Read and observe
and on page 243 first.
System displays » Fig. 304 and » Fig. 305
The system is active, but not ready to intervene.
The system is active and ready to intervene.
The system intervenes when approaching the right-hand boundary lane.
Adaptive tracking takes place.
The system can intervene when the following basic conditions are present. The system is activated.
The vehicle is travelling at more than around 65 km/h 1)
.
The boundary line of at least one side of the lane is detected.
The driver's hands are on the steering wheel.
The lane is more than 2.5 m in width.
If the turn signal is switched on (e.g. when turning), no steering intervention takes place when the vehicle approaches the boundary line. The system re-
gards the situation as an intended lane change.
Warning lights in the instrument cluster The system is active, but not ready to intervene.
The system is active and ready to intervene or is currently intervening.
Adaptive lane assist
Adaptive tracking helps to keep the vehicle in the position between the boun-
dary lines selected by the driver, by means of steering intervention.
If the position within the lane is changed, the system quickly adapts and holds
the newly-selected position.
Steering wheel vibrations
In the following situations, it may occasionally be the case that due to the
steering wheel vibrations the syst4em indicates that a driver steering inter-
vention is required.
▶ The system is not able to keep the vehicle by a within the lane due to a
steering intervention.
▶ During an intense system-related steering intervention, the system suddenly
cannot recognize the boundary lines.WARNINGThe system function may be restricted if, for example there is danger due
to ruts on a downhill road or in a crosswind.1)
Not valid for vehicles with the traffic jam assistant » page 245.
244Driving
Page 280 of 336
WARNING■Change when they are worn down to the wear indicators at the latest -
risk of accident.■
Improper wheel alignment affects the driving behaviour - there is an acci-
dent.
■
Unusual vibrations or “pulling” of the vehicle to one side could be a sign
of tyre damage. Reduce speed and stop! If no tyre damage is evident, seek
the assistance of a specialist garage.
Spare wheel
Use the emergency spare wheel only to reach the nearest specialist garage, as
it is not intended for permanent use .
A warning label is displayed on the rim of the temporary spare wheel.
Please note the following if you intend to use the temporary spare wheel. ▶ Do not cover the signs.
▶ Be particularly observant when driving.
▶ Inflate the temporary spare wheel to the maximum inflation pressure for the
vehicle » page 277 (the prescribed tyre pressure of the spare wheel R 18 is
4.2 bar).
In vehicles with tyre pressure monitoring, save the tyre pressure values in the
system » page 249 .
WARNING■
Never drive with more than one spare wheel mounted!■When driving with the temporary spare wheel at full throttle acceleration,
avoid sharp braking and fast cornering.■
Do not use snow chains on the temporary spare wheel.
■
Observe instructions on the warning sign of the emergency wheel.
Tyre marking
Explanation of tyre markings - e.g. 215/60 R 16 95 V
215Tyre width in mm60Height/width ratio in %RCode letter for the type of tyre – Radial16Diameter of wheel in inches95load indexVSpeed symbol
Load index - indicates the maximum permissible load for each individual tyre
load index919293949596979899Load
(In kg)615630650670690710730750775
Speed symbol - indicates the maximum permissible speed for a vehicle fitted
with tyres in the category concerned
speed
symbolMTUHVWYMaximum speed
(in km/h)130190200210240270300WARNINGNever exceed the maximum permissible load bearing capacity and speed
for the tyres fitted – There is a risk of accident.
Operating in winter conditions
All-year (or “winter”) tyres
All-season or “winter”tyres (indicated by an M+S or a mountain peak/snow-
flake symbol ) to improve the performance of the vehicle in winter condi-
tions.
For the best possible handling, use all-season or “winter” tyres on all four
wheels with a minimum tread depth of 4 mm.
If using “winter” tyres, fit the summer tyres on again in good time as they pro-
vide better handling properties, a shorter braking distance, less tyre noise, and
reduced tyre wear on roads which are free of snow and ice as well as at tem-
peratures above 7 °C.
278General Maintenance
Page 308 of 336
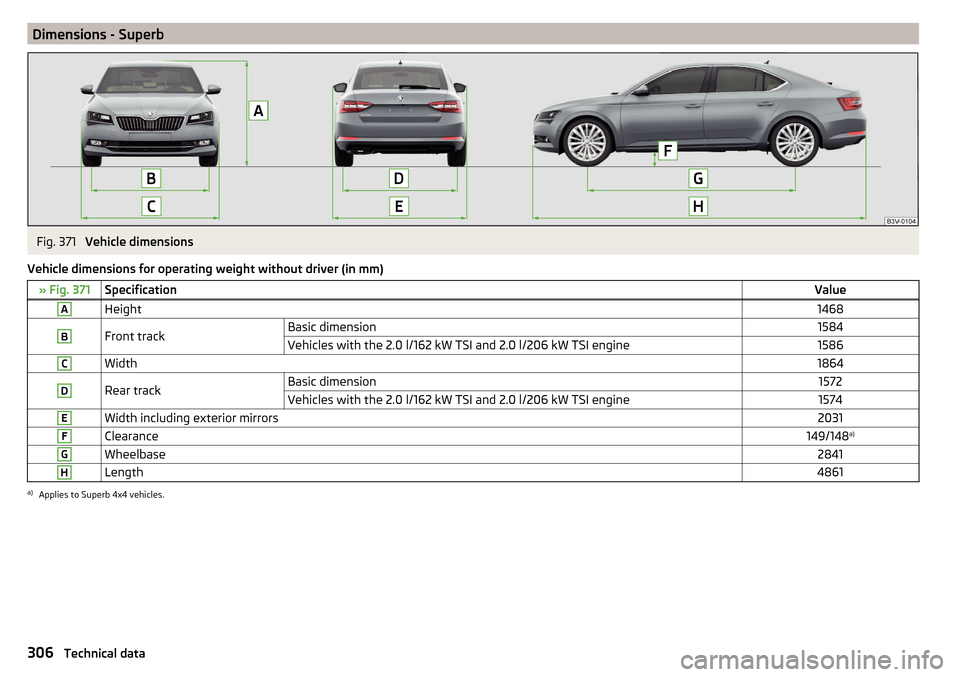
Dimensions - SuperbFig. 371
Vehicle dimensions
Vehicle dimensions for operating weight without driver (in mm)
» Fig. 371SpecificationValueAHeight1468BFront trackBasic dimension1584Vehicles with the 2.0 l/162 kW TSI and 2.0 l/206 kW TSI engine1586CWidth1864DRear trackBasic dimension1572Vehicles with the 2.0 l/162 kW TSI and 2.0 l/206 kW TSI engine1574EWidth including exterior mirrors2031FClearance149/148 a)GWheelbase2841HLength4861a)
Applies to Superb 4x4 vehicles.
306Technical data
Page 309 of 336
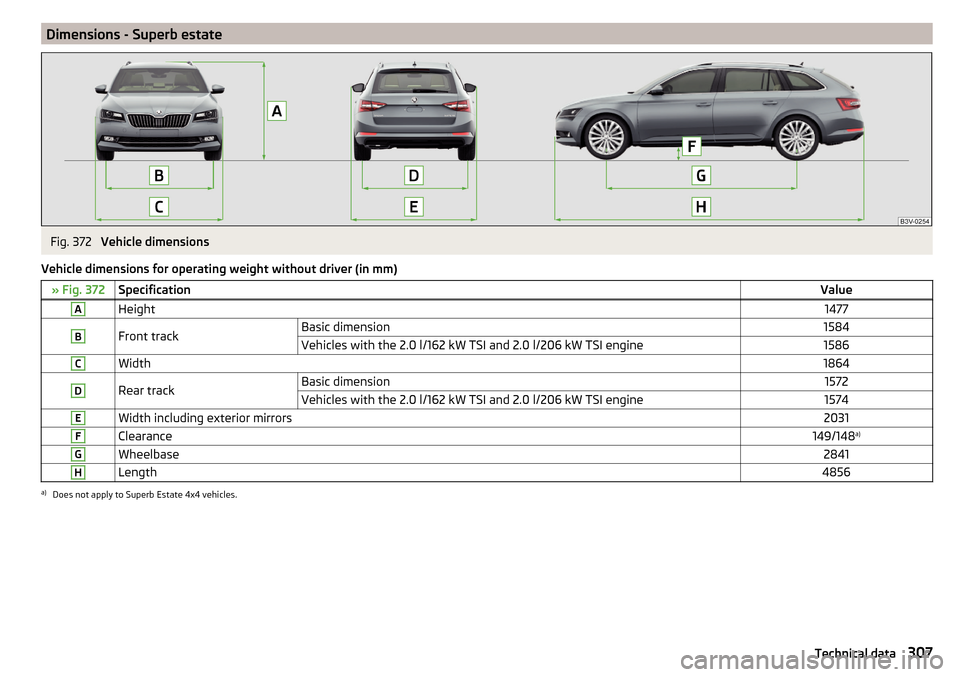
Dimensions - Superb estateFig. 372
Vehicle dimensions
Vehicle dimensions for operating weight without driver (in mm)
» Fig. 372SpecificationValueAHeight1477BFront trackBasic dimension1584Vehicles with the 2.0 l/162 kW TSI and 2.0 l/206 kW TSI engine1586CWidth1864DRear trackBasic dimension1572Vehicles with the 2.0 l/162 kW TSI and 2.0 l/206 kW TSI engine1574EWidth including exterior mirrors2031FClearance149/148 a)GWheelbase2841HLength4856a)
Does not apply to Superb Estate 4x4 vehicles.
307Technical data
Page 329 of 336
UnlockingCentral locking button55
in case of emergency292
Remote control54
Unlocking and locking53
Unlock steering lock199
Update navigation data181
Update the navigation data138
USB90, 150
Safe removal140
Used vehicles Acceptance and recycling
258
Useful equipment Clothes hook
93
Cup holders90
Glasses compartment92
Removable through-loading bag95
User account Configuration wizard
127
User profile136, 141
V
Variable loading floor
109
vCard185, 186
Vehicle - Settings198
Vehicle battery charging
275
Safety instructions273
Warning light39
Vehicle care Outside
261
Vehicle condition See Auto Check Control
44
Vehicle data sticker303
Vehicle data sticker and type plate Vehicle data sticker and type plate
303
Vehicle dimensions306, 307
Vehicle height306, 307
Vehicle identification number (VIN)303
Vehicle length306, 307
Vehicle systems198
Vehicle tool kit281
Vehicle width306, 307
Ventilation Seats
85
Vest280
Video DVD Compatible sources
156
Main menu155
Play back155
Select video source155
Supported file formats156
Video DVD menu155
Menu155
Video player155
VIN Vehicle identification number
303
Virtual pedal61
Visibility74
Visors75
Voice control128
Commands130
Correction of a voice command input130
Help130
Not recognising a voice command130
on / off129
Operation principle129
Settings133
Stop / restore command130
Voicemail168
Volume127
Volume setting127
W
Waiter Voice control
129
Warning display - low temperature42
Warning lights33
Warning symbols see Warning lights33
Warning triangle280
Warning when speeding47
Warranty5
Washing the vehicle260
Waste container91
Water in the fuel filter42
Waypoint mode194
Main menu194
Record waypoints195
Set waypoint manually195
Waypoint tour memory195, 196
Waypoint tour memory195, 196
Weather conditions256
Weights303, 304, 305
Wheel bolts Anti-theft wheel bolts
284
Caps283
Loosening and tightening284
Wheels276
Changing282
Full trim283
Load Index278
Snow chains279
Speed symbol278
Tyre age276
Tyre damage276
Tyre pressure277
Tyre storage276
Uni-directional tires276
Winter tyres278
Wi-Fi51
Wi-Fi direct52
Window operation
62
Window operation62
Windscreen Heating
198
327Index