warning light SKODA YETI 2010 1.G / 5L Owners Manual
[x] Cancel search | Manufacturer: SKODA, Model Year: 2010, Model line: YETI, Model: SKODA YETI 2010 1.G / 5LPages: 271, PDF Size: 14.71 MB
Page 188 of 271
Driving and the Environment187
Using the system
Safety
Driving Tips
General Maintenance
Breakdown assistance
Technical Data
tilt, steer immediat
ely downhill on your trajec tory and lightly depress the
accelerator.
If the vehicle is stationary on a hillside with a too great angle of lateral incli-
nation, avoid sudden and uncontrolled movements in the vehicle. The vehicle
can roll over and then roll down the hillside. This can lead to serious injuries.
If the vehicle is stationary on a hillside with a too great angle of lateral incli-
nation, neither you nor your occupants must exit the vehicle through the doors
facing downhill. This can lead to a shift of the overall centre of gravity. The
vehicle can tilt or roll over and then roll down the hillside. This can lead to
serious injuries. To avoid this, you and your occupants must exit the vehicle
only on the side facing uphill page 186, fig. 158.
When you exit the vehicle, make sure that the door which faces uphill does
not close by its own weight or by carelessness - risk of injury!
Observe the important guidelines page 179.
Driving over rutted roads and troughsYou will always encounter ruts when driv ing on forest roads, through wet meadows
and fields as well as on rutted stretches of terrain.
If the ruts and troughs are on firm and soft ground, you can simply follow the ruts.
Do not drive over ruts and troughs which ar e too deep. If you cannot avoid this, it is
better that you turn back.
Caution
If the ruts or troughs become too deep, the underbody of the vehicle can touch the
ground, which might cause the underbody to get damaged. Therefore, avoid driving in
deep ruts and troughs.Crossing a trenchIf possible, drive through the trench at an acute angle. Make sure when driving through
the trench that the tilt angle is not too steep.
WARNING
Never attempt to drive through a trench if its embankment is too steep. The
vehicle could slip, tilt or roll over - risk of accident!
Caution
If you drive into the trench at a right angle, the front wheels will sink into the trench.
There is also the danger that the underbod y of the vehicle touches the ground and is
damaged. For these reasons (even with four-wheel drive) it is rarely possible to get out
of the trench.Driving in sand and mudYou should therefore always drive at a cons tant speed through sand or mud whenever
possible and at the same time do not shift gears or change the driving stage.
– Switch on the Off-road mode page 170.
– Select a suitable gear or driving stage and maintain the gear or driving stage.
– Keep your vehicle in constant motion and do not stop until you have reached firm
ground.
Never drive too fast, otherwise the wheels may spin and the vehicle can get stuck. If
you feel that the tyres do no longer grip, then turn the steering wheel quickly back and
forth. This leads to an improved adhesion of the front tyres of the vehicle for a short
period of time.
Driving through sand
Do not reduce the tyre inflation pressure. If yo u nevertheless reduce the inflation
pressure, do not forget to re-establish the correct tyre inflation pressure level before
you continue driving. Driving with a reduced tyre inflation pressure increases the risk
that you lose control over your vehicle and that the vehicle rolls over.
Driving through mud
Do not change speed or direction when you drive through the mud. The tyres can lose
their grip in the mud. If the vehicle slides, you must steer in the appropriate direction
in order to regain control over the vehicle.
WARNING (continued)
s2ug.6.book Page 187 Friday, April 9, 2010 2:24 PM
Page 189 of 271
Driving and the Environment
188WARNING
Driving through mud can be dangerous. The vehicle can slide uncontrol-
lably which causes an increased risk of injury. Adopt a particularly cautious
style of driving. Pay attention to the information and warning notes.
An incorrect tyre inflation pressure may cause a major or fatal accident! An
incorrect tyre inflation pressure may result in bursting of a tyre, which causes
the vehicle to get out of control.
Observe the important guidelines page 179.
Stuck vehicleIf you can no longer drive on ...– Carefully dig out all the wheels and make sure that no other parts of the vehicle are
stuck in the sand.
– Engage the reverse gear.
– Gently depress the accelerator and try to drive backwards in your own track.
– Place scrub, footmats or a sackcloth directly in front of the tyres in order to improve
the road adherence and thus achieve an improved traction to drive out.Rocking out vehicle–Switch off the TCS page 165.
– Set the steering wheel straight.
– Drive so far back until the wheels just begin to spin.
– Quickly shift into first gear and drive forwards until the wheels begin to spin.
– Drive back and forth repeatedly until the momentum is sufficient to free the vehicle.
–Switch on the TCS.A few tips– Ensure that the Off-road mode is switched on page 170. – Avoid prolonged spinning of the wheels, otherwise the vehicle would still sink
deeper into the ground.
– Remove mud, dirt and stones from the tread of the tyre.
You need training and experience if you wish to rock out a vehicle. If you make a
mistake, the vehicle can still sink in further and you can only free it with the help of
others.
WARNING
Observe the important guidelines page 179.After driving off-roadCheck the vehicle for damage after driving off-road - especially on the underside of the
vehicle.
– Switch off the Off-road mode page 170.
– Check the tyres and the axles for damage and remove coarse dirt, stones and foreign bodies from the tyre tread.
– Clean the turn signal lights, the headlights, the number plate and the windows.
– Check the underbody of the vehicle and remove trapped objects, such as scrub or wood pieces.
– Contact your specialist gara ge if you detect any damage.
– In case of thick layers of dirt, clean the radiator grille, the engine compartment and the underbody of the vehicle.
WARNING
Combustible materials which are tra pped under the vehicle floor can be
dangerous. They can impair the driving safety and the safety of all the occu-
pants of the vehicle. After driving off-road, always check the underside of the
vehicle and remove trapped objects.
Never continue the journey if objects are trapped under the vehicle. This
can damage the fuel lines, the brake system, the seals and other parts of the
chassis.
s2ug.6.book Page 188 Friday, April 9, 2010 2:24 PM
Page 192 of 271
Towing a trailer191
Using the system
Safety
Driving Tips
General Maintenance
Breakdown assistance
Technical Data
Headlights
Before starting off with a hitched trailer, also check the setting of the headlights. Alter
the setting as necessary with the ai
d of the headlight beam adjuster page 58.
Detachable ball head
The ball rod is detachable on vehicles which feature a factory-fitted towing device. It is
stowed together with separate fitting instru ctions in the spare wheel well in the luggage
compartment of the vehicle.
Further information on the towing device page 192.
Note
We recommend that you also have your vehicle inspected between service inter-
vals if you tow a trailer frequently.
The handbrake on the towing vehicle must be put on when coupling and decou-
pling the trailer.
Driving Tips
Particular caution is required when towing a trailer.– Do not, as far as possible, drive with your vehicle unladen and the trailer laden.
– Do not make full use of the legal maximum speeds. This applies in particular to downhill sections.
– Apply the brakes in good time.
– Keep a check on the coolant temperature gauge if the outside temperature is high.
Distribution of weight
The distribution of the weight is very poor if your vehicle is unladen and the trailer is
laden. Maintain a particularly low speed if you cannot avoid driving with this combina-
tion.
Driving speed
Do not drive faster than 80 km/hour for safety reasons. This also applies for countries
in which higher speeds are allowed. The fact that the driving stability of the vehicle + trailer combination reduces with
increasing speed means that the legally allowed speed should not be used when there
are unfavourable road, weather or wind cond
itions, particularly near accident black
spots.
You must always reduce your speed immediat ely as soon as you detect even just the
slightest swaying of the trailer. On no account attempt to stop the trailer from
“swaying” by accelerating.
Apply the brakes in good time! If the trailer is fitted with a trailer brake, apply the
brakes gently at first and then brake firmly. This will avoid brake jolts resulting from the
trailer wheels locking. Shift down gears in good time before negotiating a downhill
section to allow the engine to also act as a brake.
Engine overheating
Please keep a check on the coolant temperature gauge if you have to negotiate a
lengthy slope in a low gear at a high engi ne speed when the outside temperature is
very high page 17, “Coolant temperature gauge”.
If the needle of the coolant temperature gauge moves into the right-hand area or even
the red area of the scale, reduce your speed immediately. Stop and switch off the
engine if the warning light
in the instrument cluster begins flashing. Wait a few
minutes and check the level of coolant in the coolant expansion bottle page 208,
“Inspecting the coolant level”.
Please refer to the following guidelines page 33, “Coolant temperature/ Coolant
quantity ”.
The coolant temperature can be reduced by switching on the heating.
Any increase in the cooling effect of the coolant fan through shifting down a gear and
increasing the engine speed is not possible since the fan speed is independent of the
engine speed. One should also not drop a gear for this reason when towing a trailer as
long as the engine can manage th e slope without any drop in speed.
s2ug.6.book Page 191 Friday, April 9, 2010 2:24 PM
Page 195 of 271
Taking care of your vehicle and cleaning the vehicle
194
There are no particular points to note be fore washing your vehicle in an automatic
vehicle wash system other than the usua l precautionary measures (closing the
windows and the sliding/tilting roof etc.).
If you have any particular attached parts fitted to your car - such as spoiler, roof rack
system, two-way radio aerial - it is best to first of all consult the operator of the car
wash plant.
It is important to degrease the lips of the windscreen wiper rubbers after passing
through the automatic vehicle wash system.Washing vehicle by handIt is important to first soften the dirt with plenty of water and rinse it off as thoroughly
as possible before washin g your vehicle by hand.
One should then clean the vehicle using a soft washing sponge, washing glove or a
washing brush and only slight pressure. Work from the top to the bottom - beginning
with the roof. Only place slight pressure on the vehicle paintwork during cleaning Only
use a car shampoo for stubborn dirt.
Wash out the sponge or washing glove thoroughly at short intervals.
Clean wheels, door sills and similar parts last. Use a second sponge for such areas.
Rinse off the vehicle well after giving it a wash and dry it off using a chamois leather.
WARNING
The ignition should always be switched off when you wash your vehicle -
risk of accident!
Protect your hands and arms from sharp-edged metal parts when you are
cleaning the underfloor, the inside of the wheel housings or the wheel trims -
risk of cuts.Caution
Do not wash your vehicle in bright sunlight - risk of paint damage.
Ensure that the jet of water is not aimed di rectly at the locking cylinders or at the
door and panel joints if you spray your vehi cle in winter down with a hose - risk of
freezing.
Do not use any insect sponges, rough kitc hen sponges or similar cleaning products
- risk of damage to the surface of paintwork.For the sake of the environment
Only wash your vehicle at wa shing bays specifically reserved for this purpose. This
ensures that no water which may be contaminated by oil flows into the sewage system.
It is not even permitted to wash your vehicl e in certain areas except at such specific
washing bays.Washing with a high-pressure cleanerWhen you wash your vehicle with a high-press ure cleaner, it is essential to comply with
the instructions for use of the cleaning equi pment. This applies in particular to the
pressure used and to the spraying distance . Maintain a sufficiently large distance to
soft materials such as rubber hoses or insulation material.
On no account use circular spray nozzles or so-called dirt cutters!
WARNING
It is particularly important that you do not clean tyres with circular spray jets.
Visible but also invisible damage to tyres may occur even at a relatively large
spraying distance and if sprayed only for a short time - risk of accident!
Caution
The water containing wax must be no hotter than 60°C, otherwise the vehicle can be
damaged.Wax treatmentGood wax treatment is an effective way of protecting the paintwork from harmful envi-
ronmental influences and minor mechanical damage.
The vehicle must be treated with a high-quali ty hard wax polish at the latest, when no
more drops form on the clean paintwork.
s2ug.6.book Page 194 Friday, April 9, 2010 2:24 PM
Page 197 of 271
Taking care of your vehicle and cleaning the vehicle
196
Do not use window leathers which you have us ed to polish the vehicle body to dry off
the windows. Residues of preservatives in the window leather can dirty the window
and reduce visibility.
Do not affix any stickers over the inside of the rear window to avoid damage to the
heating elements of the rear window heater .
We recommend using a preserva tive from Škoda genuine accessories offered by your
Škoda dealer.
Caution
Never remove snow or ice from the glass parts with warm or hot water - risk of forma-
tion of cracks in the glass!The headlight lensesPlease do not use any aggressi ve cleaning or chemical solvent products for cleaning
the front headlights - risk of damage to the plastic lenses. Please use soap and clean
warm water.
Caution
Never wipe the headlights dry and do not use any sharp objects for cleaning the plastic
lenses, this may result in damage to the protective paintwork and consequently in
formation of cracks on the headlight lenses, e.g through effect of chemical products.Door and window sealsThe rubber seals on the doors, boot lid, bonnet and windows remain supple and last
longer if you treat them from time to time with a rubber care product (e.g. with a spray
with silicone-free oil). You also avoid premature wear of the seals and prevent leakages
in this way. It is also easier to open the doors. Rubber seals which are well cared for also
do not stick together in cold winter weather.Locking cylinderWe recommend that you use the spray from Škoda original accessories with regreasing
and anticorrosive effect for de-icing locking cylinders.
Note
When washing your vehicle, ensure that as little water as possible gets into the locking
cylinders.WheelsSteel wheels
You should also thoroughly wash the wheels and wheel trims when giving your vehicle
its regular wash. This prevents any brake dust, dirt and road salt from sticking to the
wheel hubs. You can remove stubborn brake abrasion adhering to the wheels with an
industrial cleaner. Touch up any damage to the paintwork on the wheels before rust is
able to form.
Light alloy wheels
Regular care of light alloy wh eels is necessary in order to retain their decorative
appearance over long periods. It is particul arly important to remove regularly any road
salt and brake abrasion from light alloy wheels, otherwise the light metal will suffer.
Wash thoroughly and then treat the wheels with a protective product for light alloy
wheels which does not cont ain any acidic components. We recommend to apply a
hard wax layer onto the wheel hubs every three months. You must not use any prod-
ucts which cause abrasion when treating the wheel hubs. Any damage to the paint
layer on the wheel hubs must be touched up immediately.
We recommend using a preservative from Šk oda genuine accessories offered by your
Škoda dealer.
WARNING
One should remember when cleaning th e wheels that moisture, ice and road
salt may adversely affect braking ef ficiency - risk of an accident!
Note
Severe layers of dirt on the wheels can also result in wheel imbalance. This may show
itself in the form of a wheel vibration which is transmitted to the steering wheel which,
in certain circumstances, can cause premature wear of the steering. This means it is
necessary to remove the dirt.
s2ug.6.book Page 196 Friday, April 9, 2010 2:24 PM
Page 204 of 271
Inspecting and replenishing203
Using the system
Safety
Driving Tips
General Maintenance
Breakdown assistance
Technical Data
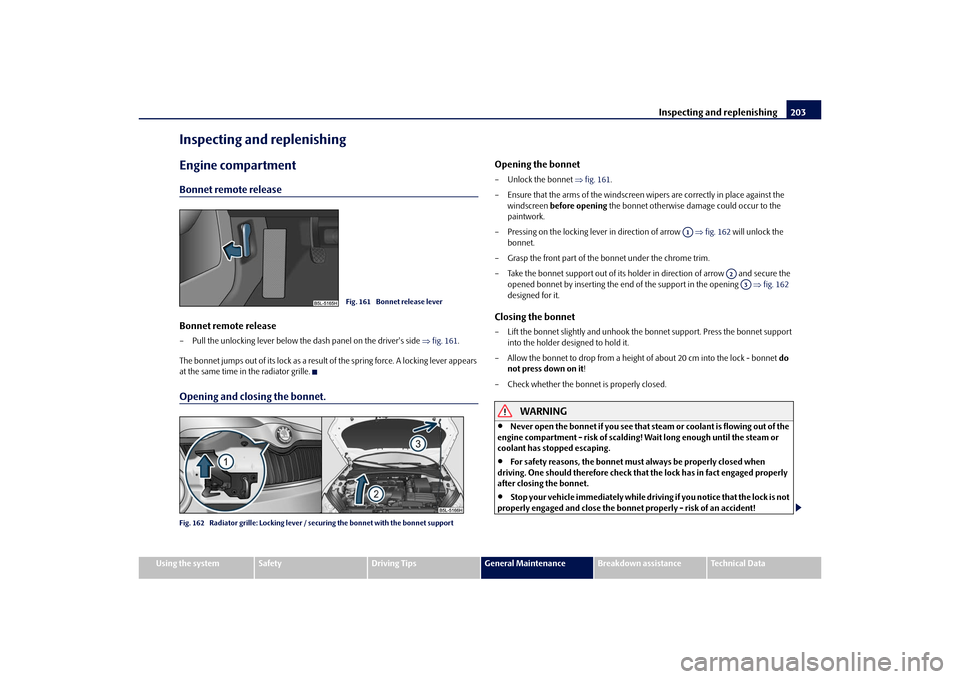
Inspecting and replenishingEngine compartmentBonnet remote releaseBonnet remote release– Pull the unlocking lever below the dash panel on the driver's side fig. 161 .
The bonnet jumps out of its lock as a result of the spring force. A locking lever appears
at the same time in the radiator grille.Opening and closing the bonnet.Fig. 162 Radiator grille: Locking lever / se curing the bonnet with the bonnet support
Opening the bonnet– Unlock the bonnet fig. 161 .
– Ensure that the arms of the windscreen wipers are correctly in place against the windscreen before opening the bonnet otherwise damage could occur to the
paintwork.
– Pressing on the locking lever in direction of arrow fig. 162 will unlock the
bonnet.
– Grasp the front part of the bonnet under the chrome trim.
– Take the bonnet support out of its holder in direction of arrow and secure the opened bonnet by inserting the end of the support in the opening fig. 162
designed for it.Closing the bonnet– Lift the bonnet slightly and unhook the bonnet support. Press the bonnet support
into the holder designed to hold it.
– Allow the bonnet to drop from a height of about 20 cm into the lock - bonnet do
not press down on it !
– Check whether the bonnet is properly closed.
WARNING
Never open the bonnet if you see that steam or coolant is flowing out of the
engine compartment - risk of scalding! Wait long enough until the steam or
coolant has stopped escaping.
For safety reasons, the bonnet must always be properly closed when
driving. One should therefore check that the lock has in fact engaged properly
after closing the bonnet.
Stop your vehicle immediately while driving if you notice that the lock is not
properly engaged and close the bonnet properly - risk of an accident!
Fig. 161 Bonnet release lever
A1
A2A3
s2ug.6.book Page 203 Friday, April 9, 2010 2:24 PM
Page 207 of 271
Inspecting and replenishing
206
It is normal for the engine to consume oil. The oil consumption may be as much as 0.5
l/1 000 km depending on your style of driving and the conditions under which you
operate your vehicle. The oil consumption may be slightly hi gher than this during the
first 5 000 kilometres.
One should therefore check the oil level at regular intervals, preferably every time after
the fuel tank is filled or after driving for long stretches.
We recommend maintaining the oil level within the range - but not above this, if
the engine has been operating at high load s, for example during a lengthy motorway
trip during the summer months, towing a tr ailer or negotiating a high mountain pass.
The warning light in the instrument cluster* will indicate page 31 whether the oil
level is too low. In this case, check the oil level as soon as possible. Top up with an
appropriate quantity of oil.
Caution
The oil level must on no account extend beyond the range . Danger of damaging
the catalytic converter.
Do not continue your journey if for some reason it is not possible under the
conditions prevailing to top up with oil. Switch the engine off and obtain professional
assistance from a specialist garage, otherwise it could lead to severe engine damage.Note
Engine oil specifications page 243, “Technical Data”.Replenishing engine oil– Inspecting the engine oil level page 205.
– Unscrew the cap of the engine oil filler opening.
– Pour in a suitable grade of oil in portions of 0.5 litres page 246, “Engine oil spec-
ifications”.
– Inspect the oil level page 205.
– Carefully screw on the cap of the filler opening and push the dipstick in fully.
WARNING
Avoid dripping oil onto hot parts of the engine when topping up will oil - a
risk of fire!
Read and observe the warning notes page 204, “Working in the engine
compartment” before working in the engine compartment.For the sake of the environment
The oil level must on no acco unt extend beyond the range page 205. Oil will
otherwise be drawn in through the crankc ase ventilation and may pass through the
exhaust system to atmosphere. The oil ma y combust in the catalytic converter and
damage it.Changing engine oilThe engine oil must be changed at the intervals stated in the Service schedule or
according to the service interval indicator page 18, “Service Interval Display”.
WARNING
Only carry out the engine oil change, if you have the required professional
knowledge!
Read and observe the warning notes page 204, “Working in the engine
compartment” before working in the engine compartment.
First of all, let the engine cool down, we ar an eye protection and gloves - risk
of caustic burns due to hot oil.Caution
You must not pour any additives into the engine oil - risk of engine damage! Damage,
which results from such product, are excluded from the warranty.
For the sake of the environment
You must on no account pour oil into the ground or into the sewage system.
AAAA
AA
s2ug.6.book Page 206 Friday, April 9, 2010 2:24 PM
Page 209 of 271
Inspecting and replenishing
208
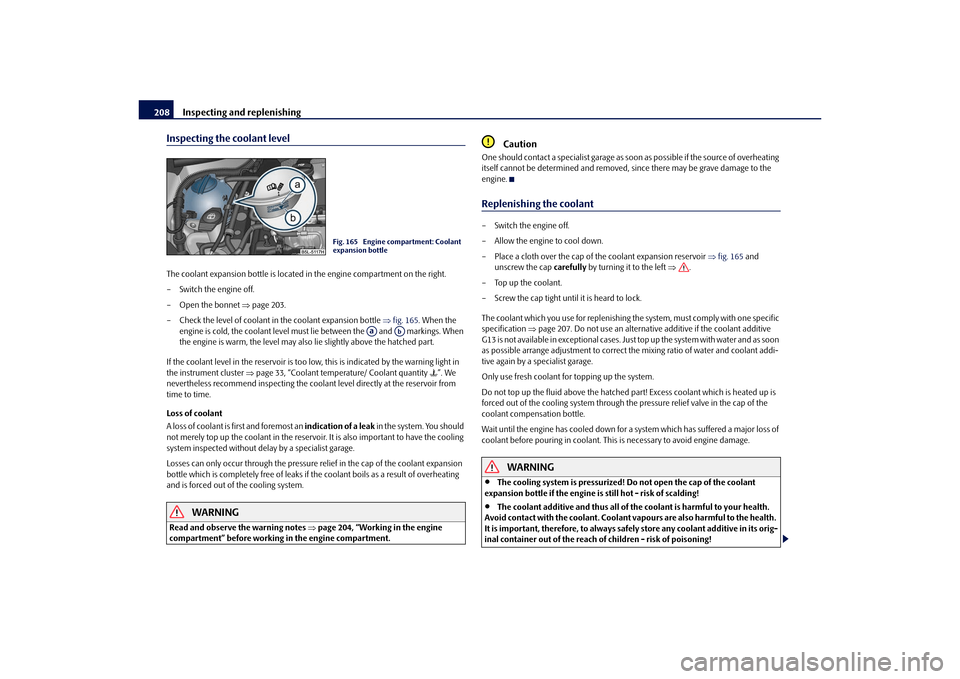
Inspecting the coolant levelThe coolant expansion bottle is located in the engine compartment on the right.
– Switch the engine off.
– Open the bonnet page 203.
– Check the level of coolant in the coolant expansion bottle fig. 165 . When the
engine is cold, the coolant level must lie between the and markings. When
the engine is warm, the level may also lie slightly above the hatched part.
If the coolant level in the reservoir is too lo w, this is indicated by the warning light in
the instrument cluster page 33, “Coolant temperature/ Coolant quantity ”. We
nevertheless recommend inspecting the cool ant level directly at the reservoir from
time to time.
Loss of coolant
A loss of coolant is first and foremost an indication of a leak in the system. You should
not merely top up the coolant in the reservoir. It is also important to have the cooling
system inspected without delay by a specialist garage.
Losses can only occur through the pressure relief in the cap of the coolant expansion
bottle which is completely free of leaks if the coolant boils as a result of overheating
and is forced out of the cooling system.
WARNING
Read and observe the warning notes page 204, “Working in the engine
compartment” before working in the engine compartment.
Caution
One should contact a specialist garage as s oon as possible if the source of overheating
itself cannot be determined and removed, since there may be grave damage to the
engine.Replenishing the coolant– Switch the engine off.
– Allow the engine to cool down.
– Place a cloth over the cap of the coolant expansion reservoir fig. 165 and
unscrew the cap carefully by turning it to the left .
–Top up the coolant.
– Screw the cap tight until it is heard to lock.
The coolant which you use for replenishing the system, must comply with one specific
specification page 207. Do not use an alternative additive if the coolant additive
G13 is not available in exceptional cases. Just top up the system with water and as soon
as possible arrange adjustment to correct the mixing ratio of water and coolant addi-
tive again by a specialist garage.
Only use fresh coolant for topping up the system.
Do not top up the fluid above the hatched pa rt! Excess coolant which is heated up is
forced out of the cooling system through the pressure relief valve in the cap of the
coolant compensation bottle.
Wait until the engine has cooled down for a system which has suffered a major loss of
coolant before pouring in coolant. This is necessary to avoid engine damage.
WARNING
The cooling system is pressurized! Do not open the cap of the coolant
expansion bottle if the engine is still hot - risk of scalding!
The coolant additive and thus all of the coolant is harmful to your health.
Avoid contact with the coolant. Coolant vapours are also harmful to the health.
It is important, therefore, to always safely store any coolant additive in its orig-
inal container out of the reach of children - risk of poisoning!
Fig. 165 Engine compartment: Coolant
expansion bottle
Aa
Ab
s2ug.6.book Page 208 Friday, April 9, 2010 2:24 PM
Page 210 of 271
Inspecting and replenishing209
Using the system
Safety
Driving Tips
General Maintenance
Breakdown assistance
Technical Data
If any splashes of coolant get into yo ur eyes, rinse out your eyes immedi-
ately with clear water and contact a doctor as soon as possible.
You should also consult a doctor without delay if you have inadvertently
swallowed coolant.Caution
Do not continue your journey if for some reason it is not possible under the
conditions prevailing to top up with coolant. Switch the engine off and obtain
professional assistance from a specialist garage, otherwise it could lead to severe
engine damage.
For the sake of the environment
Do not re-use coolant if it is necessary to drain the coolant in the system. It should be
collected and disposed of in compliance with environmental protection regulations.Radiator fan
The radiator fan may switch on suddenly.The radiator fan is driven by an electric motor and controlled according to the coolant
temperature.
The radiator fan may continue running for up to 10 minutes after the engine has been
switched off - even if the igni tion is also off. It may also switch on suddenly after a
certain time, if
the coolant temperature has risen beca use of an accumulation of heat or
the warm engine compartment is heated up additionally by strong sunlight.
WARNING
You must therefore be aware when workin g in the engine compartment that the
fan may switch on suddenly - risk of injury!
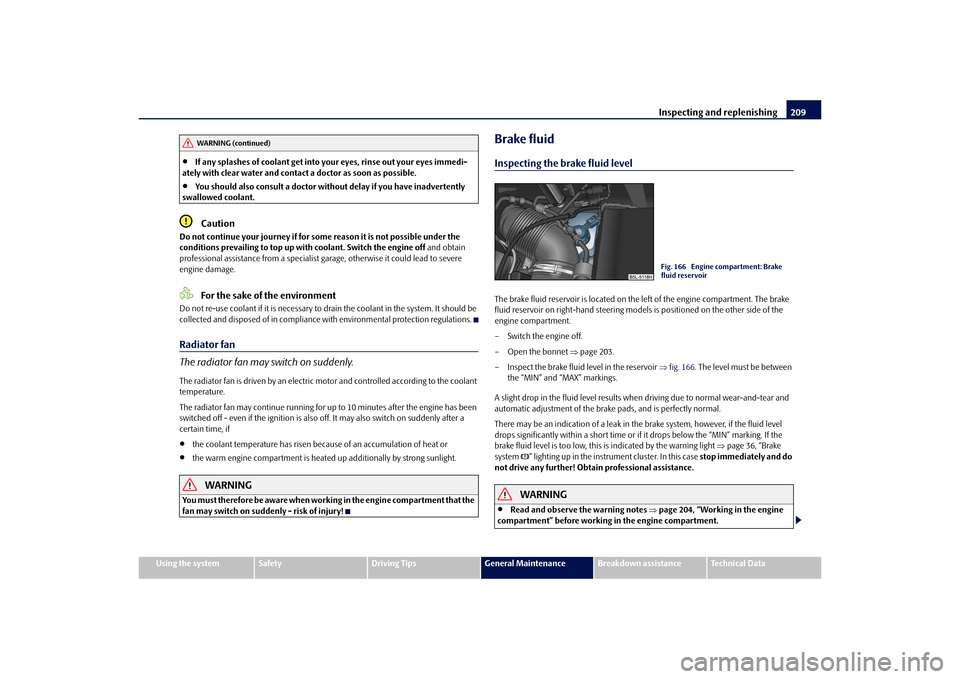
Brake fluidInspecting the brake fluid levelThe brake fluid reservoir is located on the left of the engine compartment. The brake
fluid reservoir on right-hand steering models is positioned on the other side of the
engine compartment.
– Switch the engine off.
– Open the bonnet page 203.
– Inspect the brake fluid level in the reservoir fig. 166 . The level must be between
the “MIN” and “MAX” markings.
A slight drop in the fluid level results when driving due to normal wear-and-tear and
automatic adjustment of the brak e pads, and is perfectly normal.
There may be an indication of a leak in the brake system, however, if the fluid level
drops significantly within a short time or if it drops below the “MIN” marking. If the
brake fluid level is too low, this is indicated by the warning light page 36, “Brake
system ” lighting up in the instru ment cluster. In this case stop immediately and do
not drive any further! Obtain professional assistance.
WARNING
Read and observe the warning notes page 204, “Working in the engine
compartment” before working in the engine compartment.
WARNING (continued)
Fig. 166 Engine compartment: Brake
fluid reservoir
s2ug.6.book Page 209 Friday, April 9, 2010 2:24 PM
Page 212 of 271
Inspecting and replenishing211
Using the system
Safety
Driving Tips
General Maintenance
Breakdown assistance
Technical Data
when handling batteries. Corrosive fumes
in the air irritate the air passages and
lead to conjunctivitis and inflammation of the air passages in the lungs. Battery
acid corrodes dental enamel and create s deep wounds after contact with the
skin which take a long time to heal. Repeated contact with diluted acids causes
skin diseases (inflammations, ulcers, slin cracks). Acids coming into contact
with water are diluted accompanied by significant development of heat.
Do not tilt the battery otherwise battery electrolyte may flow out of the
battery vent openings. Protect the eyes with safety glas ses or a shield! There is
the danger of suffering blindness! If an y battery electrolyte gets into your eye,
rinse out your eye immediately with cl ear water for several minutes. Contact a
doctor without delay.
Splashes of acid on your skin or clothes should be neutralised as soon as
possible using soap suds and then rinsed with plenty of water. Contact a doctor
immediately if you swal low battery electrolyte.
Keep batteries out of the reach of children.
Hydrogen is released when you charge a battery and a highly explosive gas
mixture is produced. An explosion can be caused through sparkling over during
unclamping or loosening of the cabl e plug while the ignition is on.
Bridging of the poles will create a short circuit (e.g. through metal objects,
cables). Possible consequences of a short circuit: Melting of lead struts, explo-
sion and burning of the battery, jets of acid spurting out.
It is prohibited to work with a naked flame and light, to smoke or to carry out
any activities which produce sparks. Avoi d creating sparks when working with
cables and electrical devices. Strong sparking represents a risk of injury.
Before carrying out any work on the el ectrical system, switch off the engine,
the ignition as well as all electrical components and disconnect the negative
cable (-) on the battery. If you wish to replace a bulb it is sufficient to switch off
the appropriate light.
Never charge a frozen or thawed battery - risk of explosion and caustic
burns! Replace a frozen battery.
Never jump-start the batteries which have a too low electrolyte level - risk
of explosion and caustic burns!
Never use a battery which is damaged - risk of explosion! Immediately
replace a damaged battery.Caution
You must only disconnect the battery if th e ignition is switched off, otherwise the
electrical system (electronic components ) of the vehicle may be damaged. When
disconnecting the battery from the electrical system of the vehicle, first disconnect the
negative terminal (-) of the battery. Then disconnect the positive terminal (+).
When reconnecting the battery, first connect the positive terminal (+) and only
then the negative terminal (-) of the battery. You must on no account connect the
cables wrongly - risk of a cable fire.
Ensure that battery acid does not come into contact with the vehicle body other-
wise damage could occur to the paintwork.
Do not place the battery in direct daylight in order to protect the battery housing
from the effects of ultra-violet light.For the sake of the environment
A removed battery is a special type of wa ste which is harmful to the environment -
contact your specialist garage regarding disposing of the battery.
Note
Please also refer to the guidelines page 214, also after connecting the battery.
WARNING (continued)
WARNING (continued)
s2ug.6.book Page 211 Friday, April 9, 2010 2:24 PM