technical data SKODA YETI 2010 1.G / 5L Owner's Manual
[x] Cancel search | Manufacturer: SKODA, Model Year: 2010, Model line: YETI, Model: SKODA YETI 2010 1.G / 5LPages: 271, PDF Size: 14.71 MB
Page 200 of 271
Taking care of your vehicle and cleaning the vehicle199
Using the system
Safety
Driving Tips
General Maintenance
Breakdown assistance
Technical Data
Clean the leather every 2 to 3 months, remove fresh soiling each time this occurs.
Remove fresh stains such as those from ball-point pens, ink, lipstick, shoe cream
etc., as quickly as possible.
Care also for the leather dye. Refreshen ar eas which have lost their colour with a
special coloured leather cream as required.
The leather is a natural material with specific properties. During the use of the
vehicle, minor optical changes can occur on the leather parts of the covers (e. g wrin-
kles or creases as a result of the stress of the covers).
Seat belts– Keep the seat belts clean!
– Wash seat belts which have become soiled using a mild soapy solution.
– Inspect the seat belts regularly to ensure they are in good condition.
Belt webbing which has become severely so iled may prevent the inertia reel from
reeling up the belt properly.
WARNING
The seat belts must not be removed for cleaning.
Never clean the seat belts chemically as dry cleaning may destroy the fabric.
The seat belts must also not be allowed to come into contact with corrosive
liquids (such as acids etc.).
We recommend that seat belts which have damage to the webbing, the
connections, the inertia reel or the lock should be replaced by an authorised
Škoda Service Partner.
Inertia reel belts must be completely dried before being reeled up.
s2ug.6.book Page 199 Friday, April 9, 2010 2:24 PM
Page 202 of 271
Fuel201
Using the system
Safety
Driving Tips
General Maintenance
Breakdown assistance
Technical Data
Caution
Therefore, your vehicle can only be operated with diesel fuel which complies with
the standard EN 590 (standard DIN 51628 in Germany, standard ÖNORM C 1590 in
Austria). Filling the tank even only once wi th diesel fuel which does not comply with
the standard, can result in damage to the engine parts, the lubrication system, the fuel
and exhaust system.
If by mistake you have refuelled with a different fuel other than the diesel fuel
which complies to the above mentioned standards (e.g. petrol), do not start the engine
or switch on the ignition! This can result in severe engine damage! Contact a specialist
garage and have the fuel sy stem of the engine cleaned.
Water which has collected in the fuel fi lter can result in engine problems.
Your vehicle is not adapted for use of biofue l (RME), therefore this fuel must not be
refuelled and driven. The use of biofuel (RME) can lead to damage to the engine or the
fuel system.
Operation in winterWinter-grade diesel fuel
A different grade of diesel fuel is available at filling stations in winter than during the
summer. Using “summer-grade diesel fuel” at temperatures below 0°C can result in
operational problems because th e diesel becomes viscous as a result of paraffin sepa-
ration.
It is therefore the case that the standard EN 590 (standard DIN 51628 in Germany,
standard ÖNORM C 1590 in Austria) is the diesel fuel class prescribed for certain
periods of the year which can also be purc hased at the corresponding time during the
year. “Winter-grade diesel fuel” will still operate properly even at a temperature of -
20°C.
It is often the case in countries with different climatic conditions that diesel fuels avail-
able have a different temperature characteristic. The authorised Škoda Service Part-
ners and filling stations in the country concer ned will be able to provide you with infor-
mation regarding the diesel fuels available.
Prewarming fuel
The vehicle is fitted with a fuel filter prewarming system. This secures operation of a
vehicle using diesel fuel down to an environmental temperature of -25°C.
Caution
It is not permitted to add the various fuel additives on the market, including petrol, to
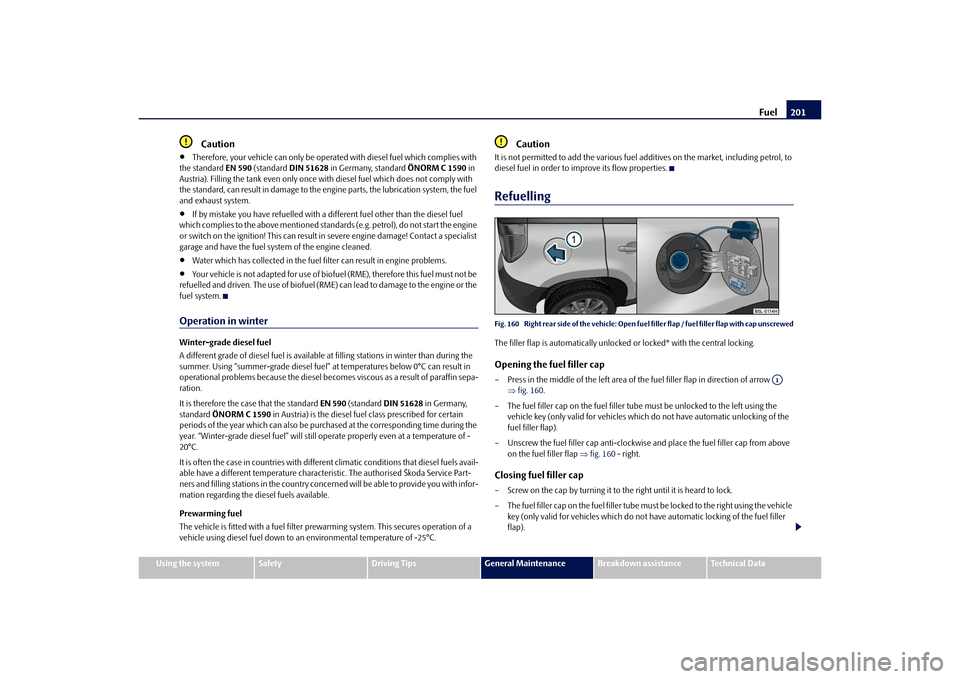
diesel fuel in order to improve its flow properties.RefuellingFig. 160 Right rear side of the ve hicle: Open fuel filler flap / fuel filler flap with cap unscrewedThe filler flap is automatically unlocked or locked* with the central locking.Opening the fuel filler cap– Press in the middle of the left area of the fuel filler flap in direction of arrow
fig. 160 .
– The fuel filler cap on the fuel filler tube must be unlocked to the left using the
vehicle key (only valid for vehicles which do not have automatic unlocking of the
fuel filler flap).
– Unscrew the fuel filler ca p anti-clockwise and place the fuel filler cap from above
on the fuel filler flap fig. 160 - right.Closing fuel filler cap– Screw on the cap by turning it to the right until it is heard to lock.
– The fuel filler cap on the fuel filler tube must be locked to the right using the vehicle
key (only valid for vehicles which do not have automatic locking of the fuel filler
flap).
A1
s2ug.6.book Page 201 Friday, April 9, 2010 2:24 PM
Page 204 of 271
Inspecting and replenishing203
Using the system
Safety
Driving Tips
General Maintenance
Breakdown assistance
Technical Data
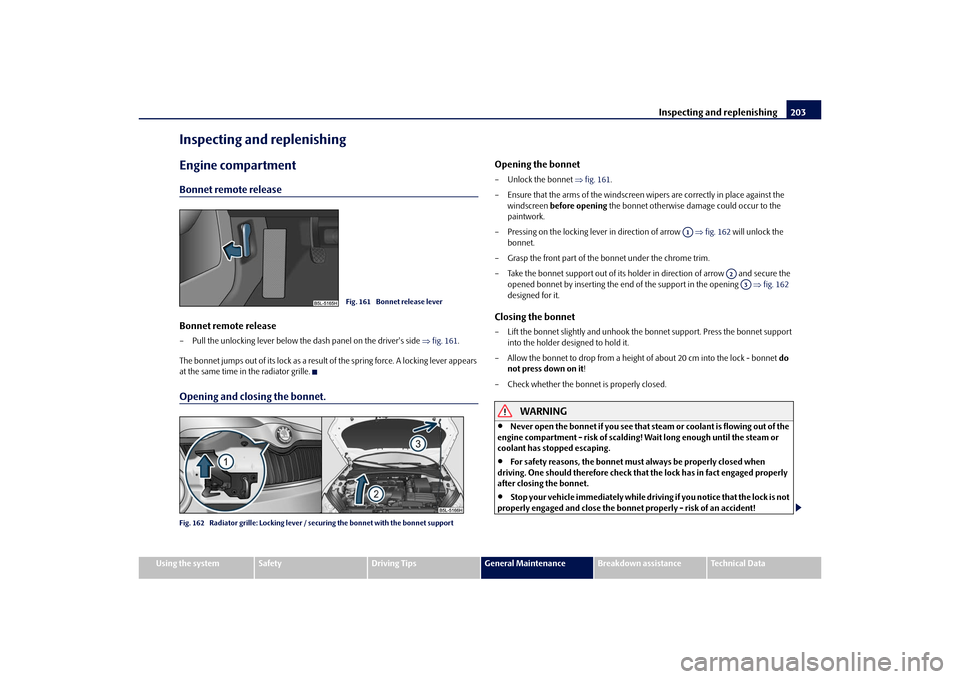
Inspecting and replenishingEngine compartmentBonnet remote releaseBonnet remote release– Pull the unlocking lever below the dash panel on the driver's side fig. 161 .
The bonnet jumps out of its lock as a result of the spring force. A locking lever appears
at the same time in the radiator grille.Opening and closing the bonnet.Fig. 162 Radiator grille: Locking lever / se curing the bonnet with the bonnet support
Opening the bonnet– Unlock the bonnet fig. 161 .
– Ensure that the arms of the windscreen wipers are correctly in place against the windscreen before opening the bonnet otherwise damage could occur to the
paintwork.
– Pressing on the locking lever in direction of arrow fig. 162 will unlock the
bonnet.
– Grasp the front part of the bonnet under the chrome trim.
– Take the bonnet support out of its holder in direction of arrow and secure the opened bonnet by inserting the end of the support in the opening fig. 162
designed for it.Closing the bonnet– Lift the bonnet slightly and unhook the bonnet support. Press the bonnet support
into the holder designed to hold it.
– Allow the bonnet to drop from a height of about 20 cm into the lock - bonnet do
not press down on it !
– Check whether the bonnet is properly closed.
WARNING
Never open the bonnet if you see that steam or coolant is flowing out of the
engine compartment - risk of scalding! Wait long enough until the steam or
coolant has stopped escaping.
For safety reasons, the bonnet must always be properly closed when
driving. One should therefore check that the lock has in fact engaged properly
after closing the bonnet.
Stop your vehicle immediately while driving if you notice that the lock is not
properly engaged and close the bonnet properly - risk of an accident!
Fig. 161 Bonnet release lever
A1
A2A3
s2ug.6.book Page 203 Friday, April 9, 2010 2:24 PM
Page 206 of 271
Inspecting and replenishing205
Using the system
Safety
Driving Tips
General Maintenance
Breakdown assistance
Technical Data
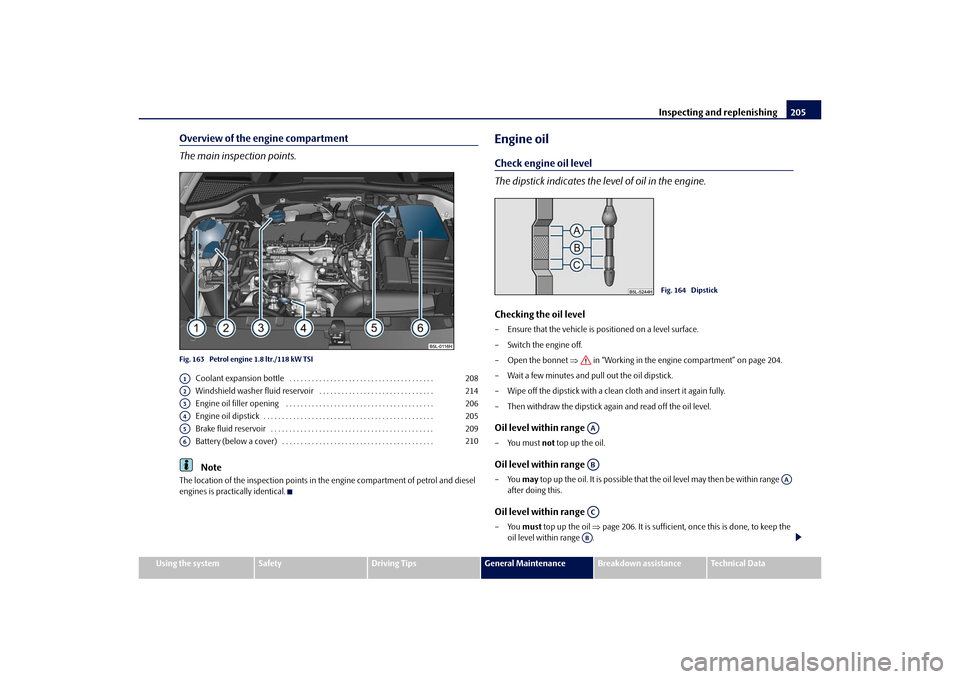
Overview of the engine compartment
The main inspection points.Fig. 163 Petrol engine 1.8 ltr./118 kW TSI
Coolant expansion bottle . . . . . . . . . . . . . . . . . . . . . . . . . . . . . . . . . . . . . . .
Windshield washer fluid reservoir . . . . . . . . . . . . . . . . . . . . . . . . . . . . . . .
Engine oil filler opening . . . . . . . . . . . . . . . . . . . . . . . . . . . . . . . . . . . . . . . .
Engine oil dipstick . . . . . . . . . . . . . . . . . . . . . . . . . . . . . . . . . . . . . . . . . . . . . .
Brake fluid reservoir . . . . . . . . . . . . . . . . . . . . . . . . . . . . . . . . . . . . . . . . . . . .
Battery (below a cover) . . . . . . . . . . . . . . . . . . . . . . . . . . . . . . . . . . . . . . . . .Note
The location of the inspection points in th e engine compartment of petrol and diesel
engines is practically identical.
Engine oilCheck engine oil level
The dipstick indicates the le vel of oil in the engine.Checking the oil level– Ensure that the vehicle is po sitioned on a level surface.
– Switch the engine off.
– Open the bonnet in “Working in the engine compartment” on page 204.
– Wait a few minutes and pull out the oil dipstick.
– Wipe off the dipstick with a clea n cloth and insert it again fully.
– Then withdraw the dipstick again and read off the oil level.Oil level within range –You must not top up the oil.Oil level within range –You may top up the oil. It is possible that the oil level may then be within range
after doing this.Oil level within range –You must top up the oil page 206. It is sufficient, once this is done, to keep the
oil level within range .
A1
208
A2
214
A3
206
A4
205
A5
209
A6
210
Fig. 164 Dipstick
AAAB
AA
ACAB
s2ug.6.book Page 205 Friday, April 9, 2010 2:24 PM
Page 207 of 271
Inspecting and replenishing
206
It is normal for the engine to consume oil. The oil consumption may be as much as 0.5
l/1 000 km depending on your style of driving and the conditions under which you
operate your vehicle. The oil consumption may be slightly hi gher than this during the
first 5 000 kilometres.
One should therefore check the oil level at regular intervals, preferably every time after
the fuel tank is filled or after driving for long stretches.
We recommend maintaining the oil level within the range - but not above this, if
the engine has been operating at high load s, for example during a lengthy motorway
trip during the summer months, towing a tr ailer or negotiating a high mountain pass.
The warning light in the instrument cluster* will indicate page 31 whether the oil
level is too low. In this case, check the oil level as soon as possible. Top up with an
appropriate quantity of oil.
Caution
The oil level must on no account extend beyond the range . Danger of damaging
the catalytic converter.
Do not continue your journey if for some reason it is not possible under the
conditions prevailing to top up with oil. Switch the engine off and obtain professional
assistance from a specialist garage, otherwise it could lead to severe engine damage.Note
Engine oil specifications page 243, “Technical Data”.Replenishing engine oil– Inspecting the engine oil level page 205.
– Unscrew the cap of the engine oil filler opening.
– Pour in a suitable grade of oil in portions of 0.5 litres page 246, “Engine oil spec-
ifications”.
– Inspect the oil level page 205.
– Carefully screw on the cap of the filler opening and push the dipstick in fully.
WARNING
Avoid dripping oil onto hot parts of the engine when topping up will oil - a
risk of fire!
Read and observe the warning notes page 204, “Working in the engine
compartment” before working in the engine compartment.For the sake of the environment
The oil level must on no acco unt extend beyond the range page 205. Oil will
otherwise be drawn in through the crankc ase ventilation and may pass through the
exhaust system to atmosphere. The oil ma y combust in the catalytic converter and
damage it.Changing engine oilThe engine oil must be changed at the intervals stated in the Service schedule or
according to the service interval indicator page 18, “Service Interval Display”.
WARNING
Only carry out the engine oil change, if you have the required professional
knowledge!
Read and observe the warning notes page 204, “Working in the engine
compartment” before working in the engine compartment.
First of all, let the engine cool down, we ar an eye protection and gloves - risk
of caustic burns due to hot oil.Caution
You must not pour any additives into the engine oil - risk of engine damage! Damage,
which results from such product, are excluded from the warranty.
For the sake of the environment
You must on no account pour oil into the ground or into the sewage system.
AAAA
AA
s2ug.6.book Page 206 Friday, April 9, 2010 2:24 PM
Page 208 of 271
Inspecting and replenishing207
Using the system
Safety
Driving Tips
General Maintenance
Breakdown assistance
Technical Data
In view of the problems involved in prop erly disposing of old oil, the necessary
special tools and the knowledge required for such work, we recommend that you have
the oil and oil filter change carried out by an authorised Škoda Service Partner.Note
After your skin has come in contact with th e oil, you must thoroughly wash your skin.Cooling systemCoolant
The job of the coolant is to cool the engine.The cooling system does not require any maintenance under normal operating condi-
tions. The coolant consists of water with a concentration of coolant additive of 40 %.
This mixture not only provides antifreeze protection down to -25°C but also protects
the cooling and heating system from corrosion. It also prevents the formation of scale
and significantly increases the boiling point of the coolant.
You must therefore not reduce the concentration of antifreeze agent in the coolant by
adding water, also not during the summer mo nths or in countries with a warm climate.
The concentration of coolant additive in the coolant must be at least 40%.
You can increase the amount of antifreeze in the coolant if a higher concentration of
antifreeze is necessary for climatic reasons but only up to 60% (antifreeze protection
down to approx. -40°C). The antifreeze prot ection tails off above that concentration.
Vehicles exported to countries with a cold climate (e.g. Sweden, Norway, Finland) are
already factory-filled with a coolant which offers antifreeze protection down to about
-35°C. In these countries the concentration of coolant additive should be at least 50%.
Coolant
The cooling system is factor y-filled with coolant (purple in colour), which complies
with the specification TL-VW 774 G.
We recommend that you use the same coolan t additive - G13 (purple in colour) - for
topping up the system. Please contact an authorised Škoda Serv
ice Partner if you have any questions
regarding the coolant or if you wish to fill up with a different coolant.
An authorised Škoda Service Partner can also supply you with the correct coolant addi-
tives.
Coolant capacity
Caution
Other coolant additives may cause operational problems which, in particular,
involves significantly reduci ng the anticorrosion effect.
Any faults or problems resulting from corrosion may cause a loss of coolant
and, as a consequenc e of this, result in major engine damage.Note
On vehicles which are fitted with an indepe ndent auxiliary heating and ventilation, the
volume of the coolant is greater by approx. 1 ltr.Petrol engines
Content
1.2 ltr./77 kW TSI - EU°5
7,7
1.8 ltr./118 kW TSI - EU 5
8,6
Diesel engines
Content
2.0 ltr./81 kW TDI CR - EU°5
8,6
2.0 ltr./103 kW TDI CR - EU°5
8,7
2.0 ltr./125 kW TDI CR - EU°5
8,4
s2ug.6.book Page 207 Friday, April 9, 2010 2:24 PM
Page 210 of 271
Inspecting and replenishing209
Using the system
Safety
Driving Tips
General Maintenance
Breakdown assistance
Technical Data
If any splashes of coolant get into yo ur eyes, rinse out your eyes immedi-
ately with clear water and contact a doctor as soon as possible.
You should also consult a doctor without delay if you have inadvertently
swallowed coolant.Caution
Do not continue your journey if for some reason it is not possible under the
conditions prevailing to top up with coolant. Switch the engine off and obtain
professional assistance from a specialist garage, otherwise it could lead to severe
engine damage.
For the sake of the environment
Do not re-use coolant if it is necessary to drain the coolant in the system. It should be
collected and disposed of in compliance with environmental protection regulations.Radiator fan
The radiator fan may switch on suddenly.The radiator fan is driven by an electric motor and controlled according to the coolant
temperature.
The radiator fan may continue running for up to 10 minutes after the engine has been
switched off - even if the igni tion is also off. It may also switch on suddenly after a
certain time, if
the coolant temperature has risen beca use of an accumulation of heat or
the warm engine compartment is heated up additionally by strong sunlight.
WARNING
You must therefore be aware when workin g in the engine compartment that the
fan may switch on suddenly - risk of injury!
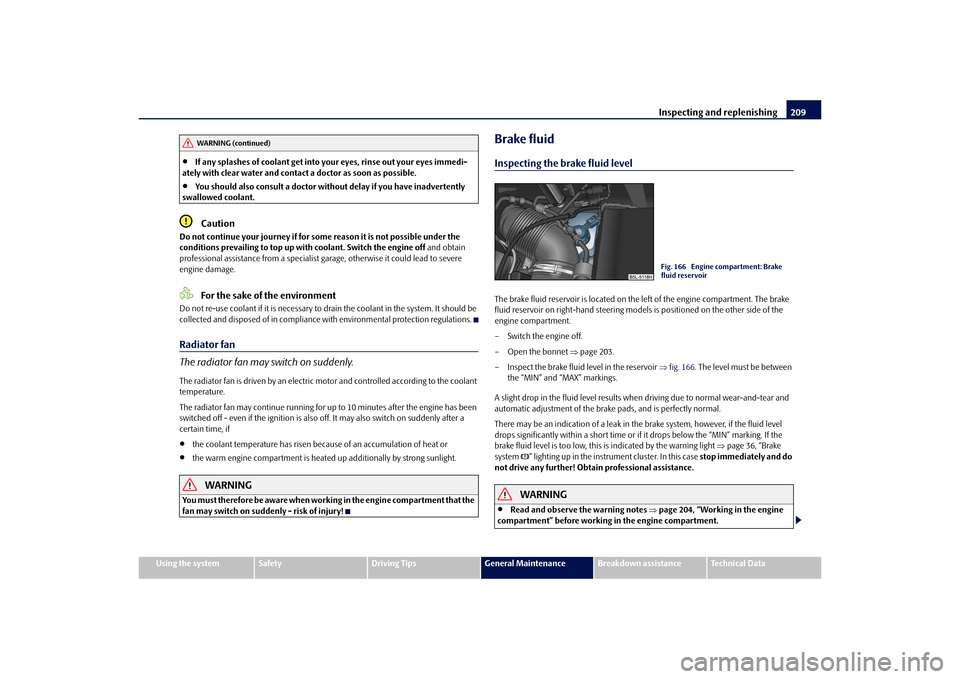
Brake fluidInspecting the brake fluid levelThe brake fluid reservoir is located on the left of the engine compartment. The brake
fluid reservoir on right-hand steering models is positioned on the other side of the
engine compartment.
– Switch the engine off.
– Open the bonnet page 203.
– Inspect the brake fluid level in the reservoir fig. 166 . The level must be between
the “MIN” and “MAX” markings.
A slight drop in the fluid level results when driving due to normal wear-and-tear and
automatic adjustment of the brak e pads, and is perfectly normal.
There may be an indication of a leak in the brake system, however, if the fluid level
drops significantly within a short time or if it drops below the “MIN” marking. If the
brake fluid level is too low, this is indicated by the warning light page 36, “Brake
system ” lighting up in the instru ment cluster. In this case stop immediately and do
not drive any further! Obtain professional assistance.
WARNING
Read and observe the warning notes page 204, “Working in the engine
compartment” before working in the engine compartment.
WARNING (continued)
Fig. 166 Engine compartment: Brake
fluid reservoir
s2ug.6.book Page 209 Friday, April 9, 2010 2:24 PM
Page 212 of 271
Inspecting and replenishing211
Using the system
Safety
Driving Tips
General Maintenance
Breakdown assistance
Technical Data
when handling batteries. Corrosive fumes
in the air irritate the air passages and
lead to conjunctivitis and inflammation of the air passages in the lungs. Battery
acid corrodes dental enamel and create s deep wounds after contact with the
skin which take a long time to heal. Repeated contact with diluted acids causes
skin diseases (inflammations, ulcers, slin cracks). Acids coming into contact
with water are diluted accompanied by significant development of heat.
Do not tilt the battery otherwise battery electrolyte may flow out of the
battery vent openings. Protect the eyes with safety glas ses or a shield! There is
the danger of suffering blindness! If an y battery electrolyte gets into your eye,
rinse out your eye immediately with cl ear water for several minutes. Contact a
doctor without delay.
Splashes of acid on your skin or clothes should be neutralised as soon as
possible using soap suds and then rinsed with plenty of water. Contact a doctor
immediately if you swal low battery electrolyte.
Keep batteries out of the reach of children.
Hydrogen is released when you charge a battery and a highly explosive gas
mixture is produced. An explosion can be caused through sparkling over during
unclamping or loosening of the cabl e plug while the ignition is on.
Bridging of the poles will create a short circuit (e.g. through metal objects,
cables). Possible consequences of a short circuit: Melting of lead struts, explo-
sion and burning of the battery, jets of acid spurting out.
It is prohibited to work with a naked flame and light, to smoke or to carry out
any activities which produce sparks. Avoi d creating sparks when working with
cables and electrical devices. Strong sparking represents a risk of injury.
Before carrying out any work on the el ectrical system, switch off the engine,
the ignition as well as all electrical components and disconnect the negative
cable (-) on the battery. If you wish to replace a bulb it is sufficient to switch off
the appropriate light.
Never charge a frozen or thawed battery - risk of explosion and caustic
burns! Replace a frozen battery.
Never jump-start the batteries which have a too low electrolyte level - risk
of explosion and caustic burns!
Never use a battery which is damaged - risk of explosion! Immediately
replace a damaged battery.Caution
You must only disconnect the battery if th e ignition is switched off, otherwise the
electrical system (electronic components ) of the vehicle may be damaged. When
disconnecting the battery from the electrical system of the vehicle, first disconnect the
negative terminal (-) of the battery. Then disconnect the positive terminal (+).
When reconnecting the battery, first connect the positive terminal (+) and only
then the negative terminal (-) of the battery. You must on no account connect the
cables wrongly - risk of a cable fire.
Ensure that battery acid does not come into contact with the vehicle body other-
wise damage could occur to the paintwork.
Do not place the battery in direct daylight in order to protect the battery housing
from the effects of ultra-violet light.For the sake of the environment
A removed battery is a special type of wa ste which is harmful to the environment -
contact your specialist garage regarding disposing of the battery.
Note
Please also refer to the guidelines page 214, also after connecting the battery.
WARNING (continued)
WARNING (continued)
s2ug.6.book Page 211 Friday, April 9, 2010 2:24 PM
Page 214 of 271
Inspecting and replenishing213
Using the system
Safety
Driving Tips
General Maintenance
Breakdown assistance
Technical Data
Inspecting the electrolyte levelThe battery is practically maintenance-free under normal operating conditions. We
do, however, recommend that you have the electrolyte level inspected from time to
time by a specialist garage when outside temperatures are high or when driving on
long trips. You should also have the electrolyte level page 213 checked each time
the battery is charged.
The electrolyte level of the battery will al so be checked as part of the Inspection
Service.Operation in winterThe battery has to provide greater amounts of electricity during the winter. It also has
only part of the initial power output at low temperatures that it has at normal temper-
atures.
A discharged battery may already freez e at temperatures just below 0°C.
We therefore recommend that you have the battery checked by a specialist garage
before the start of the winter and recharged if necessary.
WARNING
Never charge a frozen or thawed battery - risk of explosion and caustic burns.
Replace a frozen battery.Charging the battery
A properly charged battery is essentia l for reliably starting the engine.– Read the warning notes in “Working on the battery” on page 210 and .
– Switch the ignition and all electrical components off.
– Only for “quick-charging”: Disconnect both battery cables (first of all “negative”,
then “positive”).
– Carefully attach the terminal clamps of the charger to the battery terminals (red = “positive”, black = “negative”). – You can now plug the mains cable of the
charger into the power socket and switch
on the charger.
– When charging is completed: switch th e charger off and unplug the mains cable
from the power socket.
– Only then should you disconnect th e terminal clamps of the charger.
– Reconnect the cables to the battery (first of all “positive”, then “negative”).
It is not normally necessary to disconnect the cables of th e battery if you recharge the
battery using low amperages (as for example from a mini-charger). Please also refer
to the instructions from the charger manufacturer.
A charging current of 0.1 of the total battery capacity (or lower) is that which should be
used until full charging is achieved.
It is, however, necessary to disconnect both cables before charging the battery with
high amperages, so-called “ quick-charging”.
“Quick-charging” a battery is dangerous in “Working on the battery” on
page 210. It requires a special charger an d appropriate knowledge. We therefore
recommend that you have your battery quic k-charged only by an authorised Škoda
Service Partner.
A discharged battery may already freeze at temperatures just below 0°C . We
recommend that you no longer use a battery which has thawed out because the casing
of the battery may be cracked through the formation of ice and this would allow
battery electrolyte to flow out.
The vent plugs of the battery should not be opened for charging.
WARNING
Never charge a frozen or thawed battery - risk of explosion and caustic burns.
Replace a frozen battery.
Never charge a battery which has a too lo w electrolyte level - risk of explo-
sion and caustic burns.
s2ug.6.book Page 213 Friday, April 9, 2010 2:24 PM
Page 216 of 271
Inspecting and replenishing215
Using the system
Safety
Driving Tips
General Maintenance
Breakdown assistance
Technical Data
Caution
On no account should you add radiator an tifreeze or other additives to the wind-
screen washer fluid.
If the vehicle is fitted with a headligh t cleaning system, you should only add
cleaning products which do no t attack the polycarbonate coating of the headlights to
the windscreen washer fluid. Please contac t your specialist garage, who will tell you
which cleaning agent you can use.
s2ug.6.book Page 215 Friday, April 9, 2010 2:24 PM