check engine SKODA YETI 2010 1.G / 5L Owner's Guide
[x] Cancel search | Manufacturer: SKODA, Model Year: 2010, Model line: YETI, Model: SKODA YETI 2010 1.G / 5LPages: 271, PDF Size: 14.71 MB
Page 189 of 271
Driving and the Environment
188WARNING
Driving through mud can be dangerous. The vehicle can slide uncontrol-
lably which causes an increased risk of injury. Adopt a particularly cautious
style of driving. Pay attention to the information and warning notes.
An incorrect tyre inflation pressure may cause a major or fatal accident! An
incorrect tyre inflation pressure may result in bursting of a tyre, which causes
the vehicle to get out of control.
Observe the important guidelines page 179.
Stuck vehicleIf you can no longer drive on ...– Carefully dig out all the wheels and make sure that no other parts of the vehicle are
stuck in the sand.
– Engage the reverse gear.
– Gently depress the accelerator and try to drive backwards in your own track.
– Place scrub, footmats or a sackcloth directly in front of the tyres in order to improve
the road adherence and thus achieve an improved traction to drive out.Rocking out vehicle–Switch off the TCS page 165.
– Set the steering wheel straight.
– Drive so far back until the wheels just begin to spin.
– Quickly shift into first gear and drive forwards until the wheels begin to spin.
– Drive back and forth repeatedly until the momentum is sufficient to free the vehicle.
–Switch on the TCS.A few tips– Ensure that the Off-road mode is switched on page 170. – Avoid prolonged spinning of the wheels, otherwise the vehicle would still sink
deeper into the ground.
– Remove mud, dirt and stones from the tread of the tyre.
You need training and experience if you wish to rock out a vehicle. If you make a
mistake, the vehicle can still sink in further and you can only free it with the help of
others.
WARNING
Observe the important guidelines page 179.After driving off-roadCheck the vehicle for damage after driving off-road - especially on the underside of the
vehicle.
– Switch off the Off-road mode page 170.
– Check the tyres and the axles for damage and remove coarse dirt, stones and foreign bodies from the tyre tread.
– Clean the turn signal lights, the headlights, the number plate and the windows.
– Check the underbody of the vehicle and remove trapped objects, such as scrub or wood pieces.
– Contact your specialist gara ge if you detect any damage.
– In case of thick layers of dirt, clean the radiator grille, the engine compartment and the underbody of the vehicle.
WARNING
Combustible materials which are tra pped under the vehicle floor can be
dangerous. They can impair the driving safety and the safety of all the occu-
pants of the vehicle. After driving off-road, always check the underside of the
vehicle and remove trapped objects.
Never continue the journey if objects are trapped under the vehicle. This
can damage the fuel lines, the brake system, the seals and other parts of the
chassis.
s2ug.6.book Page 188 Friday, April 9, 2010 2:24 PM
Page 192 of 271
Towing a trailer191
Using the system
Safety
Driving Tips
General Maintenance
Breakdown assistance
Technical Data
Headlights
Before starting off with a hitched trailer, also check the setting of the headlights. Alter
the setting as necessary with the ai
d of the headlight beam adjuster page 58.
Detachable ball head
The ball rod is detachable on vehicles which feature a factory-fitted towing device. It is
stowed together with separate fitting instru ctions in the spare wheel well in the luggage
compartment of the vehicle.
Further information on the towing device page 192.
Note
We recommend that you also have your vehicle inspected between service inter-
vals if you tow a trailer frequently.
The handbrake on the towing vehicle must be put on when coupling and decou-
pling the trailer.
Driving Tips
Particular caution is required when towing a trailer.– Do not, as far as possible, drive with your vehicle unladen and the trailer laden.
– Do not make full use of the legal maximum speeds. This applies in particular to downhill sections.
– Apply the brakes in good time.
– Keep a check on the coolant temperature gauge if the outside temperature is high.
Distribution of weight
The distribution of the weight is very poor if your vehicle is unladen and the trailer is
laden. Maintain a particularly low speed if you cannot avoid driving with this combina-
tion.
Driving speed
Do not drive faster than 80 km/hour for safety reasons. This also applies for countries
in which higher speeds are allowed. The fact that the driving stability of the vehicle + trailer combination reduces with
increasing speed means that the legally allowed speed should not be used when there
are unfavourable road, weather or wind cond
itions, particularly near accident black
spots.
You must always reduce your speed immediat ely as soon as you detect even just the
slightest swaying of the trailer. On no account attempt to stop the trailer from
“swaying” by accelerating.
Apply the brakes in good time! If the trailer is fitted with a trailer brake, apply the
brakes gently at first and then brake firmly. This will avoid brake jolts resulting from the
trailer wheels locking. Shift down gears in good time before negotiating a downhill
section to allow the engine to also act as a brake.
Engine overheating
Please keep a check on the coolant temperature gauge if you have to negotiate a
lengthy slope in a low gear at a high engi ne speed when the outside temperature is
very high page 17, “Coolant temperature gauge”.
If the needle of the coolant temperature gauge moves into the right-hand area or even
the red area of the scale, reduce your speed immediately. Stop and switch off the
engine if the warning light
in the instrument cluster begins flashing. Wait a few
minutes and check the level of coolant in the coolant expansion bottle page 208,
“Inspecting the coolant level”.
Please refer to the following guidelines page 33, “Coolant temperature/ Coolant
quantity ”.
The coolant temperature can be reduced by switching on the heating.
Any increase in the cooling effect of the coolant fan through shifting down a gear and
increasing the engine speed is not possible since the fan speed is independent of the
engine speed. One should also not drop a gear for this reason when towing a trailer as
long as the engine can manage th e slope without any drop in speed.
s2ug.6.book Page 191 Friday, April 9, 2010 2:24 PM
Page 204 of 271
Inspecting and replenishing203
Using the system
Safety
Driving Tips
General Maintenance
Breakdown assistance
Technical Data
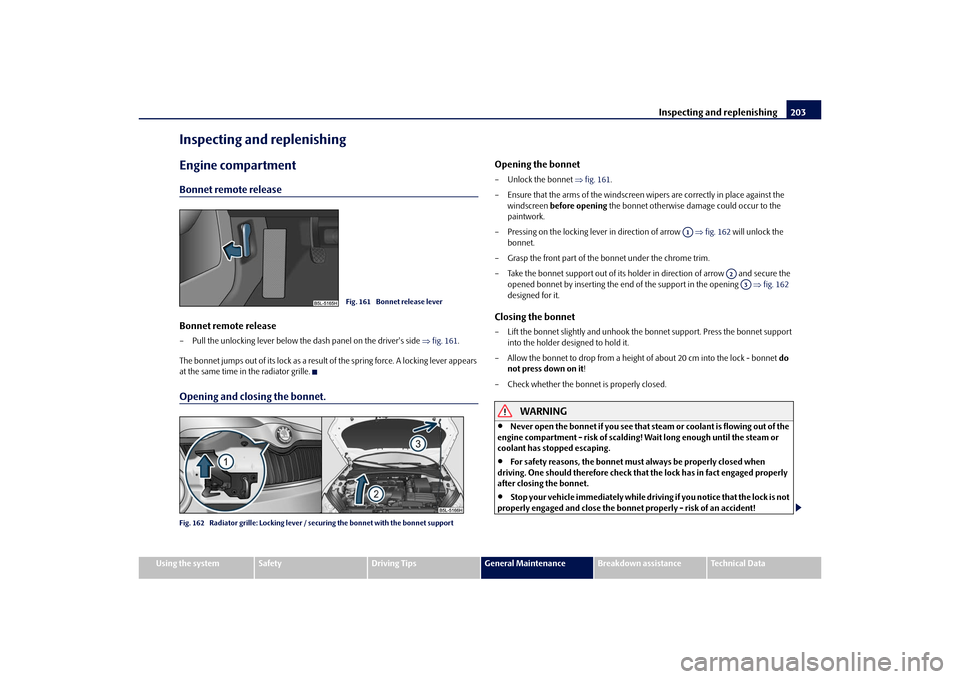
Inspecting and replenishingEngine compartmentBonnet remote releaseBonnet remote release– Pull the unlocking lever below the dash panel on the driver's side fig. 161 .
The bonnet jumps out of its lock as a result of the spring force. A locking lever appears
at the same time in the radiator grille.Opening and closing the bonnet.Fig. 162 Radiator grille: Locking lever / se curing the bonnet with the bonnet support
Opening the bonnet– Unlock the bonnet fig. 161 .
– Ensure that the arms of the windscreen wipers are correctly in place against the windscreen before opening the bonnet otherwise damage could occur to the
paintwork.
– Pressing on the locking lever in direction of arrow fig. 162 will unlock the
bonnet.
– Grasp the front part of the bonnet under the chrome trim.
– Take the bonnet support out of its holder in direction of arrow and secure the opened bonnet by inserting the end of the support in the opening fig. 162
designed for it.Closing the bonnet– Lift the bonnet slightly and unhook the bonnet support. Press the bonnet support
into the holder designed to hold it.
– Allow the bonnet to drop from a height of about 20 cm into the lock - bonnet do
not press down on it !
– Check whether the bonnet is properly closed.
WARNING
Never open the bonnet if you see that steam or coolant is flowing out of the
engine compartment - risk of scalding! Wait long enough until the steam or
coolant has stopped escaping.
For safety reasons, the bonnet must always be properly closed when
driving. One should therefore check that the lock has in fact engaged properly
after closing the bonnet.
Stop your vehicle immediately while driving if you notice that the lock is not
properly engaged and close the bonnet properly - risk of an accident!
Fig. 161 Bonnet release lever
A1
A2A3
s2ug.6.book Page 203 Friday, April 9, 2010 2:24 PM
Page 206 of 271
Inspecting and replenishing205
Using the system
Safety
Driving Tips
General Maintenance
Breakdown assistance
Technical Data
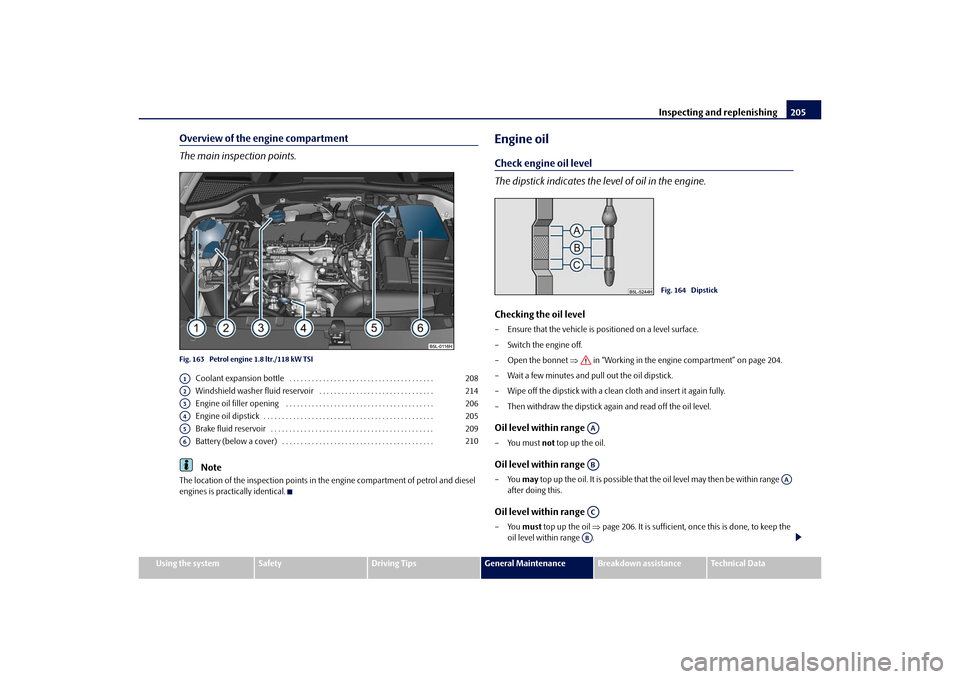
Overview of the engine compartment
The main inspection points.Fig. 163 Petrol engine 1.8 ltr./118 kW TSI
Coolant expansion bottle . . . . . . . . . . . . . . . . . . . . . . . . . . . . . . . . . . . . . . .
Windshield washer fluid reservoir . . . . . . . . . . . . . . . . . . . . . . . . . . . . . . .
Engine oil filler opening . . . . . . . . . . . . . . . . . . . . . . . . . . . . . . . . . . . . . . . .
Engine oil dipstick . . . . . . . . . . . . . . . . . . . . . . . . . . . . . . . . . . . . . . . . . . . . . .
Brake fluid reservoir . . . . . . . . . . . . . . . . . . . . . . . . . . . . . . . . . . . . . . . . . . . .
Battery (below a cover) . . . . . . . . . . . . . . . . . . . . . . . . . . . . . . . . . . . . . . . . .Note
The location of the inspection points in th e engine compartment of petrol and diesel
engines is practically identical.
Engine oilCheck engine oil level
The dipstick indicates the le vel of oil in the engine.Checking the oil level– Ensure that the vehicle is po sitioned on a level surface.
– Switch the engine off.
– Open the bonnet in “Working in the engine compartment” on page 204.
– Wait a few minutes and pull out the oil dipstick.
– Wipe off the dipstick with a clea n cloth and insert it again fully.
– Then withdraw the dipstick again and read off the oil level.Oil level within range –You must not top up the oil.Oil level within range –You may top up the oil. It is possible that the oil level may then be within range
after doing this.Oil level within range –You must top up the oil page 206. It is sufficient, once this is done, to keep the
oil level within range .
A1
208
A2
214
A3
206
A4
205
A5
209
A6
210
Fig. 164 Dipstick
AAAB
AA
ACAB
s2ug.6.book Page 205 Friday, April 9, 2010 2:24 PM
Page 207 of 271
Inspecting and replenishing
206
It is normal for the engine to consume oil. The oil consumption may be as much as 0.5
l/1 000 km depending on your style of driving and the conditions under which you
operate your vehicle. The oil consumption may be slightly hi gher than this during the
first 5 000 kilometres.
One should therefore check the oil level at regular intervals, preferably every time after
the fuel tank is filled or after driving for long stretches.
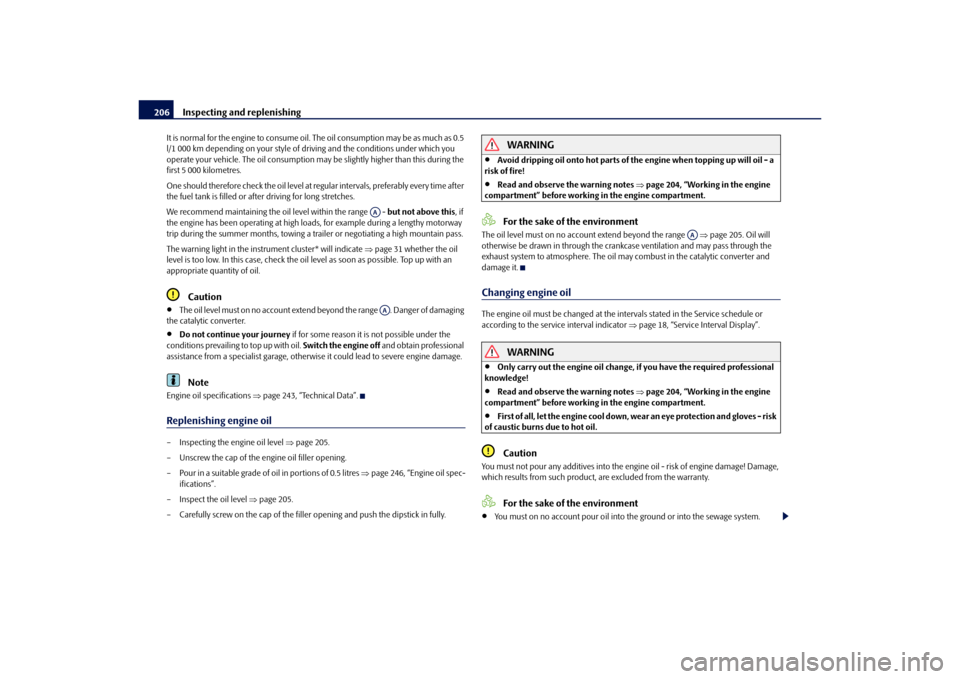
We recommend maintaining the oil level within the range - but not above this, if
the engine has been operating at high load s, for example during a lengthy motorway
trip during the summer months, towing a tr ailer or negotiating a high mountain pass.
The warning light in the instrument cluster* will indicate page 31 whether the oil
level is too low. In this case, check the oil level as soon as possible. Top up with an
appropriate quantity of oil.
Caution
The oil level must on no account extend beyond the range . Danger of damaging
the catalytic converter.
Do not continue your journey if for some reason it is not possible under the
conditions prevailing to top up with oil. Switch the engine off and obtain professional
assistance from a specialist garage, otherwise it could lead to severe engine damage.Note
Engine oil specifications page 243, “Technical Data”.Replenishing engine oil– Inspecting the engine oil level page 205.
– Unscrew the cap of the engine oil filler opening.
– Pour in a suitable grade of oil in portions of 0.5 litres page 246, “Engine oil spec-
ifications”.
– Inspect the oil level page 205.
– Carefully screw on the cap of the filler opening and push the dipstick in fully.
WARNING
Avoid dripping oil onto hot parts of the engine when topping up will oil - a
risk of fire!
Read and observe the warning notes page 204, “Working in the engine
compartment” before working in the engine compartment.For the sake of the environment
The oil level must on no acco unt extend beyond the range page 205. Oil will
otherwise be drawn in through the crankc ase ventilation and may pass through the
exhaust system to atmosphere. The oil ma y combust in the catalytic converter and
damage it.Changing engine oilThe engine oil must be changed at the intervals stated in the Service schedule or
according to the service interval indicator page 18, “Service Interval Display”.
WARNING
Only carry out the engine oil change, if you have the required professional
knowledge!
Read and observe the warning notes page 204, “Working in the engine
compartment” before working in the engine compartment.
First of all, let the engine cool down, we ar an eye protection and gloves - risk
of caustic burns due to hot oil.Caution
You must not pour any additives into the engine oil - risk of engine damage! Damage,
which results from such product, are excluded from the warranty.
For the sake of the environment
You must on no account pour oil into the ground or into the sewage system.
AAAA
AA
s2ug.6.book Page 206 Friday, April 9, 2010 2:24 PM
Page 209 of 271
Inspecting and replenishing
208
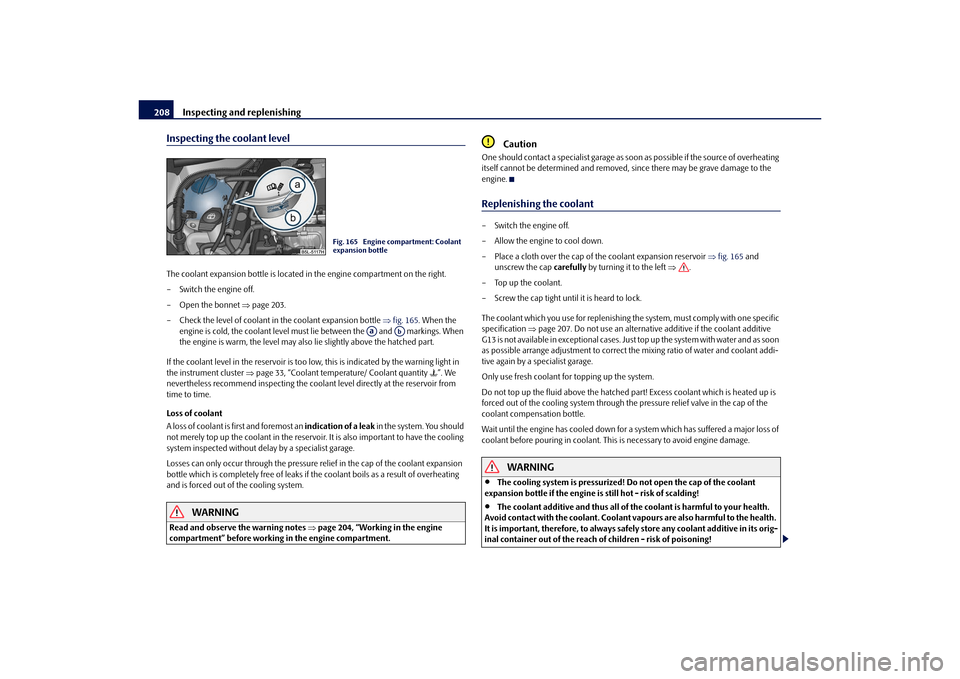
Inspecting the coolant levelThe coolant expansion bottle is located in the engine compartment on the right.
– Switch the engine off.
– Open the bonnet page 203.
– Check the level of coolant in the coolant expansion bottle fig. 165 . When the
engine is cold, the coolant level must lie between the and markings. When
the engine is warm, the level may also lie slightly above the hatched part.
If the coolant level in the reservoir is too lo w, this is indicated by the warning light in
the instrument cluster page 33, “Coolant temperature/ Coolant quantity ”. We
nevertheless recommend inspecting the cool ant level directly at the reservoir from
time to time.
Loss of coolant
A loss of coolant is first and foremost an indication of a leak in the system. You should
not merely top up the coolant in the reservoir. It is also important to have the cooling
system inspected without delay by a specialist garage.
Losses can only occur through the pressure relief in the cap of the coolant expansion
bottle which is completely free of leaks if the coolant boils as a result of overheating
and is forced out of the cooling system.
WARNING
Read and observe the warning notes page 204, “Working in the engine
compartment” before working in the engine compartment.
Caution
One should contact a specialist garage as s oon as possible if the source of overheating
itself cannot be determined and removed, since there may be grave damage to the
engine.Replenishing the coolant– Switch the engine off.
– Allow the engine to cool down.
– Place a cloth over the cap of the coolant expansion reservoir fig. 165 and
unscrew the cap carefully by turning it to the left .
–Top up the coolant.
– Screw the cap tight until it is heard to lock.
The coolant which you use for replenishing the system, must comply with one specific
specification page 207. Do not use an alternative additive if the coolant additive
G13 is not available in exceptional cases. Just top up the system with water and as soon
as possible arrange adjustment to correct the mixing ratio of water and coolant addi-
tive again by a specialist garage.
Only use fresh coolant for topping up the system.
Do not top up the fluid above the hatched pa rt! Excess coolant which is heated up is
forced out of the cooling system through the pressure relief valve in the cap of the
coolant compensation bottle.
Wait until the engine has cooled down for a system which has suffered a major loss of
coolant before pouring in coolant. This is necessary to avoid engine damage.
WARNING
The cooling system is pressurized! Do not open the cap of the coolant
expansion bottle if the engine is still hot - risk of scalding!
The coolant additive and thus all of the coolant is harmful to your health.
Avoid contact with the coolant. Coolant vapours are also harmful to the health.
It is important, therefore, to always safely store any coolant additive in its orig-
inal container out of the reach of children - risk of poisoning!
Fig. 165 Engine compartment: Coolant
expansion bottle
Aa
Ab
s2ug.6.book Page 208 Friday, April 9, 2010 2:24 PM
Page 214 of 271
Inspecting and replenishing213
Using the system
Safety
Driving Tips
General Maintenance
Breakdown assistance
Technical Data
Inspecting the electrolyte levelThe battery is practically maintenance-free under normal operating conditions. We
do, however, recommend that you have the electrolyte level inspected from time to
time by a specialist garage when outside temperatures are high or when driving on
long trips. You should also have the electrolyte level page 213 checked each time
the battery is charged.
The electrolyte level of the battery will al so be checked as part of the Inspection
Service.Operation in winterThe battery has to provide greater amounts of electricity during the winter. It also has
only part of the initial power output at low temperatures that it has at normal temper-
atures.
A discharged battery may already freez e at temperatures just below 0°C.
We therefore recommend that you have the battery checked by a specialist garage
before the start of the winter and recharged if necessary.
WARNING
Never charge a frozen or thawed battery - risk of explosion and caustic burns.
Replace a frozen battery.Charging the battery
A properly charged battery is essentia l for reliably starting the engine.– Read the warning notes in “Working on the battery” on page 210 and .
– Switch the ignition and all electrical components off.
– Only for “quick-charging”: Disconnect both battery cables (first of all “negative”,
then “positive”).
– Carefully attach the terminal clamps of the charger to the battery terminals (red = “positive”, black = “negative”). – You can now plug the mains cable of the
charger into the power socket and switch
on the charger.
– When charging is completed: switch th e charger off and unplug the mains cable
from the power socket.
– Only then should you disconnect th e terminal clamps of the charger.
– Reconnect the cables to the battery (first of all “positive”, then “negative”).
It is not normally necessary to disconnect the cables of th e battery if you recharge the
battery using low amperages (as for example from a mini-charger). Please also refer
to the instructions from the charger manufacturer.
A charging current of 0.1 of the total battery capacity (or lower) is that which should be
used until full charging is achieved.
It is, however, necessary to disconnect both cables before charging the battery with
high amperages, so-called “ quick-charging”.
“Quick-charging” a battery is dangerous in “Working on the battery” on
page 210. It requires a special charger an d appropriate knowledge. We therefore
recommend that you have your battery quic k-charged only by an authorised Škoda
Service Partner.
A discharged battery may already freeze at temperatures just below 0°C . We
recommend that you no longer use a battery which has thawed out because the casing
of the battery may be cracked through the formation of ice and this would allow
battery electrolyte to flow out.
The vent plugs of the battery should not be opened for charging.
WARNING
Never charge a frozen or thawed battery - risk of explosion and caustic burns.
Replace a frozen battery.
Never charge a battery which has a too lo w electrolyte level - risk of explo-
sion and caustic burns.
s2ug.6.book Page 213 Friday, April 9, 2010 2:24 PM
Page 215 of 271
Inspecting and replenishing
214
Disconnecting and reconnecting the batteryOn disconnecting and reconnecting the batt ery the following functions are initially
deactivated or are no longer able to operate fault-free.
We recommend having the vehicle checked by a specialist garage to ensure full func-
tionality of all electrical systems.Replacing the batteryYou should only replace a battery with a ne w battery of the same capacity, voltage (12
V), amperage and of the same size. The auth orised Škoda Service Partners have a range
of suitable batteries available.
For the sake of the environment
Batteries contain poisonous substances such as sulphuric acid and lead. They must
be disposed of in accordance with local environmental protection regulations and on
no account as domestic waste.
In view of the problems involved with its proper disposal, we recommend having
the battery replaced by a specialist garage.
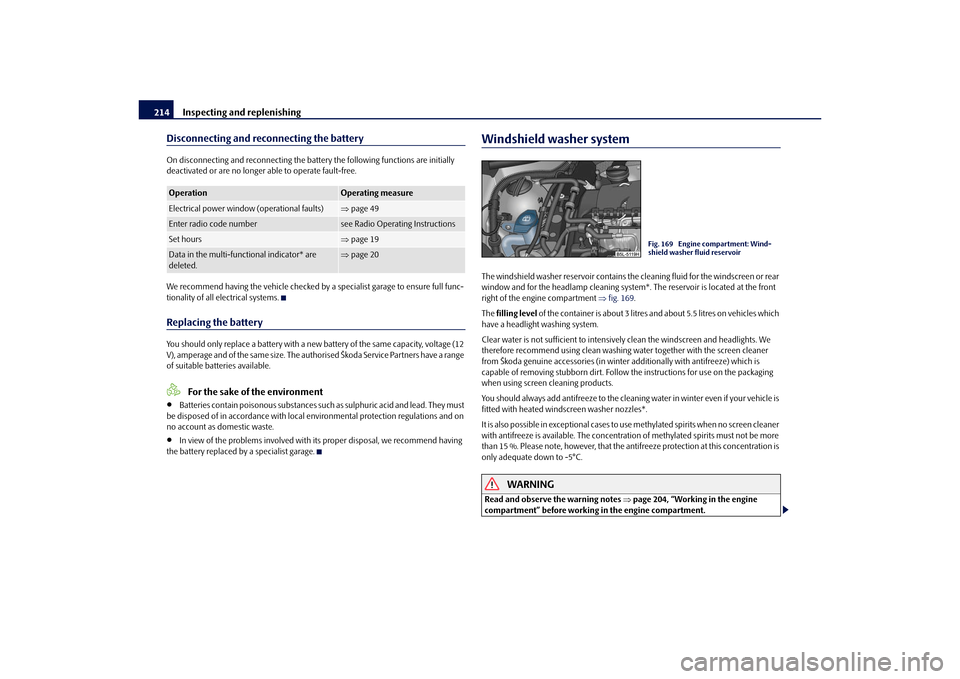
Windshield washer systemThe windshield washer reservoir contains the cleaning fluid for the windscreen or rear
window and for the headlamp cleaning system *. The reservoir is located at the front
right of the engine compartment fig. 169 .
The filling level of the container is about 3 litres and about 5.5 litres on vehicles which
have a headlight washing system.
Clear water is not sufficient to intensively clean the windscreen and headlights. We
therefore recommend using clean washing water together with the screen cleaner
from Škoda genuine accessories (in winter additionally with antifreeze) which is
capable of removing stubborn dirt. Follow the instructions for use on the packaging
when using screen cleaning products.
You should always add antifreeze to the cleaning water in winter even if your vehicle is
fitted with heated wind screen washer nozzles*.
It is also possible in exceptional cases to use methylated spirits when no screen cleaner
with antifreeze is available. The concentration of methylated spirits must not be more
than 15 %. Please note, however, that the anti freeze protection at this concentration is
only adequate down to -5°C.
WARNING
Read and observe the warning notes page 204, “Working in the engine
compartment” before working in the engine compartment.
Operation
Operating measure
Electrical power window (operational faults)
page 49
Enter radio code number
see Radio Operat ing Instructions
Set hours
page 19
Data in the multi-functional indicator* are
deleted.
page 20
Fig. 169 Engine compartment: Wind-
shield washer fluid reservoir
s2ug.6.book Page 214 Friday, April 9, 2010 2:24 PM
Page 226 of 271
Breakdown assistance225
Using the system
Safety
Driving Tips
General Maintenance
Breakdown assistance
Technical Data
Changing a wheelPreliminary workThe following steps should be carried ou t before actually changing the wheel.
– If it is necessary to change a wheel, park the vehicle as far away as possible from
the traffic flow. The place you choose should be level.
–Have all the occupants get out. While changing a wheel, the occupants of the
vehicle should not stand on the road (e.g. behind a crash barrier).
– Apply the handbrake firmly.
–Engage 1st gear or if your vehicle is fitted with an automatic gearbox, position the
selector lever into position P .
– If a trailer is coupled, uncouple it.
–Take the vehicle tool kit page 223 and the spare wheel* page 224 out of the
luggage compartment.
WARNING
If you find yourself in flowing traffic switch on the hazard warning lights
system and place the warning triangle on the side of the road at the prescribed
distance from your vehicle while observing all national legal provisions. In this
way you are protecting not only yourself but also other road users.
Never start the engine with the vehicle si tting on the raised jack - danger of
suffering injury.Caution
If you have to change a wheel on a slope first block the opposite wheel with a stone or
similar object in order to secure the vehicle from unexpectedly rolling away.
Note
Comply with the national legal regulations.
Changing a wheelAlways change a wheel on a level surface as far as possible.
– Take off the full wheel trim* page 226 or the wheel trim cap page 227 or the
caps page 226.
– In the case of light alloy wheels remove the wheel trim cap page 227.
– First of all slacken the safety wheel bolt * and afterwards the other wheel bolts page 227.
– Jack up the vehicle until the wheel to be changed is clear of the ground
page 227.
– Unscrew the wheel bolts and place them on a clean surface (cloth, paper etc.).
– Take off the wheel.
– Fit on the spare wheel and tighten the wheel bolts slightly.
– Lower the car.
– Tighten the wheel bolts firmly, alternatel y and diagonally using the wheel wrench
(crosswise) and last the safety wheel bolt* page 227.
– Mount the full wheel trim/wheel trim cap or the caps.
Note
All bolts must be clean and must turn easily.
You must never grease or oil the wheel bolts!
When fitting on unidirectiona l tyres, ensure that the tyres rotate in the correct
direction page 216.
Subsequent stepsAfter changing the wheel, you mu st perform the following steps.
– Stow and attach the replaced wheel in the spare wheel well using a special screw
page 224, fig. 175.
– Stow the vehicle tool kit in the space provided.
– Check the tyre pressure on the spare wheel just mounted as soon as possible.
s2ug.6.book Page 225 Friday, April 9, 2010 2:24 PM
Page 229 of 271
Breakdown assistance
228
– Align the lifting jack* so that its claw grasps the web of the lower sill at the height
of the marking on the plasti c cover and the base plate is resting flat with its
complete surface ag ainst firm ground.
– Turn the lifting jack* up further until the wheel is just clear of the ground.
Ground below the lifting jack which is soft and slippery can cause the vehicle to slip
off the jack. It is therefore always necessary to place the lifting jack* on a solid surface
or use a wide and stable base. Use a non-sl ip base (e.g. a rubber foot mat) if the
surface is smooth , such as cobbled stones, a tiled floor, etc.
WARNING
Always raise the vehicle with the doors closed - risk of injury!
Take suitable measures to prevent the base of the lifting jack from slipping
off - risk of injury!
Not positioning the lifting jack at the specified points can result in damage
to the vehicle. The jack can also slip off if it does not have sufficient grip - risk of
injury!
It is important to support the vehicle with suitable supporting blocks if you
wish to work under the lifted vehicle - risk of injury!
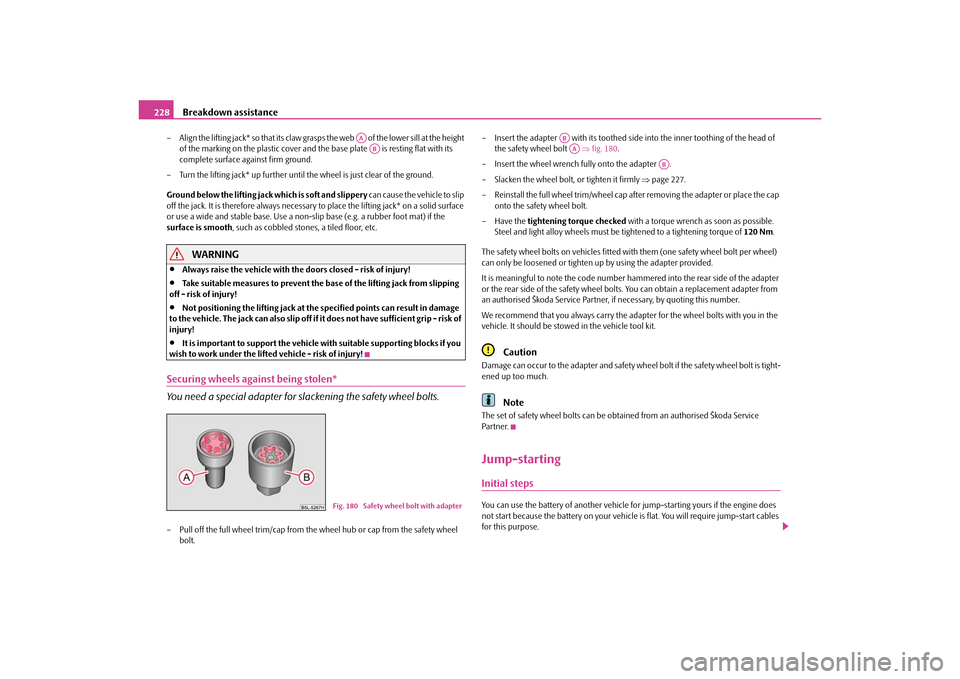
Securing wheels against being stolen*
You need a special adapter for sl ackening the safety wheel bolts.– Pull off the full wheel trim/cap from the wheel hub or cap from the safety wheel
bolt. – Insert the adapter with its toothed side into the inner toothing of the head of
the safety wheel bolt fig. 180 .
– Insert the wheel wrench fully onto the adapter .
– Slacken the wheel bolt, or tighten it firmly page 227.
– Reinstall the full wheel trim/wheel cap after removing the adapter or place the cap onto the safety wheel bolt.
– Have the tightening torque checked with a torque wrench as soon as possible.
Steel and light alloy wheels must be tightened to a tightening torque of 120 Nm.
The safety wheel bolts on vehicles fitted with them (one safety wheel bolt per wheel)
can only be loosened or tighten up by using the adapter provided.
It is meaningful to note th e code number hammered into the rear side of the adapter
or the rear side of the safety wheel bolts. You can obtain a replacement adapter from
an authorised Škoda Service Partner, if necessary, by quoting this number.
We recommend that you always carry the ad apter for the wheel bolts with you in the
vehicle. It should be stow ed in the vehicle tool kit.
Caution
Damage can occur to the adapter and safety wh eel bolt if the safety wheel bolt is tight-
ened up too much.
Note
The set of safety wheel bolts can be obta ined from an authorised Škoda Service
Par tner.Jump-startingInitial stepsYou can use the battery of another vehicle fo r jump-starting yours if the engine does
not start because the battery on your vehicle is flat. You will require jump-start cables
for this purpose.
AAAB
Fig. 180 Safety wheel bolt with adapter
ABAA
AB
s2ug.6.book Page 228 Friday, April 9, 2010 2:24 PM