steering SKODA YETI 2010 1.G / 5L Owner's Guide
[x] Cancel search | Manufacturer: SKODA, Model Year: 2010, Model line: YETI, Model: SKODA YETI 2010 1.G / 5LPages: 271, PDF Size: 14.71 MB
Page 110 of 271
Starting-off and Driving109
Using the system
Safety
Driving Tips
General Maintenance
Breakdown assistance
Technical Data
You should not switch on any major elec trical components during the heating
period otherwise the vehicle battery will be drained unnecessarily.
- start engine
Applies to all models:
Position
To lock the steering , with the ignition key withdrawn, turn the steering wheel until the
steering locking pin is heard to engage. You should always lock the steering as a general
rule if you leave your vehicle. This acts as a deterrent against possible theft of your
vehicle .
Position
Move the steering wheel back and forward a little if the ignition key cannot, or cannot
easily be turned into this position, in order to release the steering lock.
Position
The engine is started in this position. At the same time, major electrical components
are switched off for short periods. The ignition key moves back into position when
one releases the key.
The ignition key must be turned back into position each time before starting the
engine again. The starter repeat lock in th e ignition lock prevents the starter being
engaged when the engine is r unning and thus getting damaged.
Ignition key withdrawal lock (automatic gearbox)
You can only withdraw the ignition key after switching off the ignition if the selector
lever is in position P.
WARNING
When driving, the ignition key must always be in the position (ignition
switched on) without the engine running. This position is indicated by the
warning lights coming on. If this is not the case, it could result in unexpected
locking of the steering wh eel - risk of accident!
Only remove the ignition key from the ignition lock when the vehicle has
come to a standstill (by applying the handbrake or moving the selector lever
into the position P). The steering lock can engage imme diately - risk of acci-
dent!
Always withdraw the ignition key if you are going to leave the vehicle, even
for a short time. This is particularly important if children are left in the vehicle.
The children might otherwise start the engi ne or switch on electrical equipment
(e.g. power windows) - risk of accident or injury!
Starting the engineGeneral
You can only start the engine only using an original ignition key.
Place the gearshift lever into neutral (or place the selector lever to the position P or
N in the case of an automatic gearbox) and put on the handbrake firmly before starting
the engine.
Before starting, it is necessary to depres s the clutch pedal and to hold it pressed
until the engine starts. If you start the engi ne without depressing the clutch pedal, the
engine does not start and a message is show n in the display of the instrument cluster
to remind you of th e necessity to depress the clutch pedal.
Let go of the key as soon as the engine starts otherwise there may be damage to
the starter.
The engine running noises may louder at first be louder for a short time after starting
the cold engine until oil pressure can be built up in the hydraulic valve clearance
compensation. This is quite normal and is not an operating problem.
If the engine does not start ...
You can use the battery of anothe r vehicle as a jump-start aid page 228.
It is only possible to tow-start vehicles fitt ed with a manual gearbox. The tow-starting
distance must not be more than 50 metres page 231.
WARNING
Never run the engine in non ventilated or enclosed areas. The exhaust gases
of the engine contain besides the odorless and colourless carbon monoxide a
A3
A1A2A3
A2
A1
A2
WARNING (continued)
s2ug.6.book Page 109 Friday, April 9, 2010 2:24 PM
Page 115 of 271
Starting-off and Driving
114
set so that the play function volume decr eases when activating the parking aid, see
Owner's Manual radio* or na vigation system*. This improves the audibility of the
parking aid.
Activating
The parking aid is activated when the reverse gear is engaged and the ignition is
turned on or by pressing the button page 113, fig. 110 - the symbol lights up in
the button. The activation is confirmed by a brief acknowledgement signal.
Deactivating
The parking aid is deactivated after pressing the button° page 113, fig. 110 or at
a speed of more than 10 km/h - the symbol
in the button is no longer illuminated.
WARNING
The parking aid is not a substitute for the driver paying proper attention and
it is always the driver's responsibility to take care when reversing the vehicle or
carrying out similar manoeuvres.
You should therefore satisfy yourself, befo re reversing, that there is no small
obstacle, such as a rock, thin post, trailer drawbar etc., in front or behind your
vehicle. Such an obstacle might not be within the range detected by the sensors.
Under certain circumstances, surfaces of certain objects and types of
clothing cannot reflect the signal of the parking aid. Thus, these objects or
people who wear such clothing are not recognised by the sensors of the parking
aid.Note
Only the front parking aid operates if yo u are towing a trailer (applies only to
models which feature a factory-fitted towing device*).
If a warning signal sounds for about 3 seco nds after activating the system and there
is no obstacle close to your vehicle, this indicates a system fault. The fault is confirmed
additionally when the symbol flashes in the button page 113, fig. 110 . Have the
fault rectified by a specialist workshop.
The sensors must be kept clean and free of ice to enable the parking aid to operate
properly.
If the parking aid is activated and the sele ctor lever of the automatic gearbox is in
the position , warning signal indicates inte rruption (vehicle can no longer move).
Park Assist*Description and important informationThe park assist assists you when parking in a suitable parallel parking space between
two vehicles or behind a vehicle.
The park assist automatically searches for suitable parking spaces after switching on
the ignition and when driving up to 30 km/h.
During the parking procedure the park assist only takes over the steering movements,
the pedals continue to be operated by the driver.
Function of the system is based on:
Length and depth measurement of the parking spaces when driving
Evaluation of the size of the parking space
Definition of the correct position of the vehicle for parking
Calculating the line on which the vehicle drives backwards into the parking space
Actuation of the steering force assistance, automatic spinning of the wheels of the
front axle when parking.
WARNING
The park assist does not take away th e responsability from the driver when
parking.
Pay particular attention to small children and animals as they would not be
recognised by the sensors of the parking aid.
Under certain circumstances, surfaces of certain objects and types of
clothing cannot reflect the signal of the park assist or the parking aid. Thus,
these objects or people who wear such clothing are not recognised by the
sensors of the parking aid.
AP
s2ug.6.book Page 114 Friday, April 9, 2010 2:24 PM
Page 117 of 271
Starting-off and Driving
116Note
If the park assist is switched on, a yellow warning light lights up in the button.
The search for suitable parking spaces is automatic after switching on the ignition
at speeds of more than 30 km/h. Searching for a parking space is performed at the
same time on the driver and front passenger side.
If the sensors find a suitable parking space, they store its parameters until another
suitable parking space has been found or until a distance of 10 m had been driven after
finding the parking space. This is why it is possible to switch on the park assist after
driving past the parking space, the information on whether this parking space is suit-
able for parking appears in the information display*.
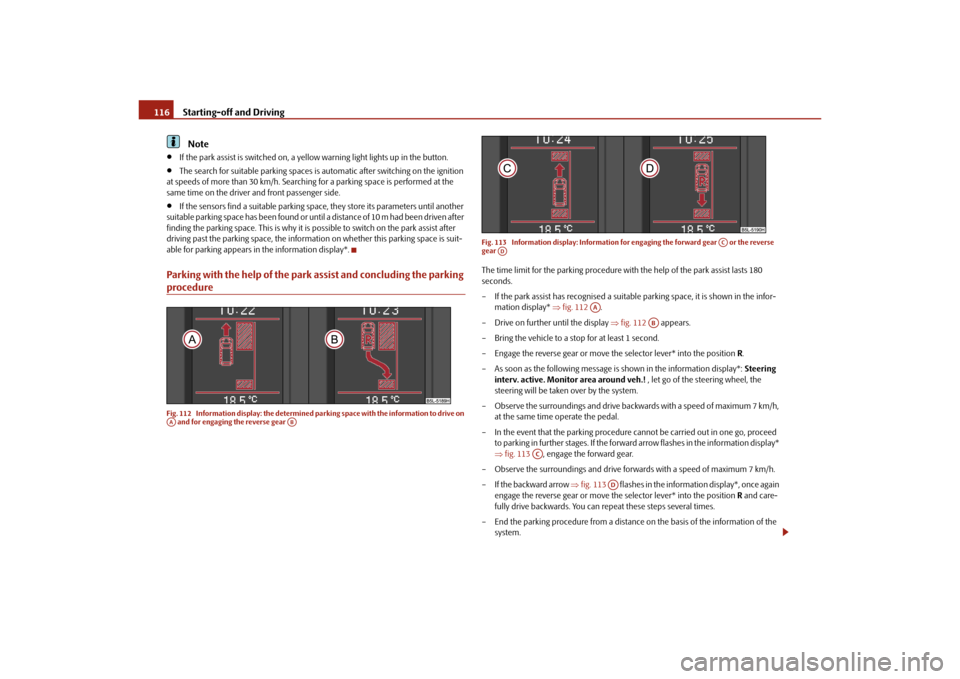
Parking with the help of the park assist and concluding the parking procedureFig. 112 Information display: the determined pa rking space with the information to drive on
and for engaging the reverse gear Fig. 113 Information display: Information fo
r engaging the forward gear or the reverse
gear
The time limit for the parking procedure with the help of the park assist lasts 180
seconds.
– If the park assist has recognised a suitable parking space, it is shown in the infor-
mation display* fig. 112 .
– Drive on further until the display fig. 112 appears.
– Bring the vehicle to a stop for at least 1 second.
– Engage the reverse gear or move the selector lever* into the position R.
– As soon as the following message is shown in the information display*: Steering
interv. active. Monitor area around veh.! , let go of the steering wheel, the
steering will be taken over by the system.
– Observe the surroundings and drive back wards with a speed of maximum 7 km/h,
at the same time operate the pedal.
– In the event that the parking procedure cannot be carried out in one go, proceed to parking in further stages. If the forward arrow flashes in the information display*
fig. 113 , engage the forward gear.
– Observe the surroundings and drive forw ards with a speed of maximum 7 km/h.
– If the backward arrow fig. 113 flashes in the information display*, once again
engage the reverse gear or move the selector lever* into the position R and care-
fully drive backwards. You can repeat these steps several times.
– End the parking procedure from a distance on the basis of the information of the
system.
AA
AB
AC
AD
AA
AB
AC
AD
s2ug.6.book Page 116 Friday, April 9, 2010 2:24 PM
Page 118 of 271
Starting-off and Driving117
Using the system
Safety
Driving Tips
General Maintenance
Breakdown assistance
Technical Data
As soon as the parking procedure is comple
ted, an audible signal sounds and in the
information display* the following message appears: Steering interv. finished.
Please take over steering! .
Switch off park assist
The park assist switches off during one of the following occurences:
a speed of 30 km/h is exceeded,
a speed of 7 km/h is exceeded during the parking procedure,
a time limit of 180 seconds is exceeded for the parking procedure,
the button for the park assist is pressed,
parking aid is activated,
Switch off TCS system
intervention of the driver in the automa tic steering procedure (stop the steering
wheel),
Disengage reverse gear or take selector lever* out of the position R when driving
backwards into the parking space.
Further warning and information texts of the park assist in the information
display*:
Park Assist finished.
The parking procedure has ended or after switching on the ignition, the vehicle has not
been driven above 10 km/h.
Park Assist: Speed too high!
Reduce the speed below 30 km/h.
Driver steering intervention: Please take over steering!
The parking procedure is ended through driver intervention.
Park Assist finished. TCS deactivated.
The parking procedure cannot be carried ou t because the TCS system is switched off.
TCS deactivated. Please take over steering!
The parking procedure was ended because the TCS system was switched off during the
parking procedure. Trailer: Park Assist finished.
The parking procedure is not possible beca
use the trailer is hitched and a plug is
inserted in the socket of the towing device.
Time limit exceeded. Please take over steering!
The parking procedure was ended because a time limit of 180 seconds for parking was
exceeded.
Fault: Park Assist stopped.
The parking procedure is not possible becaus e a fault exists on the vehicle. Have the
fault rectified by a specialist workshop.
Park Assist defective. Workshop!
The parking procedure is not possible because a fault exists on the park assist. Have the
fault rectified by a specialist workshop.
Steering interv. active. Mo nitor area around veh.!
The park assist is active and takes over the steering movements. Observe the
surroundings and carefully drive backward s, at the same time operate the pedal.
Please take over steering! Finish parking proc. manually!
Take over the steering. End the parking procedure without using the park assist.
Speed too high! Please take over steering!
The parking procedure was ended while the speed was exceeded.
Park Assist: TCS Intervention.
Intervention of the TCS while searching for a suitable parking place.
TCS intervention! Please take over steering!
Parking procedure is ended through the intervention of the TCS.
Park Assist: Stationary time not sufficient.
The stationary time of the vehicle was less than 1 second.
Park Assist: Speed too low.
After the ignition is switched on, the vehicle must exceed the speed of 10 km/h at least
once.
s2ug.6.book Page 117 Friday, April 9, 2010 2:24 PM
Page 126 of 271
Communication125
Using the system
Safety
Driving Tips
General Maintenance
Breakdown assistance
Technical Data
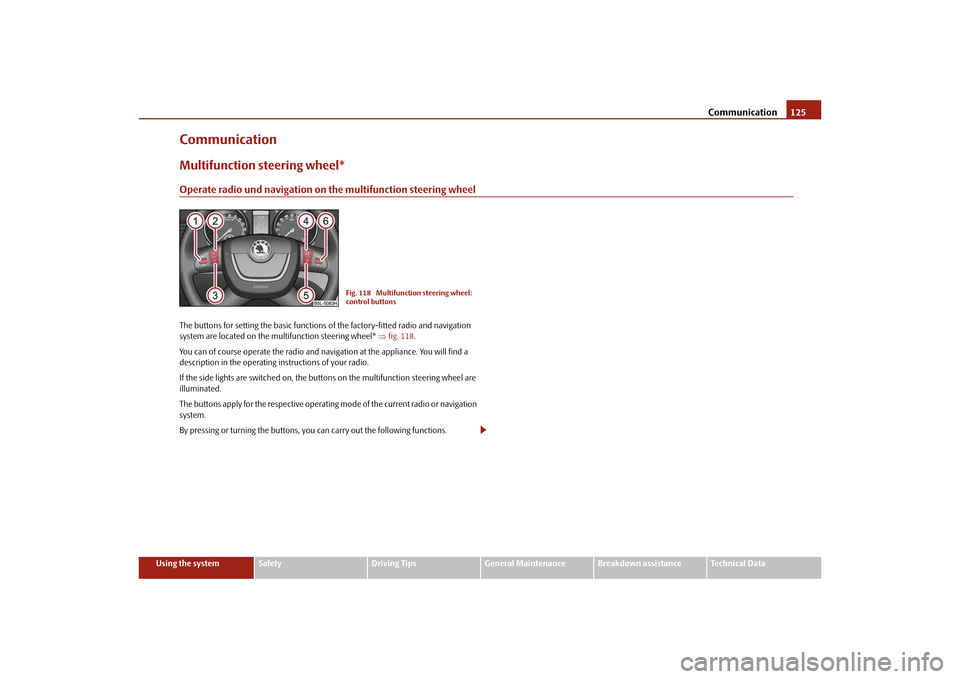
CommunicationMultifunction steering wheel*Operate radio und navigation on the multifunction steering wheelThe buttons for setting the basic functions of the factory-fitted radio and navigation
system are located on the multifunction steering wheel* fig. 118 .
You can of course operate the radio and navi gation at the appliance. You will find a
description in the operating instructions of your radio.
If the side lights are switched on, the butt ons on the multifunction steering wheel are
illuminated.
The buttons apply for the respective operating mode of the current radio or navigation
system.
By pressing or turning the buttons, you can carry out the following functions.
Fig. 118 Multifunction steering wheel:
control buttons
s2ug.6.book Page 125 Friday, April 9, 2010 2:24 PM
Page 129 of 271
Communication
128Note
The loudspeakers in the vehicle are matched to a power output of the radio and
navigation system of 4x 20°W.
For the equipment sound system*, the loudspeakers are matched to a power
output of the amplifier of 4x40°W + 6x20 W.
Mobile phones and tw o-way radio systemsThe installation of a mobile phone and two-way radio system in a vehicle should be
carried out by a specialist garage.
Škoda Auto permits the operation of mobile phones and two-way radio systems with
a professionally installed external aerial and a maximum transmission power of up to
10 watts.
It is essential that you inform yourself at specialist garages about the possibilites to
install and operate mobile phones which have a transmission power of more than 10
W. They will inform you which technical po ssibilities exist for retrofitting mobile
phones.
When using a mobille phone inside the vehicl e, which is not inserted into the phone
adapter, and thus has no connection to the external aerial, the electromagnetic radia-
tion can exceed the current limit value. We therefore recommend to operate a mobile
phone in the vehicle only when it is conne cted to an external aerial via the phone
adapter. This improves the quality of the connection.
Operation of mobile phones or two-way ra dio systems may interfere with functioning
of the electronic systems of your vehicle. The reasons for this may be:
no external aerial,
external aerial incorrectly installed,
transmission power greater than 10 watts.
WARNING
If a mobile phone or a two-way radio system is operated in the vehicle
without using a special external aerial or an external aerial which has been
incorrectly installed, this can increase the strength of the electromagnetic field
in the interior of the vehicle.
Please concentrate fully at all times on your driving!
You must not install two-way radio systems, mobile phones or mounts on
the covers of the airbags or within the immediate deployment range of airbags.
This might result in injuries to the occupants in the event of an accident.
Never leave a mobile phone on a seat, on the dash panel or in another area,
from which it can be thrown during a sudden braking manoeuver, an accident
or a collision. In this case, the occupants of the vehicle might be injured.Note
Observe the country-specific regulations for the use of mobile phones in vehicles.Universal telephone preinstallation GSM II*IntroductionThe universal telephone preinstallation GSM II is a built-in “hands-free system”, it
provides a voice operated convenience mode via the multifunction steering wheel* or
the navigation system*.
All communication between a telephone and the hands-free system of your vehicle
can only be established with the help of the Bluetooth
® technology. The adapter*
serves only for charging the telephone and fo r transmitting the signal to the external
aerial of the vehicle.
To ensure an optimum signal transmission, always leave the telephone with the
adapter* in the telephone mount.
a)Only valid for the navigation system Columbus.s2ug.6.book Page 128 Friday, April 9, 2010 2:24 PM
Page 130 of 271
Communication129
Using the system
Safety
Driving Tips
General Maintenance
Breakdown assistance
Technical Data
Furthermore the volume can be changed individually during the call at any time with
the button for setting the radio* or navigation system* or with the buttons on the
multifunction steering wheel*.
WARNING
Pay attention primarily to the traffic situation! As the driver you are fully
responsible for road safety. Use the telephone system only to such an extent, so
that you are in full control of your vehicle at any time.
Note
Please refer to the following guidelines
page 128.
Should you have any questions, please contact an authorised Škoda Service
Par tner.
Phone PhonebookA phone phonebook is part of the mobile ph one preinstallation with voice control. In
the phone phonebook there are 2500 free memory locations available. This phone
phonebook can be used in line with the mobile telephone.
After the first connection of the telephone, the system begins to load the phone book
from the phone and the SIM card into the memory of the control unit.
Each time the telephone has establishe d a new connection with the hands-free
system, an update of the relevant phone b ook is performed. The updating can take a
few minutes. During this time the phone book, which was stored after the last update
was completed, is available. Newly stored telephone numbers are only shown after the
updating has ended.
If the number of contacts loaded exceeds 2 500, the phone book is not complete.
If a telephone event (e.g. incoming or outgoing call, dialogue of the voice control)
occurs during the updating procedure, the updating is interrupted. After the telephone
event has ended, the updating starts anew.
Connection of the mobile phone with the hands-free systemIn order to connect a mobile phone with th e hands-free system, it is necessary to
connect the telephone to the hands-free sy stem. Detailed information on this is
provided in the operating instructions of your mobile phone. The following steps must
be carried out for the connection:
– Activate the Bluetooth
® in your telephone and the visibility of the mobile phone.
– Switch on the ignition.
– Select the menu Phone - Phone search in the information display and wait until
the control unit has ended the search.
– Select your mobile phone in the menu of the units found.
–Confirm the PIN (as standard 1234).
– If the hands-free system announces (as standard Skoda_BT) on the display of the
mobile phone, enter the PIN (as standard 1234) within 30 seconds and wait until
the connection is established.
10)
– After ending the connection, confirm in the information display that a new user
profile was created.
If no more free space is available for creating a new user profile, delete an existing user
profile.
If you have not managed to connect your mobile phone with the hands-free system
within 3 minutes after switching on the igniti on, switch the ignition off and then again
on. The visibility of the hands-free system is established again for 3 minutes. The visi-
bility of the Bluetooth
® device is automatically switched off if the vehicle starts off or
if the mobile phone connects to the device.
During the connecting procedure, no other mobile phone may be connected with the
hands-free system.
Up to four mobile phones ca n be paired to the hands-free system, whereby only one
mobile phone can communicate with the hands-free system.
10)Some mobile phones have a menu, in which th e authorization for establishing a Bluetooth
®
connection is performed via the input of a code. If the input for the authorization is necessary, it
must always be performed when re-establishing the Bluetooth connection.
s2ug.6.book Page 129 Friday, April 9, 2010 2:24 PM
Page 132 of 271

Communication131
Using the system
Safety
Driving Tips
General Maintenance
Breakdown assistance
Technical Data
Operating telephone calls with the aid of the adapter*.Fig. 120 Illustration image: Single -button adapter / two-button adapter
The voice control of the telephone is acti vated by briefly pressing the PTT button
(button push to talk) on the adapter* fig. 120 .
Aside from the PTT button, the SOS button can be found on certain adapters* on the
right fig. 120 . After pressing the button for 2 seconds, the number 112 (Emergency
call) is dialed (only valid for some countries).
Note
The adapters illustrated are only prime examples.
Operation of the telephone on the multifunction steering wheel*The driver can set the basic functions of the telephone by simply operating the buttons
located on the steering whee l so that he can concentrate on the traffic situation
without being distracted as little as possible by operating the telephone fig. 121 .
This applies only if your vehicle has been equipped with the telephone preinstallation
at the factory.
If the side lights are switched on, the butt ons on the multifunction steering wheel are
also illuminated except the symbols
and
.
Overview of the different functions in contrast to the multifunction steering wheel
without mobile phone operation page 125.Fig. 121 Multifunction steering wheel:
Mobile phone operation
s2ug.6.book Page 131 Friday, April 9, 2010 2:24 PM
Page 134 of 271
Communication133
Using the system
Safety
Driving Tips
General Maintenance
Breakdown assistance
Technical Data
the handwheel. You can select the numbers
0 - 9, the symbols +,
, # and the func-
tions Delete, Call, Cancel .
Call register
In the menu point Call register, you can select the following menu points:
Missed calls
Received calls
Last calls
Voice mailbox
In the menu Voice mailbox , it is possible to set the number of the voice mailbox and
then dial the number.
Bluetooth
In the menu Bluetooth you can select the following menu points:
User - the overview of the stored users
New user - Search for new telephones which are in the reception range
Visibility - Switching on the visibility of the telephone unit for other devices
Media player
Active device
Paired devices
Search
Phone name - the possibility to change the name of the telephone unit (pre-set
SKODA_BT)
Settings
In the menu Settings you can select the following menu points:
Phone book
Update
List
Surname
First name
Ring tone Back
Return in the basic menu of the telephone.
Voice controlDialogueThe period, in which the telephone system is ready to receive voice commands and
carry out the voice commands, is called DIALOGUE. The system gives audible feedback
and guides you if necessary th
rough the relevant functions.
Switch on voice control (dialogue)
You can start or end the dialogue at any time by pressing the PTT button
on the
adapter* page 131, fig. 120 or on the multifunction steering wheel* page 131.
If the system does not recognise your command, it repeats the first part of the aid and
thus a new entry is possible. After the 2nd error the system repeats the second part of
the aid. After the 3rd error the answer “ Cancel” is given and the dialogue is ended.
Switching off voice control (dialogue)
You can end the dialogue at any time by pressing the PTT button
on the adapter*
page 131, fig. 120 or on the multifunction steering wheel* page 131 or with the
voice command CANCEL.
Only the message just repeated can be ended by briefly pressing the PTT button
during the message.
When receiving an incoming call, the dialog ue is immediately interrupted and you can
accept the call by pressing the button
on the multifunction steering wheel* or by
pressing the button for receiving a call directly on your telephone.
Optimum understanding of the voice commands depends on the following
factors:
Speak with a normal tone of voice withou t intonation and excessive voice pauses.
Avoid insufficient articulation.
Close the doors, windows and sliding roof, in order to reduce or stop disturbing
exterior noise.
s2ug.6.book Page 133 Friday, April 9, 2010 2:24 PM
Page 138 of 271
Passive Safety137
Using the system
Safety
Driving Tips
General Maintenance
Breakdown assistance
Technical Data
SafetyPassive SafetyBasic informationDriving the safe way
Passive safety measures reduce the risk of injury in accident situations.In this section you will find important info rmation, tips and notes on the subject of
passive safety in your vehicle. We have combined everything here which you should
be familiar with, for example, regarding seat belts, airbags, child seats and safety of
children. It is therefore important, in partic ular, to comply with the notes and warnings
in this section for your own interest and in the interest of those travelling with you.
WARNING
This chapter contains important information on how to use the vehicle for
the driver and his occupants. You will find further information on safety, which
concerns you and those travelling with you, in the following chapters of this
Owner's Manual.
The complete on-board literature should always be in the vehicle. This
applies in particular, if you rent out or sell the vehicle.
Safety equipment
The safety equipment is part of the occupant protection and it can
reduce the risk of injuries in accident situations.“Do not put at risk” your safety and the safety of those travelling with you . In the event
of an accident, the safety equipment can redu ce the risk of injuries. The following list
contains part of the safety equipment in your vehicle:
Three-point seat belts for all the seats,
belt force limiter for front seats,
belt tensioner for front seats,
seat belt height adjuster for front seats,
front airbag for the driver and front passenger,
driver's knee airbag*,
front side airbags*,
rear side airbags*,
head airbags*,
anchoring points for child seat using the “ISOFIX” system,
anchoring points for child seat using the “Top Tether” system,
head restraint adjustable for height,
adjustable steering column.
The specified safety equipment works togeth er, in order to optimally protect you and
those travelling with you in accident situat ions. The safety equipment does not protect
you or the people travelling with you, if you or your occupants adopt an incorrect
seated position or the equipment is not correctly adjusted or used.
For this reason you will be provided with information on why this equipment is very
important, how it protects you and the occupants, what should be observed when
using the equipment and how you and the peop le travelling with you can make full use
of the existing safety equipment. This Owner's Manual contains important warning
notes, which you and those travelling with you should pay attention to in order to
reduce a risk of injury.
Safety concerns everybody!
Before setting off
The driver is always fully responsibl e for his occupants and for the oper-
ating safety of the vehicle.For your own safety and the safety of the pe ople travelling with you, please pay atten-
tion to the following points before setting off:
s2ug.6.book Page 137 Friday, April 9, 2010 2:24 PM